はじめに
LINEAPIを使ったとある高校生の工作です。
どんなものを作ったのか紹介しながら、実装についても深堀していきます。
電子工作初心者です。お手柔らかにお願いします。
環境
MacOS Catalina 10.15.6
完成DEMO(動作動画)
— ようかんのつぶやき (@youkan2002) December 3, 2020
開発の背景
- LINEPAY APIを理解したかった
- LIFFを使ってみたかった
- 電子工作デビューしたかった
- 久しぶりに段ボール工作したかった
- LINEPAY v3でホワイトリスト登録が廃止になり、Lambdaで決済サーバーが作れるようになった
アウトプット資料(画像Clickで資料に飛ぶ)
v1
v2
電子工作部分
ユーザーのフロー
LINEPAYの詳しい実装については公式ドキュメントをオススメします。
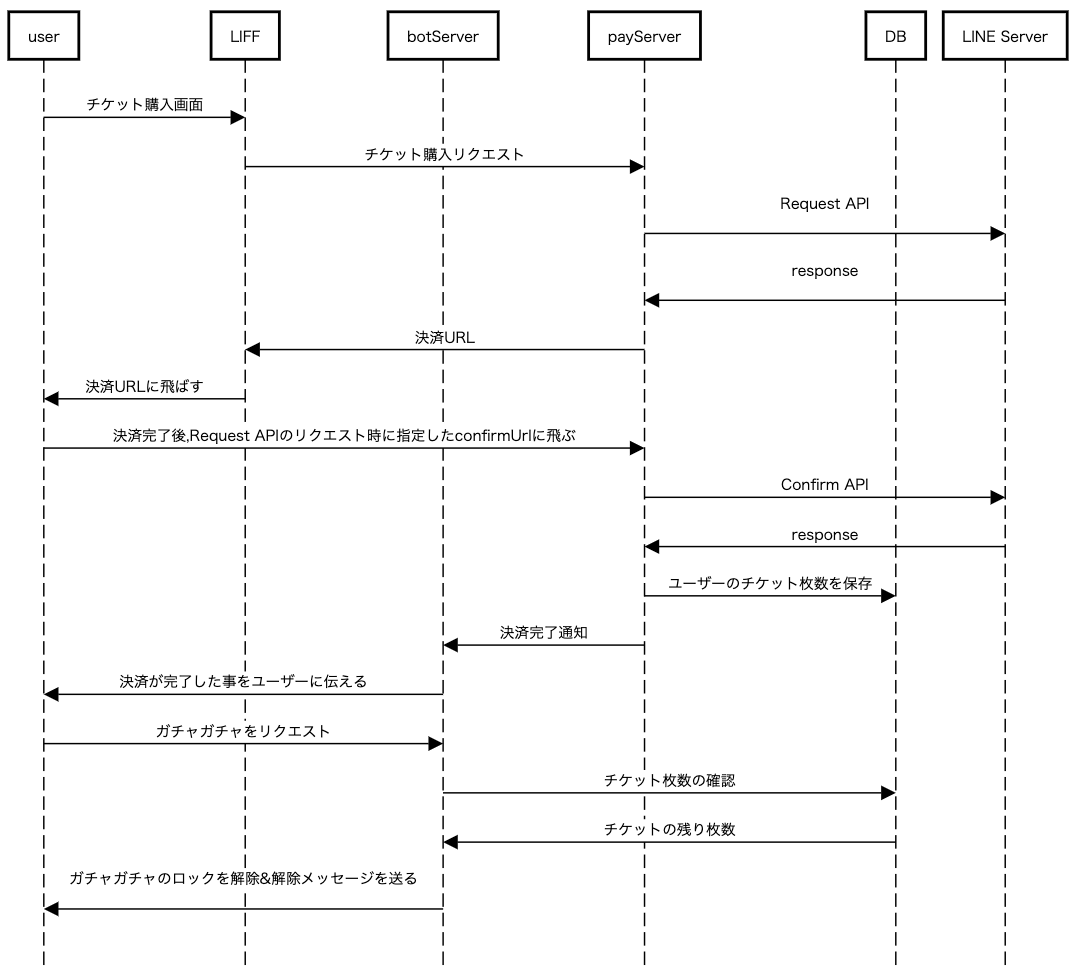
今回はLIFFとbotServerとpayServer,DBの実装を行いました。
LINE ServerはLINE側のサーバーで、決済時に各種API(Request/Confirm)を叩きます。
アーキテクチャ

実装について
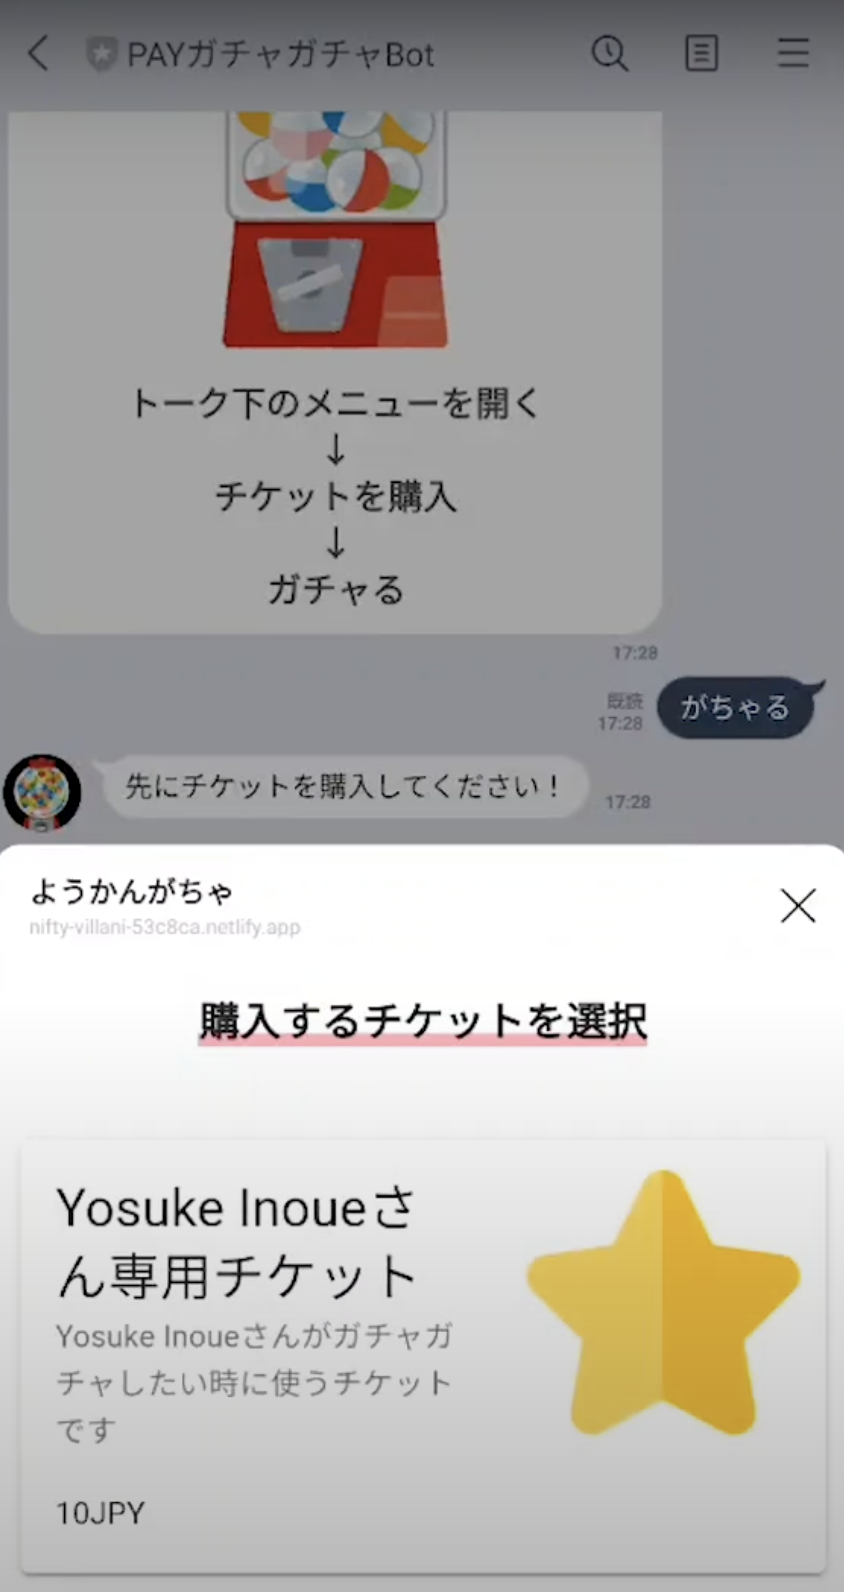
①チケット購入画面,LIFFの実装
<template>
  <div>
    <div>
      <h3 style="text-align: center">
        <span style="background: linear-gradient(transparent 70%, #ff99ab 70%)"
          >購入するチケットを選択</span
        >
      </h3>
    </div>
    <div>
      <v-spacer style="padding: 20px" />
      <v-card color="25b7c0" @click="tikcet">
        <div class="d-flex flex-no-wrap justify-space-between">
          <div>
            <v-card-title class="headline"
              >{{ this.userName }}様専用チケット</v-card-title
            >
            <v-card-subtitle
              >{{ this.userName }}様がガチャガチャしたい時に使うチケットです</v-card-subtitle
            >
            <v-card-text>10JPY</v-card-text>
          </div>
          <v-avatar class="ma-3" size="125" tile>
            <v-img
              src="https://www.flaticon.com/svg/static/icons/svg/1820/1820006.svg"
            ></v-img>
          </v-avatar>
        </div>
      </v-card>
    </div>
  </div>
</template>

<script>
export default {
  async mounted() {
    await liff
      .init({
        liffId: "①xxxxxxxxxxxxxxx-xxxxxxxx",
      })
      .then((data) => {
        this.userToken = liff.getIDToken();
      });

    let userProfile = await liff.getProfile();
    this.userName = userProfile.displayName;
  },
  data() {
    return {
      userToken: "",
      userName: "",
    };
  },
  methods: {
    async tikcet() {
      const url =
        "②confirmAPIエンドポイント";
      const response = await this.$axios.$post(url, {
        type: "ticket",
        userToken: this.userToken,
      });
      liff.openWindow({
        url: response.url,
      });
    },
  },
};
</script>
nuxtプロジェクトにAxiosをインストールし、LIFFSDKを読み込みます。
head:{
・
・
・
 script: [{ src: 'https://static.line-scdn.net/liff/edge/2/sdk.js' }] //この行を追加
}
そして、上記コードを参考にしながら、liffIdとconfirmAPIエンドポイントを各自反映します。
これで、ページが読み込まれたらliff.initを行い、チケットがタップされたら、チケットを購入するためのリクエストを叩き、返ってきたLINEPAY決済の画面へと遷移を行います。
②payServerの実装
環境変数
| キー | 直 |
|---|---|
| ACCESSTOKEN | LINEBotのアクセストークン |
| PAYCHANNELID | LINEPAYコンソールで取得したID |
| PAYCHANNELSECRET | LINEPAYコンソールで取得したシークレット |
DynamoDBの作成
| テーブル名 | capsule_Settlement |
|---|---|
| orderId(パーティションキー) | 文字列 |
| userId | 文字列 |
const LINEPAY = require("line-pay-v3");
const axios = require("axios");
const AWS = require("aws-sdk");

//DynamoDBを使えるようにする
const docClient = new AWS.DynamoDB.DocumentClient();

//LINEPAYの設定
const linePay = new LINEPAY({
    channelId: process.env.PAYCHANNELID,
    channelSecret: process.env.PAYCHANNELSECRET,
    uri: "https://api-pay.line.me",
  });

exports.handler = async (event) => {

//userTokenを検証する
 const Body = JSON.parse(event.body);
    let checkUserParams = new URLSearchParams();
    checkUserParams.append("id_token", Body.userToken);
    checkUserParams.append("client_id", "1655113173");

    const userData = await axios.post(
      "https://api.line.me/oauth2/v2.1/verify",
      checkUserParams
    );

 const userId = userData.data.sub;
 const userName = userData.data.name;

//次の工程で作成するコードを追記していく


}
②-1 決済リクエスト(RequestAPIを叩く)実装
//ユーザーがLIFFでチケット購入をリクエストした時の処理
    if (Body.type === "ticket") {
      const randomId = Math.random().toString(32).substring(2);
      const orderId = String(randomId)
      const order = {
        amount: 10, //合計金額
        currency: "JPY",
        orderId: orderId,
        packages: [
          {
            id: "Item000001",
            amount: 10,
            name: `${userName}様専用ガチャガチャチケット`,
            products: [
              {
                name: `${userName}様専用ガチャガチャチケット`,
                quantity: 1,
                price: 10,
                imageUrl:
                  "https://1.bp.blogspot.com/-sZbaFXJ4y0A/UnyGKAJjwbI/AAAAAAAAacE/RYDWRq73Hsc/s400/gachagacha.png",
              },
            ],
          },
        ],
        redirectUrls: {
          confirmUrl:
            "confirmAPIエンドポイント",
          cancelUrl: "https://example.com/cancelUrl",
          confirmUrlType: "SERVER",
        },
      };

      const res = await linePay.request(order);

      const returnUrl = res.info.paymentUrl.app;

      let DBparams = {
        TableName: "capsule_Settlement",
        Item: {
          orderId: `${orderId}`,
          userId: userId,
        },
      };

      //決済リクエストをDBに保存
      await docClient.put(DBparams).promise();

      return {
        statusCode: 200,
        headers: {
          "Content-Type": "application/json",
          "Access-Control-Allow-Origin": "*",
        },
        body: JSON.stringify({ url: returnUrl }),
      };
    }
②-2 決済確認(ConfirmAPIを叩く)実装
else {
    const transactionId = event.queryStringParameters.transactionId;

    const payBody = { amount: 10, currency: "JPY" };
    const confirmRes = await linePay.confrim(payBody, transactionId);

    let getParams = createGetParams(
      "capsule_Settlement",
      "orderId",
      confirmRes.info.orderId
    );

    let getDB = await docClient.get(getParams).promise();

    let returnMes = "";
    if (
      confirmRes.returnCode === "0000" &&
      confirmRes.returnMessage === "Success."
    ) {
      returnMes = "ok";

      let getTicketParams = createGetParams(
        "capsule-ticket",
        "userId",
        getDB.Item.userId
      );
      let getTicketDB = await docClient.get(getTicketParams).promise();

      const ticketNumber = getTicketDB.Item.ticket + 1;

      const ticketTableName = "capsule-ticket";
      let ticketParams = {
        TableName: ticketTableName,
        Item: {
          userId: getDB.Item.userId,
          ticket: ticketNumber,
        },
      };
      await docClient.put(ticketParams).promise();

      //ガチャガチャのロックが解除されたよ!ガチャを回そう
      const options = {
        method: "post",
        baseURL: "https://api.line.me/v2/bot/message/push",
        headers: {
          "Content-Type": "application/json",
          Authorization: `Bearer ${process.env.ACCESSTOKEN}`,
        },
        data: {
          to: getDB.Item.userId,
          messages: [
            {
              type: "text",
              text: `チケット購入ありがとうございます!あなたのチケット所持数:${ticketNumber}`,
            },
          ],
        },
      };

      const res = await axios.request(options);
      let response = {
        statusCode: 200,
        body: JSON.stringify("ok"),
      };
      return response;
    } else {
      let response = {
        statusCode: 200,
        body: JSON.stringify("err"),
      };
      return response;
    }

    function createGetParams(tableName, Name, value) {
      const keyName = { toString: () => Name };
      const key = {
        [keyName]: value,
      };
      const params = {
        TableName: tableName,
        Key: key,
      };
      return params;
    }
  }
③botServerの実装
環境変数
| key | value |
|---|---|
| ACCESSTOKEN | LINEBotのコンソールから取得したもの |
| CHANNELSECRET | LINEBotのコンソールから取得したもの |
"use strict";
// モジュール呼び出し
const crypto = require("crypto");
const line = require("@line/bot-sdk");
const axios = require("axios");
const AWS = require("aws-sdk");

// インスタンス生成
const client = new line.Client({ channelAccessToken: process.env.ACCESSTOKEN });
const docClient = new AWS.DynamoDB.DocumentClient();

exports.handler = (event) => {
  const signature = crypto
    .createHmac("sha256", process.env.CHANNELSECRET)
    .update(event.body)
    .digest("base64");
  const checkHeader = (event.headers || {})["X-Line-Signature"];
  const body = JSON.parse(event.body);
  const events = body.events;
  console.log(events);

  // 署名検証が成功した場合
  if (signature === checkHeader) {
    events.forEach(async (event) => {
      let message;
      switch (event.type) {
        case "message":
          message = await messageFunc(event);
          break;
        case "postback":
          message = await postbackFunc(event);
          break;
        case "follow":
          message = await followFunc(event);
          break;
      }
      // メッセージを返信
      if (message != undefined) {
        await sendFunc(body.events[0].replyToken, message);
        return;
      }
    });
  }
  // 署名検証に失敗した場合
  else {
    console.log("署名認証エラー");
  }
};

async function sendFunc(replyToken, mes) {
  const result = new Promise(function (resolve, reject) {
    client.replyMessage(replyToken, mes).then((response) => {
      resolve("送信完了");
    });
  });
  return result;
}

//メッセージを処理する関数
async function messageFunc(event) {
  let message = "";
  message = { type: "text", text: `メッセージイベント` };
  if (event.message.text === "ガチャる" || event.message.text === "がちゃる") {
    const getParams = createGetParams(
      "capsule-ticket",
      "userId",
      event.source.userId
    );
    const ticketDB = await docClient.get(getParams).promise();
    const ticketNumber = ticketDB.Item.ticket - 1;

    if (ticketDB.Item.ticket !== 0) {

    //後ほど変更の必要あり
      await axios.post(
        "以下のハードウェア実装の項目で取得するURLを入力する",
        {
          data: "unlock",
        }
      );
      message = {
        type: "flex",
        altText: "ガチャガチャのロックを解除しました",
        contents: {
          type: "bubble",
          direction: "ltr",
          header: {
            type: "box",
            layout: "vertical",
            contents: [
              {
                type: "text",
                text: "ロックを解除したよ!",
                align: "center",
                contents: [],
              },
            ],
          },
          hero: {
            type: "image",
            url:
              "https://t4.ftcdn.net/jpg/03/68/51/21/240_F_368512184_VfmkrSRCxuNBoNMIWWyUS7exyG4wJSye.jpg",
            size: "full",
            aspectRatio: "1.51:1",
            aspectMode: "fit",
          },
          footer: {
            type: "box",
            layout: "horizontal",
            contents: [
              {
                type: "spacer",
              },
            ],
          },
        },
      };

      const lostTicketParams = {
        TableName: "capsule-ticket",
        Item: {
          userId: event.source.userId,
          ticket: ticketNumber,
        },
      };
      await docClient.put(lostTicketParams).promise();
    } else {
      message = { type: "text", text: "先にチケットを購入してください!" };
    }
  }
  if (event.message.text === `チケット`) {
    const getTicketNumberParams = createGetParams(
      "capsule-ticket",
      "userId",
      event.source.userId
    );
    const getTicketDB = await docClient.get(getTicketNumberParams).promise();
    message = {
      type: "text",
      text: `現在${getTicketDB.Item.ticket}枚のチケットを持っています!`,
    };
  }
  return message;
}

//ポストバックを処理する関数
const postbackFunc = async function (event) {
  let message = "";

  if (event.postback.data === `mainMenu`) {
    //リッチメニューをメインメニューにする
    client.linkRichMenuToUser(
      event.source.userId,
      "メインメニューのリッチメニューId"
    );
  }
  if (event.postback.data === `subMenu`) {
    //リッチメニューをサブメニューにする
    client.linkRichMenuToUser(
      event.source.userId,
      "サブメニューのリッチメニューId"
    );
  }
  return message;
};

//フォローされた時の処理を記述
const followFunc = async function (event) {
  //DBにユーザー情報を記録する
  const registerParams = {
    TableName: "capsule-ticket",
    Item: {
      userId: event.source.userId,
      ticket: 0,
    },
  };
  await docClient.put(registerParams).promise();
  //リッチメニューをメイン画面にする
  client.linkRichMenuToUser(
    event.source.userId,
    "メインメニューのリッチメニュー Id"
  );

  const message = {
    type: "flex",
    altText: "友達登録ありがとうございます!",
    contents: {
      type: "bubble",
      direction: "ltr",
      header: {
        type: "box",
        layout: "vertical",
        contents: [
          {
            type: "text",
            text: "友達登録ありがとうございます!",
            align: "center",
            contents: [],
          },
        ],
      },
      hero: {
        type: "image",
        url:
          "https://1.bp.blogspot.com/-sZbaFXJ4y0A/UnyGKAJjwbI/AAAAAAAAacE/RYDWRq73Hsc/s400/gachagacha.png",
        size: "full",
        aspectRatio: "1.51:1",
        aspectMode: "fit",
      },
      footer: {
        type: "box",
        layout: "vertical",
        contents: [
          {
            type: "text",
            text: "トーク下のメニューを開く",
            weight: "bold",
            align: "center",
            style: "normal",
            contents: [],
          },
          {
            type: "text",
            text: "↓",
            weight: "bold",
            align: "center",
            contents: [],
          },
          {
            type: "text",
            text: "チケットを購入",
            weight: "bold",
            align: "center",
            wrap: true,
            contents: [],
          },
          {
            type: "text",
            text: "↓",
            weight: "bold",
            align: "center",
            contents: [],
          },
          {
            type: "text",
            text: "ガチャる",
            weight: "bold",
            align: "center",
            contents: [],
          },
        ],
      },
    },
  };
  return message;
};

function createGetParams(tableName, Name, value) {
  const keyName = { toString: () => Name };
  const key = {
    [keyName]: value,
  };
  const params = {
    TableName: tableName,
    Key: key,
  };
  return params;
}
④ハードウェアの実装
MQTT周りのよくわからないところはbeebotte
beebotteとはIoT向けのクラウドサービスです。 REST API、WebSockets、MQTTをサポート、接続された機器にリアルタイムでメッセージを通知することができます
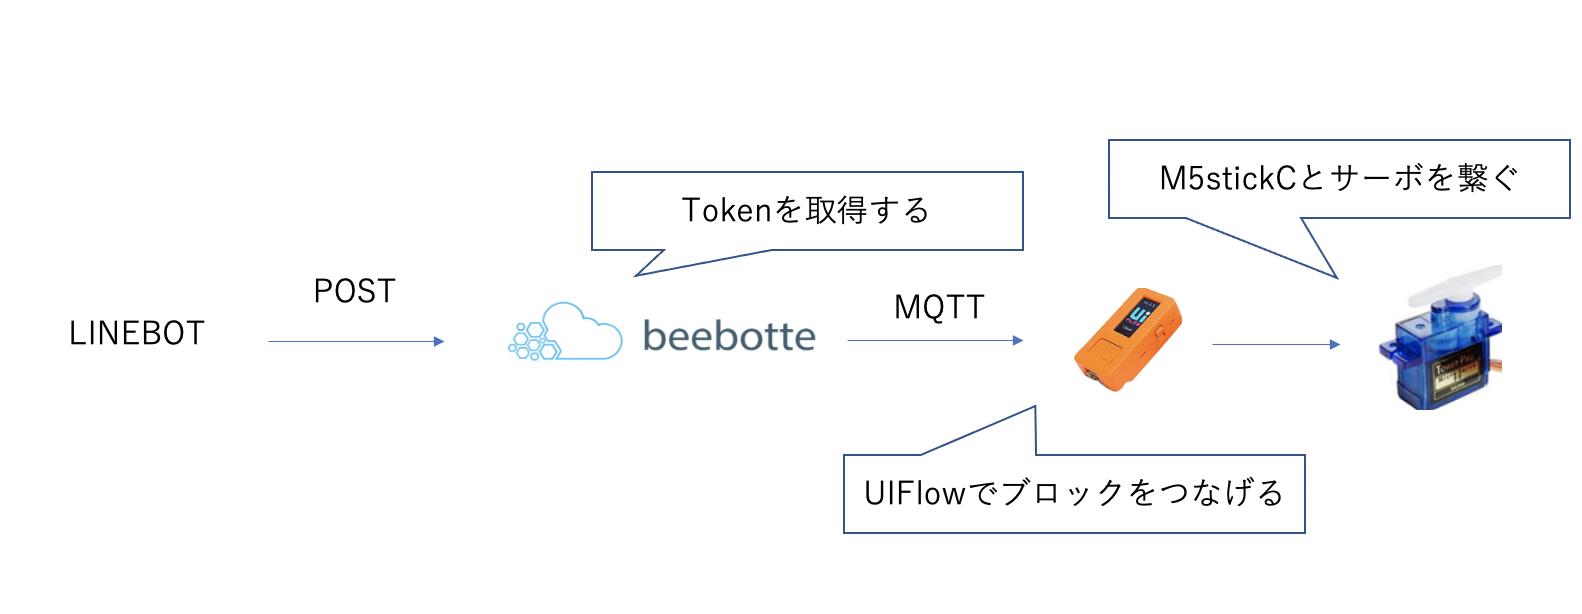
デバイスの実装はUIFlow!!
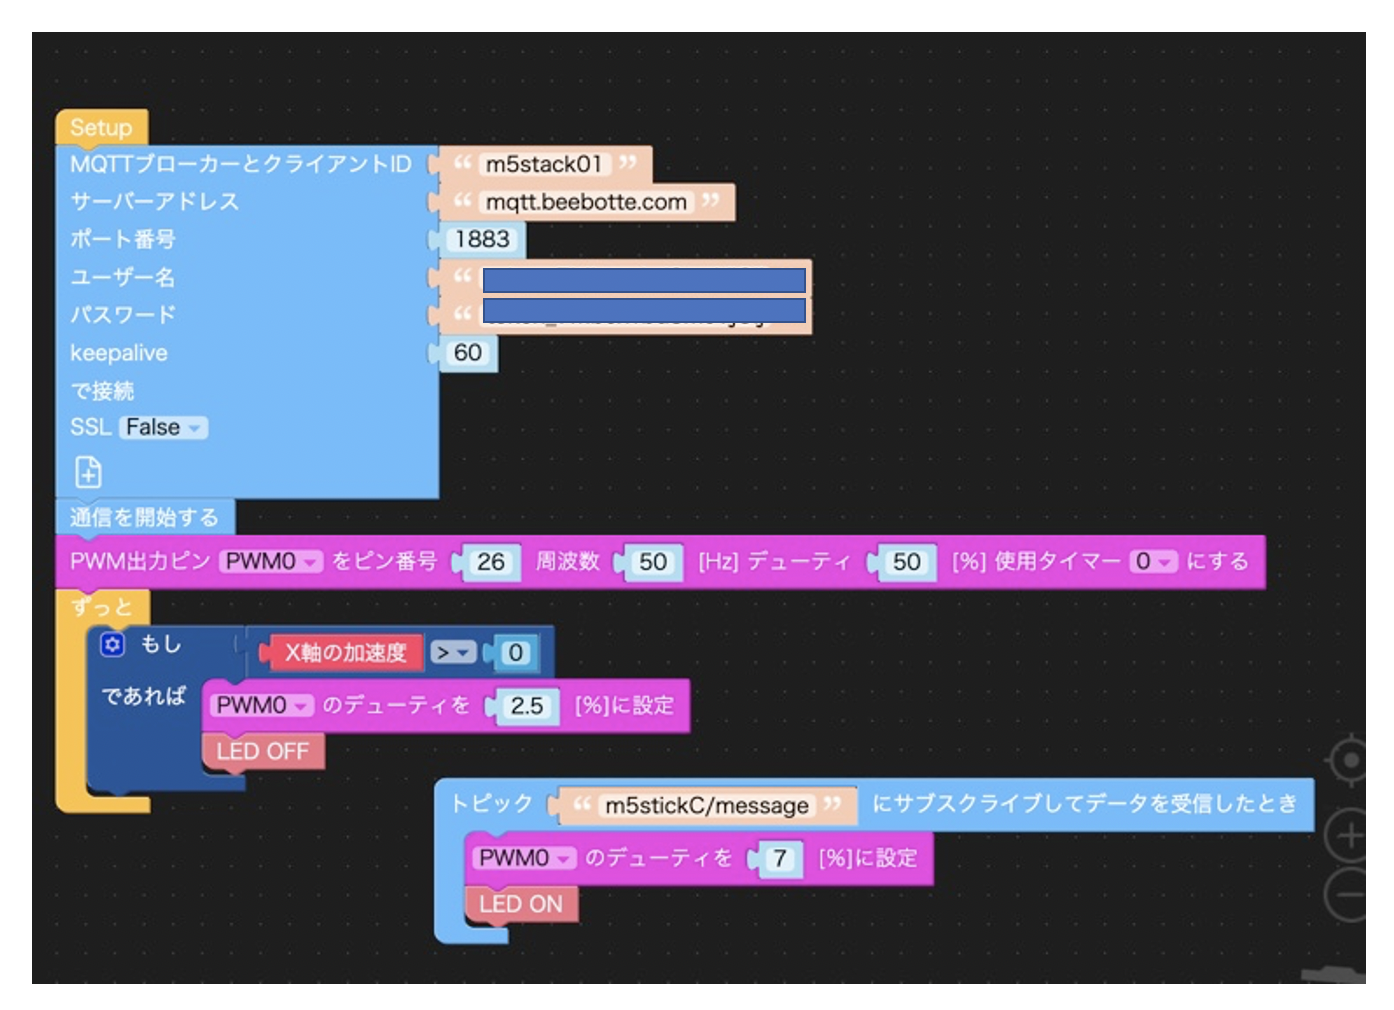
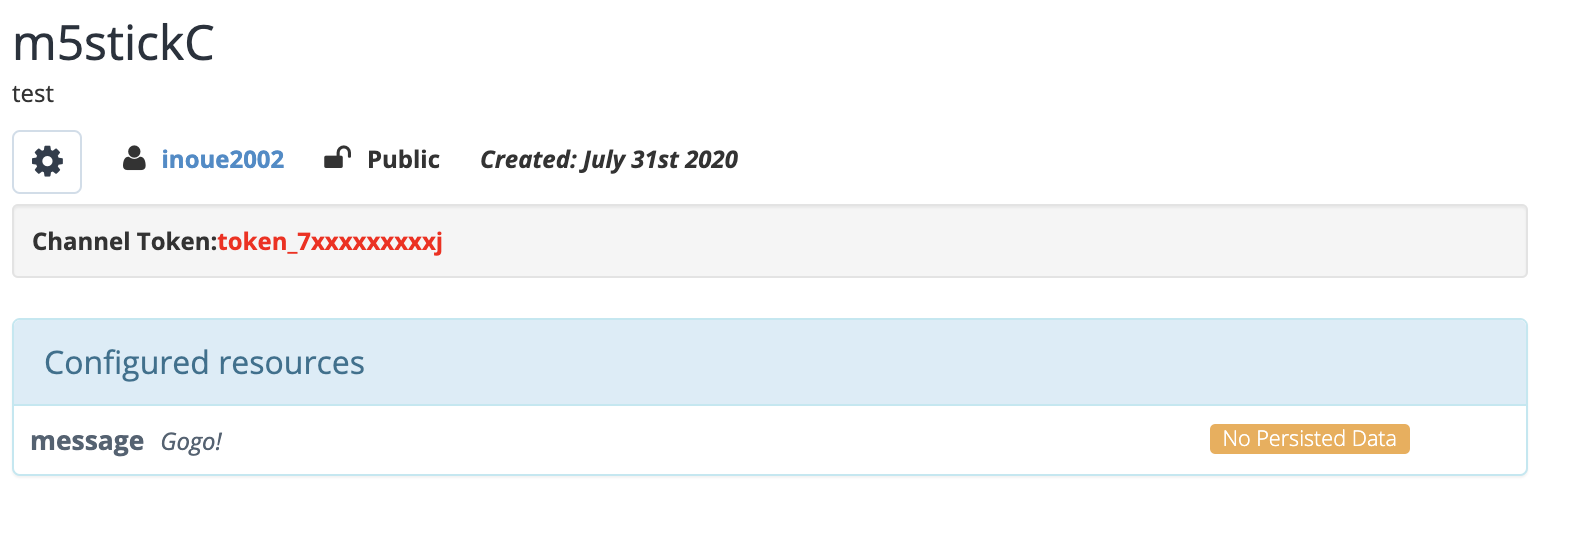
UIFlowのMQTTブロックのユーザー名とパスワードは以下のようにChannel Tokentoken_xxxxxxxを入力
先ほど実装を行ったLINEServerのaxiosURLにも
//後ほど変更の必要あり
      await axios.post(
        "以下のハードウェア実装の項目で取得するURLを入力する",
        {
          data: "unlock",
        }
のところを
      await axios.post(
        "https://api.beebotte.com/v1/data/publish/m5stickC/message?token=token_xxxxxxxxxxxxxxx",
        {
          data: "unlock",

  }
のように変更します。
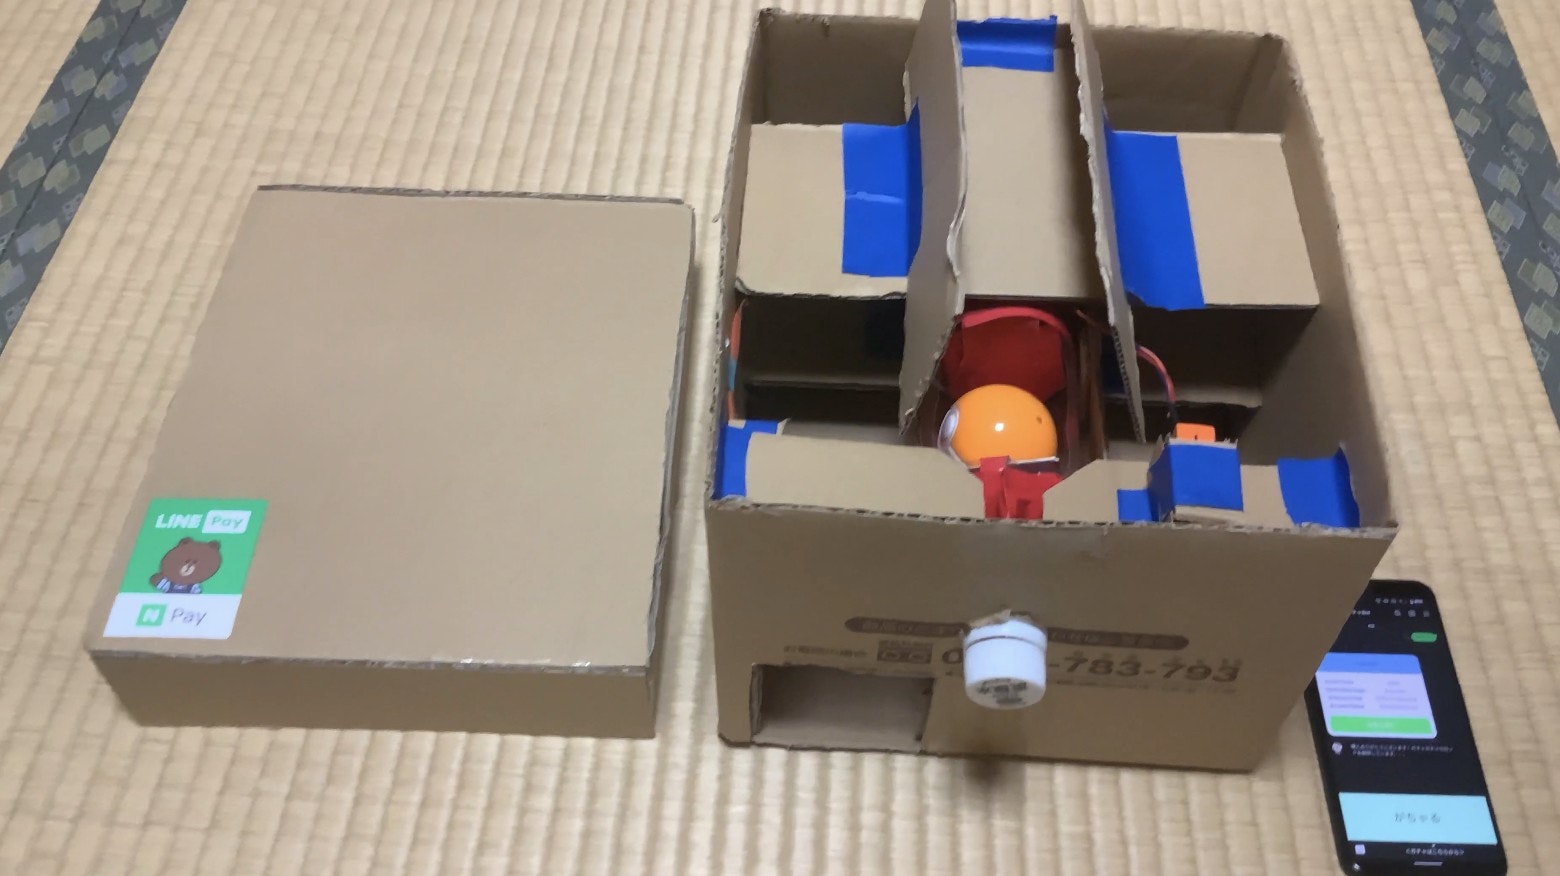
⑤段ボール工作(画像clickで動画再生)
最後に
今回始めてのLINEPAYAPI、始めての電子工作デビューという事でいろいろな初めてに挑戦しました。
まだまだ外装とかいろいろ未完成なところもあるので今後時間があれば改良を重ねて行きたいと思います。
あと、LINEのUserIdをそのままDBに保存するのはあまりよくない実装なのでマネをしない方が良いかもしれません。今回はあくまでも試作なのでお許しください笑