タブ
ブラウザのように複数のタブをtkinterで実現できるので、その記録。
何をするか
前回や前々回に続き、Subprocessを用いてWindowsコマンドを実行するのであるが、コマンドごとにタブを分ける。
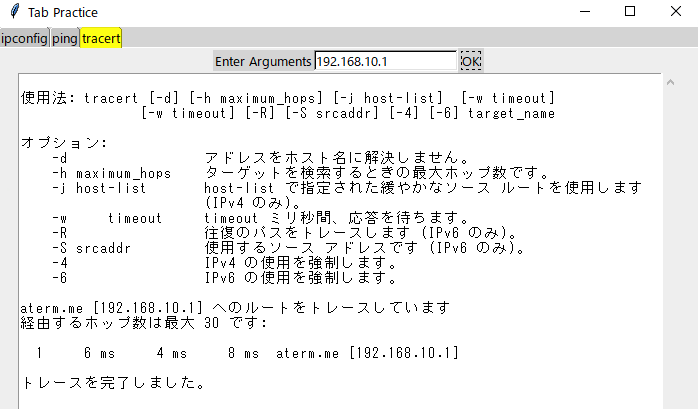
結果サンプル
コマンドとして、「ipconfig」、「ping」、「tracert」を取り扱う。


ソースコード
ポイントと感じたところを下記する。
タブの作成
こちらのサイト(【Python tkinter】複数のタブを実装したGUIアプリの作成(Notebookウィジェット))をもとに作成。
# Create Notebook Widget
note = ttk.Notebook(root)

# Create tab
tab0 = tk.Frame(note)
tab1 = tk.Frame(note)
tab2 = tk.Frame(note)

# Add tab
note.add(tab0, text=cmd_list[0])
note.add(tab1, text=cmd_list[1])
note.add(tab2, text=cmd_list[2])

# Create content of tab
create_content(tab0, 0)
create_content(tab1, 1)
create_content(tab2, 2)

# Locate tab
note.pack(expand=True, fill='both') #, padx=10, pady=10)
先ほどのリンク先を参照して作成。タブは3つ。タブコンテンツの作成は、後述する関数(create_content())を用いる。
タブカラーの設定(引用先サイトがどこかわからなくなりました)。
# Create an instance of ttk style
fgcolor = "yellow"
bgcolor = "gray80"
style = ttk.Style()
style.theme_create("style1", parent="alt", settings={
        "TNotebook.Tab": {
            "configure": {"background": bgcolor },
            "map":       {"background": [("selected", fgcolor)],
                          } } } )
style.theme_use("style1")
選択中タブは黄色、それ以外はグレー。
タブ内コンテンツの作成関数。
# Create content of tab
def create_content(frm, arg):
    frm1 = tk.Frame(frm)
    frm2 = tk.Frame(frm)
    frm1.pack()
    frm2.pack()
    frm.text = tk.Text(frm2, width=80, height=40)
    ysc = tk.Scrollbar(frm2, orient=tk.VERTICAL, command=frm.text.yview)
    frm.text["yscrollcommand"] = ysc.set
    okBtn = ttk.Button(frm1, text='OK', command=lambda:ok_clk(frm, arg))
    label = ttk.Label(frm1, text='Enter Arguments')
    label.grid(row=0, column=0)
    frm.entry = ttk.Entry(frm1)
    frm.entry.grid(row=0, column=1)
    okBtn.grid(row=0, column=2)
    ysc.pack(side=tk.RIGHT, fill="y")
    frm.text.pack()
    return
2つのフレームを設ける。1つ目のフレームには、文字列(label)、コマンド引数用エントリー(frm.entry)、OKボタン(okBtn)を配置する。2つ目のフレームには、コマンド実行結果を格納するテキストボックス(frm.text)+スクロールバーを配置する。また、タブの種類を示す引数(frm)を用いている。
OKボタンがクリックされたときの関数。
# command to execute
cmd_list = ['ipconfig', 'ping', 'tracert']

# Function for click OK
def ok_clk(frm, arg):
    cmd_arg = [cmd_list[arg]]
    if frm.entry.get() != '':
        cmd_arg.extend(frm.entry.get().split(' ')) # merge list
    output = subprocess.run(cmd_arg, shell=True, stdout=subprocess.PIPE, stderr=subprocess.STDOUT).stdout
    output = output.decode('shift_jis')
    frm.text.config(state='normal')   # editable
    frm.text.insert(tk.END, output)
    frm.text.config(state='disabled') # not editable
    frm.text.see('end')               # going to last line
    return
コマンド自体のリスト化、引数がある場合は、リストを結合する。Subprocessによりコマンドを実行し、コードをShift-JIS化。テキストボックスを編集モードにし、結果を書き込み、非編集モードにする。最後に、最終行に移動して完了。
コード全体
import subprocess
import tkinter as tk
import tkinter.ttk as ttk

# command to execute
cmd_list = ['ipconfig', 'ping', 'tracert']

# Function for click OK
def ok_clk(frm, arg):
    cmd_arg = [cmd_list[arg]]
    if frm.entry.get() != '':
        cmd_arg.extend(frm.entry.get().split(' ')) # merge list
    output = subprocess.run(cmd_arg, shell=True, stdout=subprocess.PIPE, stderr=subprocess.STDOUT).stdout
    output = output.decode('shift_jis')
    frm.text.config(state='normal')   # editable
    frm.text.insert(tk.END, output)
    frm.text.config(state='disabled') # not editable
    frm.text.see('end')
    return

# Create content of tab
def create_content(frm, arg):
    frm1 = tk.Frame(frm)
    frm2 = tk.Frame(frm)
    frm1.pack()
    frm2.pack()
    frm.text = tk.Text(frm2, width=80, height=40)
    ysc = tk.Scrollbar(frm2, orient=tk.VERTICAL, command=frm.text.yview)
    frm.text["yscrollcommand"] = ysc.set
    okBtn = ttk.Button(frm1, text='OK', command=lambda:ok_clk(frm, arg))
    label = ttk.Label(frm1, text='Enter Arguments')
    label.grid(row=0, column=0)
    frm.entry = ttk.Entry(frm1)
    frm.entry.grid(row=0, column=1)
    okBtn.grid(row=0, column=2)
    ysc.pack(side=tk.RIGHT, fill="y")
    frm.text.pack()
    return

# Start of main program
# root main window
root = tk.Tk()
root.title("Tab Practice")
root.geometry("700x500")

# Create an instance of ttk style
fgcolor = "yellow"
bgcolor = "gray80"
style = ttk.Style()
style.theme_create("style1", parent="alt", settings={
        "TNotebook.Tab": {
            "configure": {"background": bgcolor },
            "map":       {"background": [("selected", fgcolor)],
                          } } } )
style.theme_use("style1")

# Create Notebook Widget
note = ttk.Notebook(root)

# Create tab
tab0 = tk.Frame(note)
tab1 = tk.Frame(note)
tab2 = tk.Frame(note)

# Add tab
note.add(tab0, text=cmd_list[0])
note.add(tab1, text=cmd_list[1])
note.add(tab2, text=cmd_list[2])

# Create content of tab
create_content(tab0, 0)
create_content(tab1, 1)
create_content(tab2, 2)

# Locate tab
note.pack(expand=True, fill='both') #, padx=10, pady=10)

# main loop
root.mainloop()
EOF