0
0

Delete article

Deleted articles cannot be recovered.

Draft of this article would be also deleted.

Are you sure you want to delete this article?

More than 1 year has passed since last update.

はじめに

TI-Python でタートルグラフフィックする方法について紹介します。

タートルグラフックのためのモジュールをインストール

TI-84 Plus CE Python の TI-Python は標準でタートルグラフィック機能を提供していませんが、アドオンモジュールが TI から提供されています。

ここから CE Python Turtle Getting Started.zip をダウンロードしてきて展開します。

展開されるファイルから次の2つのファイルを TI Connect CE のファイル一覧画面にドラッグ&ドロップするだけでインストール完了です。

  • GRID.8xv
  • TURTLE.8xv

プログラミング

エディタ画面で Fns... のキーを押し、Modul 一覧から Add-On を選びます。

Capture1-1703325013350.png

turtle モジュールのインポートがありますので、選択します。

Capture17-1703325306328.png

エディタ画面に反映されます。オブジェクトの作成までやってくれています。

Capture2-1703325369687.png

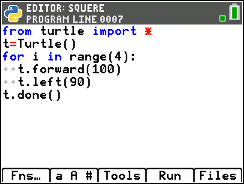
正方形を描いてみましょう。4辺あるので4回の繰り返しを用意します。

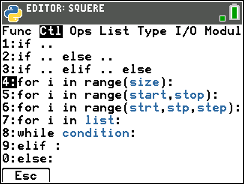
Fns...Ctl 一覧から for i in range(size): を選びます。

Capture3-1703325472904.png

エディタ画面に反映されるので、size 指定のところに 4 を入力します。

Capture5-1703325600446.png

続けて Fns...Modul 一覧から turtle を選びます。

Capture6-1703325699162.png

t.forward(distance) (前進)を選びます。

Capture7-1703325753145.png

エディタ画面に反映されるので、distance として 100 を入力します。

Capture11-1703325829244.png

同様の操作で t.left(90) (反時計方向に90度回転)と t.done() (描画終了)を入力します。

Capture12-1703325980420.png

ここまでできたら、後はRun するのみです。正方形を描画していく様子を見ることができます。

Capture15-1703326022813.png

0
0
0

Register as a new user and use Qiita more conveniently

  1. You get articles that match your needs
  2. You can efficiently read back useful information
  3. You can use dark theme
What you can do with signing up
0
0

Delete article

Deleted articles cannot be recovered.

Draft of this article would be also deleted.

Are you sure you want to delete this article?