はじめに
この記事は前回のgltfに関する記事:
p5.jsでgltfファイルを読み込んでメッシュを表示させる
の続きです。重複する部分があるので、そこについての説明は省略します。今回はgltfファイルからUVに関する情報とテクスチャ画像に関する情報を読み取り、それによりテクスチャを表示させるところまで行きたいと思います。
blenderでテクスチャ画像を作る
まず、blenderでテクスチャの付いたオブジェクトを作成します。3.1です。
これを埋め込み式gltfで保存します。base64の化け物みたいな文字列が出てきます。すごい長さです。これでもファイルサイズは341KBです(大きいのか小さいのか)。ノードについては説明を省略しますが、ShiftA -> texture -> imageTextureで線を引っ張るだけです。ノードを使って表示させるところまでやってからgltfに落とさないと反映されないので注意です。コード全文
重複部分については後で指摘しますが、とりあえず全文載せておきます。
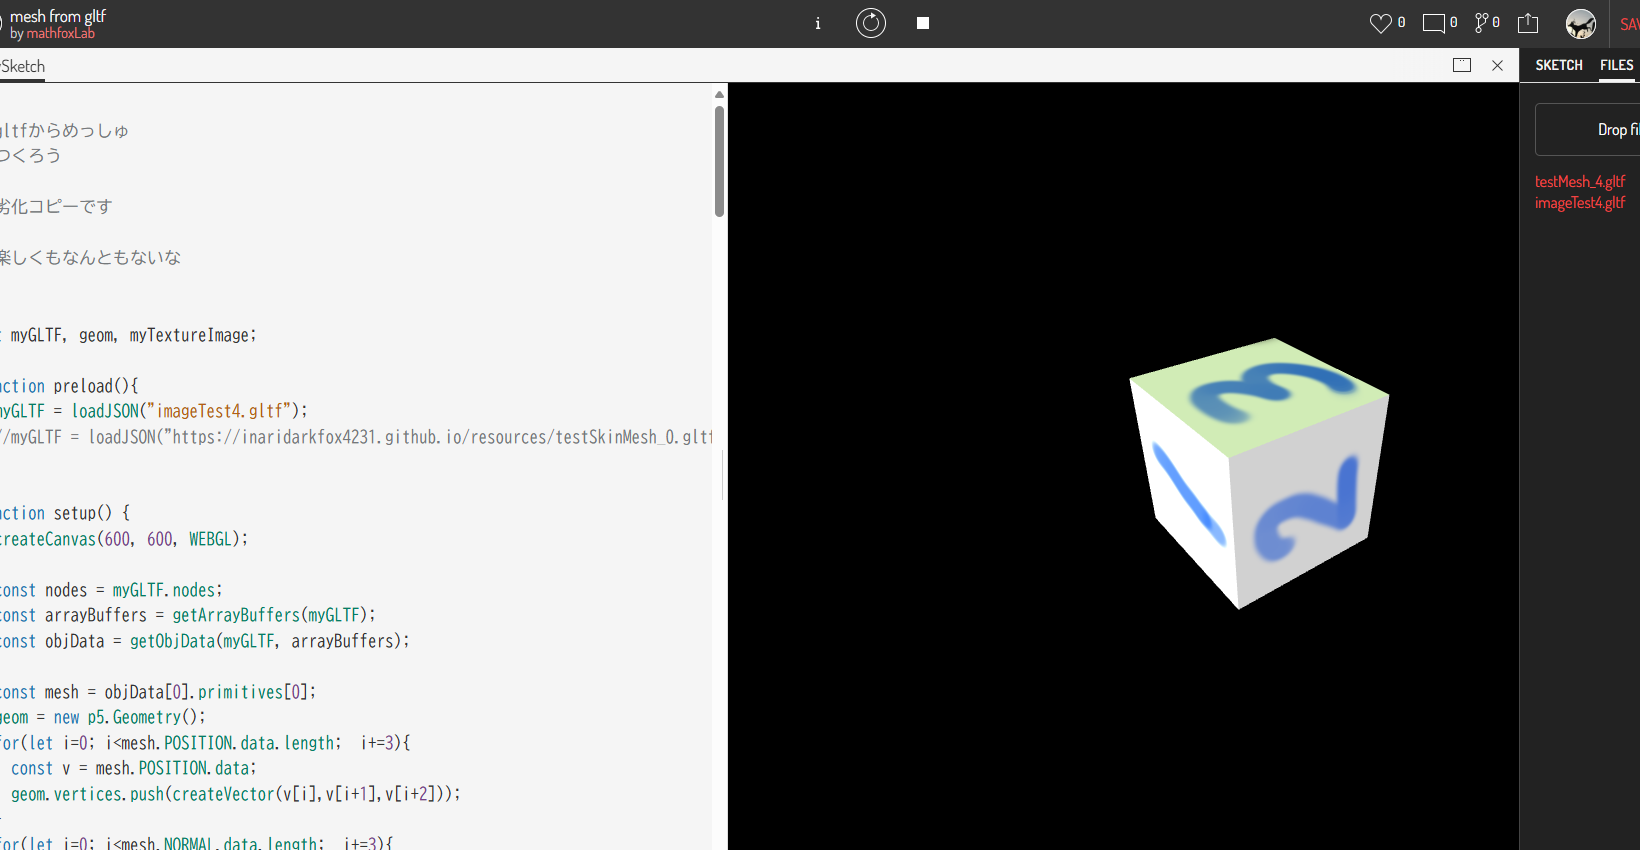
mesh from gltf image
/*
  gltfからめっしゅ
  つくろう
*/

let myGLTF, geom, myTextureImage;

function preload(){
  myGLTF = loadJSON("imageTest4.gltf");
  //myGLTF = loadJSON("https://inaridarkfox4231.github.io/resources/testSkinMesh_0.gltf");
}

function setup() {
  createCanvas(600, 600, WEBGL);

  const nodes = myGLTF.nodes;
  const arrayBuffers = getArrayBuffers(myGLTF);
  const objData = getObjData(myGLTF, arrayBuffers);

  const mesh = objData[0].primitives[0];
  geom = new p5.Geometry();
  for(let i=0; i<mesh.POSITION.data.length;  i+=3){
    const v = mesh.POSITION.data;
    geom.vertices.push(createVector(v[i],v[i+1],v[i+2]));
  }
  for(let i=0; i<mesh.NORMAL.data.length;  i+=3){
    const n = mesh.NORMAL.data;
    geom.vertexNormals.push(createVector(n[i],n[i+1],n[i+2]));
  }
  for(let i=0; i<mesh.indices.data.length; i+=3){
    const f = mesh.indices.data;
    geom.faces.push([f[i],f[i+1],f[i+2]]);
  }
  for(let i=0; i<mesh.TEXCOORD_0.data.length; i+=2){
    const uv = mesh.TEXCOORD_0.data;
    geom.uvs.push(uv[i], uv[i+1]);
  }

  const imageData = getImageData(myGLTF, arrayBuffers);
  const img = imageData[0];
  loadImage(img.url, (res) => {
    myTextureImage = res;
  });

  camera(0,16,8, 0,0,0, 0,1,0);
  const eyeDist = dist(0,16,8,0,0,0);

  // そのうえでfrustumモードを使い、上下を逆転させ、射影行列の-1を殺す。
  const nearPlaneHeightHalf = eyeDist*tan(PI/6)*0.1;
  const nearPlaneWidthHalf = nearPlaneHeightHalf*width/height;
  // ここの第3,4引数。
  frustum(-nearPlaneWidthHalf, nearPlaneWidthHalf, nearPlaneHeightHalf, -nearPlaneHeightHalf, 0.1*eyeDist, 100*eyeDist);
}

function draw(){
  background(0);
  orbitControl(1,-1,1);
  directionalLight(128,128,64,-1,-1,-1);
  directionalLight(128,64,128,1,1,-1);
  directionalLight(64,128,64,1,-1,-1);
  directionalLight(64,64,128,-1,1,-1);
  ambientLight(128);

  texture(myTextureImage);
  model(geom);
}

function getArrayBuffers(data){
  // arrayBufferの取得
  const arrayBuffers = [];
  for(let i=0; i<data.buffers.length; i++){
    const bin = data.buffers[i].uri.split(',')[1];
    arrayBuffers.push(getArrayBuffer(bin));
  }
  return arrayBuffers;
}

function getObjData(data, buf){
  const {meshes, accessors, bufferViews} = data;

  // dataは上記のdataのdata.meshesの他に
  // data.accessorsとdata.bufferViewsが入っています
  // 加えて解読済みのarrayBufferが入っています(data.buf)
  const result = [];
  for (const mesh of meshes) {
    const resultMesh = {};
    resultMesh.name = mesh.name;
    resultMesh.primitives = [];
    for (const prim of mesh.primitives) {
      const primitive = {};
      const attrs = prim.attributes;
      for (const attrName of Object.keys(attrs)) {
        // POSITION:0, NORMAL:1, TEXCOORD_0:2
        const attrAccessor = accessors[attrs[attrName]];
        const attrArrayData = getArrayData(
          buf, attrAccessor, bufferViews[attrAccessor.bufferView]
        );

        primitive[attrName] = {
          data:attrArrayData, info:getInfo(attrAccessor)
        }
      }
      const indexAccessor = accessors[prim.indices];
      const indexArrayData = getArrayData(
        buf, indexAccessor, bufferViews[indexAccessor.bufferView]
      );
      primitive.indices = {
        data:indexArrayData, info:getInfo(indexAccessor)
      }
      // shapeKeyAnimation用のtarget関連の記述はカット
      resultMesh.primitives.push(primitive);
      // とりあえずこんなもんで
    }
    result.push(resultMesh);
  }
  return result;
}

function getImageData(data, buf){
  const {images, bufferViews} = data;

  const result = [];
  for(const imgInfo of images){
    const mime = imgInfo.mimeType;
    const name = imgInfo.name;
    const bufferView = bufferViews[imgInfo.bufferView];

    // Uint8Arrayとして取得
    const bytes = createArrayData(buf[bufferView.buffer], 5121, bufferView.byteOffset, bufferView.byteLength);
    let byteString = "";
    for (let i = 0, len = bytes.byteLength; i < len; i++) {
      byteString += String.fromCharCode(bytes[i]);
    }
    const base64URL = window.btoa(byteString);
    result.push({name, url:`data:${mime};base64,${base64URL}`});
  }
  return result;
}

function getArrayBuffer(bin){
  const byteString = atob(bin);
  const byteStringLength = byteString.length;
  const arrayBuffer = new ArrayBuffer(byteStringLength);

  // このプロセスを挟むとうまくいくようです
  const intArray = new Uint8Array(arrayBuffer);
  for (let i = 0; i < byteStringLength; i++) {
    intArray[i] = byteString.charCodeAt(i);
  }
  return arrayBuffer;
}

// arrayOutputがfalseの場合はそのまま出力されるけども。
// まあjsのarrayのが便利やろ
function getArrayData(buf, accessor, bufferView, arrayOutput = true){
  // それぞれのデータを取得する感じのあれ
  const componentType = accessor.componentType;
  //const _count = accessor.count;  // 24とか30
  const _type = accessor.type;  // "VEC3"とか"SCALAR"
  let _size;
  switch(componentType) {
    case 5126: _size = 4; break;
    case 5123: _size = 2; break;
    case 5121: _size = 1; break; // 追加(boneのJOINTが5121)
  }

  const byteOffset = bufferView.byteOffset;
  const byteLength = bufferView.byteLength;
  const arrayLength = byteLength / _size;

  const resultArray = createArrayData(buf[bufferView.buffer], componentType, byteOffset, arrayLength);

  if(arrayOutput){
    const outputArray = new Array(resultArray.length);
    for(let i=0; i<outputArray.length; i++){
      outputArray[i] = resultArray[i];
    }
    return outputArray;
  }
  return resultArray;
}

function createArrayData(buf, componentType, byteOffset, arrayLength) {
  switch(componentType) {
    case 5126:
      const f32Array = new Float32Array(buf, byteOffset, arrayLength);
      return f32Array;
    case 5123:
      const i16Array = new Uint16Array(buf, byteOffset, arrayLength);
      return i16Array;
    case 5121: // 追加
      const u8Array = new Uint8Array(buf, byteOffset, arrayLength);
      return u8Array;
  }
  return [];
}

function getComponentType(code){
  switch(code){
    case 5126: return "float32";
    case 5123: return "uint16";
    case 5121: return "uint8"; // 追加
  }
  return "";
}

// accessorそのままでもいいと思う
// 適宜内容変更して
function getInfo(accessor){
  const result = {
    type:accessor.type,
    count:accessor.count,
    componentType:getComponentType(accessor.componentType)
  }
  if (accessor.max !== undefined) { result.max = accessor.max; }
  if (accessor.min !== undefined) { result.min = accessor.min; }
  return result;
}
実行結果:
画像データの取得
画像はここに入っています。
    "images" : [
        {
            "bufferView" : 4,
            "mimeType" : "image/png",
            "name" : "myTexture"
        }
    ],
bufferViewsの4に情報が入ってます。
        {
            "buffer" : 0,
            "byteLength" : 124530,
            "byteOffset" : 840
        }
124530という恐ろしい長さのバイト列がbase64内に埋め込まれています。これを取り出して画像データに加工します。
function getImageData(data, buf){
  const {images, bufferViews} = data;

  const result = [];
  for(const imgInfo of images){
    const mime = imgInfo.mimeType;
    const name = imgInfo.name;
    const bufferView = bufferViews[imgInfo.bufferView];

    // Uint8Arrayとして取得
    const bytes = createArrayData(buf[bufferView.buffer], 5121, bufferView.byteOffset, bufferView.byteLength);
    let byteString = "";
    for (let i = 0, len = bytes.byteLength; i < len; i++) {
      byteString += String.fromCharCode(bytes[i]);
    }
    const base64URL = window.btoa(byteString);
    result.push({name, url:`data:${mime};base64,${base64URL}`});
  }
  return result;
}
まずbytesのところでUint8Array形式によりこのデータを取得しています。次に、ここからバイト文字列を生成します。byteStringです。これをbase64化してURLの一部とします。最後にmimeTypeと合わせてアドレスを完成させ、出力します。
setup()内でこのアドレスからloadImageにより画像データを取得します。
  const imageData = getImageData(myGLTF, arrayBuffers);
  const img = imageData[0];
  loadImage(img.url, (res) => {
    myTextureImage = res;
  });
loadImageのコールバック内で画像を取得しています。戻り値のやり方だと失敗する可能性があります。非同期関数なので最初の数フレームは画像が設定されない場合 が あります。注意してください。myTextureImageはグローバル変数です。
uvについては単純にTEX_COORD0の内容をgeomのuvsに放り込めばOKです。
  for(let i=0; i<mesh.TEXCOORD_0.data.length; i+=2){
    const uv = mesh.TEXCOORD_0.data;
    geom.uvs.push(uv[i], uv[i+1]);
  }
Blenderと見た目を合わせるための工夫は前回と同じです。
  camera(0,16,8, 0,0,0, 0,1,0); // ここはyUpなら自由
  const eyeDist = dist(0,16,8,0,0,0);

  // そのうえでfrustumモードを使い、上下を逆転させ、射影行列の-1を殺す。
  const nearPlaneHeightHalf = eyeDist*tan(PI/6)*0.1;
  const nearPlaneWidthHalf = nearPlaneHeightHalf*width/height;
  // ここの第3,4引数。
  frustum(-nearPlaneWidthHalf, nearPlaneWidthHalf, nearPlaneHeightHalf, -nearPlaneHeightHalf, 0.1*eyeDist, 100*eyeDist);
最後にmodel()を呼ぶ前にtextureを使って設定します。
  texture(myTextureImage);
  model(geom);
おわりに
テクスチャ画像やUVまでいっしょくたにできるgltf, すごいですね。ここまでお読みいただいてありがとうございました。
参考にしたサイト
gltf形式の基本
mebiusboxさんの覚書
gltfをライブラリを使わずに読み込んでみよう
atobとbtoaについての分かりやすい記事
画像データをbase64から取得する
