この記事はWebGL Advent Calendar 2018の2日目の記事です。
はじめに
みなさんは glTF 形式のファイルを使ったことがありますか?
glTF はランタイム用途の 3D ファイル形式です。最近は、対応アプリケーションも増えてきているので、耳にしたことがある人も多いのではないでしょうか。主要な WebGL ライブラリ(three.js / Babylon.js など)でも推奨されているファイル形式ですので覚えておいて損はないでしょう。
ここでは、ファイル構造の理解のため、WebGL ライブラリに頼らず、自前で glTF ファイルを読み込んで表示させてみたいと思います。
glTF の基本構造
glTF ファイルは、メタ情報を JSON で頂点データやテクスチャ情報を外部ファイルまたは Data URI 形式で格納する仕様となっています。
今回は、下記の赤枠部分について解説したいと思います。

最小 glTF ファイル
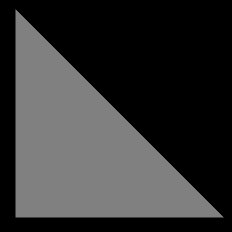
以下は最小限の glTF サンプルファイルになります。ファイルには単一の三角形が含まれています。
サンプルファイルは Khronos の glTF Tutorial から拝借しました。
{
  "scenes" : [
    {
      "nodes" : [ 0 ]
    }
  ],

  "nodes" : [
    {
      "mesh" : 0
    }
  ],

  "meshes" : [
    {
      "primitives" : [ {
        "attributes" : {
          "POSITION" : 1
        },
        "indices" : 0
      } ]
    }
  ],

  "buffers" : [
    {
      "uri" : "data:application/octet-stream;base64,AAABAAIAAAAAAAAAAAAAAAAAAAAAAIA/AAAAAAAAAAAAAAAAAACAPwAAAAA=",
      "byteLength" : 44
    }
  ],
  "bufferViews" : [
    {
      "buffer" : 0,
      "byteOffset" : 0,
      "byteLength" : 6,
      "target" : 34963
    },
    {
      "buffer" : 0,
      "byteOffset" : 8,
      "byteLength" : 36,
      "target" : 34962
    }
  ],
  "accessors" : [
    {
      "bufferView" : 0,
      "byteOffset" : 0,
      "componentType" : 5123,
      "count" : 3,
      "type" : "SCALAR",
      "max" : [ 2 ],
      "min" : [ 0 ]
    },
    {
      "bufferView" : 1,
      "byteOffset" : 0,
      "componentType" : 5126,
      "count" : 3,
      "type" : "VEC3",
      "max" : [ 1.0, 1.0, 0.0 ],
      "min" : [ 0.0, 0.0, 0.0 ]
    }
  ],

  "asset" : {
    "version" : "2.0"
  }
}
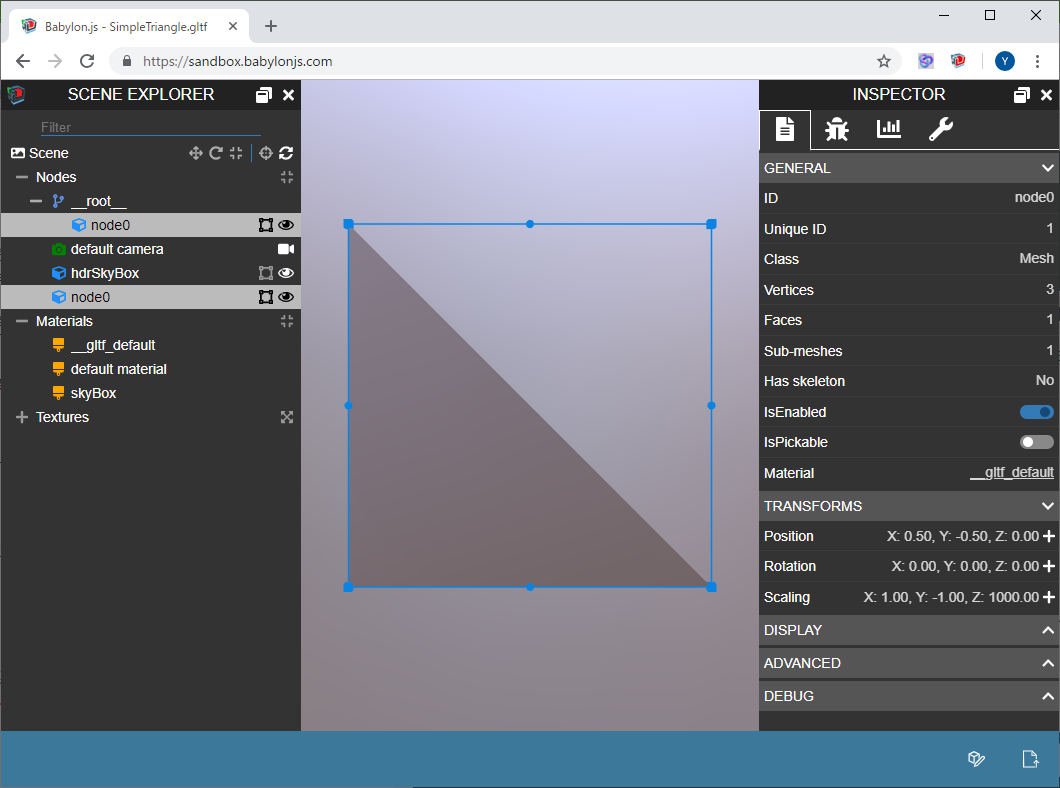
glTF ファイルとして正しいファイルですので、他の glTF 対応アプリケーションでも表示可能です。
以下は、Babylon.js の オンラインビューアでの表示結果です。
buffer、bufferView および accessor の概念について
Buffer について
buffer は生のバイナリ情報を表します。頂点データやインデックス情報等などが含まれます。
glTF の仕様としては外部ファイルまたは Data URI で格納されます。
ここでは、Data URI を使った場合の例になります。
byteLength にあるように、このバッファは 44 バイトのバイナリであることを表します。
  "buffers" : [
    {
      "uri" : "data:application/octet-stream;base64,AAABAAIAAAAAAAAAAAAAAAAAAAAAAIA/AAAAAAAAAAAAAAAAAACAPwAAAAA=",
      "byteLength" : 44
    }
  ],
Bbuffer View について
bufferView は buffer にある生データを、意味のある単位に分割したものになります。
この例では、2つに分割しています。
1つ目は、0バイト目から6バイト、2つ目は、36バイトが割り当てられています。
  "bufferViews" : [
    {
      "buffer" : 0,
      "byteOffset" : 0,
      "byteLength" : 6,
      "target" : 34963   // gl.ELEMENT_ARRAY_BUFFER
    },
    {
      "buffer" : 0,
      "byteOffset" : 8,
      "byteLength" : 36,
      "target" : 34962   // gl.ARRAY_BUFFER
    }
  ],
Accessor について
accessor は bufferView で分割されたバイナリ情報をどのように扱うかを定義したものになります。
この例では、1つ目の bufferView をインデックス情報として、2つ目の bufferView を頂点情報として扱うよう定義されています。
  "accessors" : [
    {
      "bufferView" : 0,
      "byteOffset" : 0,
      "componentType" : 5123,  // gl.UNSIGNED_SHORT
      "count" : 3,
      "type" : "SCALAR",
      "max" : [ 2 ],
      "min" : [ 0 ]
    },
    {
      "bufferView" : 1,
      "byteOffset" : 0,
      "componentType" : 5126,  // gl.FLOAT
      "count" : 3,
      "type" : "VEC3",
      "max" : [ 1.0, 1.0, 0.0 ],
      "min" : [ 0.0, 0.0, 0.0 ]
    }
  ],
1つ目の bufferView をインデックス情報は UNSIGNED_SHORT の配列で、解読すると以下の内容になります。
[ 0, 1, 2 ]
2つ目の bufferView を頂点情報は FLOAT の配列で、解読すると以下の内容になります。
[(   0.00000,    0.00000,    0.00000),
 (   1.00000,    0.00000,    0.00000),
 (   0.00000,    1.00000,    0.00000)]
これだけの情報があれば、WebGL を用いて、最小限の描画が行えることになります。
JavaScript による読み込みサンプル
サンプルコード解説
以下の構造を解析し読み込みます。
  //          +------------------------------------ accessors[0] : indices    ( 6 bytes =  2 bytes * 1 * 3)
  //          |                       +------------ accessors[1] : POSITION   (36 bytes =  4 bytes * 3 * 3)
  //          |                       |
  // +----------------+      +--------------+
  // |  accessors[0]  |      | accessors[1] |
  // +----------------+      +--------------+
  //          |                       |
  // +----------------+      +--------------+
  // | bufferViews[0] |      |bufferViews[1]|
  // +----------------+      +--------------+
  //          |                       |
  // |<--- 6 bytes -->|2bytes|<- 36 bytes ->|
  // +--------------------------------------+
  // |                buffers[0]            |
  // +--------------------------------------+
  // |<--------------- 44 bytes ----------->|
JSON のメタ情報の読み込み
  //   "accessors": [
  //     {
  //       "bufferView": 0,
  //       "byteOffset" : 0,
  //       "componentType": 5123,  // gl.UNSIGNED_SHORT
  //       "count": 3,
  //       "type": "SCALAR",
  //       "max": [2],
  //       "min": [0]
  //     },
  //
  indicesAccessor              = gltf.meshes[0].primitives[0].indices;
  indicesAccessorBufferView    = gltf.accessors[indicesAccessor].bufferView;
  indicesAccessorByteOffset    = gltf.accessors[indicesAccessor].byteOffset;
  indicesAccessorCount         = gltf.accessors[indicesAccessor].count;
  indicesAccessorType          = gltf.accessors[indicesAccessor].type;
  indicesAccessorElementCount  = getElementCountByTypeName(indicesAccessorType);
  indicesBufferViewByteLength  = gltf.bufferViews[indicesAccessorBufferView].byteLength;
  indicesBufferViewByteOffset  = gltf.bufferViews[indicesAccessorBufferView].byteOffset;
  indicesBufferViewBuffer      = gltf.bufferViews[indicesAccessorBufferView].buffer;
  indicesUri                   = gltf.buffers[indicesBufferViewBuffer].uri;

  //   "accessors": [
  //     ...
  //     {
  //       "bufferView" : 1,
  //       "byteOffset" : 0,
  //       "componentType" : 5126,  // gl.FLOAT
  //       "count" : 3,
  //       "type" : "VEC3",
  //       "max" : [ 1.0, 1.0, 0.0 ],
  //       "min" : [ 0.0, 0.0, 0.0 ]
  //     }
  //
  positionAccessor             = gltf.meshes[0].primitives[0].attributes.POSITION;
  positionAccessorBufferView   = gltf.accessors[positionAccessor].bufferView;
  positionAccessorByteOffset   = gltf.accessors[positionAccessor].byteOffset;
  positionAccessorCount        = gltf.accessors[positionAccessor].count;
  positionAccessorType         = gltf.accessors[positionAccessor].type;
  positionAccessorElementCount = getElementCountByTypeName(positionAccessorType);
  positionBufferViewByteLength = gltf.bufferViews[positionAccessorBufferView].byteLength;
  positionBufferViewByteOffset = gltf.bufferViews[positionAccessorBufferView].byteOffset;
  positionBufferViewBuffer     = gltf.bufferViews[positionAccessorBufferView].buffer;
  positionUri                  = gltf.buffers[positionBufferViewBuffer].uri;
バッファの読み込み
  var promise1 = ajax(indicesUri).then(function(response) {
    vertexIndexBuffer = gl.createBuffer();
    gl.bindBuffer(gl.ELEMENT_ARRAY_BUFFER, vertexIndexBuffer);
    gl.bufferData(gl.ELEMENT_ARRAY_BUFFER, new Uint16Array(response, indicesBufferViewByteOffset, indicesAccessorElementCount * indicesAccessorCount), gl.STATIC_DRAW);
  }, function(error) {
    console.error("Failed!", error);
  });

  var promise2 = ajax(positionUri).then(function(response) {
    vertexPositionBuffer = gl.createBuffer();
    gl.bindBuffer(gl.ARRAY_BUFFER, vertexPositionBuffer);
    gl.bufferData(gl.ARRAY_BUFFER, new Float32Array(response, positionBufferViewByteOffset, positionAccessorElementCount * positionAccessorCount), gl.STATIC_DRAW);
  }, function(error) {
    console.error("Failed!", error);
  });

  Promise.all([promise1, promise2]).then(function(){
    animate();
  });
WebGL 描画処理
  gl.bindBuffer(gl.ARRAY_BUFFER, vertexPositionBuffer);
  gl.vertexAttribPointer(aLoc["position"], 3, gl.FLOAT, false, 0, 0);

  gl.drawElements(gl.TRIANGLES, indicesAccessorCount, gl.UNSIGNED_SHORT, 0);
少しコードが長くなってしまったので、詳細は jsdo.it github のコードを参照下さい。(※)
■ [WebGL] glTF Tutorial のサンプルを自力で読み込んでみるテスト
http://jsdo.it/cx20/qaa2
https://cx20.github.io/jsdo.it-archives/cx20/qaa2/
※ 2019.11.10 追記 jsdo.it のサービス終了に伴いサンプルは github に移植しました。
実行結果
おわりに
いかがでしょうか。なんとなく雰囲気が伝わったのであれば幸いです。
今回のケースは、一番簡単なサンプルだったので、必要最小限の部分しか説明していませんが、glTF 2.0 の仕様としては、スキニングアニメーションや PBR といった仕様があります。全てを自前で実装するのは骨のある作業ですが、興味がある方はチャレンジしてみて下さい。WebGL の勉強にもなると思います。
参考情報
■ glTF Tutorial - Khronos
https://github.com/KhronosGroup/glTF-Tutorials/blob/master/gltfTutorial/README.md
■ 次世代の3Dデータフォーマット決定版 glTF 2.0 の概要図を日本語訳してみた - Qiita
https://qiita.com/randall2835/items/ec911cb6b0f10677559b
■ Triangle - glTF Sample Models - Khronos
https://github.com/KhronosGroup/glTF-Sample-Models/tree/master/2.0/Triangle
■ BabylonJS Sandbox (Babylon.js による glTF Viewer)
https://sandbox.babylonjs.com/
■ glTF Viewer (three.js による glTF Viewer)
https://gltf-viewer.donmccurdy.com/