はじめに
libtessで、点ごとになんか値を設定したとしても、新しく点が追加される場合、そこにも値を設定することは困難である。通常は。しかしlibtessなら交叉で生じる点にもその値を補間により設定できる。具体的には、点の座標値を補間で出すわけだが、同じ割合で点ごとに設定した値を補間できる。
実例を挙げた方が早いですね...
combine callback
前回のlibtess
この記事のcombineCallbackのところを掘り下げてみよう。
  function combinecallback(coords, data, weight) {
    // console.log('combine callback');
    return [coords[0], coords[1], coords[2]];
  }
実はここをこうしても動く。
  function combinecallback(coords, data, weight) {
    // console.log('combine callback');
    return [coords[0], coords[1]];
  }
というのもこのメソッドでは0番と1番しか使ってないから。実は入力が長さ2でも動く。coordsを登録するところではこのように書いているが...
    for (let j = 0; j < contour.length; j += 2) {
      const coords = [contour[j], contour[j + 1], 0];
      tessy.gluTessVertex(coords, coords);
    }
実はこれでもいい:
    for (let j = 0; j < contour.length; j += 2) {
      const coords = [contour[j], contour[j + 1]];
      tessy.gluTessVertex(coords, coords);
    }
なぜなら0番と1番しか以下略。これが基本的な使い方なのだが、追加で補間するパラメータを増やすことができる。
combine callbackのdataとweightsはそれぞれ長さ4の配列である。何が入ってるかというと、交叉する2つのエッジに現れる合計4つの頂点の位置のデータとウェイトのデータである。重み付き平均を取ると交叉点の頂点の座標になるように設定されているので、同じように平均を取る形になる。実は次のように、ダイレクトに計算できる:
  function combinecallback(coords, data, weight) {
    // console.log('combine callback');
    console.log(coords[0]);
    console.log(data[0][0]*weight[0] + data[1][0]*weight[1] + data[2][0]*weight[2]+ data[3][0]*weight[3]);
    console.log(coords[1]);
    console.log(data[0][1]*weight[0] + data[1][1]*weight[1] + data[2][1]*weight[2]+ data[3][1]*weight[3]);
    return [coords[0], coords[1], coords[2]];
  }
全く同じ値が2回ずつ出力される。ただ、ライブラリ内で計算済みの値をわざわざ再計算するのは無駄である。計算するならそれ以降の値だろう。そのやり方を紹介しようと思う。
コード全文
便利なのでp5.jsで。
js以外は同じなので省略。バージョンは2.0.5.
libtess combine test
const SIZE = 5;

const tessy = (function initTesselator() {
  const tessy = new libtess.GluTesselator();
  tessy.loops = [];

  // function called for each vertex of tesselator output
  function vertexCallback(data, polyVertArray) {
		polyVertArray.push(...data.slice(0, SIZE));
    if(tessy.loops.length > 0){
      tessy.loops[tessy.loops.length-1].push(...data.slice(0, SIZE));
    }
  }
  function begincallback(type) {
    // ここで区切りがつくので、ここで区切るたびにcontourを分離すればいいみたいです。
    // console.log(type);
    if (type === libtess.primitiveType.GL_TRIANGLES) {
      console.log('TRIANGLES!');
    }else if(type === libtess.primitiveType.GL_LINE_LOOP){
      console.log('LINE_LOOP!');
      tessy.loops.push([]);
    }
  }
  function errorcallback(errno) {
    console.log('error callback');
    console.log('error number: ' + errno);
  }
  // callback for when segments intersect and must be split
  function combinecallback(coords, data, weight) {
		for(let k=2; k<SIZE; k++){
			coords[k] = data[0][k]*weight[0] + data[1][k]*weight[1] + data[2][k]*weight[2] + data[3][k]*weight[3];
		}
    return coords;
  }
  function edgeCallback(flag) {
    // don't really care about the flag, but need no-strip/no-fan behavior
    // console.log('edge flag: ' + flag);
  }

  tessy.gluTessCallback(libtess.gluEnum.GLU_TESS_VERTEX_DATA, vertexCallback);
  tessy.gluTessCallback(libtess.gluEnum.GLU_TESS_BEGIN, begincallback);
  tessy.gluTessCallback(libtess.gluEnum.GLU_TESS_ERROR, errorcallback);
  tessy.gluTessCallback(libtess.gluEnum.GLU_TESS_COMBINE, combinecallback);
  tessy.gluTessCallback(libtess.gluEnum.GLU_TESS_EDGE_FLAG, edgeCallback);
  return tessy;
})();

function triangulate(contours, options = {}) {
  const {boundaryOnly = false, tessType = "odd"} = options;
  // libtess will take 3d verts and flatten to a plane for tesselation
  // since only doing 2d tesselation here, provide z=1 normal to skip
  // iterating over verts only to get the same answer.
  // comment out to test normal-generation code
  tessy.gluTessNormal(0, 0, 1);

  const startTime0 = window.performance.now();
  const triangleVerts = [];
  tessy.gluTessBeginPolygon(triangleVerts);

  for (let i = 0; i < contours.length; i++) {
    tessy.gluTessBeginContour();
    const contour = contours[i];
    for (let j = 0; j < contour.length; j += SIZE) {
      const coords = contour.slice(j, j+SIZE);
      tessy.gluTessVertex(coords, coords);
    }
    tessy.gluTessEndContour();
  }
  console.log(`preparation elapsed:${window.performance.now()-startTime0} milli seconds.`);
  const startTime1 = window.performance.now();

  tessy.loops.length = 0;

  switch(tessType){
    case "nonzero": // 0でない場合(一部のフォントパスなどはこれを使う)
      tessy.gluTessProperty(libtess.gluEnum.GLU_TESS_WINDING_RULE, libtess.windingRule.GLU_TESS_WINDING_NONZERO); break;
    case "positive": // 正のみ
      tessy.gluTessProperty(libtess.gluEnum.GLU_TESS_WINDING_RULE, libtess.windingRule.GLU_TESS_WINDING_POSITIVE); break;
    case "negative": // 負のみ
      tessy.gluTessProperty(libtess.gluEnum.GLU_TESS_WINDING_RULE, libtess.windingRule.GLU_TESS_WINDING_NEGATIVE); break;
    case "abs_geq_two": // 絶対値が2以上
      tessy.gluTessProperty(libtess.gluEnum.GLU_TESS_WINDING_RULE, libtess.windingRule.GLU_TESS_WINDING_ABS_GEQ_TWO); break;
    default: // いわゆるeven-odd
      tessy.gluTessProperty(libtess.gluEnum.GLU_TESS_WINDING_RULE, libtess.windingRule.GLU_TESS_WINDING_ODD);
  }

  tessy.gluTessProperty(libtess.gluEnum.GLU_TESS_BOUNDARY_ONLY, boundaryOnly);
  tessy.gluTessEndPolygon();

  console.log(`tessellation elapsed:${window.performance.now()-startTime1} milli seconds.`);

  if(boundaryOnly){
    const result = [];
    for(const eachLoop of tessy.loops){
      result.push(eachLoop.slice());
    }
    return result;
  }

  return triangleVerts;
}

function setup(){
	const obj = {};
  createCanvas(400, 400);
	const col0 = [255, 255, 0];
	const col1 = [255, 0, 0]
  const contour0 = [10, 10, ...col0, 200, 10,...col0, 200, 200,...col0, 10, 200,...col0];
  const contour1 = [120,120,...col1,320,120,...col1,320,320,...col1,120,320,...col1];
  const contours = [contour0, contour1];

  const result1 = triangulate(contours, {boundaryOnly:true, tessType:"odd"});
  console.log(result1);

  const result0 = triangulate(contours);
  console.log(result0);

  background(220);
  noStroke();
  for(let i=0; i<result0.length; i+=SIZE*3){
    fill(100, 100+random(155), 255);
    triangle(result0[i], result0[i+1], result0[i+SIZE], result0[i+SIZE+1], result0[i+SIZE*2], result0[i+SIZE*2+1]);
  }
  noFill();
  strokeWeight(2);
  stroke(60);

  for(const eachLoop of result1){
    beginShape();
    for(let i=0; i<eachLoop.length-1; i+=SIZE){
      vertex(eachLoop[i], eachLoop[i+1]);
    }
    endShape(CLOSE);
  }
  noStroke();
	for(let i=0; i<result0.length; i+=SIZE){
		fill(result0[i+2], result0[i+3], result0[i+4]);
		circle(result0[i], result0[i+1], 20);
	}
}
結果
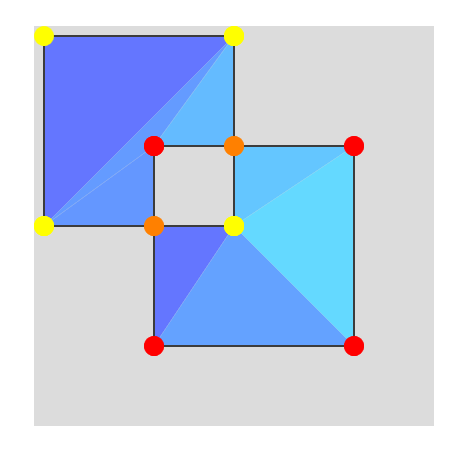
解説
今回はSIZE=5で。この場合、データを5つずつ用意する。ただし最初の2つは同じで、位置座標である。そのうしろに追加データを記述する。
	const col0 = [255, 255, 0];
	const col1 = [255, 0, 0]
  const contour0 = [10, 10, ...col0, 200, 10,...col0, 200, 200,...col0, 10, 200,...col0];
  const contour1 = [120,120,...col1,320,120,...col1,320,320,...col1,120,320,...col1];
vertexのcallbackも可変引数に対応させている。
  function vertexCallback(data, polyVertArray) {
    polyVertArray.push(...data.slice(0, SIZE));
    if(tessy.loops.length > 0){
      tessy.loops[tessy.loops.length-1].push(...data.slice(0, SIZE));
    }
  }
位置データは引き続きcontourやメッシュを作るのに使われる。問題は追加で用意される交点の頂点のデータだが、それをcombineで用意できる仕組みになっている。
  // callback for when segments intersect and must be split
  function combinecallback(coords, data, weight) {
    for(let k=2; k<SIZE; k++){
      coords[k] = data[0][k]*weight[0] + data[1][k]*weight[1] + data[2][k]*weight[2] + data[3][k]*weight[3];
    }
  return coords;
  }
ここで渡されるcoordsは実は、そのまま長さ3である。0と1は位置座標の補間結果なのでいじる必要は無いが、2は未定義値で、3以降は全く用意されていない。なので直接代入で用意する。dataの4つの成分はそれぞれ、次のように、contourを分割して得られるセグメントの値が入っている:
  for (let i = 0; i < contours.length; i++) {
    tessy.gluTessBeginContour();
    const contour = contours[i];
    for (let j = 0; j < contour.length; j += SIZE) {
      const coords = contour.slice(j, j+SIZE);
      tessy.gluTessVertex(coords, coords);
    }
    tessy.gluTessEndContour();
  }
正確に言うと、2に関してのみ、数であれば同様に補間した値が入っている。ただし数でなければNaNになるし、3以降は全く用意されないので、SIZEが3以上で使うなら実際に計算しなければならない。
今回は頂点ごとに色データを0~255で用意した。それの補間値が交叉点に設定されるよう塩梅した。その結果、このように補間してオレンジっぽい色が出力されるというわけ。
オブジェクトの場合
数である必要は無い。オブジェクトを使うやり方もある。
libtess combine object
ほぼ一緒なのでコードは割愛させていただき、ポイントだけ述べる。まず今回SIZEは3で、データはこんな感じで用意している。
	const col0 = {r:255, g:255, b:0};
	const col1 = {r:255, g:0, b:0};
  const contour0 = [10, 10, col0, 200, 10,col0, 200, 200,col0, 10, 200,col0];
  const contour1 = [120,120,col1,320,120,col1,320,320,col1,120,320,col1];
さっき数が入ってたところにオブジェクトが入っている。もちろんp5のcolorクラスかなんかでもいいしベクトルでもいいです。combineは次のように書く:
  // callback for when segments intersect and must be split
  function combinecallback(coords, data, weight) {
    coords[2] = {};
    for(const k of ["r", "g", "b"]){
      coords[2][k] = data[0][2][k]*weight[0] + data[1][2][k]*weight[1] + data[2][2][k]*weight[2] + data[3][2][k]*weight[3];
    }
    return coords;
  }
coords[2]はデフォルトではオブジェクト形式になっていないので、きちんとオブジェクトの記法で初期化しないと容赦なくNaNにされてしまいます。注意。もちろんp5.Vectorなどで初期化してもいい。自由です。そのr,g,b成分をこんな風に補間で設定します。あとは取り出すだけ。
  for(let i=0; i<result0.length; i+=SIZE){
    fill(result0[i+2].r, result0[i+2].g, result0[i+2].b);
    circle(result0[i], result0[i+1], 20);
  }
おわりに
以上が基本的な使い方になります。あんま使う機会はなさそうですが...スライスした結果の頂点にUVを持たせたりするのに使えそうです。あとは頂点色とか。
ちなみにp5はこの補間テクニックをフル活用しています。長さは確か12...だったっけ?デフォルトで常にこの長さが使われます。選択の余地はありません。2でいいじゃんって思っても2にできません。固定です。
ここまでお読みいただいてありがとうございました。
追記
foxTess版。
libtess combine foxTess
libtess combine object foxTess