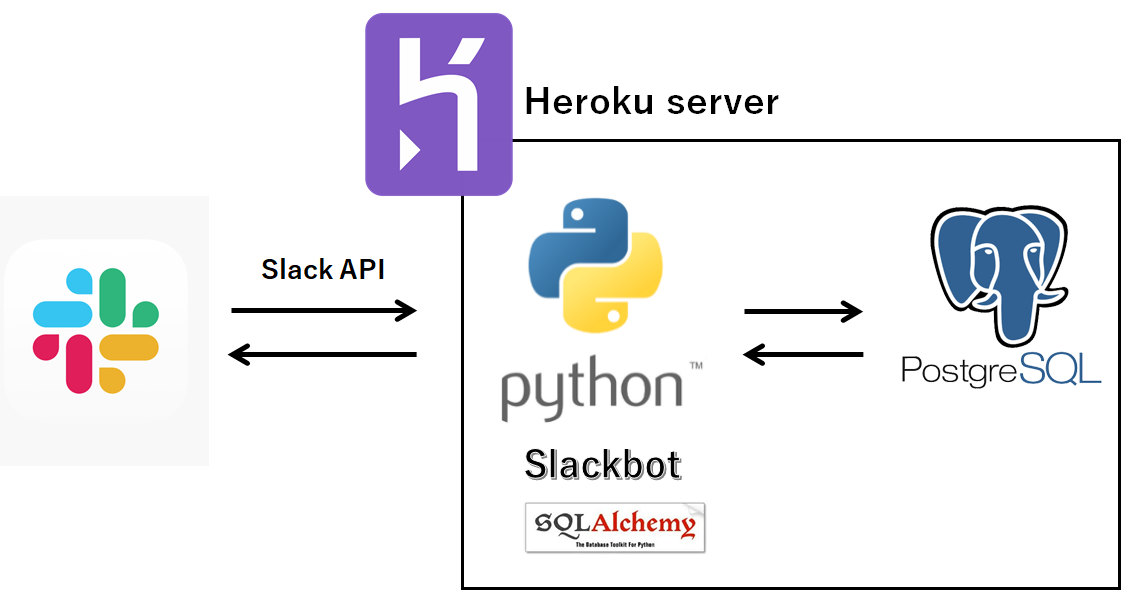
TL;DR
バイオ系の常として、実験室で実験プロトコルを参照したい時があります。スマホでネットを調べるとか、居室に戻るとかしてたんですがこの時間がかなり無駄に感じていました。
そこで、Google Driveにあらかじめプロトコルをアップロードしておき、Slackを介してリンクURLを参照することで簡易にスマホでプロトコルを参照する、ということを目的としました。また、プロトコルがよく散逸していて探せないことが多かったので、Slackを使って各プロトコルを集積し、DBを使って管理することで実験効率が上がることも期待できます。
全体像
求める機能は以下の通りです。タグ付けや、SlackAPIを使ってリスト、ボタンなどを使ったりなどいろいろ機能を追加していきたいとは思っていますが、まずキリがいいかなと思いました。
- Slackからプロトコル名、Google DriveへのリンクURLをDBへ登録する
- Slackからプロトコル名を使ってGoogle DriveへのリンクURLを表示する
- SlackからDBにあるプロトコルを削除する
- SlackのコマンドでDBに登録された全データを表示する。
slack APIトークンを作成
slackbot applicationからbotを検索し、Slack APIを取得します。
PythonでSlackBot開発①「APIキーの取得と簡単な返答」で非常に詳しく述べられていました。
Slackbotのインストールと簡易的なbotの作成
pipでインストールできるので、早速インストールします。slackbot githubはこちらになります。PythonのslackbotライブラリでSlackボットを作るを参考にしました。
pip install slackbot
次に以下のようなディレクトリ構造のファイルを作ります。
slackbot
├─ run.py
├─ slackbot_settings.py
└─ plugins
   ├─ __init__.py
   └─ respond_to.py
これらのファイル、ディレクトリの機能は以下の通りです。
|Name|種類|昨日|
|---|---|---|---|
|slackbot|dir|プロジェクトのまとめファイル。任意の名称|
|run.py|python|botの本体。このファイルを起動することでbotが起動する|
|slackbot_settings.py|python|botの設定を書き込むファイル|
|plugins|dir|機能を追加するためのディレクトリ|
|__init__.py|python|モジュールを示す空ファイル|
|respond_to.py|python|リプライで返答する機能を持たせたスクリプト|
run.py
from slackbot.bot import Bot

def main():
    bot = Bot()
    bot.run()

if __name__ == "__main__":
    main()
slackbot_settings.py
# SlackのAPIトークンを設定
API_TOKEN = "xxxx-xxxxxxxxxxx-xxxxxxxxxxxxxxxxxxxxxxxx"

# デフォルトリプライを設定
DEFAULT_REPLY = "対応していません"

# プラグインスクリプトを置いてあるサブディレクトリ名のリスト
PLUGINS = ['plugins']
respond_to.py
from slackbot.bot import respond_to

@respond_to('in-fusion')
def mention_func(message):
    message.reply('in-fusionのプロトコルです。\n url')
ローカルでbotを起動します。
python run.py
Herokuと連携
常時起動しておくために、Herokuと連携します。まず、Herokuに登録します。次にGithubからデプロイするために、新たにレポジトリを作ってHerokuと連携させておきます。
また、ディレクトリ構成を変更しました。
slackbot
├─ run.py
├─ slackbot_settings.py
├─ Procfile
├─ requirements.txt
├─ runtime.txt
└─ plugins
   ├─ __init__.py
   └─ respond_to.py
それぞれのファイルの機能は以下の通りです。
| 名前 | 機能 |
|---|---|
| Procfile | Herokuでどのプロセスを使ってどのプログラムを起動するかを指定 |
| requirements.txt | pipでインストールするモジュールを指定 |
| runtime.txt | Herokuで実行するPython versionを指定 |
Procfile
pbot: python run.py
requirements.txt
後で使いそうなものをすべて入れています。
certifi==2019.3.9
chardet==3.0.4
idna==2.8
psycopg2==2.8.2
requests==2.22.0
six==1.12.0
slackbot==0.5.3
slacker==0.13.0
SQLAlchemy==1.3.4
urllib3==1.25.3
websocket-client==0.44.0
wincertstore==0.2
runtime.txt
Python-3.7.3
Slack APIトークンについて
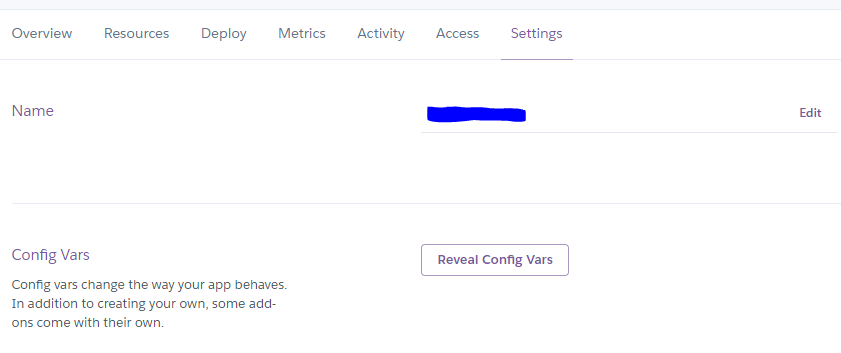
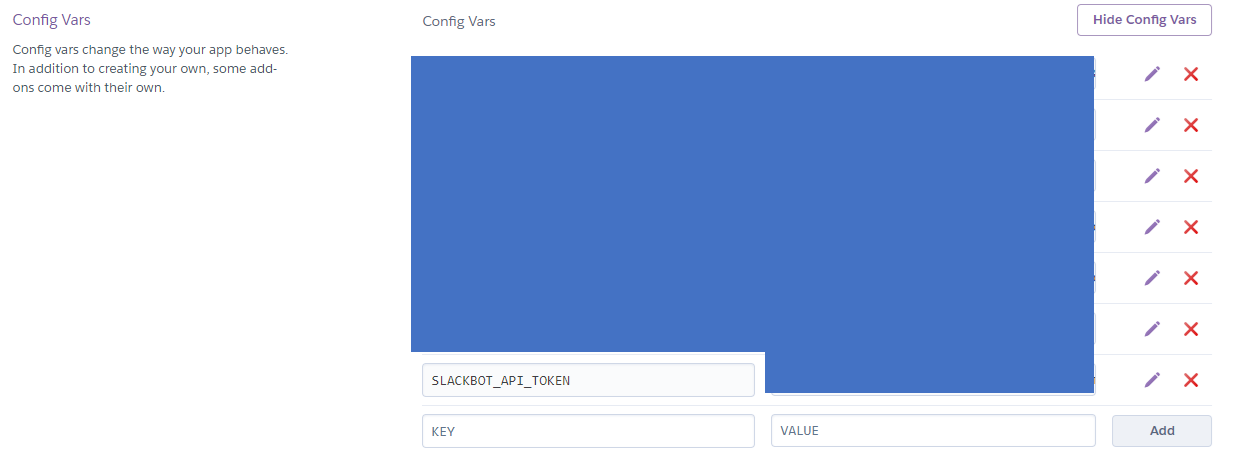
Githubとかに上げる以上直接Slack APIトークンをファイルにかけないので、Herokuに環境変数として登録しておきます。Reveal Config Varsをクリックします。Key = SLACKBOT_API_TOKEN, Value = xxxxで登録します。
githubにpush
githubにslackbotディレクトリ全体をpushします。
git init
git remote add origin <url>
git add .
git commit -m "test"
git push origin master
HerokuとGithubをつなぐ
HerokuのDeployにあるDeplyment MethodでGithubを選びます。下の様にConnectedになればOKです。

githubからHerokuにデプロイ
同じくHerokuのDeployにあるmanualy deployからGithubのbranchをデプロイします。

PostgresSQLと連携
Herokuでは無料でPostgresSQLが利用できるので、PostgresSQLを採用しました。
アドオンとして追加できます。
Resources > Configure Add ons > Add-onsで検索してインストールできます。PostgresSQLのいいところは、Hobby Devを選べばクレカ登録がいらないので心安らかでいられることです。下のような感じになればOKです。

次にResources > PostgresSQL >SettingsからUSER、Password、URL、DBを確認し、環境変数として登録します。環境変数としての登録は前回のSlackAPIトークンの登録と同様です。
SQLalchemyを使ってPostgresSQLと接続
DBと接続、ENGINE、BASEの定義
os.environmentで環境変数を取得して、その情報をもとにDBに接続します。ちょっとつまったのは、psycopg2というパッケージが必要ということがわからずエラー起こしていました。また、プロトコルテーブルは事前に作成しました。基本的に、SQLalchemyで基本的なSQLクエリまとめを参考にして編集しました。
# sql_settings.py

import os
from sqlalchemy import *
from sqlalchemy.orm import *
from sqlalchemy.ext.declarative import declarative_base

PSQL_USER = os.environ['PSQL_USER']
PSQL_PASSWORD = os.environ['PSQL_PASSWORD']
PSQL_HOST = os.environ['PSQL_HOST']
PSQL_DB = os.environ['PSQL_DB']
DATABASE = 'postgresql+psycopg2://{user}:{password}@{host}/{db}'\
                       .format(user=PSQL_USER, password=PSQL_PASSWORD, host=PSQL_HOST, db=PSQL_DB)

ENGINE = create_engine(DATABASE, encoding='utf-8', echo=False)


session = scoped_session(
    sessionmaker(
        autocommit = False,
        autoflush = False,
        bind = ENGINE
    )
)

Base = declarative_base()
Base.query = session.query_property()
TABLEモデルの定義
プロトコルをDBとして登録するために、プロトコルテーブルのモデルを作成します。
# sql_model.py
from sqlalchemy import Column, Integer, String
from entity import sql_settings


class Protocol(sql_settings.Base):
    __tablename__: str = 'protocol'
    id = Column('id', Integer, primary_key=True)
    name = Column('name', String)
    url = Column('url', String(200))
    description = Column('description', String(200))
SlackからDBにデータをSELECT・UPDATE・INSERT・DELETEする
respond_to.pyを編集して、プロトコルテーブルに対してSELECT、INSERT、UPDATE、DELETEをSlackから行えるようにします。
ディレクトリ構成を以下のように編集しました。
slackbot
├─ run.py
├─ slackbot_settings.py
├─ Procfile
├─ requirements.txt
├─ runtime.txt
└─ plugins
   ├─ __init__.py
   └─ respond_to.py
└─ entities
   ├─ __init__.py
   ├─ sql_model.py
   └─ sql_settings.py
モジュールとして作成しなければimportをSlackbotがしてくれない(?)っぽいのでentitiesというモジュールを作りました。Webアプリらしきものを作るのが初めてなのでなんかこういうときのディレクトリ構成の決まり事みたいなのがよくわかっていません...。
以下の様なコマンドをSlackから打ち込むことで、プロトコルテーブルをSlackから編集できるようにしました。Nameに対して2つプロトコルが存在してほしくないので、存在しないプロトコルにはINSERT、存在するプロトコルにはUPDATEを行うように設定しました。
# Slackでのコマンド
select name -> 該当プロトコルのURLを返す
add name url description -> nameのプロトコルをINSERT or UPDATEする
delete name -> 該当プロトコルを削除する
all -> 現在登録されているプロトコル名をすべて表示する
Slackでのリプライに対して上のような処理を実行するようにrespond_to.pyを書き換えました。
べた書きって感じがしてあれなので、もう少し上手くまとめられたら更新しようと思っています。
# respond_to.py
from slackbot.bot import respond_to
from entity import sql_model
from entity import sql_settings
import json


@respond_to('select (.*)')
def reply_protocol(message, arg):
    protocols = sql_settings.session.query(sql_model.Protocol).filter(sql_model.Protocol.name == arg).all()
    if len(protocols) == 0:
        message.reply("プロトコルがありません")
    elif len(protocols) > 1:
        message.reply('プロトコルが重複しています')
    else:
        protocol = protocols[0]
        attachments = [
            {
                'fallback': 'Fallback text',
                'author_name': protocol.name,
                'author_link': protocol.url,
                'text': protocol.url,
                'color': '#59afe1'
            }
        ]

        message.send_webapi('', json.dumps(attachments))


@respond_to("add (.*)")
def add_protocol(message, arg):
    register_info = arg.split(" ")
    protocols = sql_settings.session.query(sql_model.Protocol).filter(sql_model.Protocol.name == register_info[0]).all()
    if len(protocols) == 0:
        added_protocol = sql_model.Protocol()
        added_protocol.name = register_info[0]
        added_protocol.url = register_info[1]
        added_protocol.description = register_info[2]

        sql_settings.session.add(added_protocol)
        sql_settings.session.commit()

        message.reply(added_protocol.name+added_protocol.url+added_protocol.description)
    else:
        updated_protocol = sql_settings.session.query(sql_model.Protocol).filter(
            sql_model.Protocol.name == register_info[0]).first()
        updated_protocol.name = register_info[0]
        updated_protocol.url = register_info[1]
        updated_protocol.description = register_info[2]
        sql_settings.session.commit()

        message.reply(updated_protocol.name+updated_protocol.url+updated_protocol.description)


@respond_to("delete (.*)")
def delete_protocol(message, arg):
    sql_settings.session.query(sql_model.Protocol).filter(sql_model.Protocol.name == arg).delete()
    sql_settings.session.commit()

    message.reply("delete protocol: "+arg)


@respond_to("all")
def all_protocol(message):
    protocols = sql_settings.session.query(sql_model.Protocol.name).all()
    message_list = []
    for protocol in protocols:
        message_list.append(protocol.name)

    message.reply("\n".join(message_list))
あとがき
初めてWebアプリらしきものを作成してみましたが、結構楽しかったです。DBとかの知識ゼロだしサーバー関連の知識もなかったので非常に勉強になった、気がします。自分で使う分には使えなくもない気がしますが、公開するには粗削りすぎるなという感じです。もう少し作りこんだら研究室で公開して、実験効率が上がることを期待しています...。


