はじめに
筆者は Ultra96/Ultra96-V2(ZynqMP) 向けに Debian GNU/Linux を提供しています1。また、XRT(Xilinx Runtime) はXilinx社が提供する開発環境(Vitis)で開発したプログラムをプラットフォームで動かすための環境です2。
本来なら MPSoC Edge Device 用の XRT は Xilinx が提供する Linux 環境(Petalinux) でしか動きませんが、この記事では XRT を Ultra96/Ultra96-V2 向け Debian GNU/Linux で動かすための手順を幾つかのパートに分けて説明します。
この記事では、XRT をインストールした Ultra96/Ultra96-V2 をターゲットにして、ホストPC上の Vitis IDE からプログラムの実行&デバッグする手法について説明します。
注意
この記事で紹介している Debian Package は Xilinx 社の公式なものではありません。
ターゲットの準備
ターゲットには XRT をインストールした Ultra96/Ultra96-V2 を使用します。Ultra96/Ultra96-V2 に XRT をインストールする方法に関しては インストール編 を参照してください。
Vitis IDE からターゲット上のプログラムの実行&デバッグをするためには、ターゲットに XRT がインストールされているだけは不十分です。追加で次に示すものがターゲット側に必要です。
- TCF(Target Communication Framework) Agent
- /opt/xilinx/xrt から /usr への各種ファイルのシンボリックリンク
- zocl (MPSoC Edge Device 用のカーネルモジュール) の準備
TCF-Agent の準備
TCF(Target Communication Framework)3 は組み込みシステム(ターゲット)を駆動するための軽量で拡張可能なネットワークプロトコルです。Vitis IDE は eclipse をベースにしていて、ターゲットとは TCF で通信します。そのため、Vitis IDE からターゲットの制御を行うために、ターゲットに TCF-Agent というサーバー・プログラムを動かしておく必要があります。
TCF-Agent のビルド
TCF-Agent のソースコードは以下のURL にあります。
- git://git.eclipse.org/gitroot/tcf/org.eclipse.tcf.agent.git
ここのリポジトリをダウンロードして Ultra96/Ultra96-V2 上でビルドできます。なお、この記事では、すでにビルド済みで Debian Package 化したものを用意しているので、そちらを使ってインストールします。
TCF-Agent のインストール
ビルド済みで Debian Package化した TCF-Agent を以下のURLに用意しています。ダウンロードしてインストールします。
shell$ git clone --recursive --depth=1 -b 1.7.0-1 git://github.com/ikwzm/tcf-agent-dpkg
shell$ cd tcf-agent-dpkg
shell$ sudo apt install ./tcf-agent_1.7.0-1_arm64.deb
Reading package lists... Done
Building dependency tree
Reading state information... Done
Note, selecting 'tcf-agent' instead of './tcf-agent_1.7.0-1_arm64.deb'
The following NEW packages will be installed:
  tcf-agent
0 upgraded, 1 newly installed, 0 to remove and 69 not upgraded.
After this operation, 3,298 kB of additional disk space will be used.
Get:1 /home/fpga/work/tcf-agent-dpkg/tcf-agent_1.7.0-1_arm64.deb tcf-agent arm64 1.7.0-1 [689 kB]
debconf: unable to initialize frontend: Dialog
debconf: (Dialog frontend will not work on a dumb terminal, an emacs shell buffer, or without a controlling terminal.)
debconf: falling back to frontend: Readline
Selecting previously unselected package tcf-agent.
(Reading database ... 114950 files and directories currently installed.)
Preparing to unpack .../tcf-agent_1.7.0-1_arm64.deb ...
Processing triggers for systemd (237-3ubuntu10.39) ...
TCF-Agent のスタート
上記の Debian Package には systemd 用のプログラムも含まれています。TCF-Agent をスタートするためには以下のように systemd のコマンドを使用します。
shell$ sudo systemctl start tcf-agent.service
また、Linux のブート時に自動的に TCF-Agent をスタートする際には、以下のようにしてください。
shell$ sudo systemctl enable tcf-agent.service
TCF-Agent のストップ
TCF-Agent をストップする時は以下のようにしてください。なお、現時点では何故かTCF-Agent のストップに数分ほど時間がかかります。原因は不明です。
shell$ sudo systemctl stop tcf-agent.service
/opt/xilinx/xrt から /usr への各種ファイルのシンボリックリンク
インストール編 でインストールした XRT の実行プログラムやライブラリはターゲット上の /opt/xilinx/xrt にインストールされます。ターゲット上で XRT 用のプログラムを実行する際には、/opt/xilinx/xrt/setup.sh などのスクリプトを実行して環境変数を設定しておかなくてはなりません。
しかし、Vitis IDE から TCF を通じて XRT 用のプログラムを実行する場合、何故かライブラリが見つからないとかデバイスが見つからないとか言われて、この方法では動きませんでした。
試行錯誤した結果、/opt/xilinx/xrt/lib 下のライブラリおよび /opt/xilinx/xrt/bin 下の実行プログラムを、それぞれ /usr/lib、/usr/bin にシンボリックリンクすることで動くようになりました。
いちいち手でリンクを張るのは面倒なので、それようの Debian Package を用意しています。この Debian Package をインストールしてください。
shell$ git clone https://github.com/ikwzm/ZynqMP-FPGA-XRT.git
shell$ sudo apt install ./ZynqMP-FPGA-XRT/xrt-setup_2.6.0-1_arm64.deb
Reading package lists... Done
Building dependency tree
Reading state information... Done
Note, selecting 'xrt-setup' instead of './xrt-setup_2.6.0-1_arm64.deb'
The following NEW packages will be installed:
  xrt-setup
0 upgraded, 1 newly installed, 0 to remove and 71 not upgraded.
After this operation, 30.7 kB of additional disk space will be used.
Get:1 /home/fpga/work/ZynqMP-FPGA-XRT/xrt-setup_2.6.0-1_arm64.deb xrt-setup arm64 2.6.0-1 [1,276 B]
debconf: unable to initialize frontend: Dialog
debconf: (Dialog frontend will not work on a dumb terminal, an emacs shell buff\\
er, or without a controlling terminal.)
debconf: falling back to frontend: Readline
Selecting previously unselected package xrt-setup.
(Reading database ... 115056 files and directories currently installed.)
Preparing to unpack .../xrt-setup_2.6.0-1_arm64.deb ...
zocl の準備
zocl の準備に関しては 実践編 にて説明したとおりです。そちらを参照してください。
Vitis の準備
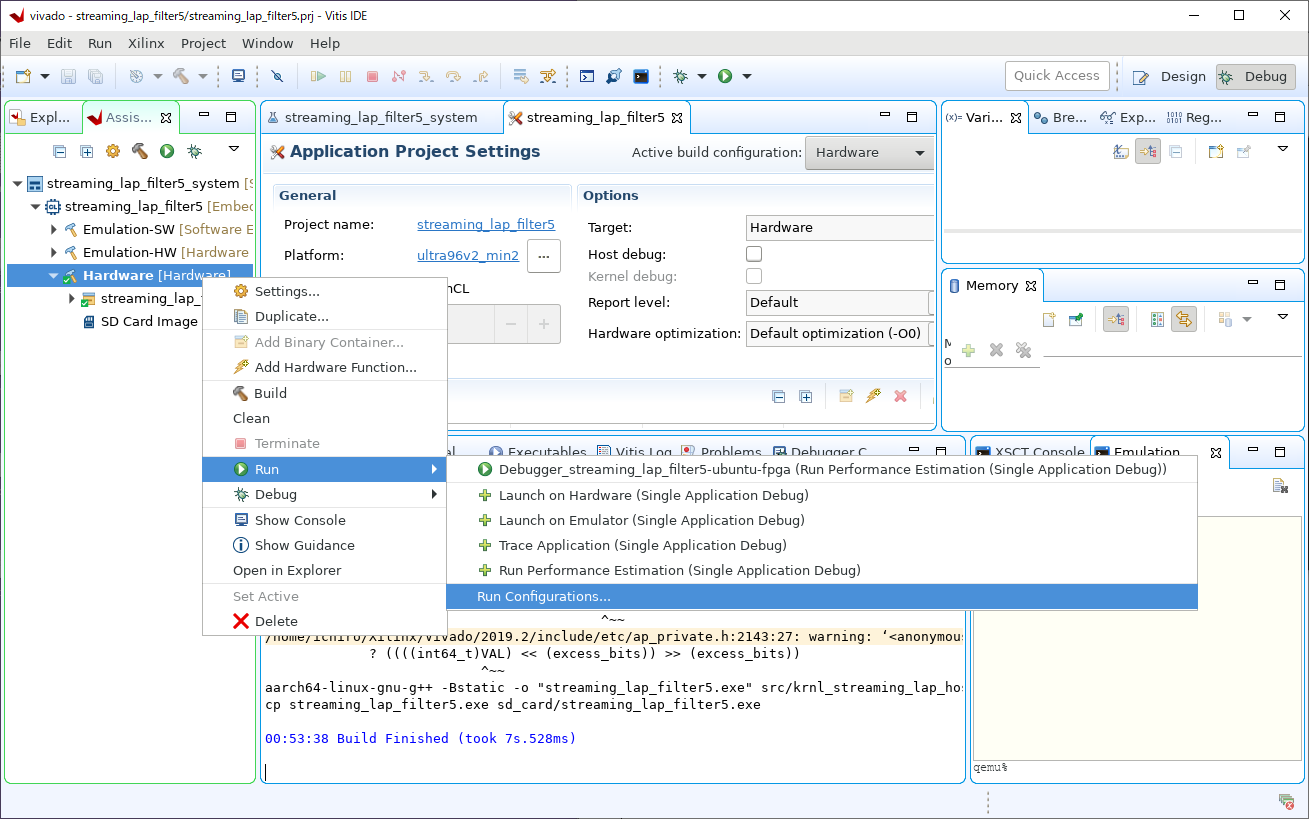
Vitis IDE の Run Configuration を開きます。
Fig.1 Vitis Run Configuration-1
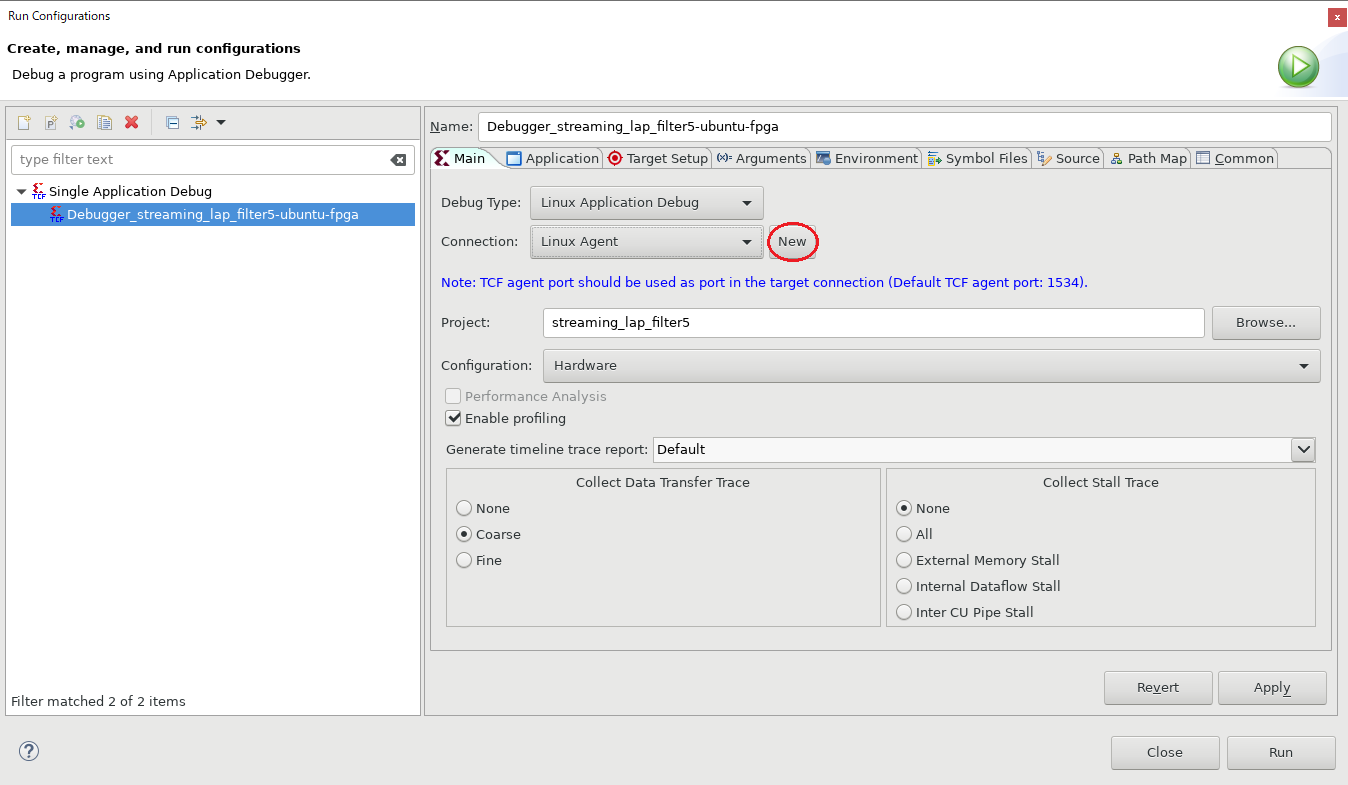
Vitis Run Configuration の Connection を新しく設定します。
Fig.2 Vitis Run Configuration-2
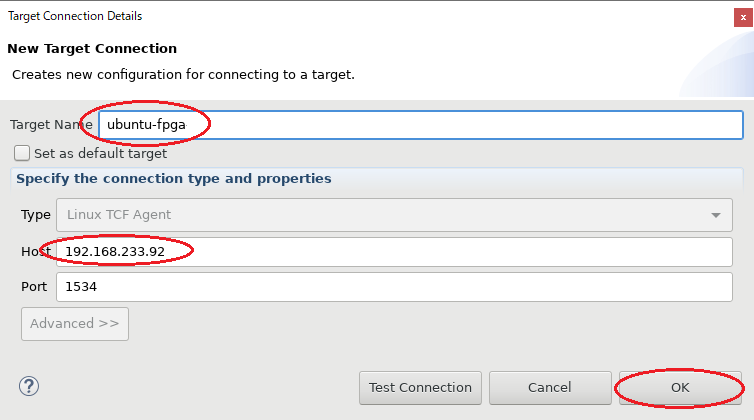
Target Name は適当に。Host には Ultra96/Ultra96-V2 の IP アドレスを指定してください。
Fig.3 Vitis Run Configuration-3
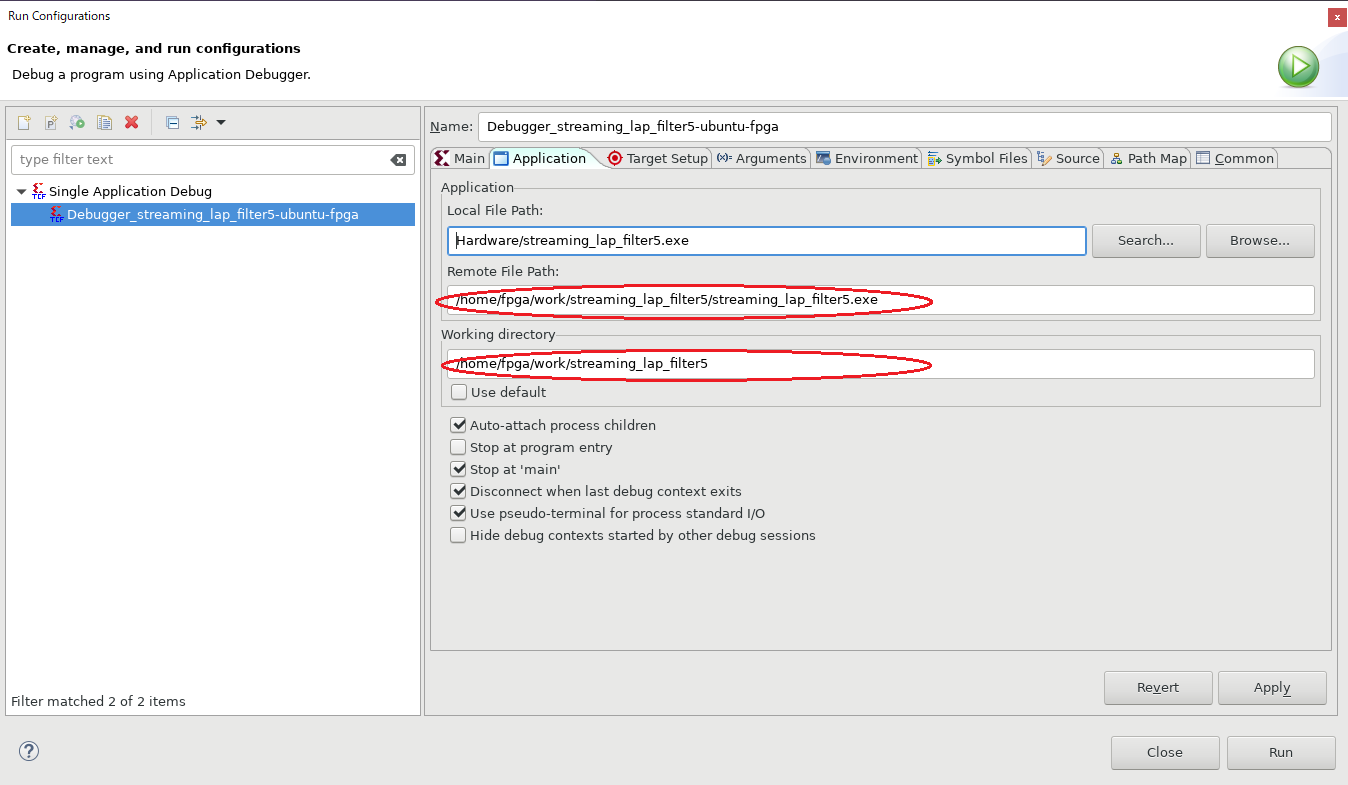
Application タブの Remote File Path と Working directory を設定します。ターゲット上にワーキング用のディレクトリを用意して、そのパスを指定します。
Fig.4 Vitis Run Configuration-4
Vitis での実行
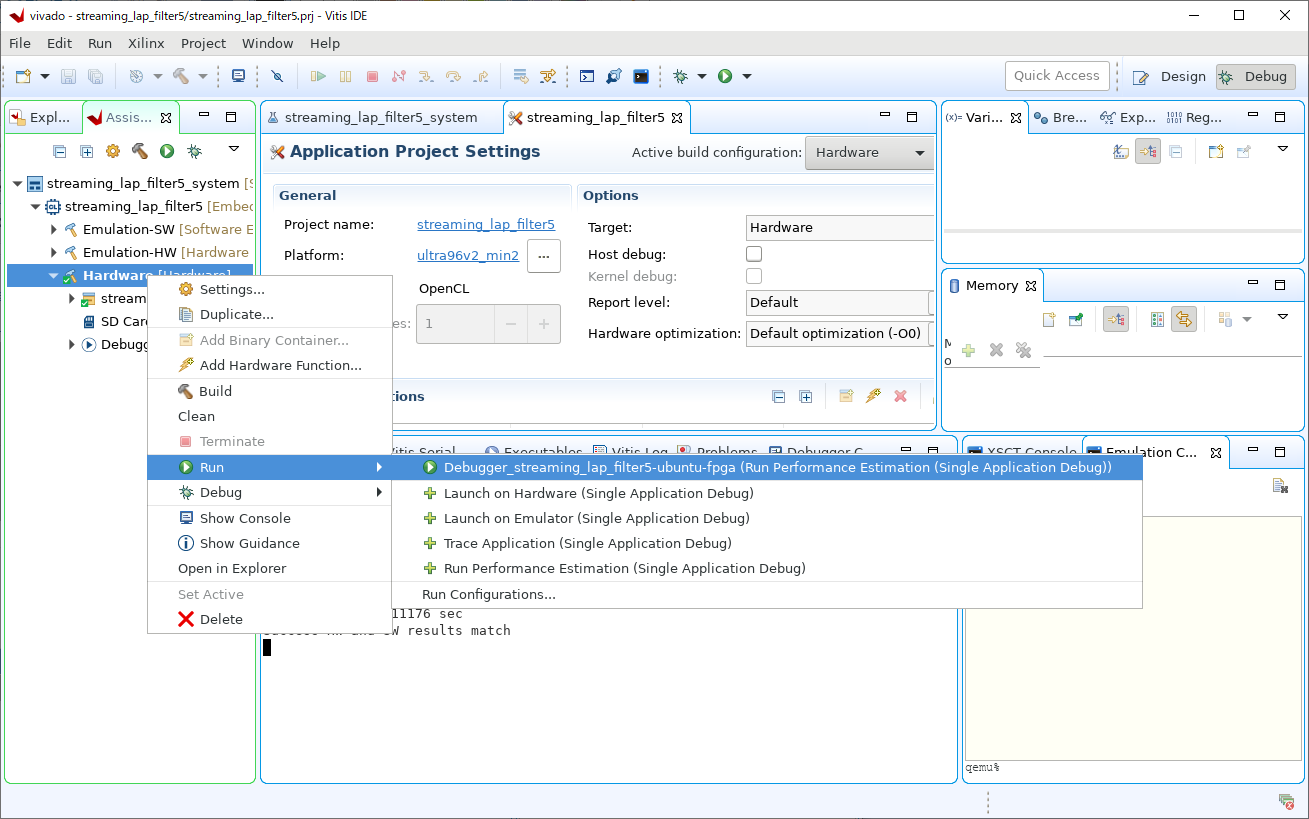
Vitis IDE の Hardware > Run から先ほど設定した Configuration を選んで実行します。
Fig.5 Vitis Run-Start
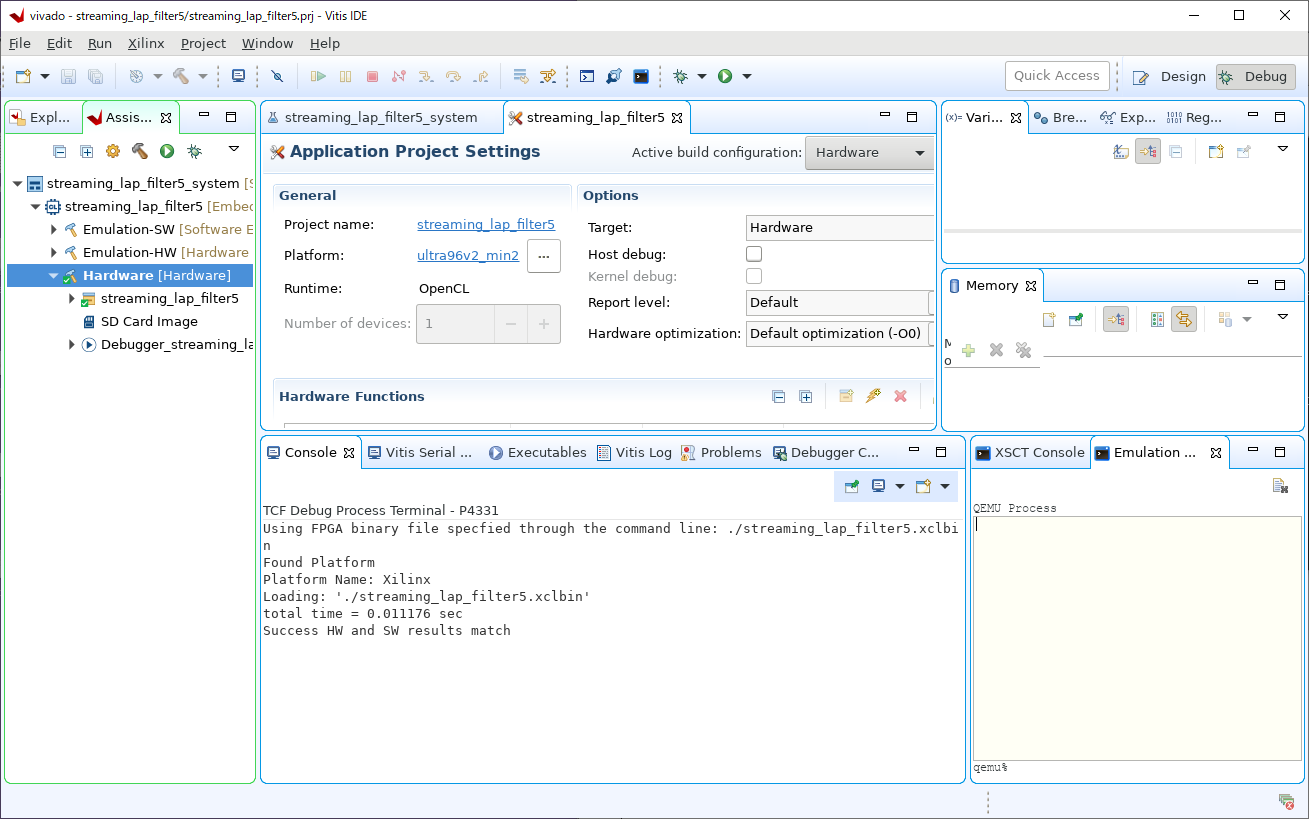
次のように Console に結果が出力されます。ここでは 実践編 で説明したサンプルプログラムの結果を示しています。
Fig.6 Vitis Run-Result
参考
- https://github.com/Xilinx/XRT
- https://www.eclipse.org/tcf/
- https://github.com/ikwzm/ZynqMP-FPGA-Linux
- https://github.com/ikwzm/ZynqMP-FPGA-XRT
- https://github.com/ikwzm/ZynqMP-FPGA-Ubuntu18.04-Ultra96
- https://github.com/ikwzm/ZynqMP-FPGA-XRT-Example-1-Ultra96
- 『Vitis 2019.2 で RTL カーネルを使用してストーミング接続を試す1』
- 『Vitis 2019.2 で RTL カーネルを使用してストーミング接続を試す2』
- 『Vitis 2019.2 で RTL カーネルを使用してストーミング接続を試す3』
- 『Vitis 2019.2 で RTL カーネルを使用してストーミング接続を試す4』
