前回投稿した『KV260 が Linux をブートするまでのシーケンス』では U-Boot のところをさらっと流してしまいましたが、この記事では U-Boot からのブートシーケンスをより詳細に説明します。
bootmenu
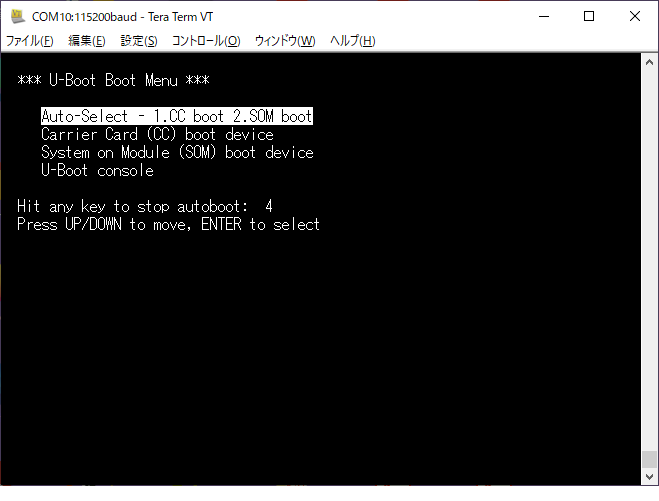
KV260 の QSPI にある U-Boot は正常に起動すると UART に次のようなメニューを表示します。このメニュー表示後5秒間なにも入力が無いと自動的に「Auto-Select - 1.CC boot 2.SOM boot」に移行します。
このメニューは U-Boot の環境変数によって次のように定義されています。(環境変数は U-Boot console から env print コマンドを実行することで確認できます。)
ZynqMP> env print bootmenu_0 bootmenu_1 bootmenu_2 bootmenu_default bootmenu_delay
bootmenu_0=Auto-Select - 1.CC boot 2.SOM boot=run cc_boot || run som_boot
bootmenu_1=Carrier Card (CC) boot device=run cc_boot
bootmenu_2=System on Module (SOM) boot device=run som_boot
bootmenu_default=0
bootmenu_delay=5
ブートメニュー0(デフォルト)では、cc_boot の実行を試みた後、som_boot を実行を試みています。
ブートメニュー1では、Carrier Card(CC) からブートを試みます。具体的には cc_boot の実行を試みます。
ブートメニュー2では、System On Module (SOM) からブートを試みます。具体的には som_boot の実行を試みます。
なお、cc_boot および som_boot はブートに成功すると戻ってきません。
cc_boot と som_boot
cc_boot と som_boot は各々次のように定義されています。
ZynqMP> env print cc_boot som_boot
cc_boot=setenv boot_targets mmc1 && run distro_bootcmd
som_boot=setenv boot_targets mmc0 && run distro_bootcmd
cc_boot は 環境変数 boot_targets に mmc1 をセットして distro_bootcmd の実行を試みます。
som_boot は 環境変数 boot_targets に mmc0 をセットして distro_bootcmd の実行を試みます。
なお、distro_bootcmd はブートに成功すると戻ってきません。
distro_bootcmd
distro_bootcmd は次のように定義されています。
ZynqMP> env print distro_bootcmd
distro_bootcmd=scsi_need_init=; for target in ${boot_targets}; do run bootcmd_${target}; done
もう少し見やすく書式を整えると次のようになります。
distro_bootcmd=
	scsi_need_init=;
	for target in ${boot_targets}; do
		run bootcmd_${target};
	done
cc_boot では 環境変数 boot_targets に mmc1 が設定されているので、bootcmd_mmc1 の実行を試みます。
som_boot では 環境変数 boot_targets に mmc0 が設定されているので、bootcmd_mmc0 の実行を試みます。
bootcmd_mmc0 と bootcmd_mmc1
bootcmd_mmc0 と bootcmd_mmc1 は各々次のように定義されています。
ZynqMP> env print bootcmd_mmc0 bootcmd_mmc1
bootcmd_mmc0=devnum=0; run mmc_boot
bootcmd_mmc1=devnum=1; run mmc_boot
bootcmd_mmc0 では 環境変数 devnum に 0 をセットして mmc_boot の実行を試みます。
bootcmd_mmc1 では 環境変数 devnum に 1 をセットして mmc_boot の実行を試みます。
mmc_boot
mmc_boot は次のように定義されています。
ZynqMP> env print mmc_boot
mmc_boot=if mmc dev ${devnum}; then devtype=mmc; run scan_dev_for_boot_part; fi
もう少し見やすく書式を整えると次のようになります。
mmc_boot=
	if mmc dev ${devnum}; then
		devtype=mmc;
		run scan_dev_for_boot_part;
	fi
まず、mmc コマンドで指定されたデバイスが有効かどうかを判定します。
mmc_boot は mmc コマンドが失敗した場合は、何もせずに戻ります。
mmc_boot は mmc コマンドが成功した場合にのみ 環境変数 devtype に mmc を設定して scan_dev_for_boot_part の実行を試みます。
mmc コマンドの詳細
ZynqMP> help mmc
mmc - MMC sub system

Usage:
mmc info - display info of the current MMC device
mmc read addr blk# cnt
mmc write addr blk# cnt
mmc erase blk# cnt
mmc rescan
mmc part - lists available partition on current mmc device
mmc dev [dev] [part] - show or set current mmc device [partition]
mmc list - lists available devices
mmc hwpartition [args...] - does hardware partitioning
  arguments (sizes in 512-byte blocks):
    [user [enh start cnt] [wrrel {on|off}]] - sets user data area attributes
    [gp1|gp2|gp3|gp4 cnt [enh] [wrrel {on|off}]] - general purpose partition
    [check|set|complete] - mode, complete set partitioning completed
  WARNING: Partitioning is a write-once setting once it is set to complete.
  Power cycling is required to initialize partitions after set to complete.
mmc bootbus dev boot_bus_width reset_boot_bus_width boot_mode
 - Set the BOOT_BUS_WIDTH field of the specified device
mmc bootpart-resize <dev> <boot part size MB> <RPMB part size MB>
 - Change sizes of boot and RPMB partitions of specified device
mmc partconf dev [boot_ack boot_partition partition_access]
 - Show or change the bits of the PARTITION_CONFIG field of the specified device
mmc rst-function dev value
 - Change the RST_n_FUNCTION field of the specified device
   WARNING: This is a write-once field and 0 / 1 / 2 are the only valid values.
mmc setdsr <value> - set DSR register value
KV260 での実行結果
mmc_boot ではサブコマンド dev を実行してデバイスが有効かどうかを判定しています。
KV260 では次のようになりました。
ZynqMP> mmc dev 0
MMC Device 0 not found
no mmc device at slot 0
ZynqMP> mmc dev 1
switch to partitions #0, OK
mmc1 is current device
devnum が 0 の場合は MMC デバイスが見つからずに失敗しています。
devnum が 1 の場合は MMC デバイスが見つかって成功しています。
scan_dev_for_boot_part
scan_dev_for_boot_part は次のように定義されています。
ZynqMP> env print scan_dev_for_boot_part
scan_dev_for_boot_part=part list ${devtype} ${devnum} -bootable devplist; env exists devplist || setenv devplist 1; for distro_bootpart in ${devplist}; do if fstype ${devtype} ${devnum}:${distro_bootpart} bootfstype; then run scan_dev_for_boot; fi; done; setenv devplist
もう少し見やすく書式を整えると次のようになります。
scan_dev_for_boot_part=
	part list ${devtype} ${devnum} -bootable devplist;
	env exists devplist || setenv devplist 1;
	for distro_bootpart in ${devplist}; do
		if fstype ${devtype} ${devnum}:${distro_bootpart} bootfstype; then
			run scan_dev_for_boot;
		fi;
	done;
	setenv devplist
scan_dev_for_boot_part はパーティションを検索してファイルシステムがあるかどうかを検索します。
ファイルシステムを見つかった場合は scan_dev_for_boot の実行を試みます。なお、scan_dev_for_boot はブートに成功すると戻ってきません。
ファイルシステムを見つからなかった場合や scan_dev_for_boot がブートに失敗した場合は 環境変数 devplist を空にして戻ります。
part コマンドの詳細
ZynqMP> help part
part - disk partition related commands

Usage:
part uuid <interface> <dev>:<part>
    - print partition UUID
part uuid <interface> <dev>:<part> <varname>
    - set environment variable to partition UUID
part list <interface> <dev>
    - print a device's partition table
part list <interface> <dev> [flags] <varname>
    - set environment variable to the list of partitions
      flags can be -bootable (list only bootable partitions)
part start <interface> <dev> <part> <varname>
    - set environment variable to the start of the partition (in blocks)
      part can be either partition number or partition name
part size <interface> <dev> <part> <varname>
    - set environment variable to the size of the partition (in blocks)
      part can be either partition number or partition name
part number <interface> <dev> <part> <varname>
    - set environment variable to the partition number using the partition name
      part must be specified as partition name
fstype コマンドの詳細
ZynqMP> help fstype
fstype - Look up a filesystem type

Usage:
fstype <interface> <dev>:<part>
- print filesystem type
fstype <interface> <dev>:<part> <varname>
- set environment variable to filesystem type
KV260 での実行結果
scan_dev_for_boot_part では、まず part list コマンドでパーティションの番号(複数の場合あり)を 環境変数 devplist にセットしています。KV260 では次のようになりました。
ZynqMP> part list mmc 1 -bootable devplist; env print devplist
## Error: "devplist" not defined
devplist の設定に失敗しているところから、どうやら part list コマンドではパーティション番号が得られなかったようです。
ZynqMP> env exists devplist || setenv devplist 1 ; env print devplist
devplist=1
devplist が存在しなかった場合は強制的に devplist に 1 がセットされます。
次に devplist の内容(複数の場合あり)から一つずつとりだして fstype コマンドを実行してファイルシステムが存在するかどうかを調べます。もし fstype コマンドが成功した場合は 環境変数 bootfstype にそのファイルシステムの名前を設定します。KV260 では次のようになりました。
ZynqMP> if fstype mmc 1:1 bootfstype; then env print bootfstype; fi
bootfstype=fat
この例では mmc1 (KV260では SD-Card) のパーティション 1 に FAT ファイルシステムがあることがわかります。
scan_dev_for_boot
scan_dev_for_boot は次のように定義されています。
ZynqMP> env print scan_dev_for_boot
scan_dev_for_boot=echo Scanning ${devtype} ${devnum}:${distro_bootpart}...; for prefix in ${boot_prefixes}; do run scan_dev_for_extlinux; run scan_dev_for_scripts; done;run scan_dev_for_efi;
もう少し見やすく書式を整えると次のようになります。
scan_dev_for_boot=
	echo Scanning ${devtype} ${devnum}:${distro_bootpart}...;
	for prefix in ${boot_prefixes}; do
		run scan_dev_for_extlinux;
		run scan_dev_for_scripts;
	done;
	run scan_dev_for_efi;
scan_dev_for_boot はコンソールにメッセージを出力した後、環境変数 boot_prefixes から prefix を順番に取り出して、scan_dev_for_extlinux コマンドと scan_dev_for_scripts コマンドの実行を順番に試みます。これらのコマンドでブートしなかった場合は scan_dev_for_efi コマンドの実行を試みます。
KV260 では環境変数 boot_prefixes は次のように設定されています。
ZynqMP> env print boot_prefixes
boot_prefixes=/ /boot/
scan_dev_for_extlinux
scan_dev_for_extlinux は次のように定義されています。
ZynqMP> env print scan_dev_for_extlinux
scan_dev_for_extlinux=if test -e ${devtype} ${devnum}:${distro_bootpart} ${prefix}${boot_syslinux_conf}; then echo Found ${prefix}${boot_syslinux_conf}; run boot_extlinux; echo SCRIPT FAILED: continuing...; fi
もう少し見やすく書式を整えると次のようになります。
scan_dev_for_extlinux=
	if test -e ${devtype} ${devnum}:${distro_bootpart} ${prefix}${boot_syslinux_conf}; then
		echo Found ${prefix}${boot_syslinux_conf};
		run boot_extlinux;
		echo SCRIPT FAILED: continuing...;
	fi
scan_dev_for_extlinux コマンドは、環境変数 devtype と devnum で指定されたデバイスの 環境変数 distro_bootpart で指定されたパーティションの 環境変数 prefix で指定されたディレクトリに 環境変数 boot_syslinux_conf に設定されたファイルがあるかどうか調べます。
KV260 では boot_syslinux_conf は次のように設定されています。
ZynqMP> env print boot_syslinux_conf
boot_syslinux_conf=extlinux/extlinux.conf
つまり、指定されたパーティションに /extlinux/extlinux.conf または /boot/extlinux/extlinux.conf があれば boot_extlinux コマンドの実行を試みます。
boot_extlinux
boot_extlinux は次のように定義されています。
ZynqMP> env print boot_extlinux
boot_extlinux=sysboot ${devtype} ${devnum}:${distro_bootpart} any ${scriptaddr} ${prefix}${boot_syslinux_conf}
指定されたパーティションに /extlinux/extlinux.conf または /boot/extlinux/extlinux.conf があれば sysboot コマンドにてブートを試みます。
sysboot コマンドの詳細
ZynqMP> help sysboot
sysboot - command to get and boot from syslinux files

Usage:
sysboot [-p] <interface> <dev[:part]> <ext2|fat|any> [addr] [filename]
    - load and parse syslinux menu file 'filename' from ext2, fat
      or any filesystem on 'dev' on 'interface' to address 'addr'
scan_dev_for_scripts
scan_dev_for_scripts は次のように定義されています。
ZynqMP> env print scan_dev_for_scripts
scan_dev_for_scripts=for script in ${boot_scripts}; do if test -e ${devtype} ${devnum}:${distro_bootpart} ${prefix}${script}; then echo Found U-Boot script ${prefix}${script}; run boot_a_script; echo SCRIPT FAILED: continuing...; fi; done
もう少し見やすく書式を整えると次のようになります。
scan_dev_for_scripts=
	for script in ${boot_scripts}; do
		if test -e ${devtype} ${devnum}:${distro_bootpart} ${prefix}${script}; then
			echo Found U-Boot script ${prefix}${script};
			run boot_a_script;
			echo SCRIPT FAILED: continuing...;
		fi;
	done
scan_dev_for_scripts コマンドは、環境変数 devtype と devnum で指定されたデバイスの 環境変数 distro_bootpart で指定されたパーティションの 環境変数 prefix で指定されたディレクトリに 環境変数 boot_scripts に設定されたファイルがあるかどうか調べます。
KV260 では boot_scripts は次のように設定されています。
ZynqMP> env print boot_scripts
boot_scripts=boot.scr.uimg boot.scr
つまり、指定されたパーティションに /boot.scr.uimg、/boot.scr、/boot/boot.scr.uimg、/boot/boot.scr があるかを順番に調べていき、みつかった場合は boot_a_script コマンドの実行を試みます。
boot_a_script
boot_a_script は次のように定義されています。
ZynqMP> env print boot_a_script
boot_a_script=load ${devtype} ${devnum}:${distro_bootpart} ${scriptaddr} ${prefix}${script}; source ${scriptaddr}
もう少し見やすく書式を整えると次のようになります。
boot_a_script=
	load ${devtype} ${devnum}:${distro_bootpart} ${scriptaddr} ${prefix}${script};
	source ${scriptaddr}
boot_a_script コマンドは、指定されたスクリプトファイルをメモリにロードして実行します。なお、source コマンドにて指定されたスクリプトファイルを実行した結果、ブートに成功すると戻ってきません。
SD-Card に boot.scr がある場合は、前回投稿した『KV260 が Linux をブートするまでのシーケンス』の「・ステージ4 SD Card (セカンダリブートデバイス)」に続きます。
scan_dev_for_efi
scan_dev_for_efi は次のように定義されています。
ZynqMP> env print scan_dev_for_efi
scan_dev_for_efi=setenv efi_fdtfile ${fdtfile}; for prefix in ${efi_dtb_prefixes}; do if test -e ${devtype} ${devnum}:${distro_bootpart} ${prefix}${efi_fdtfile}; then run load_efi_dtb; fi;done;if test -e ${devtype} ${devnum}:${distro_bootpart} efi/boot/bootaa64.efi; then echo Found EFI removable media binary efi/boot/bootaa64.efi; run boot_efi_binary; echo EFI LOAD FAILED: continuing...; fi; setenv efi_fdtfile
もう少し見やすく書式を整えると次のようになります。
scan_dev_for_efi=
	setenv efi_fdtfile ${fdtfile};
	for prefix in ${efi_dtb_prefixes}; do
		if test -e ${devtype} ${devnum}:${distro_bootpart} ${prefix}${efi_fdtfile}; then
			run load_efi_dtb;
		fi;
	done;
	if test -e ${devtype} ${devnum}:${distro_bootpart} efi/boot/bootaa64.efi; then
		echo Found EFI removable media binary efi/boot/bootaa64.efi;
		run boot_efi_binary;
		echo EFI LOAD FAILED: continuing...;
	fi;
	setenv efi_fdtfile
KV260 では fdtfile と efi_dtb_prefixes は次のように設定されています。
ZynqMP> env print fdtfile efi_dtb_prefixes
fdtfile=xilinx/zynqmp-smk-k26-rev1.dtb
efi_dtb_prefixes=/ /dtb/ /dtb/current/
scan_dev_for_efi コマンドはまず指定されたパーティションに対して、/xilinx/zynqmp-smk-k26-rev1.dtb、/dtb/xilinx/zynqmp-smk-k26-rev1.dtb、/dtb/current/xilinx/zynqmp-smk-k26-rev1.dtb が存在するかを順番に調べていき、存在した場合は load_efi_dtb コマンドを実行してデバイスツリーをロードします。
その後、指定されたパーティションに efi/boot/bootaa64.efi が存在した場合は boot_efi_binary コマンドを実行します。
load_efi_dtb
load_efi_dtb は次のように定義されています。
ZynqMP> env print load_efi_dtb
load_efi_dtb=load ${devtype} ${devnum}:${distro_bootpart} ${fdt_addr_r} ${prefix}${efi_fdtfile}
boot_efi_binary
boot_efi_binary は次のように定義されています。
ZynqMP> env print boot_efi_binary
boot_efi_binary=if fdt addr ${fdt_addr_r}; then bootefi bootmgr ${fdt_addr_r};else bootefi bootmgr ${fdtcontroladdr};fi;load ${devtype} ${devnum}:${distro_bootpart} ${kernel_addr_r} efi/boot/bootaa64.efi; if fdt addr ${fdt_addr_r}; then bootefi ${kernel_addr_r} ${fdt_addr_r};else bootefi ${kernel_addr_r} ${fdtcontroladdr};fi
もう少し見やすく書式を整えると次のようになります。
boot_efi_binary=
	if fdt addr ${fdt_addr_r}; then
		bootefi bootmgr ${fdt_addr_r};
	else
		bootefi bootmgr ${fdtcontroladdr};
	fi;
	load ${devtype} ${devnum}:${distro_bootpart} ${kernel_addr_r} efi/boot/bootaa64.efi;
	if fdt addr ${fdt_addr_r}; then
		bootefi ${kernel_addr_r} ${fdt_addr_r};
	else
		bootefi ${kernel_addr_r} ${fdtcontroladdr};
	fi
bootefi コマンドの詳細
ZynqMP> help bootefi
bootefi - Boots an EFI payload from memory

Usage:
bootefi <image address> [fdt address]
  - boot EFI payload stored at address <image address>.
    If specified, the device tree located at <fdt address> gets
    exposed as EFI configuration table.
bootefi bootmgr [fdt address]
  - load and boot EFI payload based on BootOrder/BootXXXX variables.

    If specified, the device tree located at <fdt address> gets
    exposed as EFI configuration table.