KV260 に載っている ZynqMP のブートシーケンスは次の手順で進みます。詳しいことは参考資料「ZynqMPのブートとパワーマネージメント」を参照してください。これは「ZynqMP 勉強会」で @Vengineer さんが発表した資料で、ZynqMP のブートシーケンスが詳しく説明されています。
・ステージ0 (内部ROM)
ZynqMP のステージ0ブートローダーは内部ROMにあります。ステージ0ブートローダーは PMU(Platform Management Unit) が実行します。PMU はシステム全体のリソースのパワーアップ、リセットの制御および監視を担当します。PMU はこのため専用のプロセッサで、実態は MicroBlaze という Xilinx が開発したプロセッサのようです。ステージ0ブートローダーは、プライマリブートデバイスにある BOOT.BIN に含まれるステージ1ブートローダー(FSBL) を内部RAMをロードして Coretex-A53 を起動します。
・ステージ1~3 BOOT.BIN (プライマリブートデバイス)
KV260 のプライマリブートデバイスは SOM にある QSPI に接続されたフラッシュメモリです。このプライマリブートデバイスに BOOT.BIN があります。
より正確には KV260 のプライマリーデバイスには先頭アドレスに Image Selector があります。まずこの Image Selector が内部メモリにロードされて Coretex-A53 が実行します。Image Selector の目的は、同じプライマリーデバイスにある2つ(リカバリーを含めると3つ)の BOOT.BIN を選択することです。詳細は『KV260 が Linux をブートするまでのシーケンス (Image Selector編)』を参照してください。
Image Selector によって選択された BOOT.BIN には FSBL(First Stage Boot Loader)、PMUFW(Platform Management Unit FirmWare)、BL31(ARM Trusted Firmware Boot Loader Stage 3-1)、U-Boot が含まれています。
・ステージ1 (FSBL - First Stage Boot Loader)
ステージ1ブートローダー(FSBL) は内部RAMにロードされます。ステージ1ブートローダー(FSBL)は Coretex-A53 が実行します。ステージ1ブートローダー(FSBL) は次の処理を行います。
- PS(Processing System) の初期設定
- BOOT.BIN に含まれる Bitstream を PL(Programmable Logic) へコンフィギュレーション
(ただし KV260 の QSPI にある BOOT.BIN には Bitstream は含まれていないため、このステップは無い模様) - BOOT.BIN に含まれるステージ2ブートローダー(BL31)を SDRAM にロード
- BOOT.BIN に含まれるステージ3ブートローダー(U-Boot)を SDRAM にロード
- BOOT.BIN に含まれるPMUFW(Platform Manager Unit Firmware)を PMU の RAM にロード
- ステージ2ブートローダー(BL31)に制御を移す
・ステージ2 (BL31 - ARM Trusted Firmware Boot Loader Stage 3-1)
ステージ2ブートローダー(BL31) は SDRAM にロードされます。BL31 は ARM が提供している ATF(ARM Trusted Firmware) の EL3 Runtime Firmware です。ATF に関しては次の URL を参照してください。
ステージ2ブートローダー(BL31)は Coretex-A53 が実行します。ステージ2ブートローダー(BL31)は自分自身を初期化してステージ3ブートローダー(U-Boot)に制御を移した後でも RAM に常駐して各種サービスを提供します。
・ステージ3 (U-Boot)
ステージ3ブートローダー(U-Boot)はファイルシステムを使えたり、スクリプトや環境変数などが使えるので、その設定にしたがって、Linux のカーネルイメージ、Device Tree、場合によってはルートファイルシステムを SDRAMに ロードします。その後、Linuxカーネルイメージに制御を移します。
KV260 の QSPI にある U-Boot は正常に起動すると UART に次のようなメニューを表示します。このメニュー表示後5秒間なにも入力が無いと自動的に「Auto-Select - 1.CC boot 2.SOM boot」に移行します。
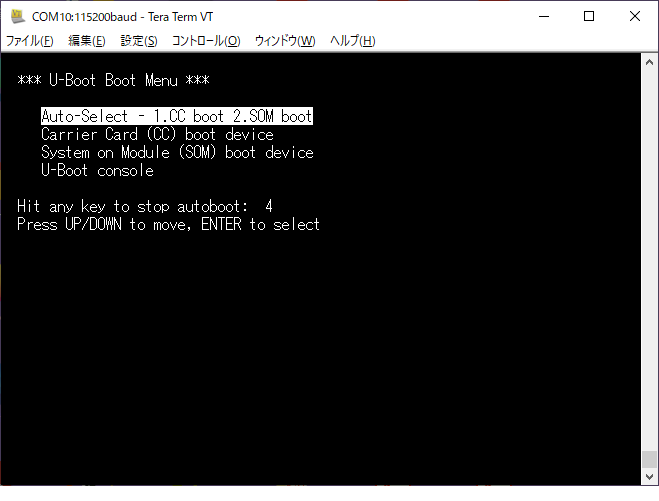
Auto-Select はセカンダリブートデバイス(KV260の場合は SD-Card)にある boot.scr を呼び出します。
ステージ3ブートローダー(U-Boot)によるブートシーケンスは『KV260 が Linux をブートするまでのシーケンス (U-Boot編)』でもう少し詳細に説明しています。
・ステージ4 SD Card (セカンダリブートデバイス)
KV260 のセカンダリーブートデバイスは SD-Card です。
boot.scr
U-Boot はセカンダリーブートデバイス(KV260の場合は SD-Card)にある boot.scr を呼び出します。
boot.scr は u-boot 専用のスクリプトファイルです。これは一見バイナリファイルに見えますが、実は Petalinux などが生成した boot.scr の場合は特にエンコードされていないので、cat で中を見ることができます。なお、boot.scr の内容はディストリビューションによって異なります。ここでは「UltraZed/Ultra96/Ultra96-V2/KV260 向け Debian GNU/Linux (v2021.1版) ブートイメージの提供」 で紹介した KV260 用 boot.scr について説明します。
fpga@debian-fpga:/mnt/boot$ file boot.scr
boot.scr: u-boot legacy uImage, Boot script, Linux/ARM, Script File (Not compressed), 2530 bytes, Tue Apr  5 23:00:00 2011, Load Address: 0x00000000, Entry Point: 0x00000000, Header CRC: 0x5C38692B, Data CRC: 0x85779C72
fpga@debian-fpga:~$ cat /mnt/boot/boot.scr
'V\8i+M・       窈rBoot script  レ# This is a boot script for U-Boot
# Generate boot.scr:
# mkimage -c none -A arm -T script -d boot.cmd.default boot.scr
#
################


for boot_target in ${boot_targets};
do
        echo "Trying to load boot images from ${boot_target}"
        if test "${boot_target}" = "jtag" ; then
                booti 0x00200000 0x04000000 0x00100000
        fi
        if test "${boot_target}" = "mmc0" || test "${boot_target}" = "mmc1" ; then
                if test -e ${devtype} ${devnum}:${distro_bootpart} /uEnv.txt; then
                        fatload ${devtype} ${devnum}:${distro_bootpart} 0x00200000 uEnv.txt;
                        echo "Importing environment(uEnv.txt) from ${boot_target}..."
                        env import -t 0x00200000 $filesize
                        if test -n $uenvcmd; then
                                echo "Running uenvcmd ...";
                                run uenvcmd;
                        fi
                fi
                if test -e ${devtype} ${devnum}:${distro_bootpart} /image.ub; then
                        fatload ${devtype} ${devnum}:${distro_bootpart} 0x10000000 image.ub;
                        bootm 0x10000000;
                fi
                if test -e ${devtype} ${devnum}:${distro_bootpart} /Image; then
                        fatload ${devtype} ${devnum}:${distro_bootpart} 0x00200000 Image;;
                fi
                if test -e ${devtype} ${devnum}:${distro_bootpart} /system.dtb; then
                        fatload ${devtype} ${devnum}:${distro_bootpart} 0x00100000 system.dtb;
                fi
                if test -e ${devtype} ${devnum}:${distro_bootpart} /ramdisk.cpio.gz.u-boot && test "${skip_tinyramdisk}" != "yes"; then
                        fatload ${devtype} ${devnum}:${distro_bootpart} 0x04000000 ramdisk.cpio.gz.u-boot;
                        booti 0x00200000 0x04000000 0x00100000
                fi
                if test -e ${devtype} ${devnum}:${distro_bootpart} /rootfs.cpio.gz.u-boot && test "${skip_ramdisk}" != "yes"; then
                        fatload ${devtype} ${devnum}:${distro_bootpart} 0x04000000 rootfs.cpio.gz.u-boot;
                        booti 0x00200000 0x04000000 0x00100000
                fi
                booti 0x00200000 - 0x00100000
        fi
        if test "${boot_target}" = "xspi0" || test "${boot_target}" = "qspi" || test "${boot_target}" = "qspi0"; then
                sf probe 0 0 0;
                sf read 0x10000000 0xF40000 0x6400000
                bootm 0x10000000;
                echo "Booting using Fit image failed"

                sf read 0x00200000 0xF00000 0x1D00000
                sf read 0x04000000 0x4000000 0x4000000
                booti 0x00200000 0x04000000 0x00100000;
                echo "Booting using Separate images failed"
        fi
        if test "${boot_target}" = "nand" || test "${boot_target}" = "nand0"; then
                nand info;
                nand read 0x10000000 0x4180000 0x6400000
                bootm 0x10000000;
                echo "Booting using Fit image failed"

                nand read 0x00200000 0x4100000 0x3200000
                nand read 0x04000000 0x7800000 0x3200000
                booti 0x00200000 0x04000000 0x00100000;
                echo "Booting using Separate images failed"
        fi
done
uEnv.txt
前節で紹介した boot.scr は、セカンダリーブートデバイスが SD-Card だった場合、まずブートパーティションに uEnv.txt があるかどうかチェックします。uEnv.txt は環境変数を設定するためのファイルです。もし uEnv.txt があった場合は、その内容を読み込んで環境変数を設定します。
uEnv.txt に環境変数 uenvmd が定義されていた場合はそれを実行します。
例えば次のような uEnv.txt があった場合、SD-Card にある image-5.10.0-xlnx-v2021.1-zynqmp-fpga を Linux Kernel Image として、また devicetree-5.10.0-xlnx-v2021.1-zynqmp-fpga-kv260-revB.dtb を Device Tree Blob として、/dev/mmcblk1p2 をルートファイルシステムとして Linux をブートします。
########################################################################
# Linux Kernel Files
#  * linux_kernel_image : Linux Kernel Image File Name
#  * linux_fdt_image    : Linux Device Tree Blob File Name
########################################################################
linux_kernel_image=image-5.10.0-xlnx-v2021.1-zynqmp-fpga
linux_fdt_image=devicetree-5.10.0-xlnx-v2021.1-zynqmp-fpga-kv260-revB.dtb

########################################################################
# Linux Boot Argments
#  * linux_boot_args_console : ex) console=tty1
#                                  console=ttyPS1,115200
#  * linux_boot_args_rootfs  : ex) root=/dev/mmcblk1p2 rw rootwait
#  * linux_boot_args_systemd : ex) systemd.unit=graphical.target
#                                  systemd.unit=multi-user.target
#  * linux_boot_args_cpuidle : ex) cpuidle.off=1
#  * linux_boot_args_cma     : ex) cma=256M
#  * linux_boot_args_uio     : ex) uio=uio_pdrv_genirq.of_id=generic-uio
#  * linux_boot_args_other   :
########################################################################
linux_boot_args_console=console=ttyPS1,115200
linux_boot_args_rootfs=root=/dev/mmcblk1p2 rw rootwait
linux_boot_args_systemd=systemd.unit=multi-user.target
linux_boot_args_cpuidle=cpuidle.off=1
linux_boot_args_cma=1000M
linux_boot_args_uio=uio_pdrv_genirq.of_id=generic-uio
linux_boot_args_other=

########################################################################
# uenvcmd : During sdboot, if uenvcmd is set, uenvcmd will be executed.
########################################################################
linux_img_load_cmd=fatload ${devtype} ${devnum}:${distro_bootpart} 0x00200000 ${linux_kernel_image}
linux_fdt_load_cmd=fatload ${devtype} ${devnum}:${distro_bootpart} 0x00100000 ${linux_fdt_image}
linux_load_cmd=env run linux_img_load_cmd && env run linux_fdt_load_cmd
linux_boot_cmd=booti 0x00200000 - 0x00100000
linux_args_cmd=if env exists linux_boot_args; then; setenv bootargs ${linux_boot_args}; else; setenv bootargs ${linux_boot_args_console} ${linux_boot_args_rootfs} ${linux_boot_args_systemd} ${linux_boot_args_cpuidle} ${linux_boot_args_cma} ${linux_boot_args_uio} ${linux_boot_args_other}; fi
uenvcmd=env run linux_args_cmd && env run linux_load_cmd && env run linux_boot_cmd
image.ub
uEnv.txt に uenvcmd が定義されていなかった場合、boot.scr は ブートパーティションに image.ub があるかチェックします。image.ub は Linux Kernel や Device Tree Blob をまとめた u-boot のブートイメージです。もし image.ub があれば、それをロードして実行します。
Image
image.ub が無かった場合、boot.scr はブートパーティションに Image があるかチェックします。Image は Linux Kernel のイメージです。Image があれば、それをロードします。
system.dtb
image.ub が無かった場合、boot.scr はブートパーティションに system.dtb があるかチェックします。system.dtb は Linux Kernel をブートする際のデバイスツリーです。system.dtb があれば、それをロードします。
ramdisk.cpio.gz.u-boot or rootfs.cpio.gz.u-boot
image.ub が無かった場合、boot.scr はブートパーティションに ramdisk.cpio.gz.u-boot または rootfs.cpio.gz.u-boot があるかチェックします。ramdisk.cpio.gz.u-boot および rootfs.cpio.gz.u-boot は Linux のルートファイルシステムです。ramdisk.cpio.gz.u-boot または rootfs.cpio.gz.u-boot があればそれをロードします。そして 前節、前前節でロードした Image と system.dtb をブートします。
ramdisk.cpio.gz.u-boot および rootfs.cpio.gz.u-boot が無かった場合は、bootargs で設定された root パラメーターにしたがってルートファイルシステムを設定します。例えばこの記事で紹介した uEnv.txt だと root=/dev/mmcblk1p2 rw rootwait なので SD-Card の第二パーティションをルートファイルシステムとしてマウントします。
参考
- 「ZynqMPのブートとパワーマネージメント」 @Vengineer ZynqMP勉強会資料(2016/2/20)
- 「UltraZed/Ultra96/Ultra96-V2/KV260 向け Debian GNU/Linux (v2021.1版) ブートイメージの提供」@Qiita
- 「Ultra96 向け Debian GNU/Linux (v2018.2版) の構築(Boot Loader編)」@Qiita
- 「Kria KV260 ビジョン AI スターターキット ユーザーガイド UG1089 (v1.1) 2022年3月16日」
- 「Zynq UltraScale+ MPSoC Technical Reference Manual, UG1085(v1.7) December 22,2017」
- 『KV260 が Linux をブートするまでのシーケンス (U-Boot編)』@Qiita
- 『KV260 が Linux をブートするまでのシーケンス (Image Selector編)』@Qiita
- 『KV260 の QSPI フラッシュメモリをのぞいてみる』@Qiita
- 『KV260 の ブートファームウェアを更新』@Qiita