Hexo は静的ブログとしてデプロイできてとても便利です。
ですが個人的な日記などを人様に公開したくない。だけどブログ記事をローカルに持つのは嫌。という人もいるかと思います。
Github にデプロイすると静的ファイルとしてデプロイできますが、認証機能などサーバー側の機能は使えません。そこで Heroku にデプロイし、動的サーバーとして起動することで Hexo ブログに HTTP の Basic 認証機能を追加することができます。
この記事では Heroku に Basic 認証つきの Hexo ブログをデプロイする方法を紹介します。
Basic 認証を有効にする方法
必要な環境 : Node.js
Hexo のインストール
$ npm install hexo-cli -g
ブログ作成と起動確認
$ hexo init blog
$ cd blog
$ npm install
$ hexo server
ブラウザで http://localhost:4000/ にアクセスすると Hexo ブログが起動していることを確認できます。
Basic 認証機能の追加
basic-auth-connect という npm を使わせていただきます。
$ npm install basic-auth-connect --save
次に basic 認証の実装をします。
$ mkdir scripts
$ vi scripts/index.js
以下コードを貼り付けます。
var basicAuth = require('basic-auth-connect');

hexo.extend.filter.register('server_middleware', function(app) {
  app.use(basicAuth(function(user, pass) {
    return 'hoge' == user && 'fuga' == pass;
  }));
});
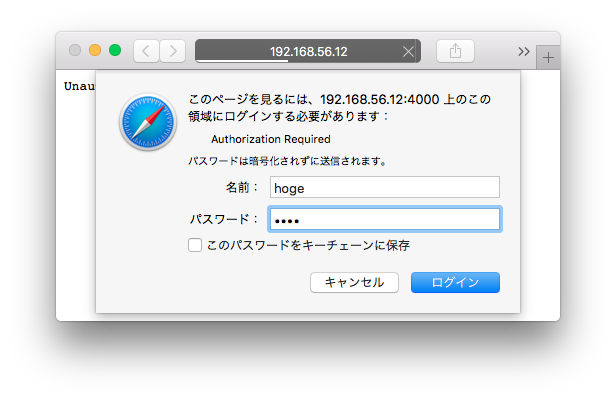
hexo を起動しなおしてブラウザを更新すると Basic 認証が有効になります。
ユーザ名 : hoge
バスワード : fuga
を入力すると認証成功してブログが見えるようになります。
Heroku に deploy する
必要な環境 : Git, Heroku Toolbet
あらかじめインストールしておいてください。
Heroku Toolbet は以下からインストールできます。
https://toolbelt.heroku.com/
Procfile の作成
Heroku 起動時に実行するコマンドを登録します。
$ cd blog    #=> 上記ブログをインストールしたディレクトリ
$ vi Procfile
以下を貼り付けます。
web: hexo server -p $PORT
git commit します
$ git init
$ git add .
$ git commit -m "First commit"
ブログ用リボジトリを Heroku に作成します
今回は hoge-blog-20160210 という名前のリポジトリを作成します。
$ heroku login
Enter your Heroku credentials.
Email: ikesato@xxx.xxx
Password (typing will be hidden):
Logged in as ikesato@xxx.xxx
$ heroku apps:create hoge-blog-20160210
Creating hoge-blog-20160210... done, stack is cedar-14
https://hoge-blog-20160210.herokuapp.com/ | https://git.heroku.com/hoge-blog-20160210.git
$ heroku git:remote -a hoge-blog-20160210
set git remote heroku to https://git.heroku.com/hoge-blog-20160210.git
Heroku にデプロイ
$ git push -u heroku master
Counting objects: 109, done.
Delta compression using up to 3 threads.
Compressing objects: 100% (97/97), done.
Writing objects: 100% (109/109), 520.82 KiB | 0 bytes/s, done.
Total 109 (delta 1), reused 0 (delta 0)
remote: Compressing source files... done.
remote: Building source:
remote:
remote: -----> Node.js app detected
remote:
...
remote: -----> Launching...
remote:        Released v3
remote:        https://hoge-blog-20160210.herokuapp.com/ deployed to Heroku
remote:
remote: Verifying deploy.... done.
To https://git.heroku.com/hoge-blog-20160210.git
 * [new branch]      master -> master
Branch master set up to track remote branch master from heroku.
ブラウザで https://hoge-blog-20160210.herokuapp.com/ を見ると Basic 認証のかかったブログが完成です。

この記事を書いた時のバージョン
Node.js: 5.6.0
hexo-cli: 0.2.1
heroku-toolbelt: 3.42.33