はじめに
今回はUICollectionViewでInstagramのプロフィールっぽいUIをコードだけで実装してみる。
という内容です
この記事が誰かの役に立てば幸いです
ただただSwift初心者がUIを真似して作っただけなので、何かと至らない点があるかと思いますが、
コードの書き方、間違い等、お気づきのところあれば是非アドバイスくださると助かります!!
書き始めたの3ヶ月前、、ピエンパオンが止まりません
完成形
[めっちゃ起業家に憧れるインスタグラマー]
対象読者
・ iOSアプリ開発初心者の方
・ UICollectionViewの使い方を知りたい方
・ StoryBoardを使用せずに開発してみたい方
・ InstagramのUIが好きな方
開発環境
・ Version 11.3 (11C29)
・ Swift 5
完成版 Github
以下にソースコードを載せておきます
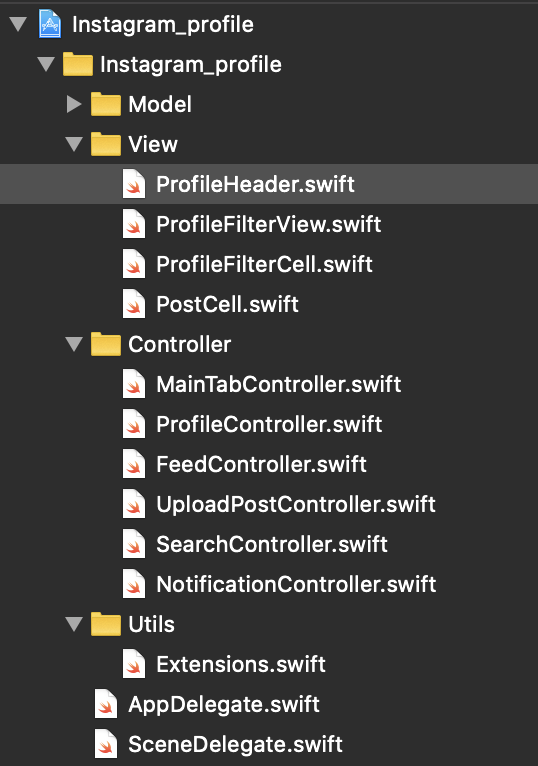
ファイル構成
今回、データの取得等の通信は行わないためView、Controllerフォルダ内に新しいファイルを追加していきます
Utils > Extensions.swiftではLayout関連の処理を簡素化するための関数を入れていますが、
こちらの記事では詳細を記述しないので、Githubよりコピペしてくださると助かります
さて、実装に移りましょう
実装の手順
1、2に関しては、TabBarが必要なければスキップしてください
- 利用するcontrollerファイルの作成
- UITabBarControllerを用いて、TabBarと表示するControllerの決定
- SceneDelegate.swiftにて、起動時に表示するControllerの決定
- Viewフォルダにて、ProfileHeaderCellの作成
- Viewフォルダにて、FilterViewの作成
- Viewフォルダにて、投稿写真表示用のPostCellの作成
- 合体 and 完成!!
1.利用するControllerファイルの作成
ここでは、2で実装するTabBarと連携するためのControllerファイルを作成しましょう
Instagramでは表示するタブアイコンが5つありますので、5つのファイルをControllerフォルダ直下に作成します
import UIKit

class ProfileController: UICollectionViewController{

  override func viewDidLoad() {
    super.viewDidLoad()

  }

}
その他の4ファイルについては以下で結構です
import UIKit

class FeedController: UIViewController{

  override func viewDidLoad() {
    super.viewDidLoad()

    // navigationBarに表示したい文字列を入れましょう
    navigation.item = "投稿"
  }

}
2.UITabBarControllerを用いて、TabBarと表示するControllerの決定
1にて作成したファイルをTabBarと連携させるために、controllerフォルダ直下にMainTabController.swiftを作成します
import UIKit

class MainTabController: UITabBarController{

    // MARK: - Lifecycle

    override func viewDidLoad() {
        super.viewDidLoad()

        configureUI()
        configureViewControllers()
    }

    // MARK: - Helpers

    func configureUI(){
        view.backgroundColor = .white
        tabBar.tintColor = .black
    }

    func configureViewControllers(){

        let feed = FeedController()
        let nav1 = templateNavigationController(image: UIImage(systemName: "house"), rootViewController: feed)

        let search = SearchController()
        let nav2 = templateNavigationController(image: UIImage(systemName: "magnifyingglass"), rootViewController: search)

        let upload = UploadPostController()
        let nav3 = templateNavigationController(image: UIImage(systemName: "plus.app"), rootViewController: upload)

        let notification = NotificationController()
        let nav4 = templateNavigationController(image: UIImage(systemName: "heart"), rootViewController: notification)
        // 2件通知きてるかのように表示
        nav4.tabBarItem.selectedImage = UIImage(systemName: "heart.fill")
        nav4.tabBarItem.badgeValue = "2"

        let profile = ProfileController(collectionViewLayout: UICollectionViewFlowLayout())
        let nav5 = templateNavigationController(image: UIImage(systemName: "person"), rootViewController: profile)

        // tabバーに配置するControllerを決定
        viewControllers = [nav1, nav2, nav3, nav4, nav5]

        // profileControllerを初期表示
        selectedIndex = 4
    }

    // 任意のrootViewController、tabIconイメージを設定する関数, configureViewControllers内で使用
    func templateNavigationController(image: UIImage?, rootViewController: UIViewController) -> UINavigationController{
        let nav = UINavigationController(rootViewController: rootViewController)
        nav.tabBarItem.image = image
        nav.navigationBar.tintColor = .white
        return nav
    }
}
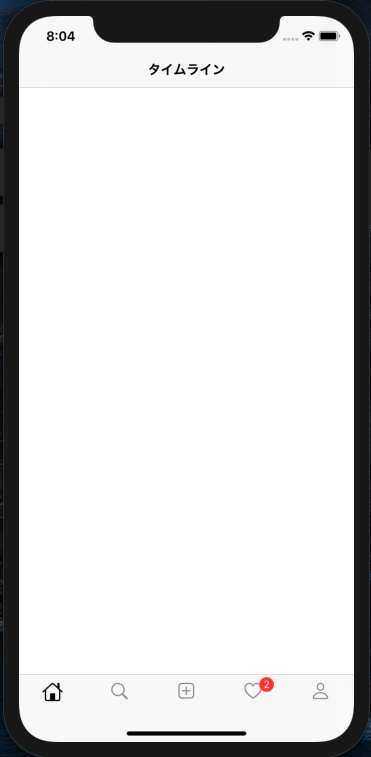
3.SceneDelegate.swiftにて、起動時に表示するControllerの決定
さて、SceneDelegate.swiftを編集して、MainTabControllerを起動時に表示するように設定しましょう
class SceneDelegate: UIResponder, UIWindowSceneDelegate {

  // 省略

    func scene(_ scene: UIScene, willConnectTo session: UISceneSession, options connectionOptions: UIScene.ConnectionOptions) {
        guard let scene = scene as? UIWindowScene else { return }
        window = UIWindow(windowScene: scene)
        window?.rootViewController = MainTabController()
        window?.makeKeyAndVisible()
    }

  // 省略
}
こちら設定後Simulatorを立ち上げると以下のように表示されれば完璧です
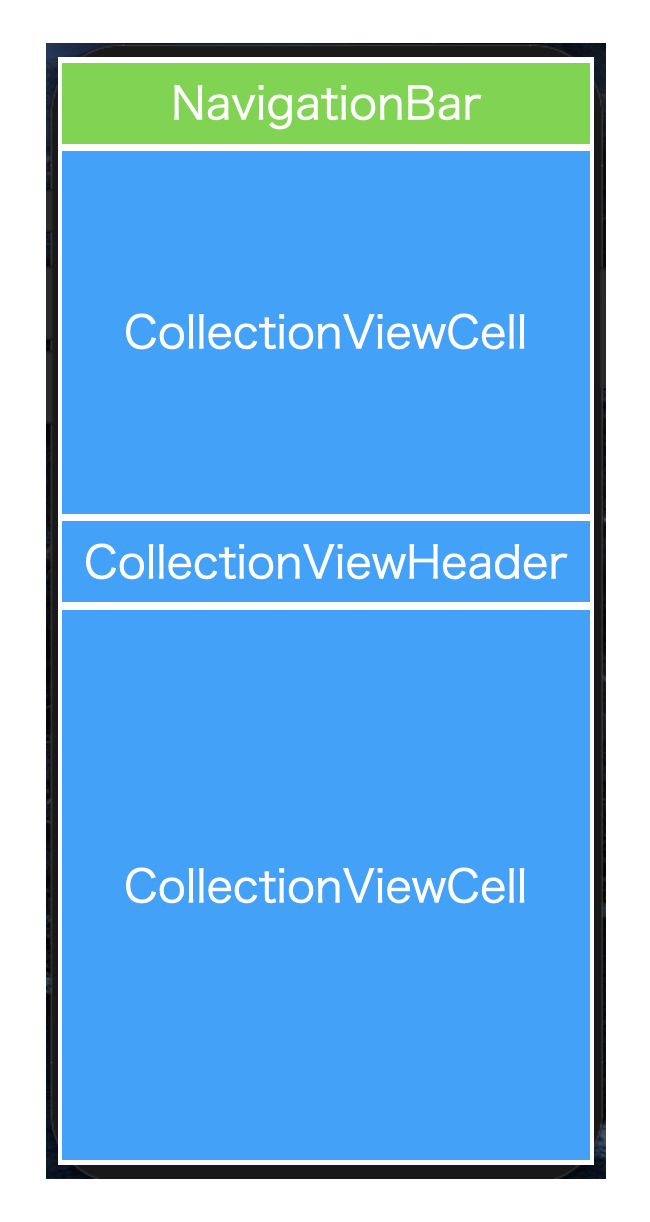
4.Viewフォルダにて、ProfileHeaderCellの作成
次に、ProfileControllerに適用するViewの作成に入ります
以下のような形式で作っていきますが、まずここでプロフィール概要部分のProfileHeaderCellを作りましょう
View直下にProfileHeader.swiftをファイルを作成します
import UIKit

// ハリボテなので無くても良い
protocol ProfileHeaderDelegate: class {
    func handleEditProfile(_ header: ProfileHeader)
}

class ProfileHeader: UICollectionViewCell{

    // MARK: - Properties

    // ハリボテなので無くても良い
    weak var delegate: ProfileHeaderDelegate?

    private let profileImageView: UIImageView = {
        let iv = UIImageView()
        iv.contentMode = .scaleAspectFit
        iv.clipsToBounds = true
        iv.image = UIImage(named: "適当に写真入れてみてください")
        iv.layer.borderColor = UIColor.black.cgColor
        return iv
    }()

    private lazy var postCountButton = makeStatsButton(withNumber: "12")
    private lazy var followingCountButton = makeStatsButton(withNumber: "320")
    private lazy var followerCountButton = makeStatsButton(withNumber: "1000")

    private lazy var postCountLabel = makeStatsTitle(withTitle: "投稿")
    private lazy var followingCountLabel = makeStatsTitle(withTitle: "フォロー中")
    private lazy var followerCountLabel = makeStatsTitle(withTitle: "フォロワー")

    private let fullnameLabel: UILabel = {
        let label = UILabel()
        label.text = "オナマエー"
        label.font = UIFont.boldSystemFont(ofSize: 14)
        return label
    }()

    private let bioLabel: UILabel = {
        let label = UILabel()
        label.text = "これはInstagramのプロフィールのUIをひたすらに真似する試みです。そうです。ただただ真似るだけです。"
        label.font = UIFont.systemFont(ofSize: 14)
        label.numberOfLines = 3
        return label
    }()

    private let editProfileButton: UIButton = {
        let button = UIButton(type: .system)
        button.setTitle("プロフィールを編集", for: .normal)
        button.setTitleColor(.black, for: .normal)
        button.addTarget(self, action: #selector(handleEditProfileButtonTapped), for: .touchUpInside)
        button.titleLabel?.font = UIFont.boldSystemFont(ofSize: 14)
        button.layer.borderColor = UIColor.lightGray.cgColor
        button.layer.borderWidth = 1
        button.layer.cornerRadius = 4
        button.backgroundColor = .white
        return button
    }()

    private let storiesPlusButton: UIButton = {
        let button = UIButton(type: .system)
        button.setImage(UIImage(systemName: "plus"), for: .normal)
        button.tintColor = .black
        button.backgroundColor = .clear
        button.layer.borderColor = UIColor.lightGray.cgColor
        button.layer.borderWidth = 0.75
        return button
    }()

    private let storiesPlusLabel: UILabel = {
        let label = UILabel()
        label.text = "新規"
        label.textAlignment = .center
        label.font = UIFont.systemFont(ofSize: 10)
        return label
    }()

    // MARK: - Lifecycle

    override init(frame: CGRect) {
        super.init(frame: frame)

        backgroundColor = .systemGroupedBackground

        let postCountStack = makeStatsStackView(button: postCountButton, label: postCountLabel)
        let followingCountStack = makeStatsStackView(button: followingCountButton, label: followingCountLabel)
        let followerCountStack = makeStatsStackView(button: followerCountButton, label: followerCountLabel)

        let infoStack = UIStackView(arrangedSubviews: [postCountStack, followingCountStack, followerCountStack])
        infoStack.axis = .horizontal
        infoStack.alignment = .center
        infoStack.distribution = .fillEqually

        addSubview(profileImageView)
        profileImageView.anchor(top: safeAreaLayoutGuide.topAnchor, left: leftAnchor, paddingTop: 16, paddingLeft: 16)
        profileImageView.setDimensions(width: 96, height: 96)
        profileImageView.layer.cornerRadius = 96 / 2

        addSubview(infoStack)
        infoStack.centerY(inView: profileImageView)
        infoStack.anchor(left: profileImageView.rightAnchor, right: rightAnchor, paddingLeft: 16, paddingRight: 32)

        addSubview(fullnameLabel)
        fullnameLabel.anchor(top: profileImageView.bottomAnchor, left: leftAnchor, right: rightAnchor, paddingTop: 16, paddingLeft: 16, paddingRight: 16)

        addSubview(bioLabel)
        bioLabel.anchor(top: fullnameLabel.bottomAnchor, left: leftAnchor, right: rightAnchor, paddingTop: 4, paddingLeft: 16, paddingRight: 16)

        addSubview(editProfileButton)
        editProfileButton.anchor(top: bioLabel.bottomAnchor, left: leftAnchor, right: rightAnchor, paddingTop: 16, paddingLeft: 16, paddingRight: 16 )

        addSubview(storiesPlusButton)
        storiesPlusButton.anchor(top: editProfileButton.bottomAnchor, left: leftAnchor, paddingTop: 16, paddingLeft: 16)
        storiesPlusButton.setDimensions(width: 64, height: 64)
        storiesPlusButton.layer.cornerRadius = 64 / 2

        addSubview(storiesPlusLabel)
        storiesPlusLabel.centerX(inView: storiesPlusButton)
        storiesPlusLabel.anchor(top: storiesPlusButton.bottomAnchor, paddingTop: 4)
    }


    required init?(coder: NSCoder) {
        fatalError("init(coder:) has not been implemented")
    }

    // MARK: - Selectors

    // ハリボテなので無くても良い
    @objc func handleEditProfileButtonTapped(){
        delegate?.handleEditProfile(self)
    }


    // MARK: - Helpers

    // ボタンと詳細数を縦並びに揃えるStackView作成用
    fileprivate func makeStatsStackView(button: UIButton, label: UILabel) -> UIStackView{
        let stack = UIStackView(arrangedSubviews: [button, label])
        stack.axis = .vertical
        stack.alignment = .center
        stack.setDimensions(width: 160, height: 40)
        return stack
    }

    // 投稿数やフォロワー等の表示ボタン作成用
    private func makeStatsButton(withNumber number: String) -> UIButton{
        let button = UIButton(type: .system)
        button.setTitle(number, for: .normal)
        button.setTitleColor(.black, for: .normal)
        button.titleLabel?.font = UIFont.boldSystemFont(ofSize: 16)
        return button
    }
    // 投稿数やフォロワー等の詳細数表示ラベル作成用
    private func makeStatsTitle(withTitle title: String) -> UILabel{
        let label = UILabel()
        label.text = title
        label.textAlignment = .center
        label.font = UIFont.systemFont(ofSize: 14)
        return label
    }
}
こちらをProfileControllerに適用してみましょう(5, 6では一旦すっ飛ばします)
import UIKit

private let profileHeaderCell = "ProfileHeaderCell"

class ProfileController: UICollectionViewController{

    // MARK: - Lifecycle

    override func viewDidLoad() {
        super.viewDidLoad()

        configureUI()
    }

    // MARK: - Selectors

    // お飾り
    @objc func handleRightButtonTapped(){
        print("DEBUG: you pressed the button..")
    }

    @objc func handleRefresh(){
        // データがないので何もしません
        collectionView.refreshControl?.beginRefreshing()
        collectionView.refreshControl?.endRefreshing()
    }

    // MARK: - Helpers

    // 全体UIの設定
    func configureUI(){
        view.backgroundColor = .systemGroupedBackground

        configureNavigationBar()
        configureCollectionView()

        // 下にスワイプしてリロードしてる風設定
        let refreshControl = UIRefreshControl()
        refreshControl.addTarget(self, action: #selector(handleRefresh), for: .valueChanged)
        collectionView.refreshControl = refreshControl
    }

    // navigationBarに関する諸設定
    func configureNavigationBar(){
        navigationController?.navigationBar.tintColor = .black
        navigationController?.navigationBar.barTintColor = .systemGroupedBackground
        navigationController?.navigationBar.isTranslucent = false
        navigationController?.navigationBar.shadowImage = UIImage()

        navigationItem.title = "user_id"
        navigationItem.rightBarButtonItem = UIBarButtonItem(image: UIImage(systemName: "line.horizontal.3"), style: .plain, target: self, action: #selector(handleRightButtonTapped))
    }

    func configureCollectionView(){
        collectionView.backgroundColor = .systemGroupedBackground

        // ProfileHeaderの登録
        collectionView.register(ProfileHeader.self, forCellWithReuseIdentifier: profileHeaderCell)

        // collectionViewをtabBarにかからないように配置
        guard let tabHeight = tabBarController?.tabBar.frame.height else { return }
        collectionView.contentInset.bottom = tabHeight
    }
}

// MARK: - UICollectionViewDataSource / UICollectionViewDelegate

extension ProfileController{

    // セクション数はひとまず1に設定 → PostCell設定後2に変更
    override func numberOfSections(in collectionView: UICollectionView) -> Int {
        return 1
    }

    // セクション内に表示するセルの数 → ProfileHeaderは1つで良いので一旦1
    override func collectionView(_ collectionView: UICollectionView, numberOfItemsInSection section: Int) -> Int {
        return 1
    }

    // 表示するcellの設定
    override func collectionView(_ collectionView: UICollectionView, cellForItemAt indexPath: IndexPath) -> UICollectionViewCell {
        let cell = collectionView.dequeueReusableCell(withReuseIdentifier: profileHeaderCell, for: indexPath) as! ProfileHeader
        return cell
    }
}

// MARK: - UICollectionViewDelegateFlowLayout

extension ProfileController: UICollectionViewDelegateFlowLayout{

    // cellのサイズ設定 → 適当に高さは変えてください
    func collectionView(_ collectionView: UICollectionView, layout collectionViewLayout: UICollectionViewLayout, sizeForItemAt indexPath: IndexPath) -> CGSize {

        return CGSize(width: view.frame.width, height: 340)
    }
}
ここまででSimulatorを立ち上げるとProfileHeader箇所は表示されましたでしょう!多分!
ここからサクッと最後まで終わらせましょう
5.Viewフォルダにて、FilterViewの作成
FilterViewは、自分の投稿一覧or友達がタグ付けした一覧を表示するためのフィルター部分です
ProfileController上では、indexPath.section = 1 のheaderとして表示します
さて、FilterViewですが、UICollectionReusableViewの中にUICollectionViewを設置する形で作成します
はい、つまりUICollectionViewCellのFilterViewCellも別ファイルで作ります。頑張りましょう
import UIKit

private let profileHeaderCellIdentifier = "profileHeaderCell"

// ハリボテ
protocol ProfileFilterViewDelegate: class {
    func filterView(_ view: ProfileFilterView, didSelect index: Int)
}

class ProfileFilterView: UICollectionReusableView {

    // MARK: - Properties

    // ハリボテ
    weak var delegate: ProfileFilterViewDelegate?

    // viewに載せていくcollectionView
    lazy var collectionView: UICollectionView = {
        let layout = UICollectionViewFlowLayout()
        let cv = UICollectionView(frame: .zero, collectionViewLayout: layout)
        cv.backgroundColor = .systemGroupedBackground
        cv.delegate = self
        cv.dataSource = self
        return cv
    }()

    // こいつをアニメーションさせていい感じに選択した感を演出
    private let underlineView: UIView = {
        let view = UIView()
        view.backgroundColor = .black
        return view
    }()

    // profileHeaderCellとの境界線
    private let abovelineView: UIView = {
        let view = UIView()
        view.backgroundColor = .lightGray
        return view
    }()

    // MARK: - Lifecycle

    override init(frame: CGRect) {
        super.init(frame: frame)

        collectionView.register(ProfileFilterCell.self, forCellWithReuseIdentifier: identifier)

        // 初期化時にisSelected = trueにするcellを決定する
        let selectedIndexPath = IndexPath(row: 0, section: 0)
        collectionView.selectItem(at: selectedIndexPath, animated: true, scrollPosition: .left)

        addSubview(collectionView)
        // 親viewいっぱいにcollectionViewを広げる
        collectionView.addConstraintsToFillView(self)
    }

    override func layoutSubviews() {
        addSubview(abovelineView)
        abovelineView.anchor(left: leftAnchor, bottom: topAnchor, width: frame.width, height: 0.5)

        addSubview(underlineView)
        underlineView.anchor(left: leftAnchor, bottom: bottomAnchor, width: frame.width / 2, height: 1)
    }

    required init?(coder: NSCoder) {
        fatalError("init(coder:) has not been implemented")
    }
}

// MARK: - UICollectionViewDataSource

extension ProfileFilterView: UICollectionViewDataSource{
    func collectionView(_ collectionView: UICollectionView, numberOfItemsInSection section: Int) -> Int {
        // tag or post の 2択なので return 2 でも ok
        return ProfileFilterOptions.allCases.count
    }

    func collectionView(_ collectionView: UICollectionView, cellForItemAt indexPath: IndexPath) -> UICollectionViewCell {
        let cell = collectionView.dequeueReusableCell(withReuseIdentifier: identifier, for: indexPath) as! ProfileFilterCell

        // cell側のoptionを更新
        let option = ProfileFilterOptions(rawValue: indexPath.row)
        cell.option = option

        return cell
    }
}

// MARK: - UICollectionViewDelegate

extension ProfileFilterView: UICollectionViewDelegate{
    func collectionView(_ collectionView: UICollectionView, didSelectItemAt indexPath: IndexPath) {
        let cell = collectionView.cellForItem(at: indexPath)
        // underlineViewをtouchUpInsideされたcellのx座標に0.3秒で移動させる
        let xPosition = cell?.frame.origin.x ?? 0

        UIView.animate(withDuration: 0.3) {
            self.underlineView.frame.origin.x = xPosition
        }

        // ハリボテ → 本来ProfileControllerにて表示画像変更できるように処理書く
        delegate?.filterView(self, didSelect: indexPath.row)
    }
}

// MARK: - UICollectionViewDelegateFlowLayout

extension ProfileFilterView: UICollectionViewDelegateFlowLayout{
    func collectionView(_ collectionView: UICollectionView, layout collectionViewLayout: UICollectionViewLayout, sizeForItemAt indexPath: IndexPath) -> CGSize {
        let count = CGFloat(ProfileFilterOptions.allCases.count)
        return CGSize(width: frame.width / count, height: frame.height)
    }

    // item同士の隙間がないよう設置
    func collectionView(_ collectionView: UICollectionView, layout collectionViewLayout: UICollectionViewLayout, minimumInteritemSpacingForSectionAt section: Int) -> CGFloat {
        return 0
    }
}
import UIKit

// 投稿 or tag付け投稿一覧どっちやねんを見極めます
enum ProfileFilterOptions: Int, CaseIterable{
    case post
    case tag

    var systemImage: UIImage? {
        switch self {
        case .post: return UIImage(systemName: "rectangle.split.3x3")
        case .tag: return UIImage(systemName: "person.crop.rectangle")
        }
    }
}

class ProfileFilterViewCell: UICollectionViewCell{

    // MARK: - Properties

    // 投稿 or tag付け投稿一覧どっちやねんが更新されたら、imageViewのimageを変更するように設定
    var option: ProfileFilterOptions! {
        didSet{ imageView.image = option.systemImage }
    }

    private var imageView: UIImageView = {
        let iv = UIImageView()
        return iv
    }()

    // 選択された場合と否かでtintColor変更
    override var isSelected: Bool {
        didSet{
            imageView.tintColor = isSelected ? .black : .lightGray
        }
    }

    // MARK: - Lifecycle

    override init(frame: CGRect) {
        super.init(frame: frame)

        addSubview(imageView)
        imageView.tintColor = .lightGray
        imageView.setDimensions(width: 24, height: 24)
        imageView.center(inView: self)
    }

    required init?(coder: NSCoder) {
        fatalError("init(coder:) has not been implemented")
    }
}
さあ、そろそろ記事書くのに息切れしてきましたが、工程6に進みましょう
6.Viewフォルダにて、投稿写真表示用のPostCellの作成
さあ、最後にただただ写真を表示するだけのcellをサクッと作りましょう!!
import UIKit

class PostCell: UICollectionViewCell{

    // MARK: - Properties

    let postImageView: UIImageView = {
        let iv = UIImageView()
        iv.contentMode = .scaleAspectFill
        iv.clipsToBounds = true
        return iv
    }()


    // MARK: - Lifecycle

    override init(frame: CGRect) {
        super.init(frame: frame)

        self.layer.borderColor = UIColor.white.cgColor
        self.layer.borderWidth = 0.5

        addSubview(postImageView)
        postImageView.addConstraintsToFillView(self)
        postImageView.center(inView: self)

    }

    required init?(coder: NSCoder) {
        fatalError("init(coder:) has not been implemented")
    }
}
一気に人生イージーモードに突入したので、本当に最後にProfileControllerにて全部合致しましょう!!
7.合体 and 完成!!
import UIKit

private let filterViewIdentifier = "filterView"
private let profileHeaderCellIdentifier = "profileHeaderCell"
private let postCellIdentifier = "postCell"

class ProfileController: UICollectionViewController{

    // MARK: - Properties

    // post cell箇所に適応したいハリボテUIIMage配列を作成
    private var imageArray: [UIImage?] =
        [UIImage(named: "jeff"), UIImage(named: "zack"), UIImage(named: "elon"), UIImage(named: "steve"),
         UIImage(named: "jeff"), UIImage(named: "zack"), UIImage(named: "elon"), UIImage(named: "steve"),
         UIImage(named: "jeff"), UIImage(named: "zack"), UIImage(named: "elon"), UIImage(named: "steve"),
         UIImage(named: "jeff"), UIImage(named: "zack"), UIImage(named: "elon"), UIImage(named: "steve")]


    // MARK: - Lifecycle

    override func viewDidLoad() {
        super.viewDidLoad()

        configureUI()
    }


    // MARK: - Selectors

    @objc func handleRightButtonTapped(){
        print("DEBUG: you pressed the button..")
    }

    @objc func handleRefresh(){
        // データがないので何もしません
        collectionView.refreshControl?.beginRefreshing()
        collectionView.refreshControl?.endRefreshing()
    }

    // MARK: - Helpers

    func configureUI(){
        view.backgroundColor = .systemGroupedBackground

        configureNavigationBar()
        configureCollectionView()

        let refreshControl = UIRefreshControl()
        refreshControl.addTarget(self, action: #selector(handleRefresh), for: .valueChanged)
        collectionView.refreshControl = refreshControl
    }


    func configureNavigationBar(){
        navigationController?.navigationBar.tintColor = .black
        navigationController?.navigationBar.barTintColor = .systemGroupedBackground
        navigationController?.navigationBar.isTranslucent = false
        navigationController?.navigationBar.shadowImage = UIImage()

        navigationItem.title = "user_id"
        navigationItem.rightBarButtonItem = UIBarButtonItem(image: UIImage(systemName: "line.horizontal.3"), style: .plain, target: self, action: #selector(handleRightButtonTapped))

    }

    func configureCollectionView(){
        collectionView.backgroundColor = .systemGroupedBackground

        collectionView.register(ProfileHeader.self, forCellWithReuseIdentifier: profileHeaderCellIdentifier)
        collectionView.register(PostCell.self, forCellWithReuseIdentifier: postCellIdentifier)

        collectionView.register(ProfileFilterView.self, forSupplementaryViewOfKind: UICollectionView.elementKindSectionHeader, withReuseIdentifier: filterViewIdentifier)

        guard let tabHeight = tabBarController?.tabBar.frame.height else { return }
        collectionView.contentInset.bottom = tabHeight

        // スクロールした際にFilterViewをnavigationBarと同化させる
        guard let flowLayout = collectionView.collectionViewLayout as? UICollectionViewFlowLayout else { return }
        flowLayout.sectionHeadersPinToVisibleBounds = true
    }
}

// MARK: - UICollectionViewDataSource

extension ProfileController{

    override func numberOfSections(in collectionView: UICollectionView) -> Int {
        return 2
    }

    override func collectionView(_ collectionView: UICollectionView, numberOfItemsInSection section: Int) -> Int {
        switch section {
        case 0:
            return 1
        default:
            // 表示したいimage数だけcellを配置
            return imageArray.count
        }
    }

    override func collectionView(_ collectionView: UICollectionView, cellForItemAt indexPath: IndexPath) -> UICollectionViewCell {
        switch indexPath.section {
        case 0:
            let cell = collectionView.dequeueReusableCell(withReuseIdentifier: profileHeaderCellIdentifier, for: indexPath) as! ProfileHeader
            return cell
        default:
            let cell = collectionView.dequeueReusableCell(withReuseIdentifier: postCellIdentifier, for: indexPath) as! PostCell
            // cellのimageに代入
            cell.postImageView.image = imageArray[indexPath.row]
            return cell
        }
    }

    override func collectionView(_ collectionView: UICollectionView, viewForSupplementaryElementOfKind kind: String, at indexPath: IndexPath) -> UICollectionReusableView {
        // headerとしてProfileFilterView登録
        let header = collectionView.dequeueReusableSupplementaryView(ofKind: kind, withReuseIdentifier: filterViewIdentifier, for: indexPath) as! ProfileFilterView
        return header
    }
}

// MARK: - UICollectionViewDelegate

extension ProfileController{
    override func collectionView(_ collectionView: UICollectionView, didSelectItemAt indexPath: IndexPath) {
        if(indexPath.section == 1){
          print("DEBUG: this item is \(indexPath.row)")
        }
    }
}
// MARK: - UICollectionViewDelegateFlowLayout

extension ProfileController: UICollectionViewDelegateFlowLayout{

    func collectionView(_ collectionView: UICollectionView, layout collectionViewLayout: UICollectionViewLayout, referenceSizeForHeaderInSection section: Int) -> CGSize {
        switch section {
        case 0:
            return CGSize(width: 0, height: 0)
        default:
            let height: CGFloat = 50
            return CGSize(width: view.frame.width, height: height)
        }
    }

    func collectionView(_ collectionView: UICollectionView, layout collectionViewLayout: UICollectionViewLayout, sizeForItemAt indexPath: IndexPath) -> CGSize {
        switch indexPath.section {
        case 0:
            let height: CGFloat = 340
            return CGSize(width: view.frame.width, height: height)
        default:
            // 3列表示、正方形サイズに
            let size = view.frame.width / 3
            return CGSize(width: size, height: size)
        }
    }

    func collectionView(_ collectionView: UICollectionView, layout collectionViewLayout: UICollectionViewLayout, minimumInteritemSpacingForSectionAt section: Int) -> CGFloat {
        return 0
    }

    func collectionView(_ collectionView: UICollectionView, layout collectionViewLayout: UICollectionViewLayout, minimumLineSpacingForSectionAt section: Int) -> CGFloat {
        return 0
    }
}
最後に
どうでしょうか?
いい感じに、InstagramのプロフィールっぽいハリボテUI完成しましたでしょうか?
最後の方、段々疲れて来て口数減ってしまいました。
説明が足りない箇所等コメントにて教えてくださると追記したいと思います。
というか、コピペしても動かんねんけどという苦情あったらすみません。すぐ直します。
それでは!