WPF/C# でバーコードを含むレシートをさくっとデザインして印刷する方法です。
事前準備
予め ITF.otf をインストールしておきます。
レシートのデザイン
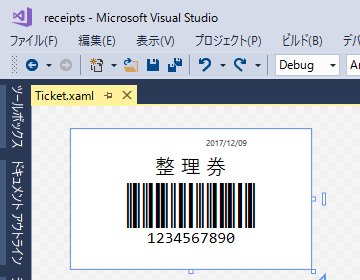
レシートの見た目を XAML でデザインしていきます。バーコードにする数列を「(」と「)」で囲むのをお忘れなく。
Ticket.xaml
<UserControl x:Class="receipts.Ticket"
             xmlns="http://schemas.microsoft.com/winfx/2006/xaml/presentation"
             xmlns:x="http://schemas.microsoft.com/winfx/2006/xaml"
             xmlns:mc="http://schemas.openxmlformats.org/markup-compatibility/2006"
             xmlns:d="http://schemas.microsoft.com/expression/blend/2008"
             xmlns:local="clr-namespace:receipts"
             mc:Ignorable="d"
             d:DesignHeight="140" d:DesignWidth="240">
	<FixedPage Name="fixedPage">
		<StackPanel Width="240">
			<TextBlock FontSize="8" HorizontalAlignment="Right" Margin="0,8,64,0">2017/12/09</TextBlock>
			<TextBlock FontSize="20" HorizontalAlignment="Center" Margin="4">整 理 券</TextBlock>
			<TextBlock FontFamily="ITF" FontSize="45" HorizontalAlignment="Center">(1234567890)</TextBlock>
			<TextBlock FontFamily="Consolas" FontSize="16" HorizontalAlignment="Center">1234567890</TextBlock>
		</StackPanel>
	</FixedPage>
</UserControl>
プリンタの指定
Print メソッドが呼ばれたら指定したプリンタで印刷するようにします。
Ticket.xaml.cs
using System.Printing;
using System.Windows.Controls;

namespace receipts
{
	/// <summary>
	/// Ticket.xaml の相互作用ロジック
	/// </summary>
	public partial class Ticket : UserControl
	{
		public Ticket()
		{
			InitializeComponent();
		}

		public void Print()
		{
			var printerName = "Microsoft XPS Document Writer";

			new PrintDialog
			{
				PrintQueue = new PrintQueue(new PrintServer(), printerName),
			}.PrintVisual(fixedPage, "ticket");
		}
	}
}
ここでは「Microsoft XPS Document Writer」を指定しているので、印刷時には保存するファイル名を尋ねられます。ファイル名を指定して .oxps ファイルとして保存してください。
レシートの印刷
Print メソッドは MainWindow のボタンが押されたら呼び出すようにしてみました。
MainWindow.xaml.cs
using System.Windows;

namespace receipts
{
	/// <summary>
	/// MainWindow.xaml の相互作用ロジック
	/// </summary>
	public partial class MainWindow : Window
	{
		public MainWindow()
		{
			InitializeComponent();

			btnPrint.Click += (s, e) => new Ticket().Print();
		}
	}
}
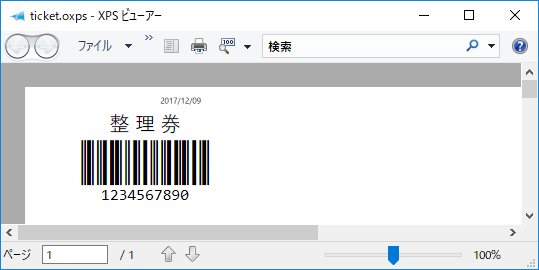
そうすると、下記のようなファイルが保存されます。
もちろん、実際のプリンタを指定すればファイルが作成されるのではなくプリンタから印字されます。
この方法だと XAML で見た目をデザインできるから楽ちんです。

