はじめに
ElasticsearchをEC2で構築する場合に便利なのが、S3 Repository Pluginです!!
ElasticsearchのIndexバックアップは、Elastic社公式ツールであるCuratorを用いて実施するのが安心安全だと思いますが、Curatorで取得するSnapshotの保存先リポジトリとしてS3 Bucketをシームレスに認識してくれる優れものです^^
利用環境
| product | version |
|---|---|
| Curator | 5.6.0 |
| Elasticsearch | 6.6.0 |
| OS(EC2) | Amazon Linux2 |
| ※CuratorおよびElasticsearchは現行最新版を利用しています。 | |
| ※Elasticsearchには、旧X-packのSecurityを有効化しています。 | |
| ※AWSリージョンはシンガポール(ap-southeast-1)を利用しています。 |
AWS Cloud Pluginとは
ElasticsearchをAWS上で利用する場合の便利Pluginになります。
バージョン5.0よりも古いElasticsearchでは、2つのPluginを合わせてAWS Cloud Pluginとして提供していました。
今回紹介するS3 Repository Pluginともう1つEC2 Discovery Pluginを合わせたものになりますが
5.0以降は、この2つのPluginは分離され、それぞれ個別にインストールする形式になりました。
S3 Repository Pluginの嬉しいポイントは、以下の2点だと思っています。
・elasticsearch.ymlのpath.repoの記載が不要
・ElasticsearchのOS上にS3バックアップ領域のマウント不要
【参考】
・AWS Cloud Pugin
Curatorとは
Elastic社が提供するPythonベースのElasticsearchのIndex管理ツールになります。
Indexのバックアップ(snapshot取得)以外にも以下のような操作をAPI経由で実施してくれます。
※今回は★の内容を実施します。
【Index操作】
・Create(作成する)
・Close(検索対象外にする)
・Delete(削除する) ★
・ReOpen(再度検索対象にする)
・Force Merge(セグメントをデフラグする)
・ReIndex(Hot→Warmへの移動など)
・Aliasの作成と削除
・Rollover(Aliasの付け替え)
・ShardのReplica数の変更
・Shard Routing Allocation変更
【Snapshot操作】
・Snapshot取得 ★
・Snapshot削除 ★
・SnapshotからIndexリストア
Curatorには、2種類の設定ファイル(yml形式)があります。
1つ目はconfigurationファイルで、Elasticsearchに対する接続情報やログ出力設定などを記載します。
2つ目はactionファイルで、上記の実行したい操作を定義します。
【参考】
・About Curator
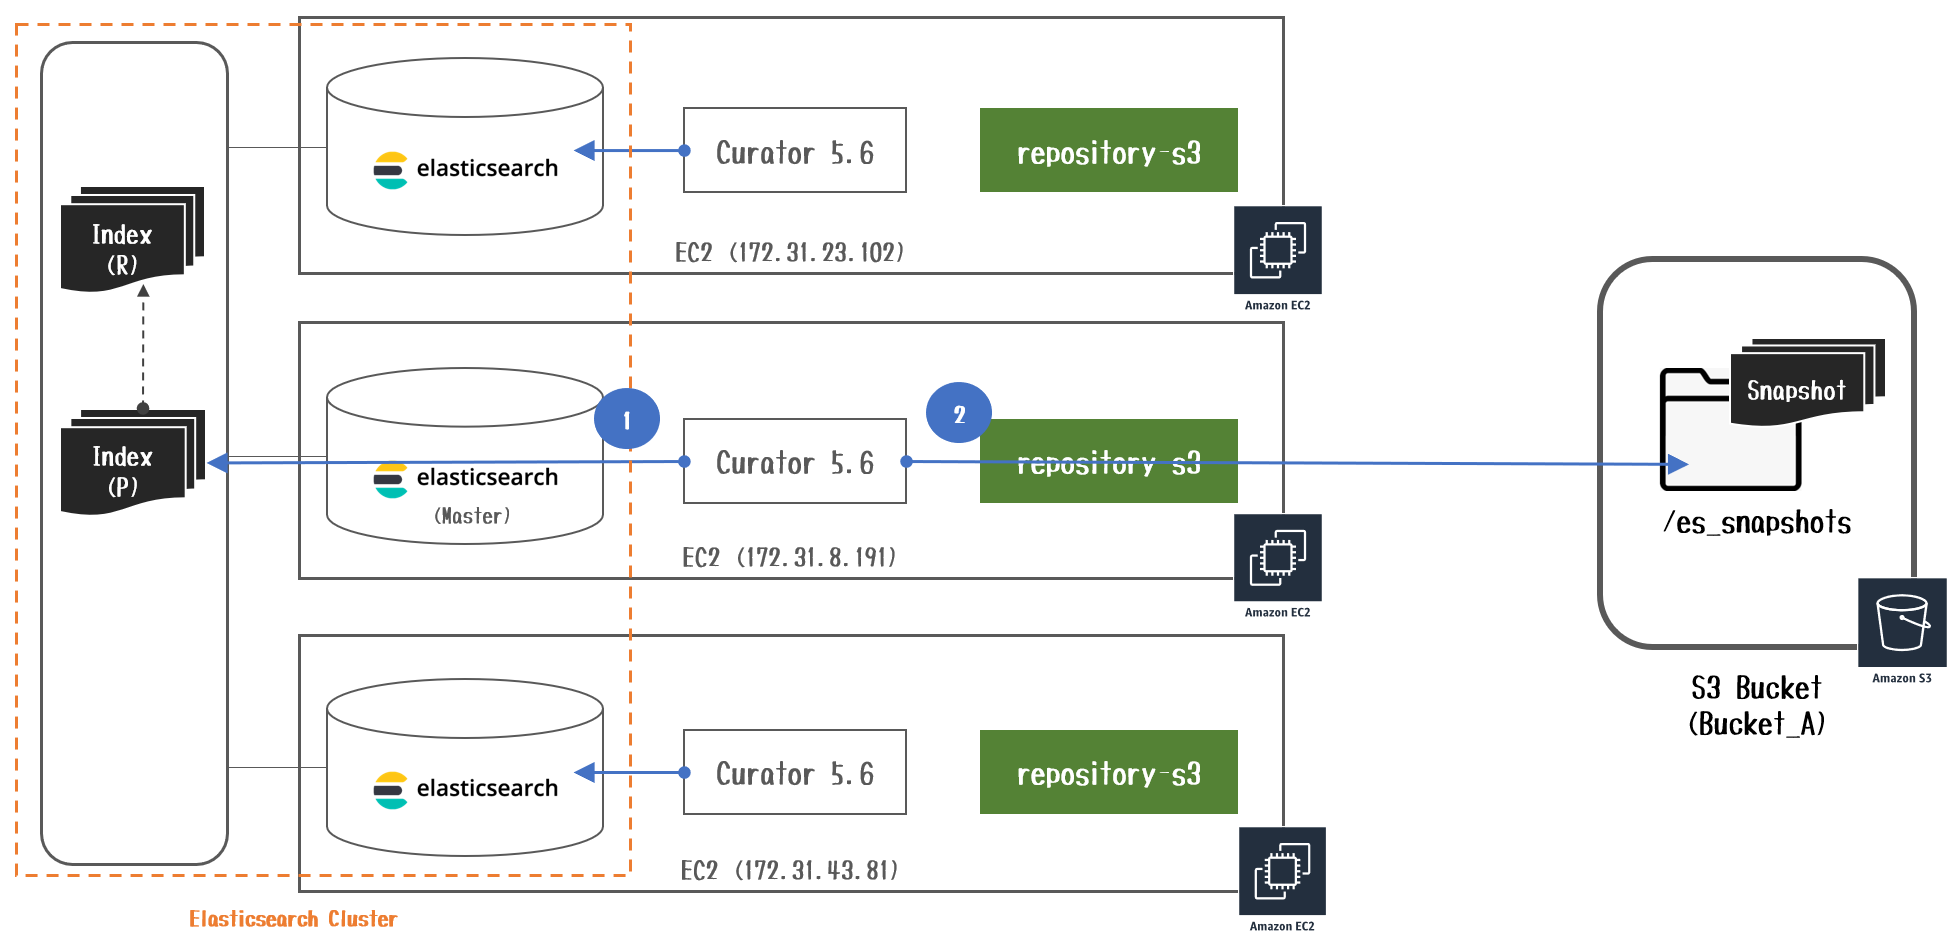
実施内容
3台のMasterノード(Master Eligibleノード含む)で組まれたElasticsearch Cluster内のIndexのSnapshotをS3 Bucketに取得します。また取得したSnapshotの削除やElasticsearch内のIndexの削除も合わせて実施します。Curator設定は3台のElasticsearchで同設定としています。(Masterノード障害時の可用性のため)
実施手順
- S3 Bucketを作成する
- IAM Roleを作成する
- repository-s3 pluginをインストールする
- バックアップ領域の登録
- Curatorをインストールする
- Curatorログ出力先を作成する
- configurationファイルを作成する
- actionファイルを作成する
- 実行結果を確認する
- crontabを設定する
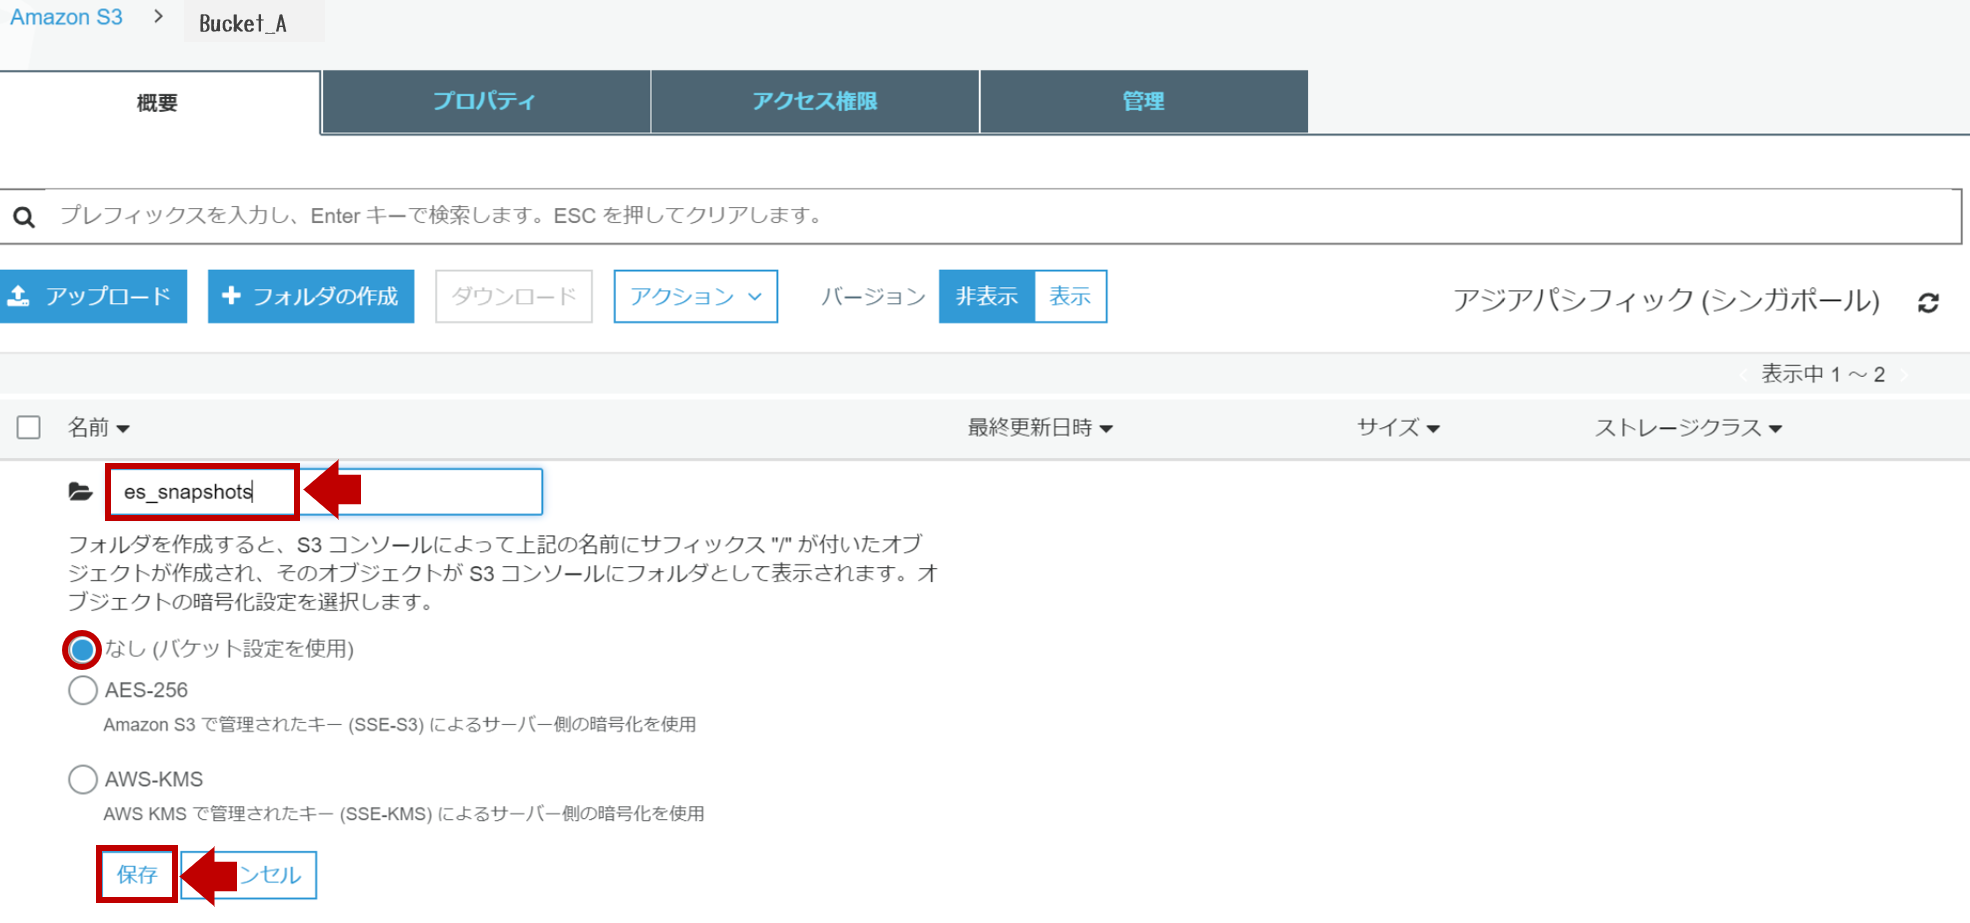
1. S3 Bucketを作成する
- 今回は既存S3 Bucketに[es_snapshots]というPrefixを切って、リポジトリにします。
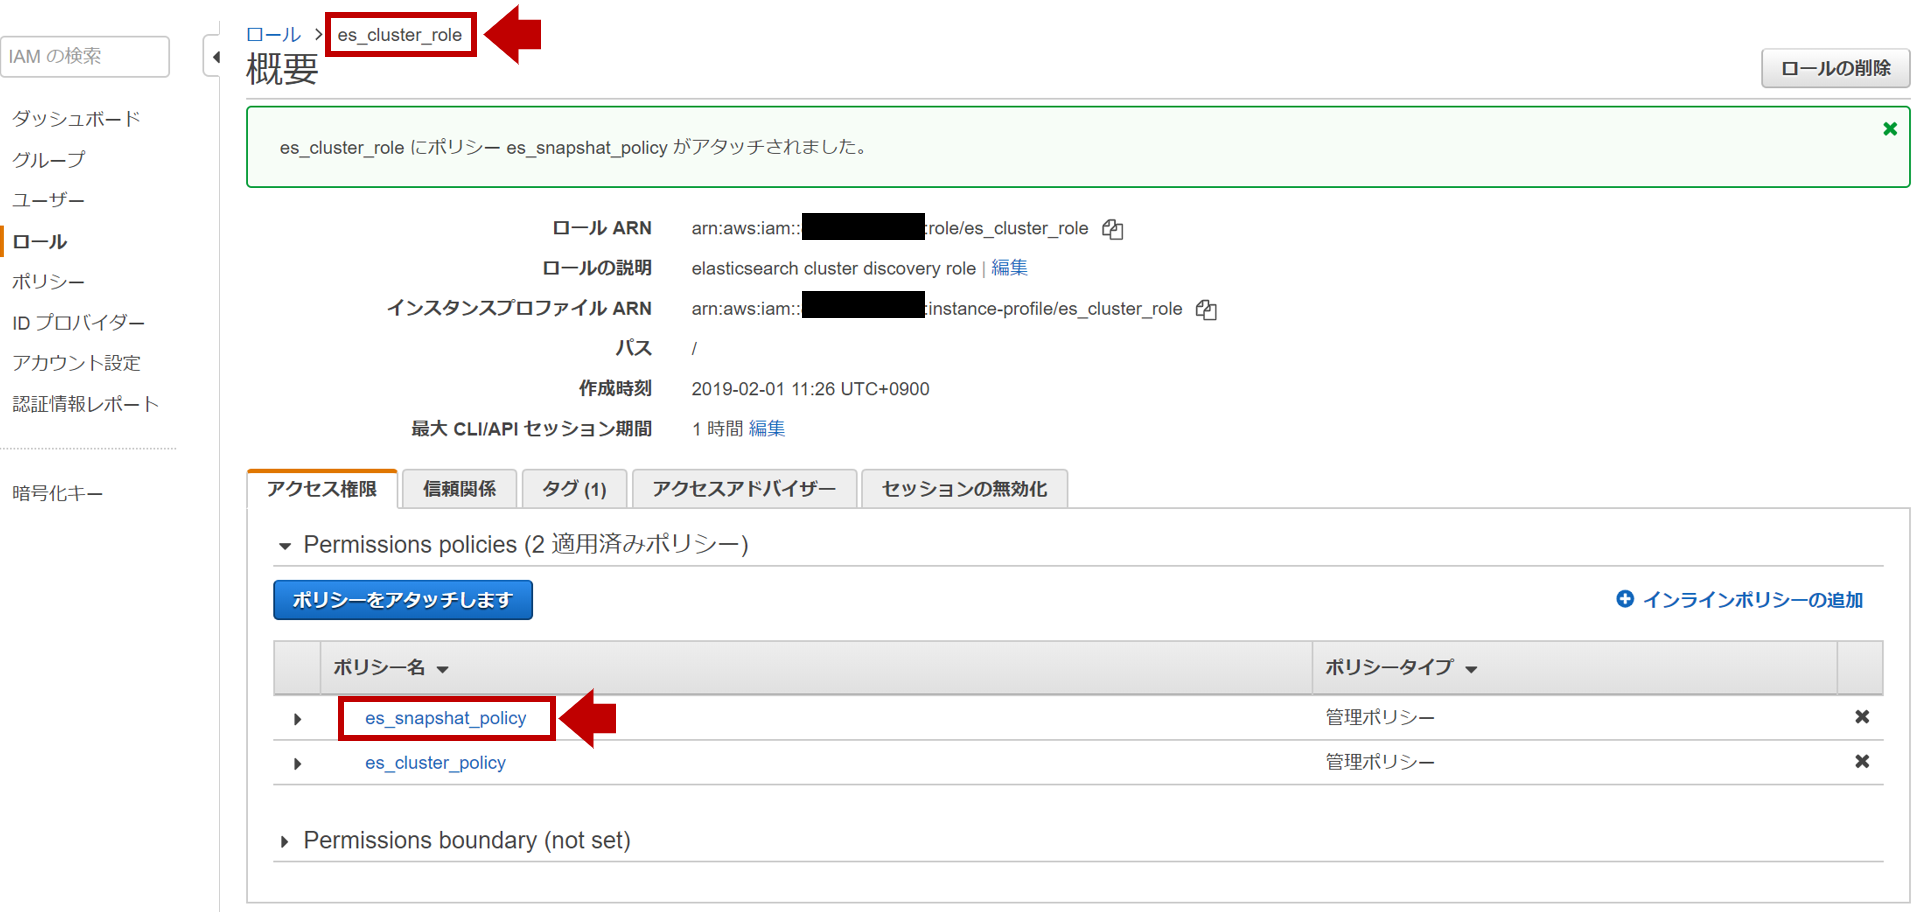
2. IAM Roleを作成する
- CuratorからS3に対するAPIを許可するIAM Policy(es_snapshat_policy)を作成します。
{
  "Statement": [
    {
      "Action": [
        "s3:ListBucket",
        "s3:GetBucketLocation",
        "s3:ListBucketMultipartUploads",
        "s3:ListBucketVersions"
      ],
      "Effect": "Allow",
      "Resource": [
        "arn:aws:s3:::Bucket_A"
      ]
    },
    {
      "Action": [
        "s3:GetObject",
        "s3:PutObject",
        "s3:DeleteObject",
        "s3:AbortMultipartUpload",
        "s3:ListMultipartUploadParts"
      ],
      "Effect": "Allow",
      "Resource": [
        "arn:aws:s3:::Bucket_A/*"
      ]
    }
  ],
  "Version": "2012-10-17"
}
- 作成したIAM PolicyをElasticsearchのEC2に割り当てられるようにIAM Role(今回はes_cluster_role)にアタッチします。
3. repository-s3 pluginをインストールする
- Elasticsearchの3台それぞれにログインし、以下のコマンドでrepository-s3をインストールします。
[root@ip-172-31-8-191 ~]# /usr/share/elasticsearch/bin/elasticsearch-plugin install repository-s3
-> Downloading repository-s3 from elastic
[=================================================] 100%
@@@@@@@@@@@@@@@@@@@@@@@@@@@@@@@@@@@@@@@@@@@@@@@@@@@@@@@@@@@
@     WARNING: plugin requires additional permissions     @
@@@@@@@@@@@@@@@@@@@@@@@@@@@@@@@@@@@@@@@@@@@@@@@@@@@@@@@@@@@
* java.lang.RuntimePermission accessDeclaredMembers
* java.lang.RuntimePermission getClassLoader
* java.lang.reflect.ReflectPermission suppressAccessChecks
* java.net.SocketPermission * connect,resolve
* java.util.PropertyPermission es.allow_insecure_settings read,write
See http://docs.oracle.com/javase/8/docs/technotes/guides/security/permissions.html
for descriptions of what these permissions allow and the associated risks.

Continue with installation? [y/N]y
-> Installed repository-s3

[root@ip-172-31-8-191 ~]# ll /usr/share/elasticsearch/plugins/
total 8
drwxr-xr-x 2 root root 4096 Feb  2 18:51 discovery-ec2
drwxr-xr-x 2 root root 4096 Feb 18 01:53 repository-s3   ← 追加されていればOK
【参考】
・S3 Repository Plugin
4. バックアップ領域の登録
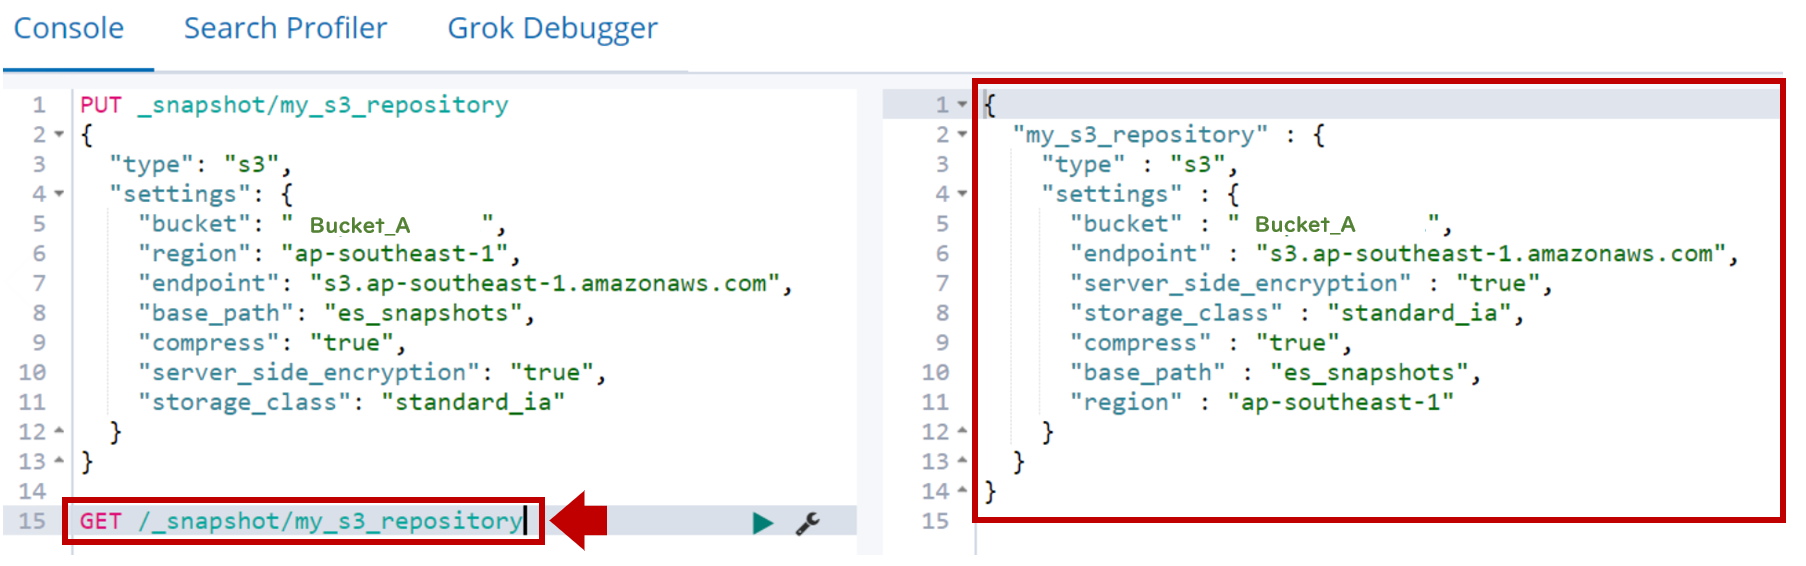
- Kibanaの[DevTools]からs3をリポジトリにするAPIを実行します。(
my_s3_repositoryというリポジトリを作成)
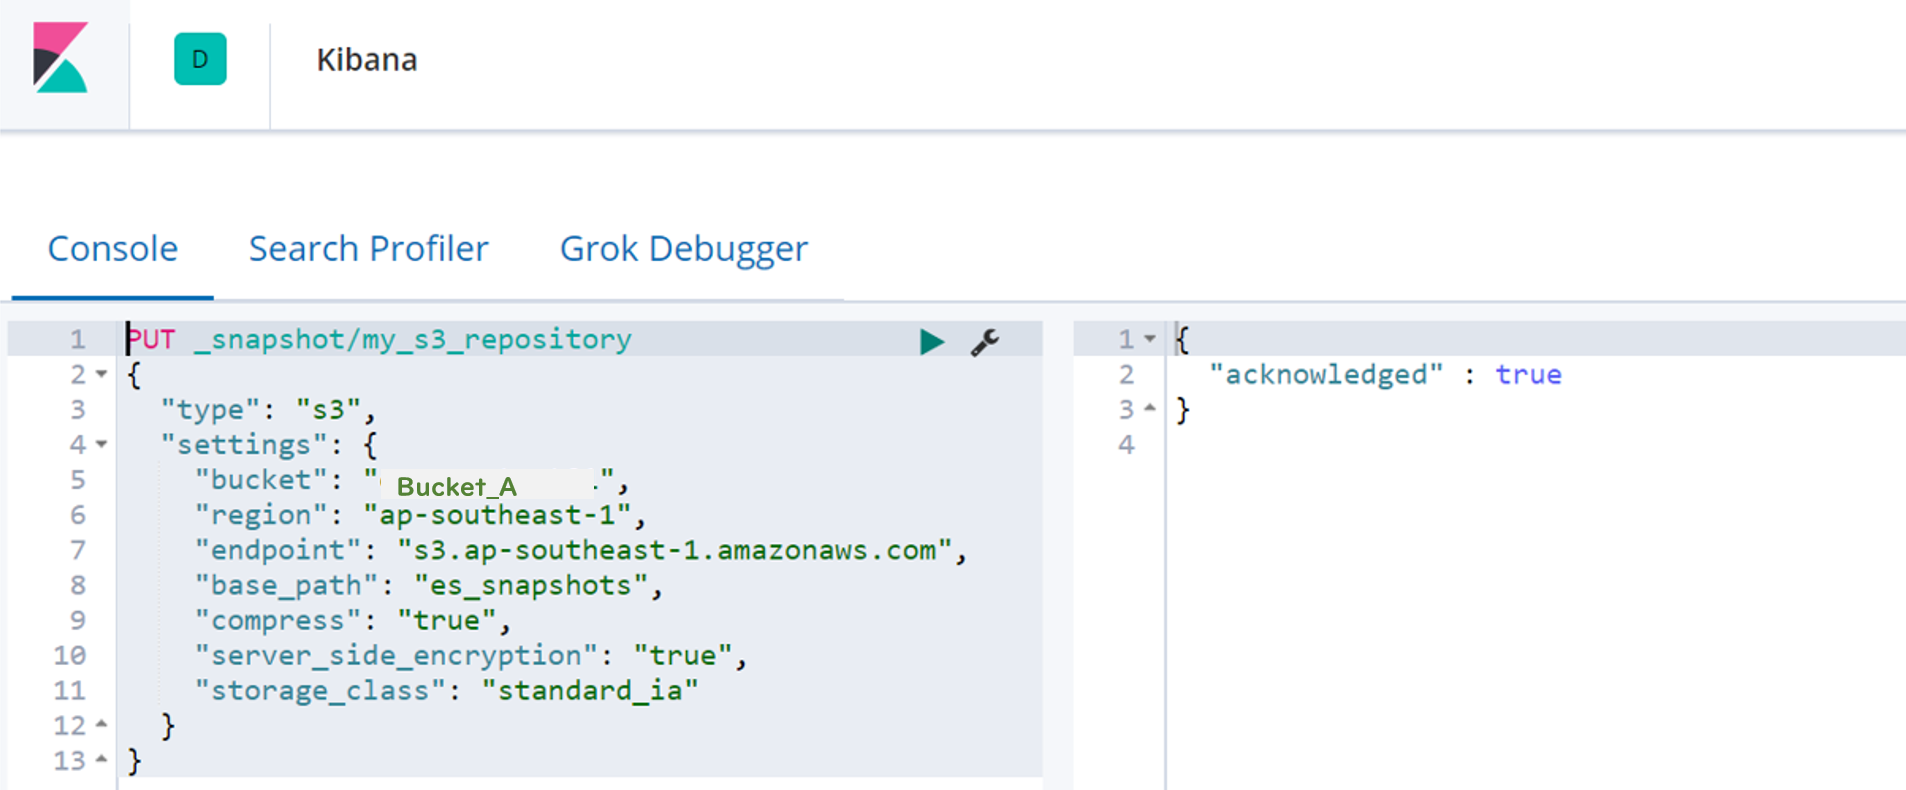
※コスト的に嬉しいように圧縮有効(compress: true)でS3ストレージクラスを標準IA(storage_class: standard_ia)としています。
PUT _snapshot/my_s3_repository
{
  "type": "s3",
  "settings": {
    "bucket": "Bucket_A",
    "region": "ap-southeast-1",
    "endpoint": "s3.ap-southeast-1.amazonaws.com",
    "base_path": "es_snapshots",
    "compress": "true",
    "server_side_encryption": "true",
    "storage_class": "standard_ia"
  }
}
-
GET /_snapshot/my_s3_repositoryでリポジトリが出来ていることを確認します。以下のようになっていればOKです。
【参考】
・Repository Settings
5. Curatorをインストールする
- Curator公式リポジトリを
curator.repoとして登録し、yum installコマンドでインストールします。
[root@ip-172-31-8-191 ~]# vi /etc/yum.repos.d/curator.repo
[root@ip-172-31-8-191 ~]# cat /etc/yum.repos.d/curator.repo
[curator-5]
name=CentOS/RHEL 7 repository for Elasticsearch Curator 5.x packages
baseurl=https://packages.elastic.co/curator/5/centos/7
gpgcheck=1
gpgkey=https://packages.elastic.co/GPG-KEY-elasticsearch
enabled=1

[root@ip-172-31-8-191 ~]# yum install -y elasticsearch-curator
[root@ip-172-31-8-191 ~]# yum list installed | grep elasticsearch-curator
elasticsearch-curator.x86_64          5.6.0-1                        @curator-5
【参考】
・Curator Installation Yum repository
6. Curatorログ出力先を作成する
- Curatorの実行結果をログとして記録するため、
/var/log/curator/curator.logを作成します。(logrotate設定は省略)
[root@ip-172-31-8-191 ~]# mkdir -p /var/log/curator
[root@ip-172-31-8-191 ~]# touch /var/log/curator/curator.log
[root@ip-172-31-8-191 ~]# ll /var/log/curator/
total 0
-rw-r--r-- 1 root root 0 Feb 18 03:41 curator.log
7. configurationファイルを作成する
- /root配下に
.curatorディレクトリを作成します。
[root@ip-172-31-8-191 ~]# mkdir -p /root/.curator
- 上記にて作成したディレクトに
curator.ymlというconfigurationファイルを作成します。
[root@ip-172-31-8-191 ~]# vi /root/.curator/curator.yml
# Remember, leave a key empty if there is no value.  None will be a string,
# not a Python "NoneType"
client:
  hosts:
    - ${HOSTNAME}
  port: 9200
  url_prefix:
  use_ssl: False
  certificate:
  client_cert:
  client_key:
  ssl_no_validate: False
  http_auth: elastic:パスワード
  timeout: 30
  master_only: True

logging:
  loglevel: INFO
  logfile: /var/log/curator/curator.log
  logformat: default
  blacklist: ['elasticsearch', 'urllib3']
※hostsの設定は、elasticsearch.ymlのnetwork.hostと合わせています。
※X-packのSecurityを利用している場合にはhttp_authの設定(Elasticsearchのユーザ認証)が必要です。
※今回はデフォルトのelasticユーザを利用していますが、権限が強いため専用のcuratorユーザを作成することをお勧めします。
【参考】
・Configuration File
8. actionファイルを作成する
- ①backcup用、②index_delete用、③snapshot_delete用の3つのactionファイルを作成します。
- 対象のIndexには
.security_audit_log-YYYY.mm.ddを利用します。
[root@ip-172-31-8-191 ~]# vi /opt/elasticsearch-curator/action_file/index_backup_action.yml
actions:
# Snapshotを取得する
  1:
    action: snapshot
    description: >-
    options:
      repository: my_s3_repository
      name: 'snapshot-%Y.%m.%d'
      include_global_state: True
      wait_for_completion: True
      max_wait: 3600
      wait_interval: 10
    filters:
    - filtertype: pattern
      kind: prefix
      value: .security_audit_log-
      exclude: False
    - filtertype: age
      source: name
      direction: older
      timestring: '%Y.%m.%d'
      unit: days
      unit_count: 1
[root@ip-172-31-8-191 ~]# vi /opt/elasticsearch-curator/action_file/index_delete_action.yml
actions:
# 7日以前のindexをdeleteする
  1:
    action: delete_indices
    description: "Delete selected indices"
    options:
      ignore_empty_list: True
    filters:
    - filtertype: pattern
      kind: prefix
      value: .security_audit_log-
      exclude: False
    - filtertype: age
      source: name
      direction: older
      timestring: '%Y.%m.%d'
      unit: days
      unit_count: 7
[root@ip-172-31-8-191 ~]# vi /opt/elasticsearch-curator/action_file/snapshot_delete_action.yml
actions:
# 0日以前のSnapshotを削除する
  1:
    action: delete_snapshots
    description: "Delete selected snapshots"
    options:
      repository: my_s3_repository
      retry_interval: 120
      retry_count: 3
      ignore_empty_list: True
    filters:
    - filtertype: pattern
      kind: prefix
      value: snapshot-
      exclude: False
    - filtertype: age
      source: name
      direction: older
      timestring: '%Y.%m.%d'
      unit: days
      unit_count: 0
※snapshot名はsnapshot-YYYY.mm.ddとなります。
※IndexやSnapshotの保持期間を変更したい場合は、②や③のunit_countの値を変更してください。
【参考】
・Action File
9. 実行結果を確認する
- ①backcupを取得します。
[root@ip-172-31-8-191 ~]# curator --config /root/.curator/curator.yml /opt/elasticsearch-curator/action_file/index_backup_action.yml
- Masterノードの
curator.logを確認します。
[root@ip-172-31-8-191 ~]# cat /var/log/curator/curator.log
2019-02-19 10:26:08,824 INFO      Preparing Action ID: 1, "snapshot"
2019-02-19 10:26:08,863 INFO      Trying Action ID: 1, "snapshot":
2019-02-19 10:26:09,199 INFO      Creating snapshot "snapshot-2019.02.19" from indices: ['.security_audit_log-2019.02.12', '.security_audit_log-2019.02.17', '.security_audit_log-2019.02.11', '.security_audit_log-2019.02.13', '.security_audit_log-2019.02.16', '.security_audit_log-2019.02.14', '.security_audit_log-2019.02.15', '.security_audit_log-2019.02.18']
2019-02-19 10:26:09,557 INFO      Snapshot snapshot-2019.02.19 still in progress.
2019-02-19 10:26:19,596 INFO      Snapshot snapshot-2019.02.19 still in progress.
2019-02-19 10:26:29,646 INFO      Snapshot snapshot-2019.02.19 still in progress.
2019-02-19 10:26:39,696 INFO      Snapshot snapshot-2019.02.19 still in progress.
2019-02-19 10:26:49,730 INFO      Snapshot snapshot-2019.02.19 still in progress.
2019-02-19 10:26:59,782 INFO      Snapshot snapshot-2019.02.19 still in progress.
2019-02-19 10:27:09,907 INFO      Snapshot snapshot-2019.02.19 still in progress.
2019-02-19 10:27:19,963 INFO      Snapshot snapshot-2019.02.19 still in progress.
2019-02-19 10:27:30,016 INFO      Snapshot snapshot-2019.02.19 still in progress.
2019-02-19 10:27:40,068 INFO      Snapshot snapshot-2019.02.19 still in progress.
2019-02-19 10:27:50,121 INFO      Snapshot snapshot-2019.02.19 still in progress.
2019-02-19 10:28:00,172 INFO      Snapshot snapshot-2019.02.19 still in progress.
2019-02-19 10:28:10,293 INFO      Snapshot snapshot-2019.02.19 still in progress.
2019-02-19 10:28:20,350 INFO      Snapshot snapshot-2019.02.19 still in progress.
2019-02-19 10:28:30,382 INFO      Snapshot snapshot-2019.02.19 still in progress.
2019-02-19 10:28:40,435 INFO      Snapshot snapshot-2019.02.19 still in progress.
2019-02-19 10:28:50,474 INFO      Snapshot snapshot-2019.02.19 still in progress.
2019-02-19 10:29:00,534 INFO      Snapshot snapshot-2019.02.19 still in progress.
2019-02-19 10:29:10,621 INFO      Snapshot snapshot-2019.02.19 still in progress.
2019-02-19 10:29:20,718 INFO      Snapshot snapshot-2019.02.19 successfully completed.
2019-02-19 10:29:20,761 INFO      Snapshot snapshot-2019.02.19 successfully completed.
2019-02-19 10:29:20,762 INFO      Action ID: 1, "snapshot" completed.
2019-02-19 10:29:20,762 INFO      Job completed.
-
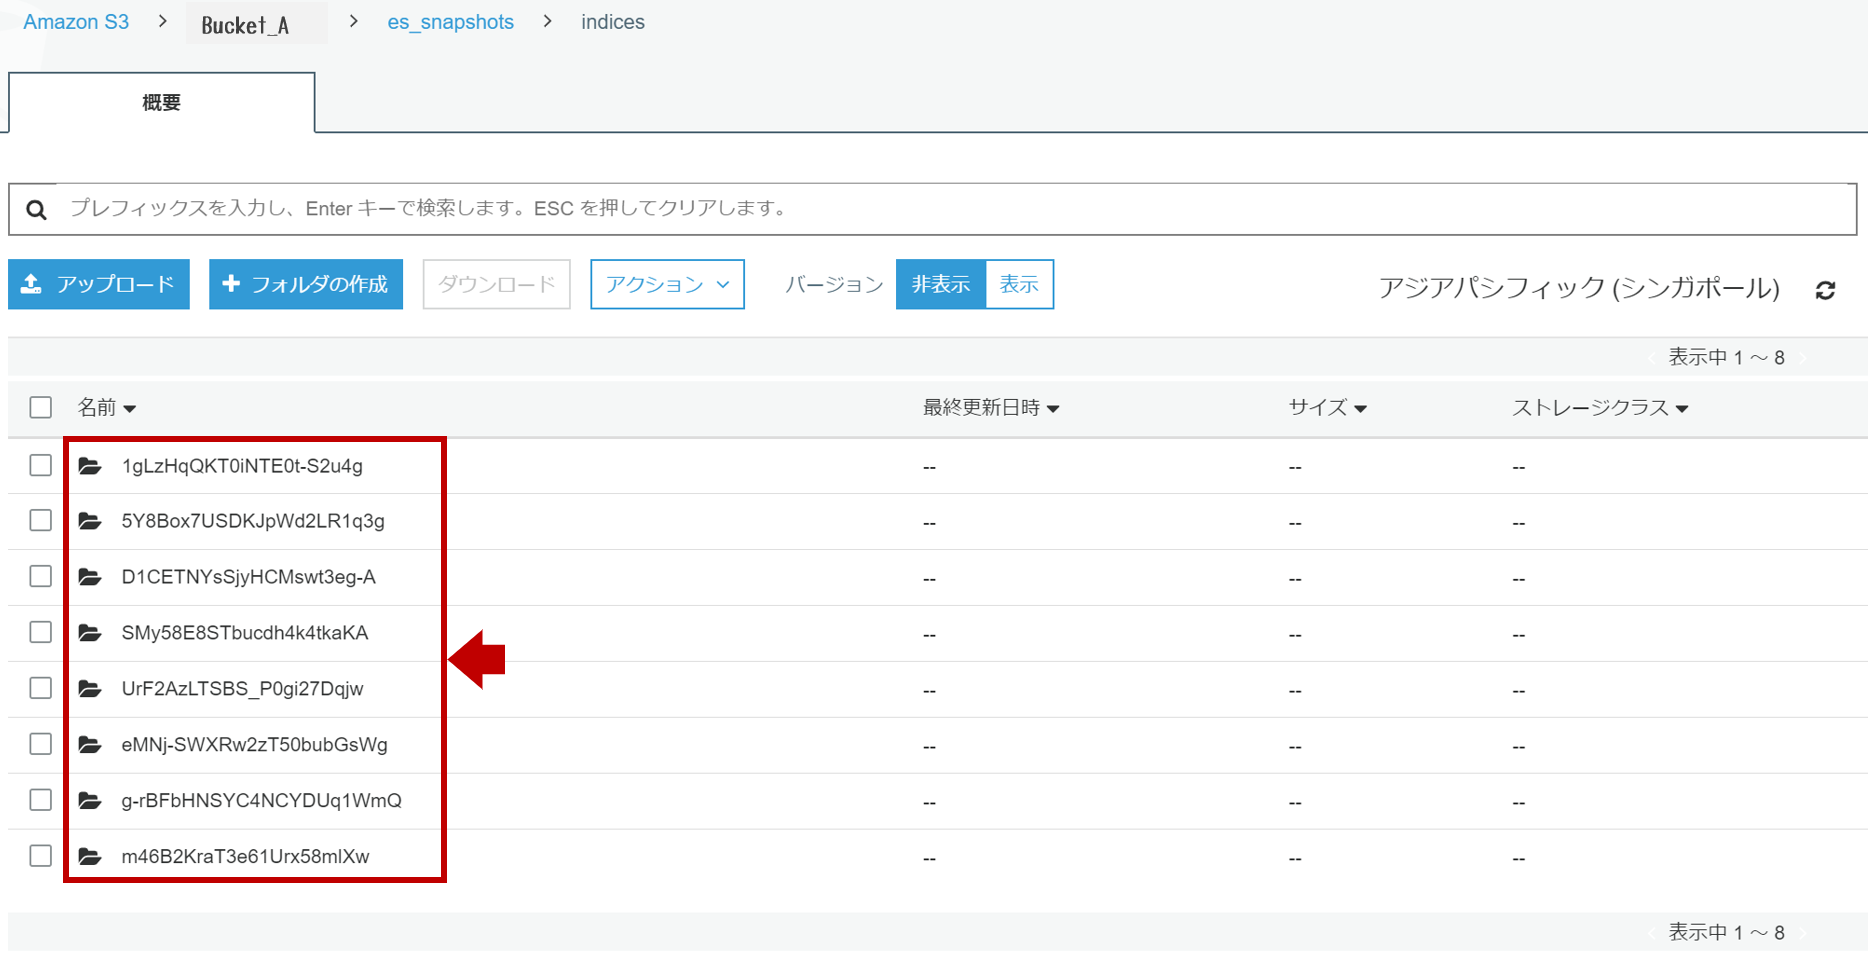
S3の該当Prefix内にindicesディレクトリが作成され、Backup取得対象のIndexの数だけディレクトリが生成されます。
-
GET /_cat/snapshot/my_s3_repository?v&s=idでSnapshotが生成されていることをAPIでも確認することが出来ます。

-
ちなみにMasterノード以外のMaster Eligibleノードでは以下のようなログになります。
[root@ip-172-31-23-102 ~]# cat /var/log/curator/curator.log
2019-02-19 10:26:08,826 INFO      Preparing Action ID: 1, "snapshot"
2019-02-19 10:26:09,019 INFO      Master-only flag detected. Connected to non-master node. Aborting.
※ これはconfigurationファイルの master_only: Trueを設定していることで実現しています。
- ②indexをdeleteします。
[root@ip-172-31-8-191 ~]# curator --config /root/.curator/curator.yml /opt/elasticsearch-curator/action_file/index_delete_action.yml
- Masterノードの
curator.logを確認します。(2019.02.11と2019.02.12の2日分が削除されました)
[root@ip-172-31-8-191 ~]# cat /var/log/curator/curator.log
2019-02-19 12:02:18,222 INFO      Preparing Action ID: 1, "delete_indices"
2019-02-19 12:02:18,239 INFO      Trying Action ID: 1, "delete_indices": Delete selected indices
2019-02-19 12:02:18,271 INFO      Deleting selected indices: ['.security_audit_log-2019.02.12', '.security_audit_log-2019.02.11']
2019-02-19 12:02:18,271 INFO      ---deleting index .security_audit_log-2019.02.12
2019-02-19 12:02:18,271 INFO      ---deleting index .security_audit_log-2019.02.11
2019-02-19 12:02:20,402 INFO      Action ID: 1, "delete_indices" completed.
2019-02-19 12:02:20,402 INFO      Job completed.
-
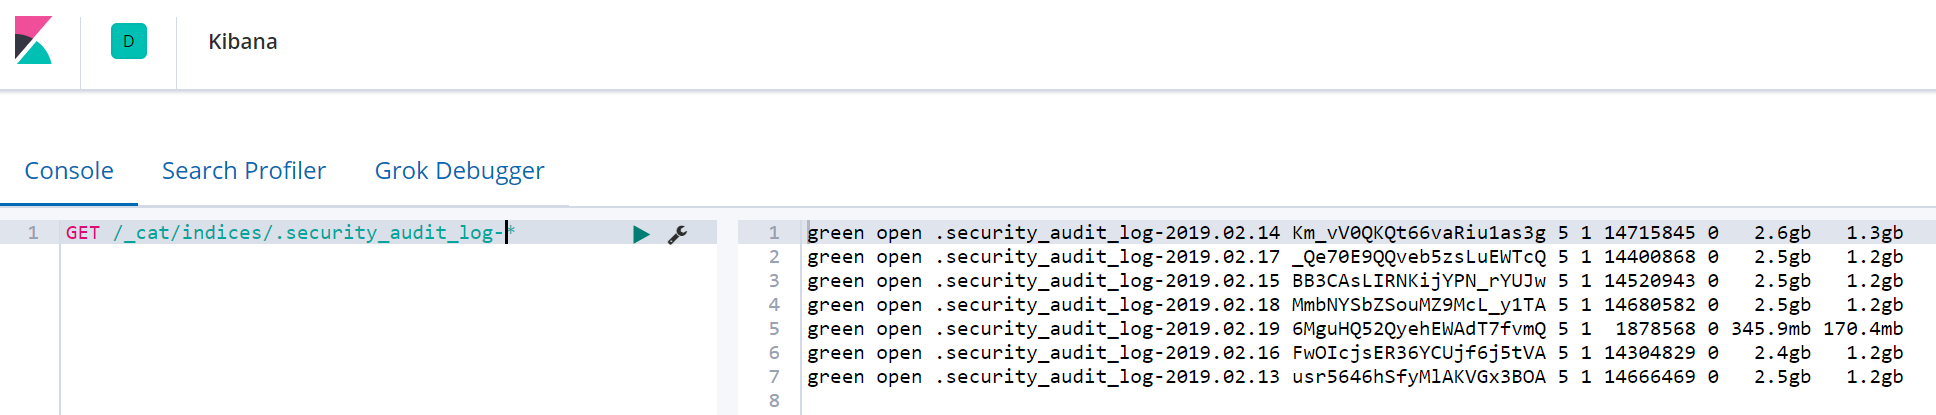
GET /_cat/indices/.security_audit_log-*でIndexが削除されていることをAPIで確認することが出来ます。
-
③indexをdeleteします。
[root@ip-172-31-8-191 ~]# curator --config /root/.curator/curator.yml /opt/elasticsearch-curator/action_file/snapshot_delete_action.yml
- Masterノードの
curator.logを確認します。(2019.02.11と2019.02.12の2日分が削除されました)
[root@ip-172-31-8-191 ~]# cat /var/log/curator/curator.log
2019-02-19 11:28:58,638 INFO      Preparing Action ID: 1, "delete_snapshots"
2019-02-19 11:28:58,664 INFO      Trying Action ID: 1, "delete_snapshots": Delete selected snapshots
2019-02-19 11:28:58,878 INFO      Deleting selected snapshots
2019-02-19 11:28:58,937 INFO      Deleting snapshot snapshot-2019.02.19...
2019-02-19 11:29:41,062 INFO      Action ID: 1, "delete_snapshots" completed.
2019-02-19 11:29:41,062 INFO      Job completed.
GET /_cat/snapshot/my_s3_repository?v&s=idでSnapshotが削除されていることをAPIでも確認することが出来ます。

- ちなみに対象のSnapshotがなくジョブが空振りすると以下のようなログになります。
2019-02-19 10:55:03,058 INFO      Preparing Action ID: 1, "delete_snapshots"
2019-02-19 10:55:03,084 INFO      Trying Action ID: 1, "delete_snapshots": Delete selected snapshots
2019-02-19 10:55:03,224 INFO      Skipping action "delete_snapshots" due to empty list: <class 'curator.exceptions.NoSnapshots'>
2019-02-19 10:55:03,224 INFO      Action ID: 1, "delete_snapshots" completed.
2019-02-19 10:55:03,224 INFO      Job completed.
10. crontabを設定する
- 最後に、実運用に乗せる場合は手動実行するわけには行かないので、cronジョブ(root権限で)として登録します。
[root@ip-172-31-8-191 ~]# crontab -u root -e
no crontab for root - using an empty one
crontab: installing new crontab
00 00 * * * curator --config /root/.curator/curator.yml /opt/elasticsearch-curator/action_file/index_backup_action.yml
00 06 * * * curator --config /root/.curator/curator.yml /opt/elasticsearch-curator/action_file/index_delete_action.yml
30 06 * * * curator --config /root/.curator/curator.yml /opt/elasticsearch-curator/action_file/snapshot_delete_action.yml
※ ①backupを毎日AM0時、②delete_indexを毎日AM6時、③delete_snapshotを毎日AM6時半とします。
- 以下のコマンドでジョブ登録結果を確認します。
[root@ip-172-31-8-191 ~]# crontab -l
00 00 * * * curator --config /root/.curator/curator.yml /opt/elasticsearch-curator/action_file/index_backup_action.yml
00 06 * * * curator --config /root/.curator/curator.yml /opt/elasticsearch-curator/action_file/index_delete_action.yml
30 06 * * * curator --config /root/.curator/curator.yml /opt/elasticsearch-curator/action_file/snapshot_delete_action.yml
まとめ
いかがでしたでしょうか。
Curator設定方法について、書いている記事はいくつか見かけますが、AWSでEC2としてElasticsearchを構築する人が少ないのか、あまりS3 Repository Pluginの記事がありませんでしたので、S3 Repository Plugin + Curatorをお送りしました^^
不明な点、誤植などありましたら、コメントをお願いします!!