なにこれ
Pythonで多層パーセプトロンをスクラッチする機会があったので残しておきます。
以下に多層パーセプトロンで排他的論理和(XOR)を学習させた時のサンプルを示します。運が悪いと学習が収束しませんが、繰り返せばちゃんとできていることがわかると思います。
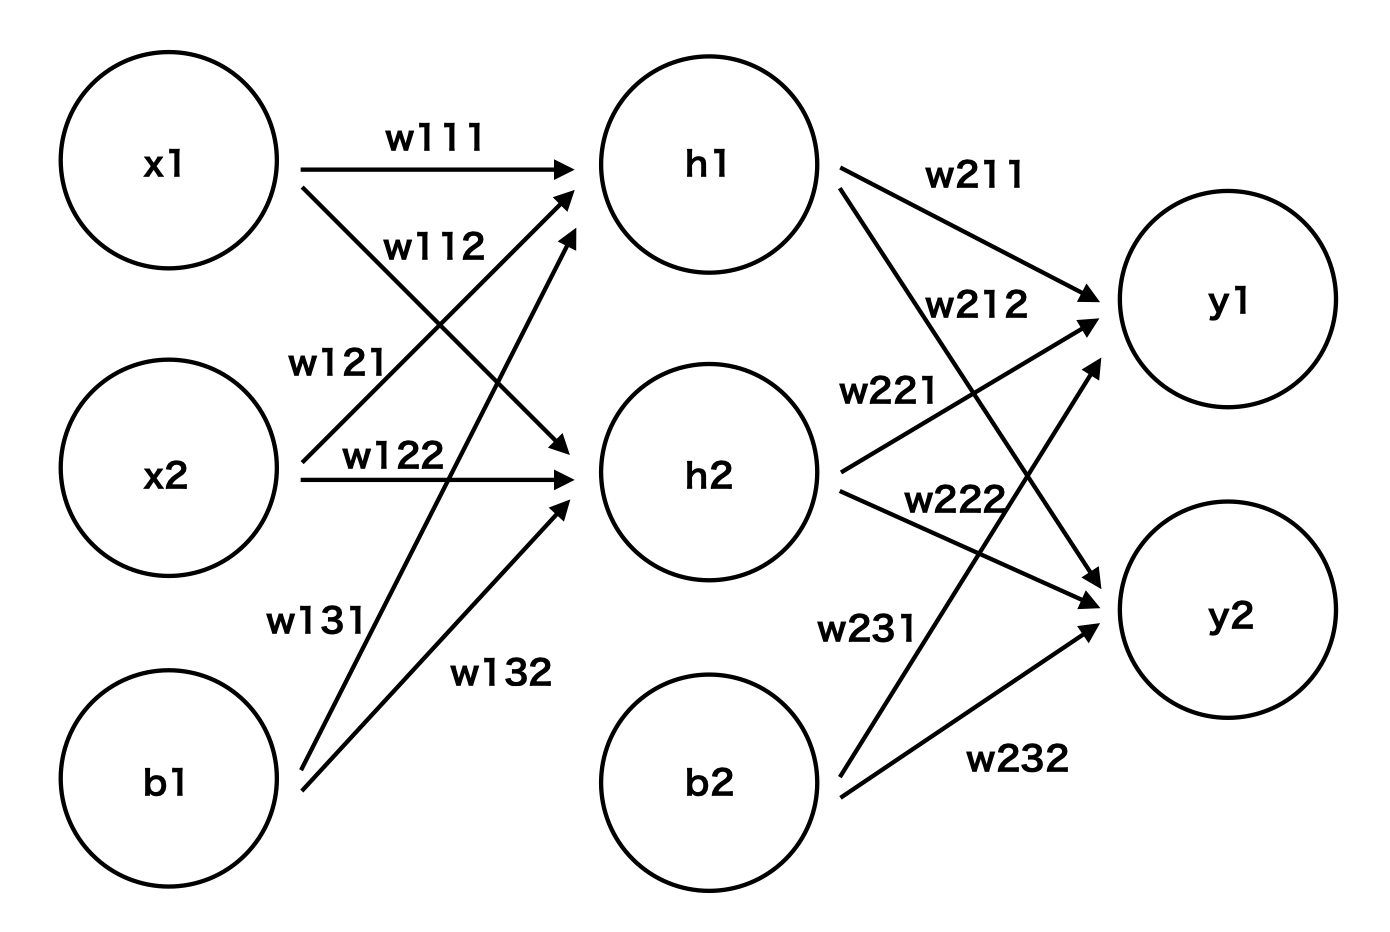
今回取り上げているパーセプトロンのイメージ図はこんな感じです。

実際のプログラムがこれです。
perceptron.py
import numpy as np

# ベクタライズされた(リストの各要素に対して処理するようにされた)シグモイド関数
@np.vectorize
def sigmoid(x):
    return 1.0 / (1.0 + np.exp(-x))

# [0,0,0]もしくは[[0,0,0]]という形式のリストを[[0],[0],[0]]という形式に変換する関数


def verticalize(row):
    return np.reshape(row, (1, len(row)))


# 学習率
rho = 1
# 入力データ
# このデータで全ての入力パターンを尽くしている
x = np.array([[0, 0, -1], [0, 1, -1], [1, 0, -1], [1, 1, -1]])
# 教師データ
# 0,1の出力をインデックスに対応させている
# 1が立っているところが正解ラベルの意
y = np.array([[1, 0], [0, 1], [0, 1], [1, 0]])

# 重みをランダムに決定
w1 = np.random.randn(3, 2)
w2 = np.random.randn(3, 2)

# 今回は出力層ニューロンを二つ用意して、出力が0か1かという2クラスの分類問題に帰着させる
# これにより一般的な多層パーセプトロンの計算を適用できる

# 50000回繰り返せば十分収束しそうなので、この回数学習させる
for i in range(50000):
    # x(入力データ)は m*n行列.
    # 各行が一つのデータを表し、各列が特徴を表ている
    # 順に1行ずつ取り出して重みの更新を行う(オンライン学習)
    for p in range(len(x)):
        # 行列計算のためにxを縦方向に変える
        # [[x1], [x2], [b1]]みたいな感じ
        xp = verticalize(x[p])
        yp = y[p]
        # 入力データと入力層から隠れ層への重みの行列積にsigmoid関数を通したもの
        # この結果は隠れ層の各ニューロンの出力値になる
        g1 = sigmoid(xp @ w1)
        # 上記の結果にバイアス項を付加して縦に並べる
        # [[h1],[h2],[b2]]みたいな感じ
        # バイアス項は常に-1を出力する
        g1 = verticalize(np.hstack((g1[0], [-1])))
        # 隠れ層の出力+バイアスの出力と、出力層から隠れ層への重みの行列積にsigmoid関数を通したもの
        # この結果は出力層の各ニューロンの出力値になる
        g2 = sigmoid(g1 @ w2)
        # 誤差逆伝播法によって、隠れ層から出力層への重みの誤差を計算する
        eps_out = (g2 - yp) * g2 * (1 - g2)
        # 誤差逆伝播法によって、隠れ層から入力層への重みの誤差を計算する
        # バイアス項が計算に混ざってしまうので削除する
        eps_hidden = np.delete(np.sum(eps_out*w2, axis=1)*g1*(1 - g1), -1, 1)
        # 重みの更新
        w2 -= rho * g1.T @ eps_out
        w1 -= rho * xp.T @ eps_hidden

# 結果の確認(予測)
# フォワードだけ計算して、その出力値をみる
for p in range(len(x)):
    xp = verticalize(x[p])
    yp = y[p]
    g1 = sigmoid(xp @ w1)
    g1 = verticalize(np.hstack((g1[0], [-1])))
    g2 = sigmoid(g1 @ w2)
    # 出力層の出力値の確認
    print(g2[0])
    # 出力層の中でもっとも値の大きいインデックスの出力
    # インデックスに基づいてクラス分類するように学習したのでこれによってクラスが決定できる
    print(np.argmax(g2))
ポイントはベクタライズされたシグモイド関数と、np.dotと同等の@演算子です。これでネストがなく綺麗に実装することができます。
それと重み層も適当に変更を加えればまぁ汎用性も出せるかなと思います。
我ながら結構いい感じにできていると思います。
コメントを省くとこうです。
perceptron.py
import numpy as np

@np.vectorize
def sigmoid(x):
    return 1.0 / (1.0 + np.exp(-x))

def verticalize(row):
    return np.reshape(row, (1, len(row)))

rho = 1

x = np.array([[0, 0, -1], [0, 1, -1], [1, 0, -1], [1, 1, -1]])
y = np.array([[1, 0], [0, 1], [0, 1], [1, 0]])

w1 = np.random.randn(3, 2)
w2 = np.random.randn(3, 2)

for i in range(50000):
    for p in range(len(x)):
        xp = verticalize(x[p])
        yp = y[p]
        g1 = sigmoid(xp @ w1)
        g1 = verticalize(np.hstack((g1[0], [-1])))
        g2 = sigmoid(g1 @ w2)
        eps_out = (g2 - yp) * g2 * (1 - g2)
        eps_hidden = np.delete(np.sum(eps_out*w2, axis=1)*g1*(1 - g1), -1, 1)
        w2 -= rho * g1.T @ eps_out
        w1 -= rho * xp.T @ eps_hidden

for p in range(len(x)):
    xp = verticalize(x[p])
    yp = y[p]
    g1 = sigmoid(xp @ w1)
    g1 = verticalize(np.hstack((g1[0], [-1])))
    g2 = sigmoid(g1 @ w2)
    print(g2[0])
    print(np.argmax(g2))
まとめ
scikit-learnを使おう!(大学の課題なのでそうも言ってられないのですが)
11/25追記
汎用性を増してクラスとして実装したものも書いたので追記しておきます!
お前らの多層パーセプトロンは汚い