概要
AWS Mobile Hubを使って社内にあるAMIMOTOマネージドホスティングのサーバをiPhoneアプリで一元管理するようにしました。
構成図
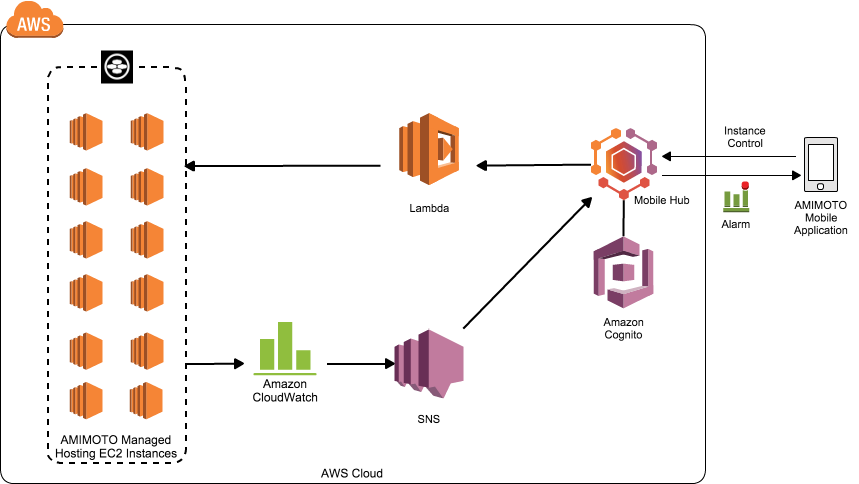
モバイルアプリからの指令でインスタンスの起動と停止とインスタンスサイズの変更が可能になってます。それらはすべてLambdaファンクションで処理させます。
CloudWatchのアラートが上がったらSNS経由でアプリにpush通知を送ります。
Cloud Logic
 Mobile Hub上で動くLambdaファンクションを管理してくれます。これチェックが付いているLambdaファンクションのみがアプリからのリクエストを受け取れるようになってます。
実際のLambdaファンクションは以下のような感じ
var AWS = require('aws-sdk');

function startInstance(instance_id, context) {
    var ec2 = new AWS.EC2();
    var params = {
        InstanceIds: [
            instance_id
        ]
    };

    ec2.startInstances(params, function(err, data) {
        if (err){ console.log(err, err.stack);
        } else {
            ec2.waitFor('instanceRunning', params, function(err, data) {
                if (err) console.log(err, err.stack);
                else     context.done(null, data);
            });
        }
    });
}

exports.handler = function(event, context) {
    startInstance(event.instance_id, context);
};
var AWS = require('aws-sdk');

function ISODateString(d){
  function pad(n){return n<10 ? '0'+n : n}
  return d.getUTCFullYear()+'-'
    + pad(d.getUTCMonth()+1)+'-'
    + pad(d.getUTCDate())+'T'
    + pad(d.getUTCHours())+':'
    + pad(d.getUTCMinutes())+':'
    + pad(d.getUTCSeconds())+'Z'
}
function getTimeStamp(d){
  var now = ISODateString(d);
  return now;
}

function getMetricStatics(event, context) {
    var cloudwatch = new AWS.CloudWatch();
    var past       = new Date();
    past           = new Date(past.setHours(past.getHours() - 1));
    var now        = new Date();
    var endtime    = getTimeStamp(now);
    var starttime  = getTimeStamp(past);
    var params = {
                    EndTime: endtime,
                    MetricName: 'CPUUtilization',
                    Namespace: 'AWS/EC2',
                    Period: 300,
                    StartTime: starttime,
                    Statistics: [
                        'Average'
                    ],
                    Dimensions: [
                        {
                            Name: 'InstanceId',
                            Value: event.instance_id
                        }
                    ]
    };

    cloudwatch.getMetricStatistics(params, function(err, data) {
                    if (err) console.log(err, err.stack);
                    else     context.done(null, JSON.stringify(data));
    });
}

exports.handler = function(event, context) {
    getMetricStatics(event, context);
};
Push Notifications
 Push通知の設定もmobile Hubの設定画面上から出来ます。
iPhoneアプリの場合はデベロッパー登録をAppleに申請して証明書をMobile Hub(SNS)にアップロードして上げる必要があります。AWS側の設定は特にコード等書く必要はなくこれで完了します。
Push通知の設定もmobile Hubの設定画面上から出来ます。
iPhoneアプリの場合はデベロッパー登録をAppleに申請して証明書をMobile Hub(SNS)にアップロードして上げる必要があります。AWS側の設定は特にコード等書く必要はなくこれで完了します。
アプリのビルド
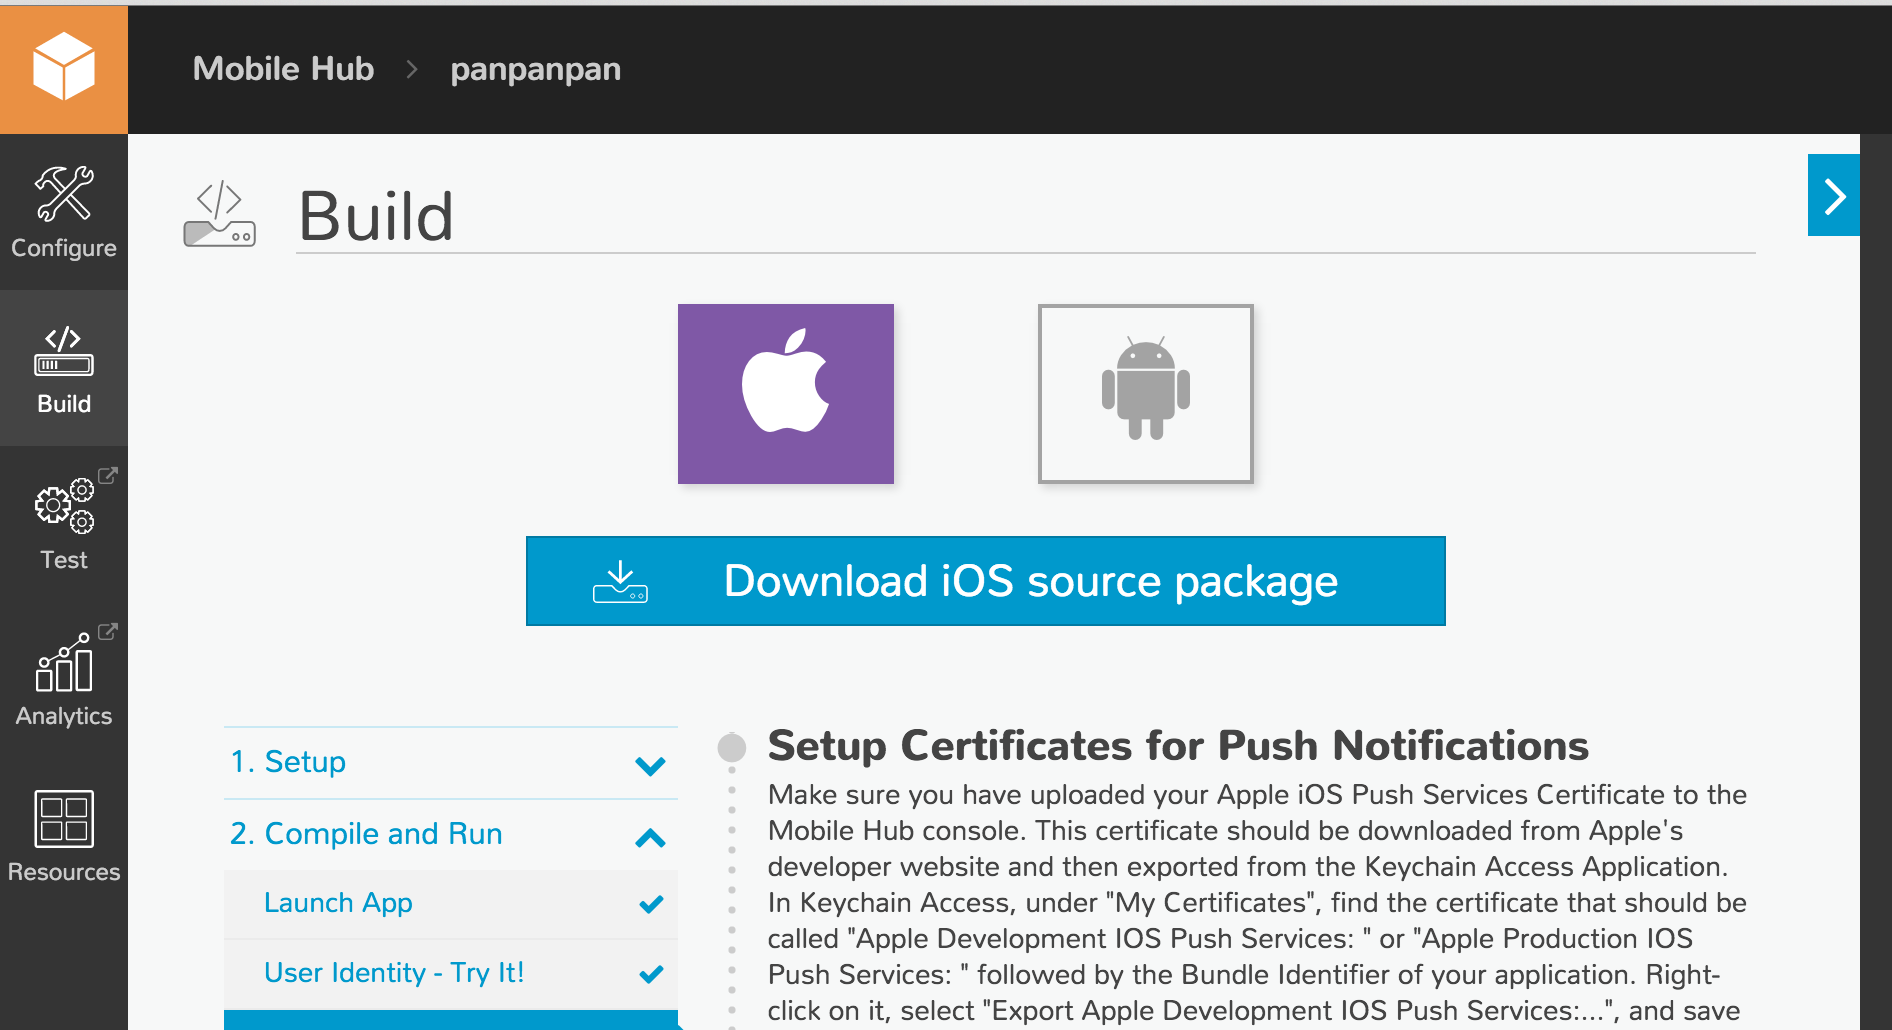 AWS側で必要な設定が終われば、Mobile Hubのbuildメニューからアプリのソースコードを生成します。ローカルにダウンロードして後はアプリの開発です。
アプリ開発
後はゴリゴリとアプリ開発です。アプリ開発と言ってもビジネスロジックはLambdaで構成しているため、画面の開発とどのタイミングでLambdaに命令をおくるかというAction部分の開発になります。
Mobile Hubからダウンロードしたデフォルトの状態ではAWS Mobile Hubで作ったスマホアプリでAMIMOTOを起動させるにて紹介しているようなサンプルのアプリがダウンロードされた状態になります。これを好きなUIになるようにフォークして開発するイメージです。
以下はインスタンススタートを実施するアプリのコードの例。
ボタンをタップしたら指紋認証を挟んで、通過後にLambdaのインスタンスをスタートさせるLambdaファンクションにリクエストを送ります。
- (IBAction)startInstance:(id)sender {
    LAContext *myContext = [[LAContext alloc] init];
    NSError *error = nil;

    // 端末が指紋認証を使えるかどうか判定
    if([myContext canEvaluatePolicy:LAPolicyDeviceOwnerAuthenticationWithBiometrics error:&error]) {
        NSString *myLocalizedReasonString = @"指紋認証せんかい!";
        [self.activityIndicator startAnimating];
        // 指紋認証画面を表示
        [myContext evaluatePolicy:LAPolicyDeviceOwnerAuthenticationWithBiometrics
                  localizedReason:myLocalizedReasonString
                            reply:^(BOOL success, NSError *error) {

                                if(success) {

                                    // 指紋認証成功
                                    NSString *functionName = @"start-instance";

                                    NSLog(@"Function Name: %@", functionName);

                                    NSError *jsonError = nil;
                                    NSString *jsonInput = [NSString stringWithFormat:@"{\"instance_id\":\"%@\"}", self.instanceId];
                                    NSData *jsonData = [jsonInput dataUsingEncoding:NSUTF8StringEncoding];
                                    NSDictionary *parameters = [NSJSONSerialization JSONObjectWithData:jsonData
                                                                                               options:NSJSONReadingAllowFragments
                                                                                                 error:&jsonError];
                                    NSLog(@"Json Input: %@", jsonInput);

                                    [[AWSCloudLogic sharedInstance] invokeFunction:functionName withParameters:parameters
                                                               withCompletionBlock:^(id result, NSError *error) {
                                                                   dispatch_async(dispatch_get_main_queue(), ^{
                                                                       [self.activityIndicator stopAnimating];
                                                                       if (error != nil) {

                                                                           UIAlertView *alert =
                                                                           [[UIAlertView alloc] initWithTitle:@"Error" message:[error localizedDescription] delegate:nil cancelButtonTitle:@"DISMISS" otherButtonTitles:nil];
                                                                           [alert show];
                                                                       } else {
                                                                           self.instanceStatusLabel.text = @"インスタンスステータス:running";
                                                                           self.instanceStatus = @"running";
                                                                       }
                                                                   });
                                                               }];
                                } else {
                                    [self.activityIndicator stopAnimating];
                                }
                            }];
    } else {
        // 指紋認証を使えない端末の処理
        // 指紋認証を使える端末だが、ユーザーが指紋認証機能をオフにしているケースの処理

    }
}
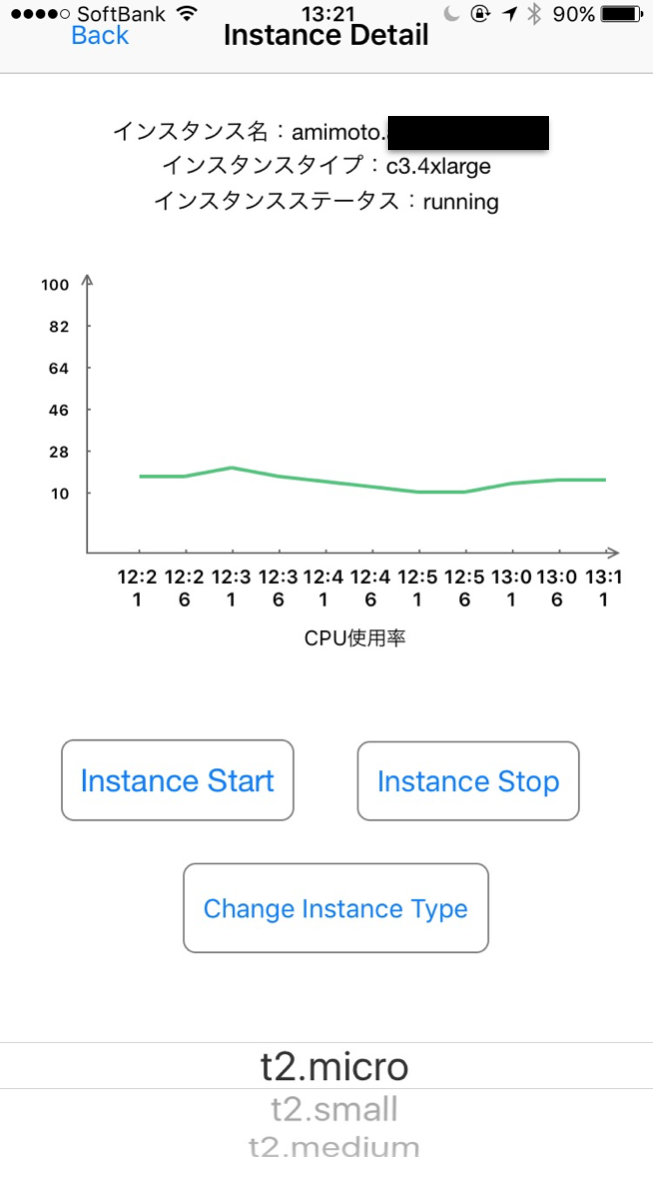
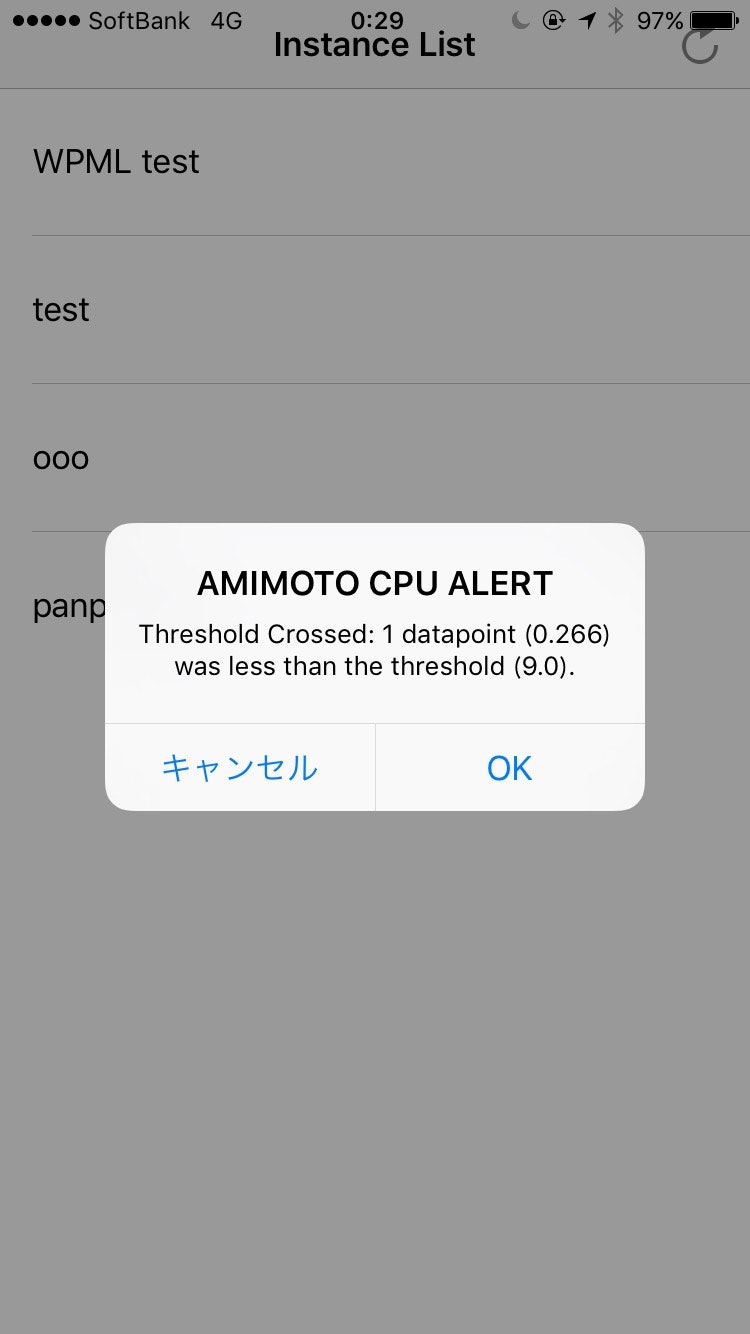
完成品
クライアント名がわかるものは伏せ字にしてますが以下の様な感じ!
管理してるAMIMOTOの一覧画面

詳細画面
Push通知来た時
まとめ
とこんな感じで社内のマネージドホスティングのサーバを管理できるようにしました。
開発者としての率直な印象として、Mobile Hubが認証周りやIAM権限周りを一通り面倒見てくれるところが素晴らしいなと思いました。
また、Lambdaでビジネスロジックを作れたので、アプリはUIとActionを作るだけで完結するというのもアプリ開発初心者の僕からすればすごくとっつきやすいです。
やりたいことだけをシンプルにやるっていうサーバレスアーキテクチャの本質から言えばすごく理にかなっていて効率的だと思いました。
それではみなさん、よいサーバレスライフを!