完全閉域化されたECS環境をTerraformで作りましょう🏯
閉域化とはパブリックからのアクセスが完全にできない状態のことです。エンタープライズ系の案件だと、よくあるお話ではないでしょうか。実際に私が閉域化したときにやったことをすべて書きます。
ネットワーク系は図がないとわかりにくいので、図解を3つ用意しました。同じような境遇の方がいましたら、ぜひ参考にしてください。
構成
わかりやすいように閉域化する前と後の構成図に加え、ネットワークの流れ図の3つを記載しました。
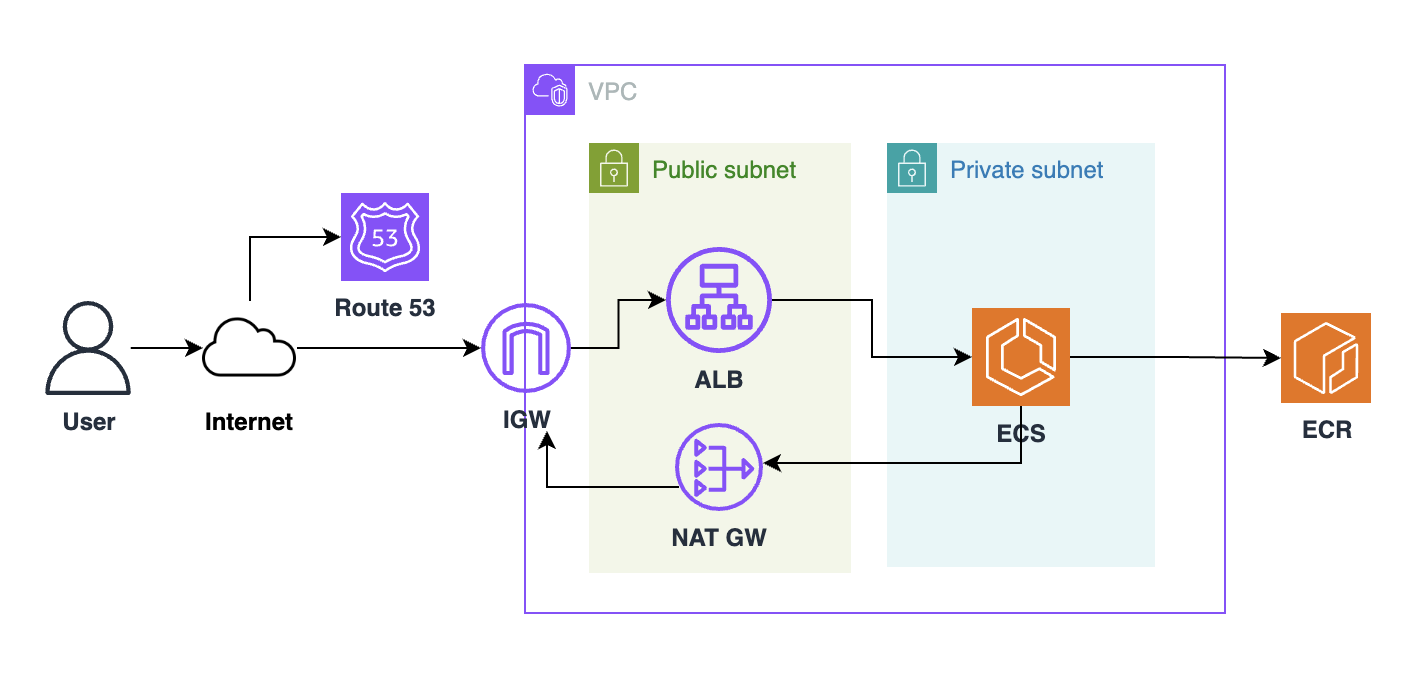
閉域化前
なんのへんてつもない、普通のECS環境です。
閉域化後
上の図を閉域化させました。
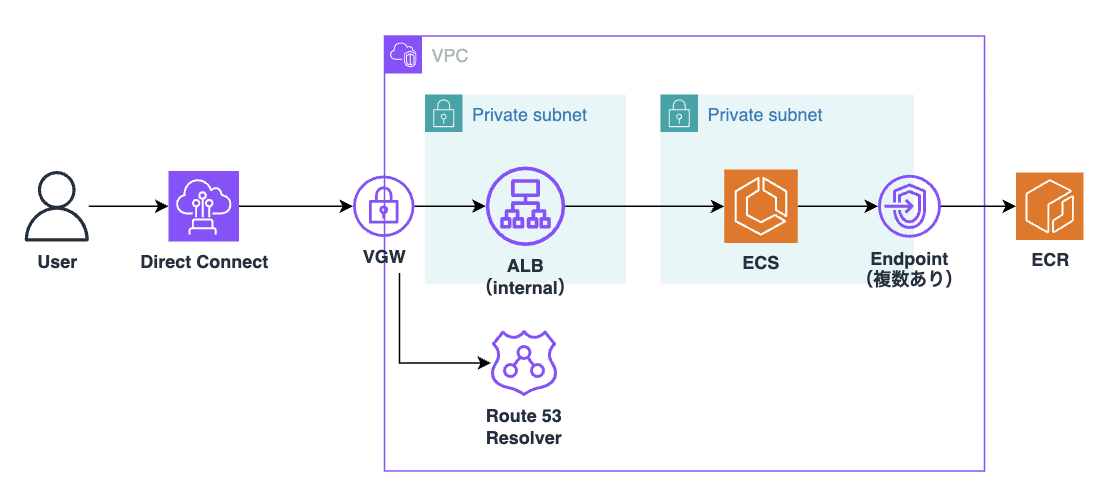
変更されたことは以下です。
- ALBのinternal化
- ECRとの接続にエンドポイント追加
- 名前解決にRoute 53 Resolverを追加(プライベートホストゾーン)
- VPCへの接続にDirect Connect(以下DX / 他複数手段あり)
接続の変更はDXを採用していますが、これは私が実際に行ったものであり、他にも手段はいろいろあります。DXが使えない場合は、別の方法を検討してみてください。
閉域後の通信の流れ
DXを経由した外部ネットワークからVPCへの通信を整理しておきます。
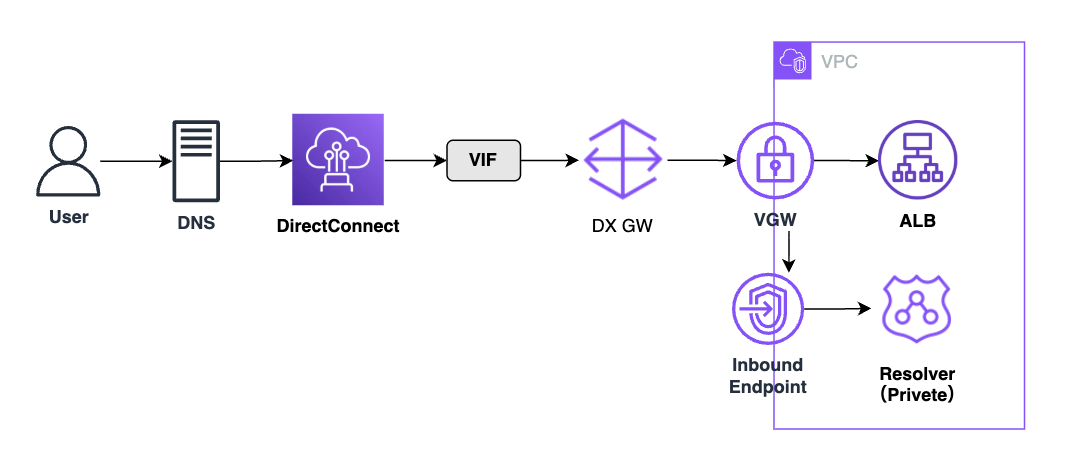
VGWからの矢印が2つありますが、Route 53 Resolverで名前解決を行い、その結果に基づいてALBへアクセスします。
実際に変更してみる
ここからは実際に変更する場合の設定をTerraformで書きます。
ALB
これはinternalに設定するだけです。これを変えることでプライベートIPを使用して、ターゲットへリクエストをルーティングするようになります。
resource "aws_lb" "test" {
  name               = "test-lb-tf"
  internal           = true # ここ!
  load_balancer_type = "application"
  security_groups    = [aws_security_group.lb_sg.id]
  subnets            = [for subnet in aws_subnet.private : subnet.id]
...
ECRとの接続(VPCエンドポイントの追加)
外部への経路があれば、何も気にしなくてもECRからイメージを取得できるのですが、閉域化した瞬間に取得ができなくなります。そのため、エンドポイントを張って、取得経路を作ってあげましょう。
取得には下記3つのエンドポイントが必要です。S3のエンドポイントだけGateway型にしています。
# ECR API VPC Endpoint
resource "aws_vpc_endpoint" "ecr_api" {
  vpc_id              = aws_vpc.main.id
  service_name        = "com.amazonaws.ap-northeast-1.ecr.api"
  vpc_endpoint_type   = "Interface"
  subnet_ids          = [aws_subnet.private_1a.id, aws_subnet.private_1c.id]
  security_group_ids  = [aws_security_group.ecr_endpoints.id]
  private_dns_enabled = true

  tags = {
    Name = "internal-ecr-api-endpoint"
  }
}

# ECR DKR VPC Endpoint
resource "aws_vpc_endpoint" "ecr_dkr" {
  vpc_id              = aws_vpc.main.id
  service_name        = "com.amazonaws.ap-northeast-1.ecr.dkr"
  vpc_endpoint_type   = "Interface"
  subnet_ids          = [aws_subnet.private_1a.id, aws_subnet.private_1c.id]
  security_group_ids  = [aws_security_group.ecr_endpoints.id]
  private_dns_enabled = true

  tags = {
    Name = "internal-ecr-dkr-endpoint"
  }
}

# S3 Gateway VPC Endpoint for ECR
resource "aws_vpc_endpoint" "ecr_s3" {
  vpc_id            = aws_vpc.main.id
  service_name      = "com.amazonaws.ap-northeast-1.s3"
  vpc_endpoint_type = "Gateway"
  route_table_ids   = [aws_route_table.private.id]

  tags = {
    Name = "internal-ecr-s3-endpoint"
  }
}
今回はECRのエンドポイントのみ記載していますが、外部への通信が発生するリソース(CWなど)は個別にエンドポイントが必要になります。必要に応じて、適宜設定してください。
Route 53 Resolver
ホストゾーンの変更
プライベートホストゾーンへ変更します。これは名前解決をパブリックではなくVPC内でさせます。
resource "aws_route53_zone" "private" {
  name = "example.com"

  vpc {
    vpc_id = aws_vpc.example.id
  }
}
あとは対向先にDNSの登録をしてもらいましょう。設定はドメイン単位のDNSフォワード(ADなら条件付きフォワーダ)でしてもらいます。
Resolverエンドポイントの設置
DNS問い合わせされる側なので、インバウンドで設置します。
resource "aws_route53_resolver_endpoint" "foo" {
  name      = "foo"
  direction = "INBOUND"

  security_group_ids = [
    aws_security_group.sg1.id,
    aws_security_group.sg2.id,
  ]

  ip_address {
    subnet_id = aws_subnet.sn1.id
  }

  ip_address {
    subnet_id = aws_subnet.sn2.id
    ip        = "10.0.64.4"
  }

  tags = {
    Environment = "Prod"
  }
}
Direct Connect(DX)
最後はDXです。冒頭にも記述しましたが、他にもプライベートな通信手段はありますので、適切なものを選んで設定してください。ここではDXGWを使った、DXの設定方法を記述します。
なお、このDX設定に限り一部手動設定を含みます。
① DXGW
DXGWを作成します。
resource "aws_dx_gateway" "example" {
  name            = "tf-dxg-example"
  amazon_side_asn = "64512"
}
② VIF(手動設定)
VIFを承諾し、①で作成したDXGWを関連付けます。
③ VGW
VGWを作成し、DXGWと関連付けます。
# VGW
resource "aws_vpn_gateway" "vpn_gw" {
  vpc_id = aws_vpc.main.id

  tags = {
    Name = "main"
  }
}

# DXGWとの関連付け
resource "aws_dx_gateway_association" "example" {
  dx_gateway_id         = aws_dx_gateway.example.id
  associated_gateway_id = aws_vpn_gateway.example.id

  allowed_prefixes = [
    "210.52.109.0/24", # VGWと関連付けられたVPC
    "175.45.176.0/22", # VGWと関連付けられたVPC
  ]
}
④ ルートテーブル
対向先のCIDRを、接続先となるプライベートサブネットのルートテーブルに追加しておきましょう。gateway_idが必要です。
resource "aws_route" "r" {
  route_table_id            = aws_route_table.testing.id
  destination_cidr_block    = "10.0.1.0/22"
  gateway_id                = aws_vpn_gateway.vpn_gw.id
}
以上で閉域化の完了です!ぜひ参考にしてみてください🏯