前書き
前回 はコマンドを作成しました。
今回はそのコマンドに情報を入れたり、コマンドを個々のファイルに分けたりしたいと思います。
開発環境
前回 と少し変わります(discord.jsを少しアプデしました。)
- Windows10
- npm 7.6.3
- node 17.0.1 (最小要件:16.6.0)
- discord.js 13.3.1
コーディング
前回 作成したファイル(deploy-commands.js)のcommandsの部分を下記のものに書き換え + 書き加えます。
編集後の構文はこちら
deploy-commands.js
- const { SlashCommandBuilder } = require('@discordjs/builders');
+ const fs = require('fs');
const { REST } = require('@discordjs/rest');
const { Routes } = require('discord-api-types/v9');

- const commands = [
-   new SlashCommandBuilder().setName('ping').setDescription('Replies with pong!'), //pingコマンド
-   new SlashCommandBuilder().setName('server').setDescription('Replies with server info!'), //serverコマンド
-   new SlashCommandBuilder().setName('user').setDescription('Replies with user info!'), //userコマンド
- ]
-   .map(command => command.toJSON());
+ const commands = [];
+ const commandFiles = fs.readdirSync('./commands').filter(file => file.endsWith('.js'));

const client_id  = 'クライアントのID'
const guild_id = 'サーバーのID'
const token = 'トークン'

+ for (const file of commandFiles) {
+	const command = require(`./commands/${file}`);
+	commands.push(command.data.toJSON());
+ }

const rest = new REST({ version: '9' }).setToken(process.env.TOKEN);

rest.put(Routes.applicationGuildCommands(client_id, guild_id), { body: commands })
	.then(() => console.log('Successfully registered application commands.'))
	.catch(console.error);
さっそくコマンドを作成したいと思います。
あらたにcommandsというフォルダを作成し、その中にping.jsというjavascriptファイルを作成します。
ping.js
const { SlashCommandBuilder } = require('@discordjs/builders'); //SlashCommandBuilderを読み込む

module.exports = {
	data: new SlashCommandBuilder()
		.setName('ping') //名前を'ping'に設定
		.setDescription('Pong! と返事をします。'), //説明を'Pong! と返事をします。'に設定
	async execute(interaction) {
		await interaction.reply('Pong!'); //返答
	},
};
次にメインとなる index.js も書き換え + 書き加えます。
index.js
+ const fs = require('fs');
+ const { Client, Collection, Intents } = require('discord.js'); //Collectionを追加してください

const client = new Client({ intents: [Intents.FLAGS.GUILDS] });

+ client.commands = new Collection(); //新しいインスタンスを作成します

+ const commandFiles = fs.readdirSync('./commands').filter(file => file.endsWith('.js'));

+ for (const file of commandFiles) {
+	const command = require(`./commands/${file}`); //同じ階層にあるcommandフォルダの中にあるjsファイルを取得
	// コレクションに新しいアイテムを設定
+	client.commands.set(command.data.name, command);
+ }

client.on('interactionCreate', async interaction => {
	if (!interaction.isCommand()) return;
-       const { commandName } = interaction;
-       if (commandName === 'ping') { //pingコマンド
-           await interaction.reply('Pong!');
-       } else if (commandName === 'server') { //serverコマンド
-           await interaction.reply('Server info');
-       } else if (commandName === 'user') { //userコマンド
-           await interaction.reply('User info.');
-       }
+	const command = client.commands.get(interaction.commandName);
+	if (!command) return;
+	try {
+		await command.execute(interaction);
+	} catch (error) {
+		console.error(error);
+		await interaction.reply({ content: 'コマンド実行時にエラーが発生しました', ephemeral: true});
+		}
});
これで個々のファイルにコマンドを作ることができました。
これによりコーディングが見やすく、容易にすることができます。
コマンド発展
今回作成する機能は
- コマンドを入力したサーバーの情報を表示
- 指定したユーザーの情報を表示
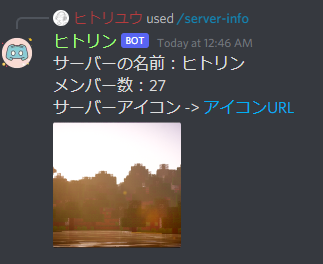
まずは「コマンドを入力したサーバーの情報を表示」を作成したいと思います。
先ほど作成したcommandsフォルダに新しくserver.jsというファイルを作成しましょう(ファイル名は任意)
server.js
const { SlashCommandBuilder } = require('@discordjs/builders'); //スラッシュコマンドを作成する際のおまじない

module.exports = {
    data: new SlashCommandBuilder()
        .setName('server')
        .setDescription('サーバーの情報を表示します。'),
    async execute(interaction) {
        const server = interaction.guild; //コマンドを入力したサーバーを取得
        await interaction.reply(
            `サーバーの名前:${server.name}
            \n
            メンバー数:${server.memberCount}
            \n
            サーバーアイコン -> ${server.iconURL({ format: 'png' })}`
        );
    },
};
次に「指定したユーザーの情報を表示」を作成したいと思います。
先ほどのファイルとは別にuser.jsというファイルを作成しましょう(これもファイル名は任意)
user.js
const { SlashCommandBuilder } = require('@discordjs/builders');

module.exports = {
    data: new SlashCommandBuilder()
        .setName('user')
        .setDescription('ユーザーの情報を表示します。')
        .addUserOption(option => option.setName('ユーザー').setDescription('情報を表示したいユーザーを指定。')),
    async execute(interaction) {
        const user = interaction.options.getUser('ユーザー');
        await interaction.reply(
            `ユーザーの名前:${user.username}
            \n
            ユーザーID:${user.id}
            \n
            アバター -> [アバターURL](${user.avatarURL({ format: 'png' })})`
            );
    },
};
.addUserOptionでユーザーを指定する設定をします。
SUB_COMMANDやSTRING、NUMBER等いろいろあります。

構文一覧
deploy-commands.js
const fs = require('fs');
const { REST } = require('@discordjs/rest');
const { Routes } = require('discord-api-types/v9');

const commands = [];
const commandFiles = fs.readdirSync('./commands').filter(file => file.endsWith('.js'));

const client_id  = 'クライアントのID'
const guild_id = 'サーバーのID'
const token = 'トークン'

for (const file of commandFiles) {
  const command = require(`./commands/${file}`);
  commands.push(command.data.toJSON());
}

const rest = new REST({ version: '9' }).setToken(process.env.TOKEN);

rest.put(Routes.applicationGuildCommands(client_id, guild_id), { body: commands })
	.then(() => console.log('Successfully registered application commands.'))
	.catch(console.error);
index.js
const fs = require('fs');
const { Client, Collection, Intents } = require('discord.js');

const client = new Client({ intents: [Intents.FLAGS.GUILDS] });

client.commands = new Collection();

const commandFiles = fs.readdirSync('./commands').filter(file => file.endsWith('.js'));

for (const file of commandFiles) {
    const command = require(`./commands/${file}`);
    client.commands.set(command.data.name, command);
}

client.on('interactionCreate', async interaction => {
    if (!interaction.isCommand()) return;
    const command = client.commands.get(interaction.commandName);
    if (!command) return;
    try {
        await command.execute(interaction);
    } catch (error) {
        console.error(error);
        await interaction.reply({ content: 'コマンド実行時にエラーが発生しました。', ephemeral: true});
    }
});

client.login('トークン');
server.js
const { SlashCommandBuilder } = require('@discordjs/builders');

module.exports = {
    data: new SlashCommandBuilder()
        .setName('server')
        .setDescription('サーバーの情報を表示します。'),
    async execute(interaction) {
        const server = interaction.guild;
        await interaction.reply(
            `サーバーの名前:${server.name}\nメンバー数:${server.memberCount}\nサーバーアイコン -> ${server.iconURL({ format: 'png' })}`
        );
    },
};
user.js
const { SlashCommandBuilder } = require('@discordjs/builders');

module.exports = {
    data: new SlashCommandBuilder()
        .setName('user')
        .setDescription('ユーザーの情報を表示します。')
        .addUserOption(option => option.setName('ユーザー').setDescription('情報を表示したいユーザーを指定。')),
    async execute(interaction) {
        const user = interaction.options.getUser('ユーザー');
        await interaction.reply(`ユーザーの名前:${user.username}\nユーザーID:${user.id}\nアバター -> [アバターURL](${user.avatarURL({ format: 'png' })})`);
    },
};
参考にしたサイト