前回の記事 -> 【基本】discord.js v13 でボット作成
[2021年10月23日時点]
前書き
前回 はコーディングから起動までを行いました。
今回はさっそくコマンドを作成していきます。
今回参考にさせていただいたサイト -> Creating commands - Discord.js Guide
開発環境
前回 と変わりません
- Windows10
- npm 7.6.3
- node 17.0.1 (最小要件:16.6.0)
- discord.js 13.2.0
スラッシュコマンド
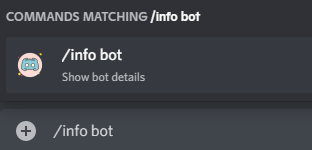
下記の画像のように /コマンド を作ります。
ダウンロード
スラッシュコマンドを作るために @discordjs/builders、 @discordjs/rest、 discord-api-types をダウンロードします。
npm install @discordjs/builders @discordjs/rest discord-api-types
コーディングの前に
スラッシュコマンドを作成し、サーバー等に追加するにはボットを追加するときのように許可をする必要があります。
DEVELOPER PORTALに行き、作成したアプリケーションをクリック、OAuth2のところにある
OAuth2 URL GeneratorのSCOPESボックスの中からapplications.commandsのところをチェックします。
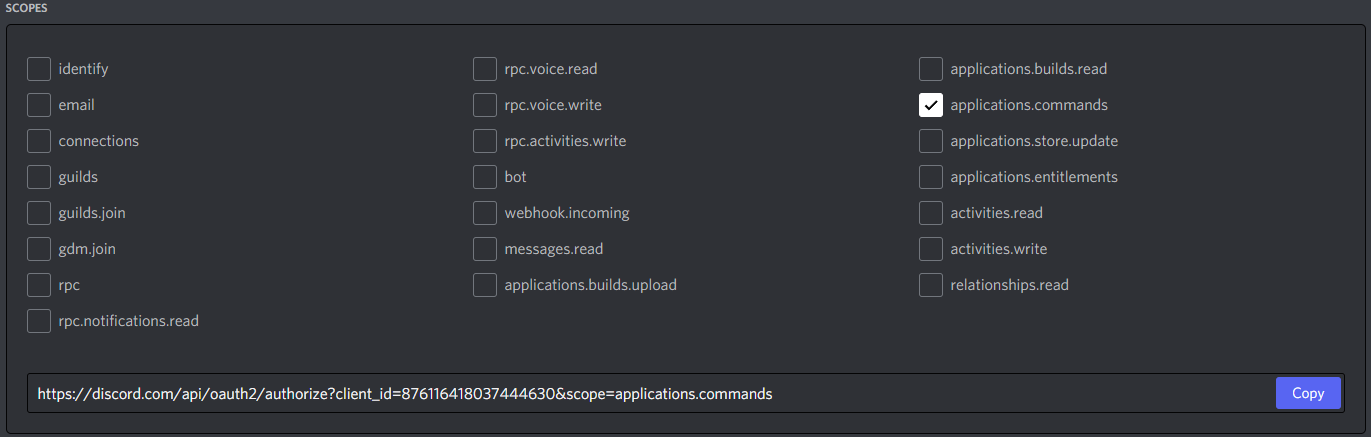
出てきたURLをコピペし開き、許可します。
これで準備ができました。コーディングに移りましょう。
コーディング
まずは、スラッシュコマンドを登録および更新するために使用するファイルを作成します。
前回 作成したファイルとは違う別のjavascriptファイルを作成します。
※今回は、deploy-commands.js という名前で作成します。
const { SlashCommandBuilder } = require('@discordjs/builders'); //SlashCommandBuilderを読み込む
const { REST } = require('@discordjs/rest'); //RESTを読み込む
const { Routes } = require('discord-api-types/v9'); //Routesを読み込む
const client_id  = 'クライアントのID' //クライアントIDをclient_idに代入
const guild_id = 'サーバーのID' //サーバーIDをguild_idに代入
const token = 'トークン' //トークン

const commands = [
	new SlashCommandBuilder().setName('ping').setDescription('Replies with pong!'), //pingコマンド
	new SlashCommandBuilder().setName('server').setDescription('Replies with server info!'), //serverコマンド
	new SlashCommandBuilder().setName('user').setDescription('Replies with user info!'), //userコマンド
]
	.map(command => command.toJSON());

const rest = new REST({ version: '9' }).setToken(token);

rest.put(Routes.applicationGuildCommands(client_id, guild_id), { body: commands })
	.then(() => console.log('Successfully registered application commands.'))
	.catch(console.error); //指定したサーバーにコマンドを登録・更新
前回 作成したファイル(index.js)に下記のコードを追加します。
readyの後、loginの前が良いでしょう。
~
~
~
client.on('interactionCreate', async interaction => { //メッセージを受け取ったら
	if (!interaction.isCommand()) return; //コマンド以外は無視

	const { commandName } = interaction;

	if (commandName === 'ping') { //pingコマンド
		await interaction.reply('Pong!');
	} else if (commandName === 'server') { //serverコマンド
		await interaction.reply('Server info');
	} else if (commandName === 'user') { //userコマンド
		await interaction.reply('User info.');
	}
});
~
~
~
client.login('トークン');
これでコーディングは完了です。起動してみましょう
起動
今回の起動には注意が必要です。コマンドラインを開き、まずは下記のコマンドを入力してください。
node deploy-commands.js
コマンドを新しく作成したり、編集したりしたときはこのコマンドを入力してください。
そしたら 前回 と同じように下記のコマンドを入力しましょう。
node index.js
また、package.jsonで指定している場合は
node .
でも起動できます。
先ほど指定したサーバーで「/server」などを入力し送信するとボットから「Server info」と送られてくれば成功です。
次回はコマンドを別々のファイルに保存したり、コマンドに様々な情報を入れて使えるようにしたいと思います。