環境
ここをクリックしてください
python3.11
IDLE
pythonの基礎を学びたい人へ
サイトを紹介しておきます。
参考にしたサイト
ここをクリックしてください
人工知能に関する断創録
PythonとPygameで作る レトロ風RPG 全コード
*注意:while の中にprint()があると、基本的に無限ループに陥るので気をつけましょう。(ただし、処理が遅い場合やif文、キー操作で一回だけ実行する場合は大丈夫です)
Pygameド素人がRPGを作る1
Pygameド素人がRPGを作る2
PygameでRPG制作 ーーそれっぽい画面を作ってみよう
PygameでRPG制作 ーーそれっぽい画面を作ってみよう② バトル画面のメニューを作ろう
PygameでRPG制作 ーーそれっぽい画面を作ってみよう③効果音を使ってみよう
PygameでRPG制作 ーーそれっぽい画面を作ってみよう④ 各アクションのでの動作とHP機能の実装
PygameでRPG制作 ーーそれっぽい画面を作ってみよう⑤ HP表示とスライムリッキーの反撃、終了処理
画面の表示
ここをクリックしてください
import pygame
import sys

pygame.init()
screen = pygame.display.set_mode((320, 320))
pygame.display.set_caption('screen only')

black = (0,0,0)

clock = pygame.time.Clock()
running = True
while running:
    clock.tick(60)
    screen.fill(black)
    pygame.display.update()
    for event in pygame.event.get():
        if event.type == pygame.QUIT:
            pygame.quit()
            sys.exit()
import pygame
ライブラリのインポート
事前にインストールしておきましょう。
コマンドで py -m pip install pygame
import sys
画面を閉じるのに必要です。
pygame.init()
初期化します。
screen = pygame.display.set_mode((320, 320))
数値は画面の大きさです。(よこ、たて)
pygame.display.set_caption('screen only')
ウィンドウの名前です。
black = (0,0,0)
色のタプルを変数に格納します。
黒(0, 0, 0)白(255, 255, 255)灰色(128, 128, 128)
clock = pygame.time.clock()
running = True
while runnig:
clock.tick(60)
runningがTrueなら繰り返し処理を実行します。
clock.tick(60) を入れることで、Pygame のゲームループの実行速度を 1 秒間に 60 フレームに制限し、CPU の使用率を抑えることができます。
screen.fill(black)
画面を指定した色で塗りつぶします。
pygame.display.update()
画面の更新をします。
for event in pygame.event.get():
if event.type == pygame.QUIT:
pygame.quit()
ウィンドウの閉じるボタンを押すと動かなくなります。まだ閉じません。
sys.exit()
ウィンドウを閉じます。
テキスト表示
ここをクリックしてください
コードを動かす前に、まずはフォントファイルの準備が必要です。
pygameでは日本語がサポートされてません。日本語でテキストを表示するには、.ttfファイルが必要です。.pngファイルだと自分でコードを書かないとダメです。
一般社団法人文字情報技術促進協議会(ここから、フォントファイルをダウンロード)

Windowsでパスをそのまま貼り付けるとエラーが出るので、""(ダブルクォーテーション)の前にrをつけましょう。(r"")
エラーの原因がエラー文が指し示すのとは別の行のこともあります。
import pygame
import sys

pygame.init()
screen = pygame.display.set_mode((160, 160))
pygame.display.set_caption('text only')
#ここにフォントのパスを貼り付ける
font = pygame.font.Font(パス, 30)

white = (255,255,255)
black = (0,0,0)

clock = pygame.time.Clock()
running = True
while running:
    clock.tick(60)
    screen.fill(black)
    message_text = font.render("こんにちは", True, white)
    screen.blit(message_text, (5, 65))

    pygame.display.update()
    for event in pygame.event.get():
        if event.type == pygame.QUIT:
            pygame.quit()
            sys.exit()
font = pygame.font.Font(ここにパスを貼り付ける, 30)
フォントファイルをロードします。()の中にパスを貼り付けましょう。数値はフォントの大きさです。
message_text = font.render("こんにちは", True, white)
Falseにすると、文字がギザギザします。最後は文字の色です。
screen.blit(message_text, (5, 65))
文字を画面に描画します。数値は座標です。(よこ、たて)
*座標は左上が(0,0)です。ヨコは右に行くほど増えます。タテは下に行くほど増えます。

効果音を鳴らす
ここをクリックしてください
コードを動かす前に効果音のファイルが必要です。
On-Jin ~音人~ ここから効果音ファイルをダウンロード
import pygame
import sys
from pygame.locals import *

pygame.init()
pygame.mixer.init()
screen = pygame.display.set_mode((160, 160))
pygame.display.set_caption('SE only')
#ここに効果音のパスを貼り付ける
sound = pygame.mixer.Sound(パス)

black = (0,0,0)

clock = pygame.time.Clock()
running = True
while running:
    clock.tick(60)
    screen.fill(black)
    pygame.display.update()
    for event in pygame.event.get():
        if event.type == QUIT:
            pygame.quit()
            sys.exit()
        elif event.type == KEYDOWN:
            sound.play()
from pygame.locals import *
from pygame.locals import * は特定の定数のみをインポートし、from pygame import * はPygame全体をインポートします。
これがあると KEYDOWNやQUITの前にpygame. を書かなくてよいです。すべてのpygame.がいらなくなるわけではないです。(pygame.quit()のpygameを消すとちょっと挙動が怪しいので消さないようにしましょう)
sound = pygame.mixer.Sound(ここにパスを貼り付ける)#ファイルのパス
効果音をロードします。
pygame.error: No such file or directory:
こういったエラーが出たら、パスの前にrをつけましょう。
r"パス"
elif event.type == KEYDOWN:
何かキーが押されたときに処理を実行します。
for event in pygame.event.get():の下に書きます。
sound.play()
効果音を鳴らします。(ここではsoundは変数名です。)
BGMを鳴らす
ここをクリックしてください
コードを動かす前に音楽ファイルが必要です。
かまタマゴ ここから音楽ファイルをダウンロード
import pygame
import sys
from pygame.locals import *

pygame.init()
screen = pygame.display.set_mode((160,160))
pygame.display.set_caption("BGM_only")
#ここにBGMのパスを貼り付ける
pygame.mixer.music.load(パス)
pygame.mixer.music.play(-1)

black = (0,0,0)

clock = pygame.time.Clock()
running = True
while running:
    clock.tick(60)
    screen.fill(black)
    pygame.display.update()
    for event in pygame.event.get():
        if event.type == QUIT:
            pygame.quit()
            sys.exit()
pygame.mixer.music.load(ここにパスを貼り付ける)
BGMをロードします。
pygame.error: No such file or directory:
こういったエラーが出たら、パスの前にrをつけましょう。
r"パス"
pygame.mixer.music.play(-1)
BGMをループします。1だと1回、鳴らします。何も書かない場合でも1回、鳴らします。
start = 1.0 でスタート地点を指定できます。ただし2回目は最初から再生されます。数値は秒単位です。pygame.mixer.music.play(1,1.0)と書くこともできます。
選択肢を作る
ダウンキーとアップキーでテキストの明るさが変わります。
ここをクリックしてください
import pygame
from pygame.locals import *
import sys

pygame.init()
screen = pygame.display.set_mode((160,160))
#ここにフォントのパスを貼り付ける
font = pygame.font.Font(パス, 30)
white = (255,255,255)
black = (0,0,0)
gray = (128,128,128)
color1 = white
color2 = gray
cmd = 0

clock = pygame.time.Clock()
running = True
while running:
    clock.tick(60)
    screen.fill(black)
    text1 = font.render("newgame", True, color1)
    text2 = font.render("continue", True, color2)
    screen.blit(text1, (10 , 50))
    screen.blit(text2, (10 , 80))
    pygame.display.update()

    for event in pygame.event.get():
        if event.type == QUIT:
            pygame.quit()
            sys.exit()

        elif event.type == KEYDOWN:
            if event.key == K_DOWN:
                if cmd == 0:
                    cmd = 1
                    color1 = gray
                    color2 = white

            elif event.key == K_UP:
                if cmd == 1:
                    cmd = 0
                    color1 = white
                    color2 = gray
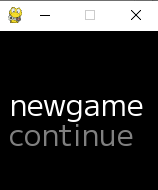
明るさが変わると書きましたが、実際は色を変えてます。
線の描画
ここをクリックしてください
import pygame
import sys
from pygame.locals import *

pygame.init()
screen = pygame.display.set_mode((320, 320))
pygame.display.set_caption('line')
white = (255,255,255)
black = (0,0,0)
clock = pygame.time.Clock()
running = True
while running:
    clock.tick(60)
    screen.fill(black)
    pygame.draw.line(screen, white, (110, 160), (210, 160), 2)
    pygame.display.update()
    for event in pygame.event.get():
        if event.type == pygame.QUIT:
            pygame.quit()
            sys.exit()
pygame.draw.line(screen, white, (110, 160), (210, 160), 2)
white 色の指定です。
(110,160),(210,160) (始点の座標),(終点の座標)
2は線の太さです。
背景の描画
背景をダウンロードしましょう。
ぴぽや倉庫 ここからダウンロード
ここをクリックしてください
import pygame
import sys

pygame.init()
screen = pygame.display.set_mode((320,320))
pygame.display.set_caption("背景の描画")
#ここに背景のパスを貼り付ける
bg = pygame.image.load(パス)
clock = pygame.time.Clock()
running = True
while running:
    clock.tick(60)
    screen.blit(bg,(0,0))
    pygame.display.update()
    for event in pygame.event.get():
        if event.type == pygame.QUIT:
            pygame.quit()
            sys.exit()
bg = pygame.image.load(ここにパスを貼り付ける)
画像をロードします。
pygame.error: No such file or directory:
こういったエラーが出たら、パスの前にrをつけましょう。
r"パス"
screen.blit(bg,(0,0))
(0,0)座標です。(よこ、たて)
タイトル画面
ここをクリックしてください
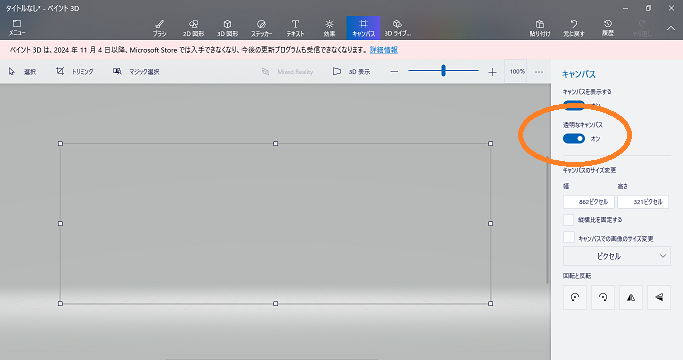
あらかじめ、ペイント3Dでタイトルロゴを作ります。
(ペイント3Dは、2024年11月4日以降、Microsoft Storeでは入手できなくなり、今後の更新プログラムも受信できなくなります。)
まずはフォントをインストールします。
フォントファイルをダブルクリックします。
インストールをクリックします。
一瞬で終わります。

ペイント3Dを開きます。
キャンパスをクリックします。(アイコンの方)
透明なキャンパスをオンにします。

テキストをクリックします。(右側のTの字)
3Dテキストをクリックします。
フォントを選びます。
大きさを48にします。
色をクリックします。

キャンパス内をクリックしてタイトルを書きます。
タイトルを傾けます。

クリックして確定します。
(一度位置を確定しても文字をダブルクリックすればもう一度やり直せます。文字の変更の表示が出なくても辛抱強くダブルクリックしましょう。そのうち出ます)
キャンパスをクリックします。(アイコンの方)
キャンパスをできるだけ小さくします。
メニューをクリックして、名前を付けて保存を選びます。
画像をクリックします。
ファイルの種類をPNGのままにして保存をクリックします。
(PNGでないと背景が透明のまま保存できません)
import pygame
import sys
from pygame.locals import *

# Pygameの初期化
pygame.init()

# 画面サイズの設定
screen = pygame.display.set_mode((640, 480))
pygame.display.set_caption("title")

#ここにフォントのパスを貼り付ける
font = pygame.font.Font(パス, 20)
#背景画像
#ここに背景のパスを貼り付ける
image = pygame.image.load(パス)
#タイトル画像
#ここにタイトル画像のパスを貼り付ける
tile_image = pygame.image.load(パス)
#シルエット画像
#ここにシルエット画像のパスを貼り付ける
silhouette_image = pygame.image.load(パス)

cmd = 0

white = (255,255,255)
gray = (208,208,208)
red = (255,0,0)
yellow = (245,245,0)

color1 = (208,208,208)
color2 = (208,208,208)
color3 = (208,208,208)


# メインループ
clock = pygame.time.Clock()
running = True
while running:
    clock.tick(60)

    #背景
    screen.blit(image,(0, 0))
    #タイトルロゴ
    screen.blit(silhouette_image,(260,30))
    screen.blit(tile_image,(20,70))
    #サブタイトル
    message_text = font.render("ヘイジパクエスト", True, red)
    screen.blit(message_text, (240, 175))
    pygame.draw.line(screen, red, (240, 200), (400, 200), 1)
    message_text = font.render("失われた王国の秘宝", True, white)
    screen.blit(message_text, (228, 205))
    #選択
    message_text = font.render("New Game", True, color1)
    screen.blit(message_text, (270, 293))
    message_text = font.render("Continue", True, color2)
    screen.blit(message_text, (280, 323))
    message_text = font.render("Finish", True, color3)
    screen.blit(message_text, (290, 353))

    #色の変更
    if cmd == 0:
        color1 = white
    else:
        color1 = gray

    if cmd == 1:
        color2 = white
    else:
        color2 = gray

    if cmd == 2:
        color3 = white
    else:
        color3 = gray


    # 画面を更新
    pygame.display.flip()
    for event in pygame.event.get():
        if event.type == pygame.QUIT:
            pygame.quit()
            sys.exit()
        elif event.type == KEYDOWN:
            if event.key == K_DOWN:
                if cmd == 0:
                    cmd = 1
                elif cmd == 1:
                    cmd = 2
                elif cmd == 2:
                    cmd = 0
            elif event.key == K_UP:
                if cmd == 0:
                    cmd = 2
                elif cmd == 1:
                    cmd = 0
                elif cmd == 2:
                    cmd = 1

pygame.error: No such file or directory:
こういったエラーが出たら、パスの前にrをつけましょう。
r"パス"
エラー文ではシルエット画像が示されましたが、エラーの原因はタイトル画像でした。(ぼくの体験談)
エラーの原因がエラー文が指し示すのとは別の行のこともあります。
画面切り替え
ここをクリックしてください
スペースキーで画面が切り替わります。
import pygame
from pygame import *
import sys

first,second = 0,1
game_state = first
pygame.init()
screen=pygame.display.set_mode((160,160))
pygame.display.set_caption("Screen switching")

black = (0,0,0)

clock = pygame.time.Clock()
running = True
while running:
    clock.tick(60)
    screen.fill(black)
    pygame.display.update()

    if game_state==first:
        pygame.init()
        screen=pygame.display.set_mode((160,160))
        pygame.display.set_caption('a')
        black = (0,0,0)
        clock = pygame.time.clock()
        running = True
        while running:
            clock.tick(60)
            screen.fill(black)
            pygame.display.update()
            for event in pygame.event.get():
                if event.type==QUIT:
                    pygame.quit()
                    sys.exit()
                elif event.type==KEYDOWN:
                    if event.key==K_SPACE:
                        if game_state==first:
                            running = False
                            game_state=second

    elif game_state==second:
        pygame.init()
        screen=pygame.display.set_mode((160,160))
        pygame.display.set_caption('b')
        black = (0,0,0)
        clock = pygame.time.clock()
        running = True
        while running:
            clock.tick(60)
            screen.fill(black)
            pygame.display.update()
            for event in pygame.event.get():
                if event.type==QUIT:
                    pygame.quit()
                    sys.exit()
                elif event.type==KEYDOWN:
                    if event.key==K_SPACE:
                        if game_state==second:
                            running = False
                            game_state=first

    for event in pygame.event.get():
        if event.type==QUIT:
            pygame.quit()
            sys.exit()
if文とキーハンドラーを使って切り替えます。
ポイントはgame_stateを変更する前にrunning = Falseにしていることです。これがないと画面が切り替わりません。ループを止めてから画面を切り替えます。