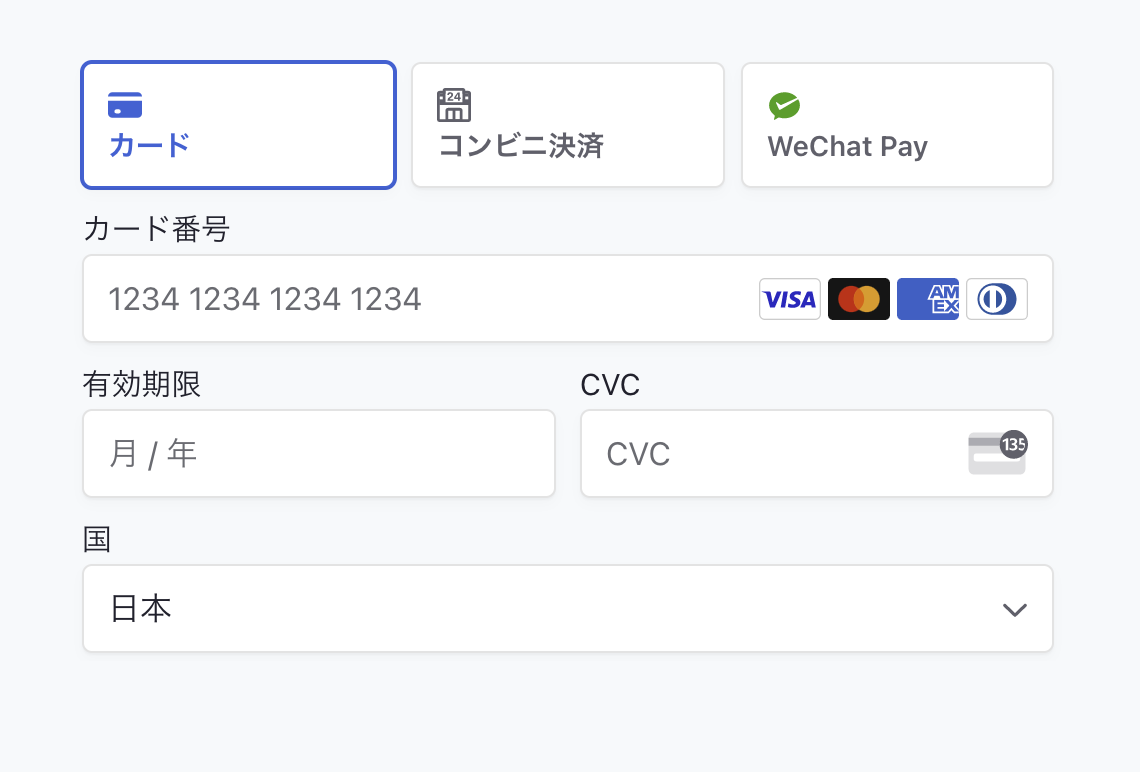
Stripeではリダイレクト型決済フォームのCheckout以外に、サイト・アプリに埋め込むトークン型決済のElementsを提供しています。
今回は、その中でも2022年春に登場した「銀行振込」をサポートする方法を紹介します。
Elementsで銀行振込決済を受け付ける3Step
Step1: API・サーバー側処理で、銀行振込に対応したPayment Intentを作成する
Elementsでは、まずPayment Intentをサーバー側で作成します。
この際に、銀行振込に必要な情報や発行される口座情報を紐づけるための顧客データ作成処理を含めましょう。
  const stripe = new Stripe(process.env.STRIPE_API_KEY as string, {
    apiVersion: '2022-08-01'
  });
  const customer = await stripe.customers.create();
  const intent = await stripe.paymentIntents.create({
    amount: 1000,
    currency: 'jpy',
    customer: customer.id,
    payment_method_types: ['card', 'customer_balance'],
    payment_method_data: {
      type: 'customer_balance'
    },
    payment_method_options: {
      customer_balance: {
        funding_type: 'bank_transfer',
        bank_transfer: {
          type: 'jp_bank_transfer'
        }
      }
    }
  });
  res.status(200).json({
    client_secret: intent.client_secret
  });
payment_method_dataやpayment_method_optionsの設定は、カード決済やコンビニ決済を利用する場合でもそのまま利用できます。
Step2: @stripe/stripe-jsと@stripe/react-stripe-jsで決済フォームを描画する
続いてAPIから受け取ったPayment Intentデータを利用して、決済フォームを用意します。
import { useEffect, useState } from 'react';
import { Elements } from "@stripe/react-stripe-js";
import { loadStripe } from "@stripe/stripe-js";

export const PaymentFormElement = () => {
  return <p>Dummy</p>
}

export const PaymentPage = () => {
  const [clientSecret, setClientSecret] = useState('');
  useEffect(() => {
    fetch('/api/hello')
    .then(data => data.json())
    .then((intent) => {
      if (intent.client_secret) setClientSecret(intent.client_secret);
    });
  },[setClientSecret]);

  if (!clientSecret) return <p>Loading...</p>;
  return (
    <Elements
      stripe={stripePromise}
      options={{
        clientSecret
      }}
    >
      <PaymentFormElement />
    </Elements>
  );
};
@stripe/react-stripe-jsの、<PaymentElement>や<LinkAuthenticationElement>を利用するには、payment_intent.client_secretが必要です。
そのため、APIからclient_secretを取得できるまでの間、「Loading...」テキストを代替コンテンツとして表示させています。
続いて、PaymentFormElementに<PaymentElement>を含むform要素と、submit時の処理を追加します。
- import { Elements } from "@stripe/react-stripe-js";
+ import { Elements, PaymentElement, useElements, useStripe  } from "@stripe/react-stripe-js";

const PaymentFormElement = () => {
-  return <p>Dummy</p>
+  const stripe = useStripe();
+  const elements = useElements();
+  return (
+    <form
+      onSubmit={e => {
+        e.preventDefault();
+        if (!stripe || !elements) return;
+        stripe.confirmPayment({
+          elements,
+          confirmParams: {
+            return_url: 'https://example.com'
+          }
+        })
+      }}
+    >
+      <PaymentElement />
+      <button type='submit'>Order</button>
+    </form>
+  );
+}
変更を保存すると、カード・銀行振込に対応した決済フォームを描画するページの完成です。
Step3: Webhookを受け取るAPIを用意し、入金完了をシステムに伝える仕組みを作る
顧客が必要な金額を振り込みしたかどうかについては、Stripe Webhookを利用して確認できます。
payment_intent.succeededイベントは、カードなどの決済でも発火します。
そのため、複数の決済方法をサポートしたいシステムでは、このイベントを受けて発送系などのシステムを動かすアーキテクチャにする必要があります。
      if (event.type === 'payment_intent.succeeded') {
          const paymentIntent = event.data.object;
          /**
           * 入金が完了したことをシステムに伝える。
           * - 入金のお礼メール
           * - 発送系のシステムをよびだす
           * - etc...
           **/
      }
Webhookの署名検証やAPIセットアップ方法については、ドキュメントのコードビルダーをお使いください。
銀行振込をテストする
銀行振込での決済をテストする簡単な方法は、Stripe Dashboardを利用することです。
対象となる顧客の詳細ページを開き、[支払い方法]の[追加]をクリックします。
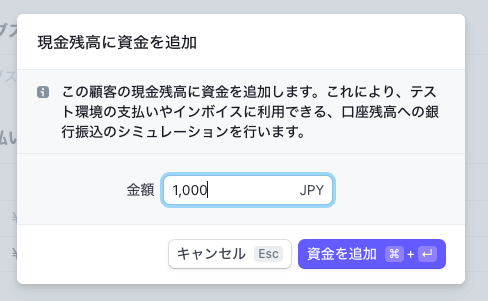
すると、[現金残高に資金を追加(テスト環境のみ)]が表示されます。これをクリックすると、顧客の現金残高を追加することができます。
残高を追加すると、作成済みのPayment Intentや請求書の金額の決済が自動で行われます。
そのため、payment_intent.succeededのテストが行いたい場合は、請求金額と同じか、それより多い額を入金しましょう。
[PR] Stripe開発者向け情報をQiitaにて配信中!
- [Stripe Updates]:開発者向けStripeアップデート紹介・解説
- ユースケース別のStripe製品や実装サンプルの紹介
- Stripeと外部サービス・OSSとの連携方法やTipsの紹介
- 初心者向けのチュートリアル(予定)
など、Stripeを利用してオンラインビジネスを始める方法について週に2〜3本ペースで更新中です。


