通常のWebアプリケーションのフロントエンド開発を行う場合、一般ユーザーがログイン等を行わず利用する画面と、会員ユーザーがログインして使う画面や管理者画面があります。
前者は初めて訪れるユーザー向けのページであることが多く、ページが表示されるまでの時間が気になることが多いと思います。
そこで、ログインして利用するような画面の部分を必要なタイミングで遅延ロードして画面表示するようにすることで、Webアプリケーションの初期表示時にダウンロードされるjsファイルのサイズを小さくする方法があります。
今回は、以下のサイトで紹介されていたangular-cliでAngular2モジュールの遅延ロード(lazy load)を行う方法を実際に試してみます。
参考:Lazy-loading content with angular-cli
今回の実行環境
angular-cli: 1.0.0-beta.28.3
node: 6.10.3
os: macOS Sierra
アプリの作成
angular-cli-lazyloadという名前のプロジェクトを作成します。--routing trueオプションでルーティング設定付きにします。
ng new --routing true angular-cli-lazyload
初期表示コンポーネントとしてHomeを作成します。このコンポーネントは遅延ロードしない普通のやつです。
ng g component Home
遅延ロードするモジュールを追加
Lazyという名前で遅延ロードするモジュールを生成します。名前はなんでもいいと思います。--routing trueオプションでルーティング設定付きにします。
実行すると、勝手にappフォルダ内にLazyというフォルダが作成され、その中にlazy.componentが生成されました。
ng g module --routing true Lazy
遅延ロードされるLazyモジュールが表示するコンポーネントをLazyPageという名前で生成します。
ng g component lazy/LazyPage
src/app/lazy/lazy-routing.module.tsに生成されたLazyPageの設定を追加します。
import { NgModule } from '@angular/core';
import { Routes, RouterModule } from '@angular/router';
import {LazyComponent} from './lazy.component';
import {LazyPageComponent} from './lazy-page/lazy-page.component';

const routes: Routes = [{
  path: '',
  component: LazyComponent,
  children: [
    {
      path: 'lazypage',
      component: LazyPageComponent
    }
  ]
}];

@NgModule({
  imports: [RouterModule.forChild(routes)],
  exports: [RouterModule],
  providers: []
})
export class LazyRoutingModule { }
src/app/lazy/lazy.component.htmlにrouter-outlet設定を追加。
<h2>Lazy Module</h2>

<router-outlet></router-outlet>
アプリケーションのルーティング設定を修正
src/app/app-routing.module.tsに、lazy以下のURLにアクセスした際にLazyModuleを遅延ロードする設定を追加
import { NgModule } from '@angular/core';
import { Routes, RouterModule } from '@angular/router';
import {HomeComponent} from './home/home.component';

const routes: Routes = [
  { path: '', component: HomeComponent },
  { path: 'lazy', loadChildren: './lazy/lazy.module#LazyModule' },
  { path: '**', redirectTo: '' }
];

@NgModule({
  imports: [RouterModule.forRoot(routes)],
  exports: [RouterModule],
  providers: []
})
export class AppRoutingModule { }
src/app/app.component.htmlにナビゲーション設定を追加します。
<h1>
  {{title}}
</h1>

<p>Navigation:
  <a [routerLink]="['/']">Home</a>
  <a [routerLink]="['lazy/lazypage']">Lazy Page</a>
</p>

<h3>Current Route:</h3>
<router-outlet></router-outlet>
試してみる
アプリケーションをコンパイルして起動する。
ng serve
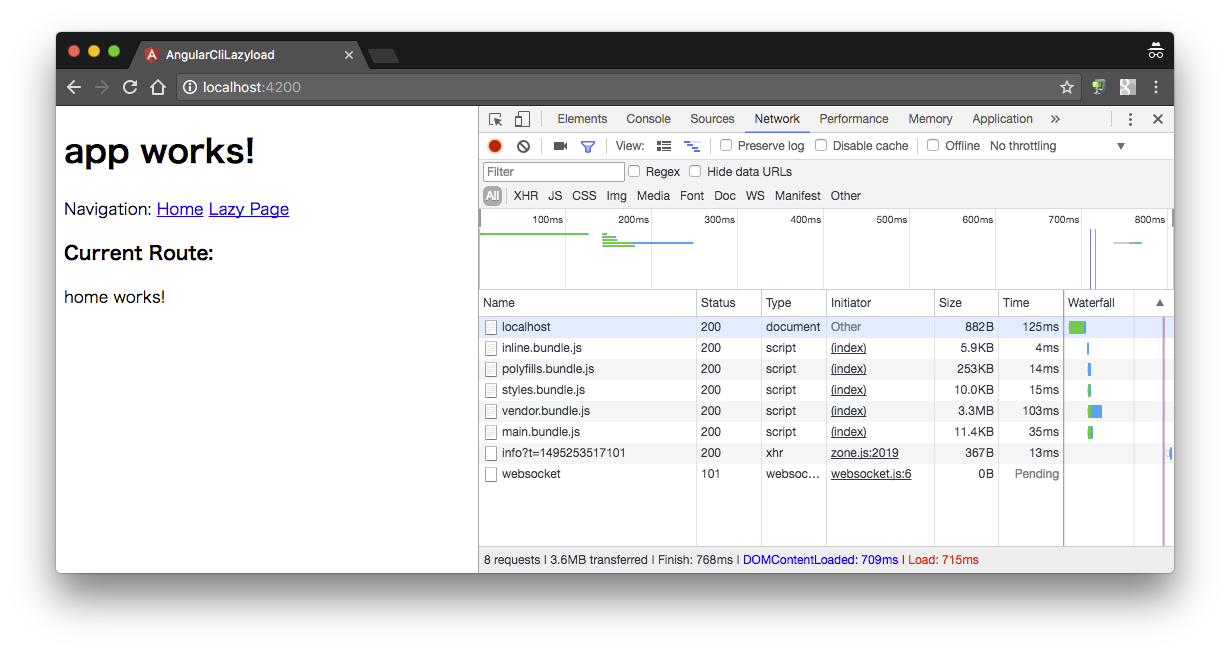
chromeとかのブラウザでディベロッパーツール等を起動してNetworkを表示した状態でhttp://localhost:4200にアクセスしてみる

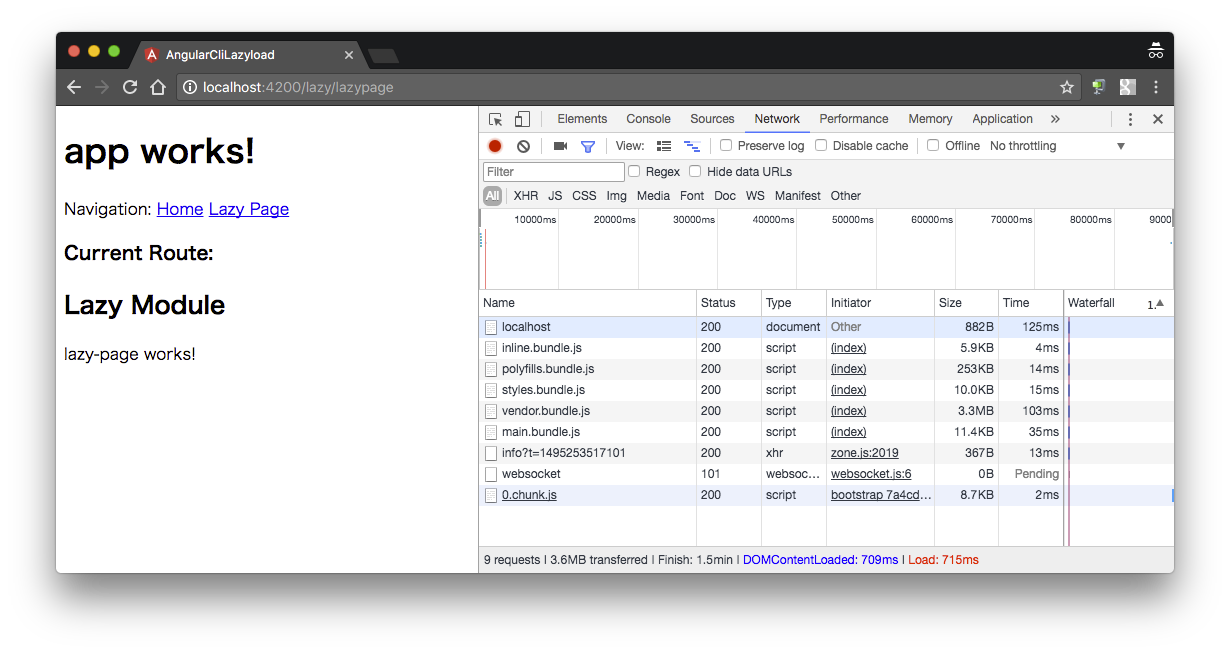
Lazy Pageのリンクをクリックして画面遷移すると、0.chunk.jsが遅延ロードされているのが分かります。

すごい!簡単にできました〜。