これはなに
Oracle Cloud Infrastructure(以下OCI。OracleのIaaS)上に、Kubernetesクラスターを構築する手順を書きます。
このチュートリアルでは、OracleがOSSとして公開している、TerraformベースのKubernetesインストーラーを利用します。
(2018/06/29追記)
OCIのコンソールのUIが一部変更になったため、本エントリの画面イメージは実際のコンソールと異なっています。
画面イメージ中でコンソール上方のタブ、及び左方のメニューで行っていたナビゲーションは、画面左上のハンバーガーメニューを展開して行うように変更されているのでご注意ください)
動作確認できている条件
- クラウド
- North America リージョンのDCが有効なOracle Cloudアカウントがあること
- ローカルPC
- Ubuntu 16.04(多分Macでもいける)
Oracle Cloudは、\35,000分のクラウド・サブスクリプションを無料で利用できる、トライアルアカウントを提供しています(2018/03/03現在)。このチュートリアルは、左記トライアルアカウントでも実施可能です。
トライアルアカウントのサインインの際、デフォルトのデータセンター・リージョンをNorth Americaに設定しておくと、このチュートリアルの実施がスムーズです。
全体の流れ
手順の大まかな流れは以下のとおりです。
- OCI上での準備作業
- TerraformベースのKubernetesインストーラーを使ってKubernetesクラスターを構築する
- クラスター環境にアクセスするためのクライアントをセットアップする
1 . OCIでの準備作業
まずはじめに、OCI上にKubernetes用の領域(Compartment)や、そのCompartmentの管理者アカウントなど、必要なリソースを作成していきます。
1-1. APIアクセスキーの作成
後の手順で利用するKubernetesインストーラーは、OCIのAPIを利用してその機能を実現しています。このAPIを利用するためには、OCI側に適切なアクセスキーを設定しておく必要があります。
ここでは、上記アクセスキーとして利用するキーペアを作成しておきます。
> mkdir ~/.oci
> openssl genrsa -out ~/.oci/oci_api_key.pem 2048
Generating RSA private key, 2048 bit long modulus
........................................................+++
..................................+++
e is 65537 (0x10001)
> chmod go-rwx ~/.oci/oci_api_key.pem
> openssl rsa -pubout -in ~/.oci/oci_api_key.pem -out ~/.oci/oci_api_key_public.pem
> ls .oci/
oci_api_key.pem  oci_api_key_public.pem
1-2. OCI上に必要なリソースを作成する
OCIのサービス・コンソールを操作して、Compartment等の必要なリソースを作成していきます。
1-2-1. OCIのサービス・コンソールにアクセスする
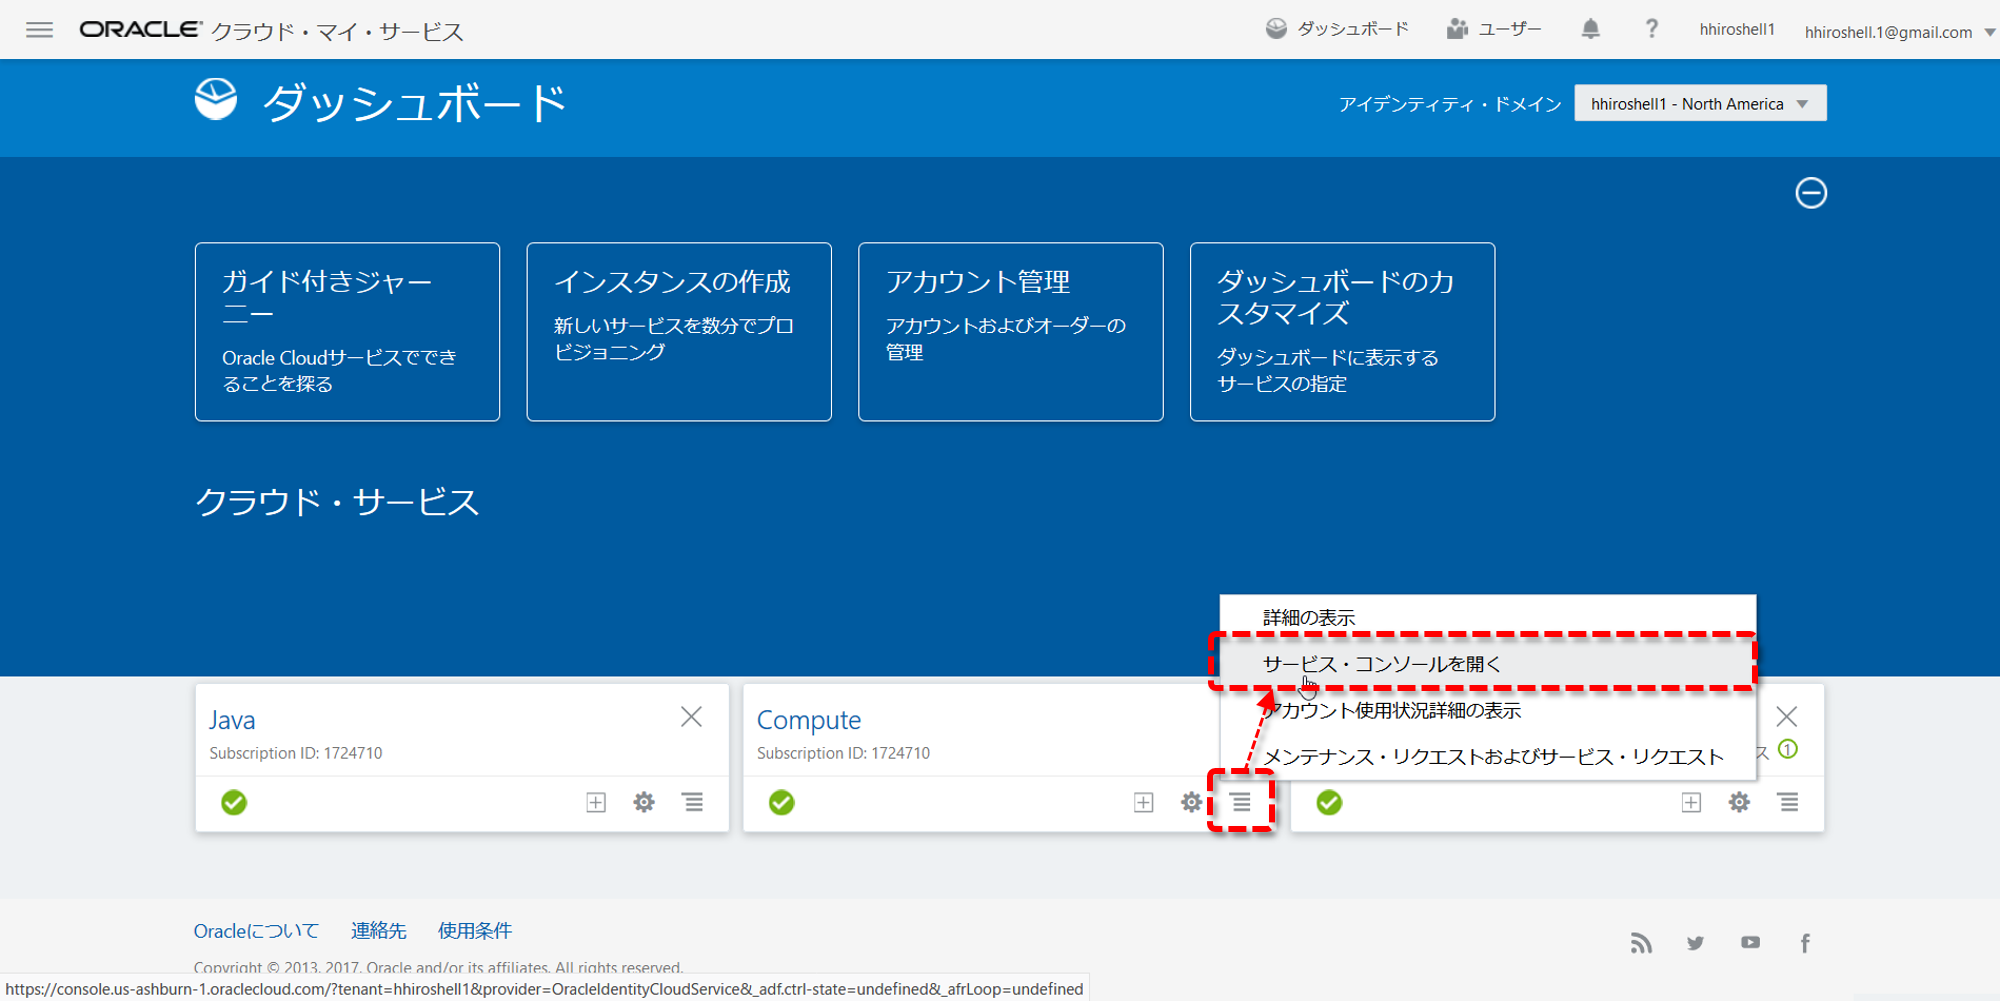
Oracle Cloudのダッシューボードにログインし、ダッシューボード画面で、"Compute"パネル右下のメニューアイコン -> "サービス・コンソールを開く"の順にクリックします。
"Compute"パネルが表示されていない場合は、画面上半分の青い領域にある"ダッシューボードのカスタマイズ"をクリックして、"Compute"パネルの表示を有効にしてください。
1-2-2. Compartmentを作成する
CompartmentはOCIのテナントの内部を仕切る区画で、その中に各種リソースを配置したり、CompartmentにPolicyを割り当てることを通じてアカウントの権限を管理したりすることができます。
ここでは、Kubernetesクラスターを構成するための各種リソースを配置するCompartmentを作成します。
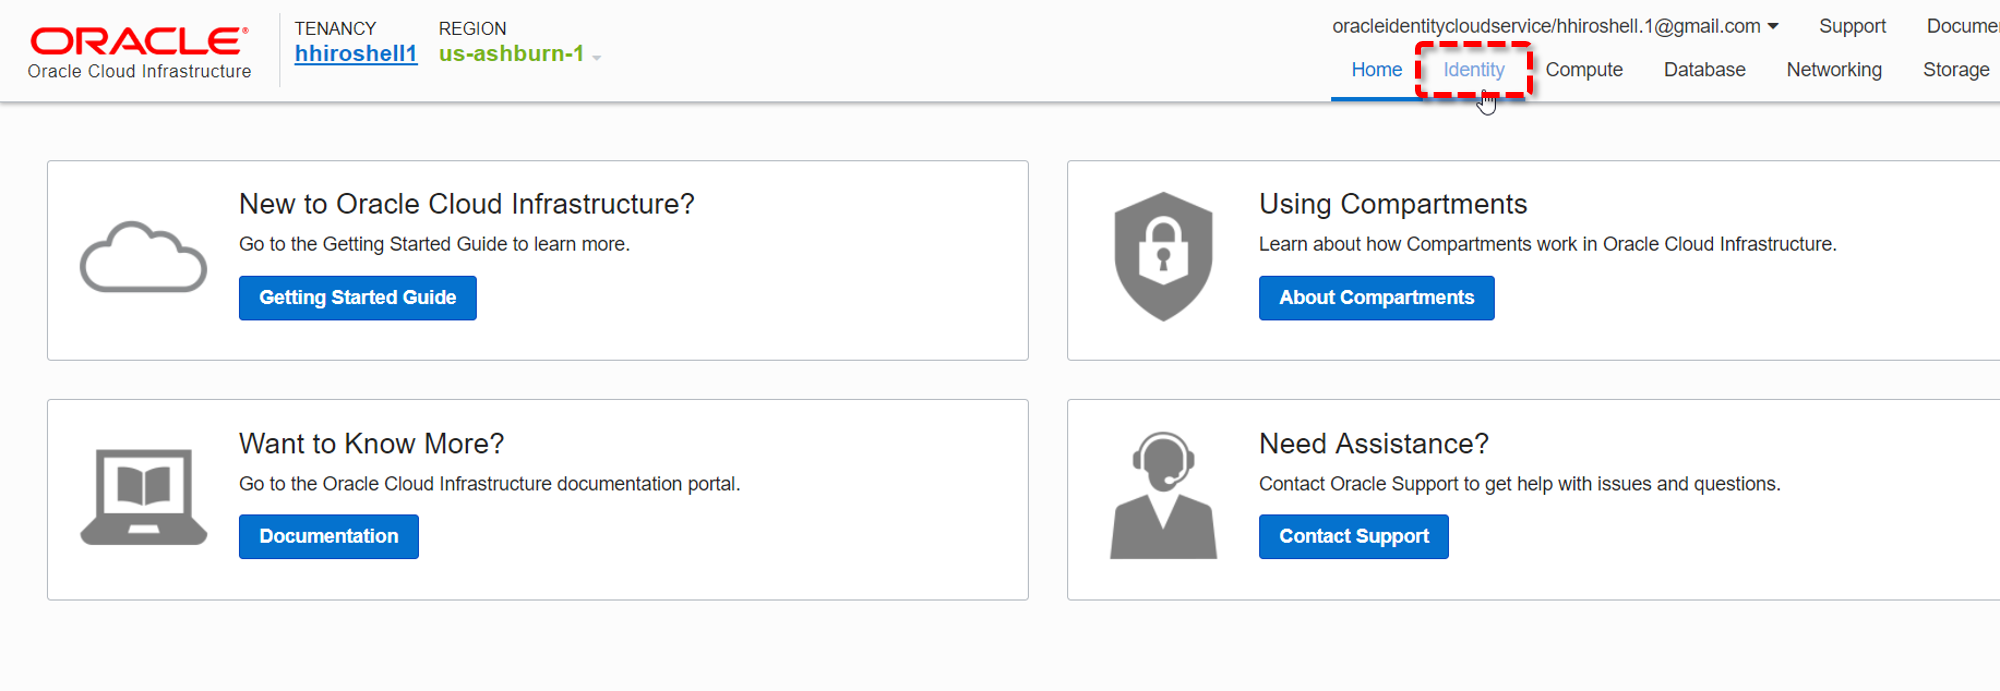
はじめに、OCIのサービス・コンソールの右上のタブで、"Identity"をクリックします。
画面左のメニューで"Compartment"をクリックし、更に"Create Compartment"ボタンをクリックします。
"Create Compartment"ダイアログで以下のように値を設定し、"Create Compartment"ボタンをクリックします。
- NAME: k8s
- DESCRIPTION: k8s on OCI
- (上記以外はデフォルトのまま)

以上で、Compartmentの作成は完了です。
1-2-3. Compartmentの管理者アカウント用のGroupを作成する
Compartmentの管理者アカウントが所属するためのGroupを作成します。
画面左のメニューで"Groups"をクリックし、更に"Create Group"ボタンをクリックします。
"Create Group"ダイアログで以下のように値を設定し、"Submit"ボタンをクリックします。
- NAME: k8s_administrators
- DESCRIPTION: k8s administrators
- (上記以外はデフォルトのまま)

以上で、管理者アカウント用のGroupの作成は完了です。
1-2-4. Groupに適用するPolicyを作成する
所定のPolicyを設定することによって、目的のGroupに権限を割り当てることができます。
ここでは、管理者アカウント用のGroupに割り当てるためのPolicyを作成します。ここで作成するPolicyは、Compartmentに対する全権限を持ちます。
画面左のメニューで"Policies"をクリックします。
画面左下にある"List Scope"メニューで"k8s"のCompartmentを選択します。その後、"Create Policy"ボタンをクリックします。
"Create Policy"ダイアログで以下のように値を設定し、"Create"ボタンをクリックします。
- NAME: k8s_admin_policy
- DESCRIPTION: Grants users full permissions on the k8s compartment
- Policy Statements
- STATEMENT: Allow group k8s_administrators to manage all-resources in compartment k8s
- (上記以外はデフォルトのまま)

以上で、Groupに適用するPolicyの作成は完了です。
1-2-5. Compartmentの管理者ユーザーを作成する
このCompartmentの管理者となるUserを作成します。
このUserは、管理者アカウント用のGroupに所属することによって、Compartmentに対する全権限を持つようにします。また、1-1. で作成したAPIアクセスキーを設定しておくことにより、このユーザーの権限で、外部からOCIのAPIを実行できるようにします。
画面左のメニューで"Users"をクリックし、更に"Create User"ボタンをクリックします。
"Create User"ダイアログで以下のように値を設定し、"Create"ボタンをクリックします。
- NAME: k8s_admin
- DESCRIPTION: k8s administrator
- (上記以外はデフォルトのまま)

ユーザーの一覧画面で、"k8s_admin"をクリックします。
画面左下にあるメニューで"Groups"をクリックし、更に"Add User to Group"ボタンをクリックします。
"Add User To Group"ダイアログで、"k8s_administrators"を選択します。

画面左下にあるメニューで"API Keys"をクリックし、更に"Add Public Key"ボタンをクリックします。
"Add Public Key"ダイアログで、"PUBLIC KEY"テキストボックスに1-1. で作成した公開鍵~/.oci/oci_api_key_public.pemの文字列をペーストします。
> cat ~/.oci/oci_api_key_public.pem (<-- この結果表示される文字列をコピー/ペースト)

最後に"Add"ボタンをクリックします。
以上で、Compartmentの管理者となるUserの作成は完了です。
1-3. Kubernetesインストーラーが必要とする各種の値を収集する
Kubernetesインストーラーが当該Compartmentにアクセスするには、以下の値が必要になります。
- APIアクセスキーのFingerprint
- OCIのテナントのOCID
- Compartmentの管理者のOCID
- CompartmentのOCID
- データセンターのリージョン
OCIDは、OCIにおける各種リソースの識別子です。これらの値を、ここでOCIのサービス・コンソールから収集しておきます。
まず、管理者User作成後の画面で、追加されたAPIアクセスキーのFingerprintとテナントのOCIDを取得します。
前者は"API Keys"という見出しの一覧の中に、テナントのOCIDは画面のフッターに表示されていますので、これらの値をテキストエディタ等にコピー/ペーストしておきます。
画面を上にスクロールすると、"User Information"タブ内にOCIDの情報があります。
"Copy"をクリックするとこのUser(Compartmentの管理者)のOCIDがクリップボードにコピーされますので、これをテキストエディタ等にペーストしておきます。
次にCompartmentのOCIDです。画面左上のパンくずリストの"Idnetity"をクリックします。

画面左のメニューで、"Compartments"をクリックしすると"Compartment"のリストが表示されます。
この中の"k8s"の"Copy"をクリックすると、このCompartmentのOCIDがクリップボードにコピーされますので、これをテキストエディタ等にペーストしておきます。
最後に、データセンターのリージョンです。これは、サービス・コンソールのヘッダーで確認することができます。これを後の手順で入力します。

以上で、OCIのサービス・コンソールで行う作業は完了です。
2 . Kubernetesクラスターを構築する
OCI用のTerraformベースのKubernetesインストーラー(Terraform Kubernetes Installer)を利用して、KubernetesクラスターをOCI上に構築します。
2-1. Terraform Kubernetes Installerをセットアップする
まずは、Terraform Kubernetes Installerを利用できる環境をセットアップしていきます。
2-1-1. Terraformをインストールする
Terraformをインストールします。利用するPCのプラットフォームに合わせて公式のバイナリをダウンロードして、PATHをとおせばOKです。
ダウンロードするバイナリのURLを確認するには、公式のダウンロードページを参照します。
以下は、Ubuntu 16.04でインストールする例です。
> wget https://releases.hashicorp.com/terraform/0.11.3/terraform_0.11.3_linux_amd64.zip
> unzip terraform_0.11.3_linux_amd64.zip
> sudo mv terraform /usr/local/bin/
正しくインストールされているか確認します。
> terraform --version
Terraform v0.11.3
2-1-2. terraform-provider-ociをインストールする
TerraformからOCIを操作するためのプラグインをインストールします。こちらも、利用するPCのプラットフォームに合わせて、適切なものをダウンロードします。
ダウンロード対象のURLの確認はGithubのReleasesから。
同じくUbuntu 16.04でインストールする例です。
> wget https://github.com/oracle/terraform-provider-oci/releases/download/2.0.7/linux.tar.gz
> tar xvf linux.tar.gz
Terraformのプラグインは、~/.terraform.d/pluginsに配置します。このディレクトリがなければ、新たに作成しておきます。
> mkdir -p ~/.terraform.d/plugins
最後に、上のディレクトリにプラグイン本体をコピーします。
> mv linux_amd64/terraform-provider-oci_v2.0.7 ~/.terraform.d/plugins/
2-1-3. Terraform Kubernetes Installerを準備する
Terraform Kubernetes Installerをcloneします。
> git clone -b v1.3.0 https://github.com/oracle/terraform-kubernetes-installer.git
> cd terraform-kubernetes-installer/
以上で、Terraform Kubernetes Installerを実行する環境ができました。
2-2. Terraform Kubernetes Installerのパラメータの設定
OCI上に構築するKubernetesの構成を、Terraformのパラメータファイルterraform.tfvarsに記述する設定によって変更することができます。
ベースとなるパラメータファイルをコピーして、これを編集していきます。
> cp terraform.example.tfvars terraform.tfvars
> vim terraform.tfvars
パラメータファイルの冒頭に、OCIの環境情報とAPIアクセスキーの設定情報を記述している箇所があります。ここのパラメータを、1-3. で収集したものに変更していきます。
また、1-1. で作成したAPIアクセスキー(秘密鍵の方)のパスと、利用するOCIのリージョンもここで指定します。。
対象のパラメータは以下のとおりです。
| key | value |
|---|---|
| tenancy_ocid | OCIのテナントのOCID |
| compartment_ocid | CompartmentのOCID |
| user_ocid | Compartmentの管理者のOCID |
| fingerprint | APIアクセスキーのFingerprint |
| private_key_path | APIアクセスキー |
| region | データセンターのリージョン |
その他、Kubernetesの各ノードのシェイプや、ファイヤーウォールの設定をしていきます。各パラメータの詳細は、Terraform Kubernets Installerのドキュメントを参照してください。
以下に、パラメータファイルの記述例を示します。
この設定は、構築後の環境の中を調べやすいように、NodeのSSHを許可したり、Nodeへのインターネットからのアクセスを許可する設定になっています。あくまで動作確認用の設定ですのでご注意ください。
(2018/06/29追記:デフォルトで指定されるOSイメージは現在OCIでは提供されいませんので、xxx_ol_image_nameパラメータでOSイメージを指定する必要があります。)
# BMCS Service
tenancy_ocid = "ocid1.tenancy.oc1..xxxxxxxxxxxxxxxxxxxxxxxxxxxxxxxxxxxxxxxxxxxxxxxxxxxxxxxxxxxx"
compartment_ocid = "ocid1.compartment.oc1..xxxxxxxxxxxxxxxxxxxxxxxxxxxxxxxxxxxxxxxxxxxxxxxxxxxxxxxxxxxx"
fingerprint = "00:11:22:33:44:55:66:77:88:99:aa:bb:cc:dd:ee:ff"
private_key_path = "/home/hhiroshell/.oci/oci_api_key.pem"
user_ocid = "ocid1.user.oc1..xxxxxxxxxxxxxxxxxxxxxxxxxxxxxxxxxxxxxxxxxxxxxxxxxxxxxxxxxxxx"
region = "us-ashburn-1"

# CCM user
# cloud_controller_user_ocid = "ocid1.tenancy.oc1..xxxxxxxxxxxxxxxxxxxxxxxxxxxxxxxxxxxxxxxxxxxxxxxxxxxxxxxxxxxx"
# cloud_controller_user_fingerprint = "00:11:22:33:44:55:66:77:88:99:aa:bb:cc:dd:ee:ff"
# cloud_controller_user_private_key_path = "/tmp/bmcs_api_key.pem"

etcdShape = "VM.Standard1.2"
k8sMasterShape = "VM.Standard1.2"
k8sWorkerShape = "VM.Standard1.2"

# OS image names for Master/Workder/etcd/nat
master_ol_image_name = "Oracle-Linux-7.5-2018.06.14-0"
worker_ol_image_name = "Oracle-Linux-7.5-2018.06.14-0"
etcd_ol_image_name = "Oracle-Linux-7.5-2018.06.14-0"
nat_ol_image_name = "Oracle-Linux-7.4-2018.06.14-0"

etcdAd1Count = "1"
etcdAd2Count = "1"
etcdAd3Count = "1"

k8sMasterAd1Count = "1"
k8sMasterAd2Count = "1"
k8sMasterAd3Count = "1"

k8sWorkerAd1Count = "1"
k8sWorkerAd2Count = "1"
k8sWorkerAd3Count = "1"

# etcdLBShape = "100Mbps"
# k8sMasterLBShape = "100Mbps"

etcd_ssh_ingress = "0.0.0.0/0"
etcd_cluster_ingress = "0.0.0.0/0"
master_ssh_ingress = "0.0.0.0/0"
worker_ssh_ingress = "0.0.0.0/0"
master_https_ingress = "0.0.0.0/0"
worker_nodeport_ingress = "0.0.0.0/0"

control_plane_subnet_access = "public"
k8s_master_lb_access = "public"
natInstanceShape = "VM.Standard1.2"
# nat_instance_ad1_enabled = "true"
# nat_instance_ad2_enabled = "false"
# nat_instance_ad3_enabled = "true"
nat_ssh_ingress = "0.0.0.0/0"
public_subnet_http_ingress = "0.0.0.0/0"
public_subnet_https_ingress = "0.0.0.0/0"

# worker_iscsi_volume_create is a bool not a string
# worker_iscsi_volume_create = true
# worker_iscsi_volume_size = 100

# etcd_iscsi_volume_create = true
# etcd_iscsi_volume_size = 50
2-3. Terraform Kubernetes Installerを実行する
いよいよTerraform Kubernetes Installerを実行し、クラスターを構築します。
まずはterraform init。
> terraform init
…
Terraform has been successfully initialized!
plan。
> terraform plan
...
Plan: 46 to add, 0 to change, 0 to destroy.
この時点では、まだ実際の環境構築は行われていません。ここまで特にエラーの発生がなく進んでいれば、最後にterraform applyを実行して環境の構築を開始します。
> terraform apply
構築には、しばらく時間がかかります。この間OCIのサービス・コンソールを見ると、Kubernetesに必要なネットワークや、Nodeが作られて行っていることが確認できます。
以下は、ネットワークのリソースを表示した例です。画面右上のタブメニューで"Network"をクリックした後、画面左のCOMPARTMENTのリストで"k8s"を選択すると表示されます。
以下は、Compute Instanceのリソースを表示した例です。画面右上のタブメニューで"Compute"をクリックした後、画面左のCOMPARTMENTのリストで"k8s"を選択すると表示されます。
2-4. 接続確認
クラスターが正常に構築されているかどうかは、同梱の接続チェック用スクリプトで確認することができます。
以下の例は、まだクラスターの構築が完了していない場合のスクリプトの実行結果です。
> scripts/cluster-check.sh
[cluster-check.sh] Running some basic checks on Kubernetes cluster....
[cluster-check.sh]   Checking SSH connectivity to each node (from this host)...
[cluster-check.sh]   Checking whether instance bootstrap has completed on each node...
[cluster-check.sh]   [FAILED] cloud-init has not finished running on master xxx.xxx.xxx.xxx
[cluster-check.sh]   If this does not complete soon, log into the BMC instance and examine the /var/log/cloud-init-output.log file.
クラスターの構築が完了していると、以下のような結果が表示されます。
> scripts/cluster-check.sh
[cluster-check.sh] Running some basic checks on Kubernetes cluster....
[cluster-check.sh]   Checking SSH connectivity to each node (from this host)...
[cluster-check.sh]   Checking whether instance bootstrap has completed on each node...
[cluster-check.sh]   Checking Flannel's etcd key from each node...
[cluster-check.sh]   Checking whether expected system services are running on each node...
[cluster-check.sh]   Checking status of /healthz endpoint at the LB...
[cluster-check.sh]   Running 'kubectl get nodes' a number of times through the master LB...
[cluster-check.sh]   Checking status of kube-dns pod...
[cluster-check.sh]   Checking an app deployment of nginx exposed as a service...

The Kubernetes cluster is up and appears to be healthy.
Kubernetes master is running at https://xxx.xxx.xxx.xxx:443
KubeDNS is running at https://xxx.xxx.xxx.xxx:443/api/v1/namespaces/kube-system/services/kube-dns:dns/proxy
2-7. クリーンアップ
クラスターを削除する場合は、terraform destroyを実行します。
> terraform destroy
以上で、OCI上にKubernetesクラスターを構築することができました。
3 . 環境へのアクセス方法
ここまでの手順で構築したKubernetesクラスターに、kubectl、及びSSHでアクセスしてみます。
3-1. kubectl
kubectlの設定ファイルは、Terraform Kubernetes Installerのgeneratedディレクトリに自動で生成されています。kubectl実行時に、この設定ファイルを利用するようにすればOKです。
この例は、環境変数KUBECONFIGに設定ファイルのパスを指定する方法です。
> export KUBECONFIG=~/terraform-kubernetes-installer/generated/kubeconfig
クラスターの一般情報を取得するコマンドで、動作を確認してみます。以下のような応答が返れば、正常にクラスターにアクセスできています。
> kubectl cluster-info
Kubernetes master is running at https://xxx.xxx.xxx.xxx:443
KubeDNS is running at https://xxx.xxx.xxx.xxx:443/api/v1/namespaces/kube-system/services/kube-dns:dns/proxy

To further debug and diagnose cluster problems, use 'kubectl cluster-info dump'.
3-2. SSH
SSHでKubernetesを構成するNodeにアクセスするには、まずSSHの秘密鍵をTerraformのステート情報から抽出して、秘密鍵を作成します。
> mkdir ssh
> terraform output ssh_private_key >ssh/private_key
> chmod 600 ssh/private_key
NodeのIPアドレスもTerraformのステート情報から取得できます。
> terraform output worker_public_ips
> terraform output master_public_ips
> terraform output etcd_public_ips
後はこの秘密鍵を使ってNodeにSSHでつなぐだけですが、Nodeにアクセスするときのアカウント名は、"opc"とする必要があります。
> ssh -i ssh/private_key opc@xxx.xxx.xxx.xxx
以上で、OracleのIaaS上にTerraformを使ってKubernetesクラスターを作ることができました。
お疲れ様でした!


