Ok guys, So today we are going to discuss and develop sample pwa.As usual let start with the definition.
I.WHAT IS PWA?
PWA stand for Progressive Web Apps. It use modern web capabilities to deliver an app-like user experience. They evolve from pages in browser tabs to immersive, top-level apps, maintaining the web's low friction at every moment. According to Official Google Document about PWA it states like so.
It's important to remember that Progressive Web Apps work everywhere but are supercharged
in modern browsers. Progressive enhancement is a backbone of the model.
For more detail about PWA you could visit this.
ok now let us start create a sample pwa.
II. GETTING START
To make you easy I will list the important things in order to develop PWA.
-
First, we need we have manifest files. Manifest file is a json file which provide information about the web application. The JSON structure of that file can contain information such as name, author, icons and description. This information is used to install the web application to the homescreen of a device so that the user can access the application more easily and has an overall app-like experience.
-
Second, we need Service Worker. It is a javascript file which is added to the project and registered in the browser. The service worker script is then able to run in the background and perform tasks like:
Recognizing the network state and display a special page if no network, cache data so the user can still see your website when offline and push notifications.
*Thing to notice
Server worker only run on HTTPS.
ok now let's start.
1.Setup Hosting
So first of all we need a web server to hosting our website. So I am going to choose firebase hosting since it is free and very easy to use. To save time I don't write the step on how to host website on firebase.Please watch this video instead.
2.Make Sample Page(Html&CSS)
- Sample Html File name it index.html
<!DOCTYPE html>
<html>
    <meta name="theme-color" content="#ffffff">
    <meta charset="utf-8">
    <meta name="viewport" content="width=device-width, initial-scale=1">
    <title>PWA SAMPLE</title>
    <link rel="stylesheet" type="text/css" href="/stylesheets/style.css" media="all">
  </head>


  <body>
    <h1 class="vertical-container">SAMPLE</h1>
    <div class="vertical-container">
      <button class="vertical-container" id="addtohomescreenBtn" name="btnAdd" type="button">Add To Home Screen</button>
    </div>
  </body>

</html>
- Sample CSS File name it style.css
body
{
    background-color: rgb(164, 102, 9);
    color: black;
}
.vertical-container
{
    display: -webkit-flex;
    display:         flex;
    -webkit-align-items: center;
            align-items: center;
    -webkit-justify-content: center;
            justify-content: center;
}
h1.vertical-container
{
    font-size: 275%;
    color: white;

}

# addtohomescreenBtn
{
    background-color: white;
    color: black;
    center:center;

}
So right now we a responsive website which always center a header and button.
3. Create APP ICON
now let's create app icon for our app. goto http://www.favicon-generator.org and create a sample icon for our application. please select option Generate icons for Web, Android, Microsoft, and iOS (iPhone and iPad) Apps and click on button Create Favicon. You will receive a zip file which contain all the icon size and the following snippet code:
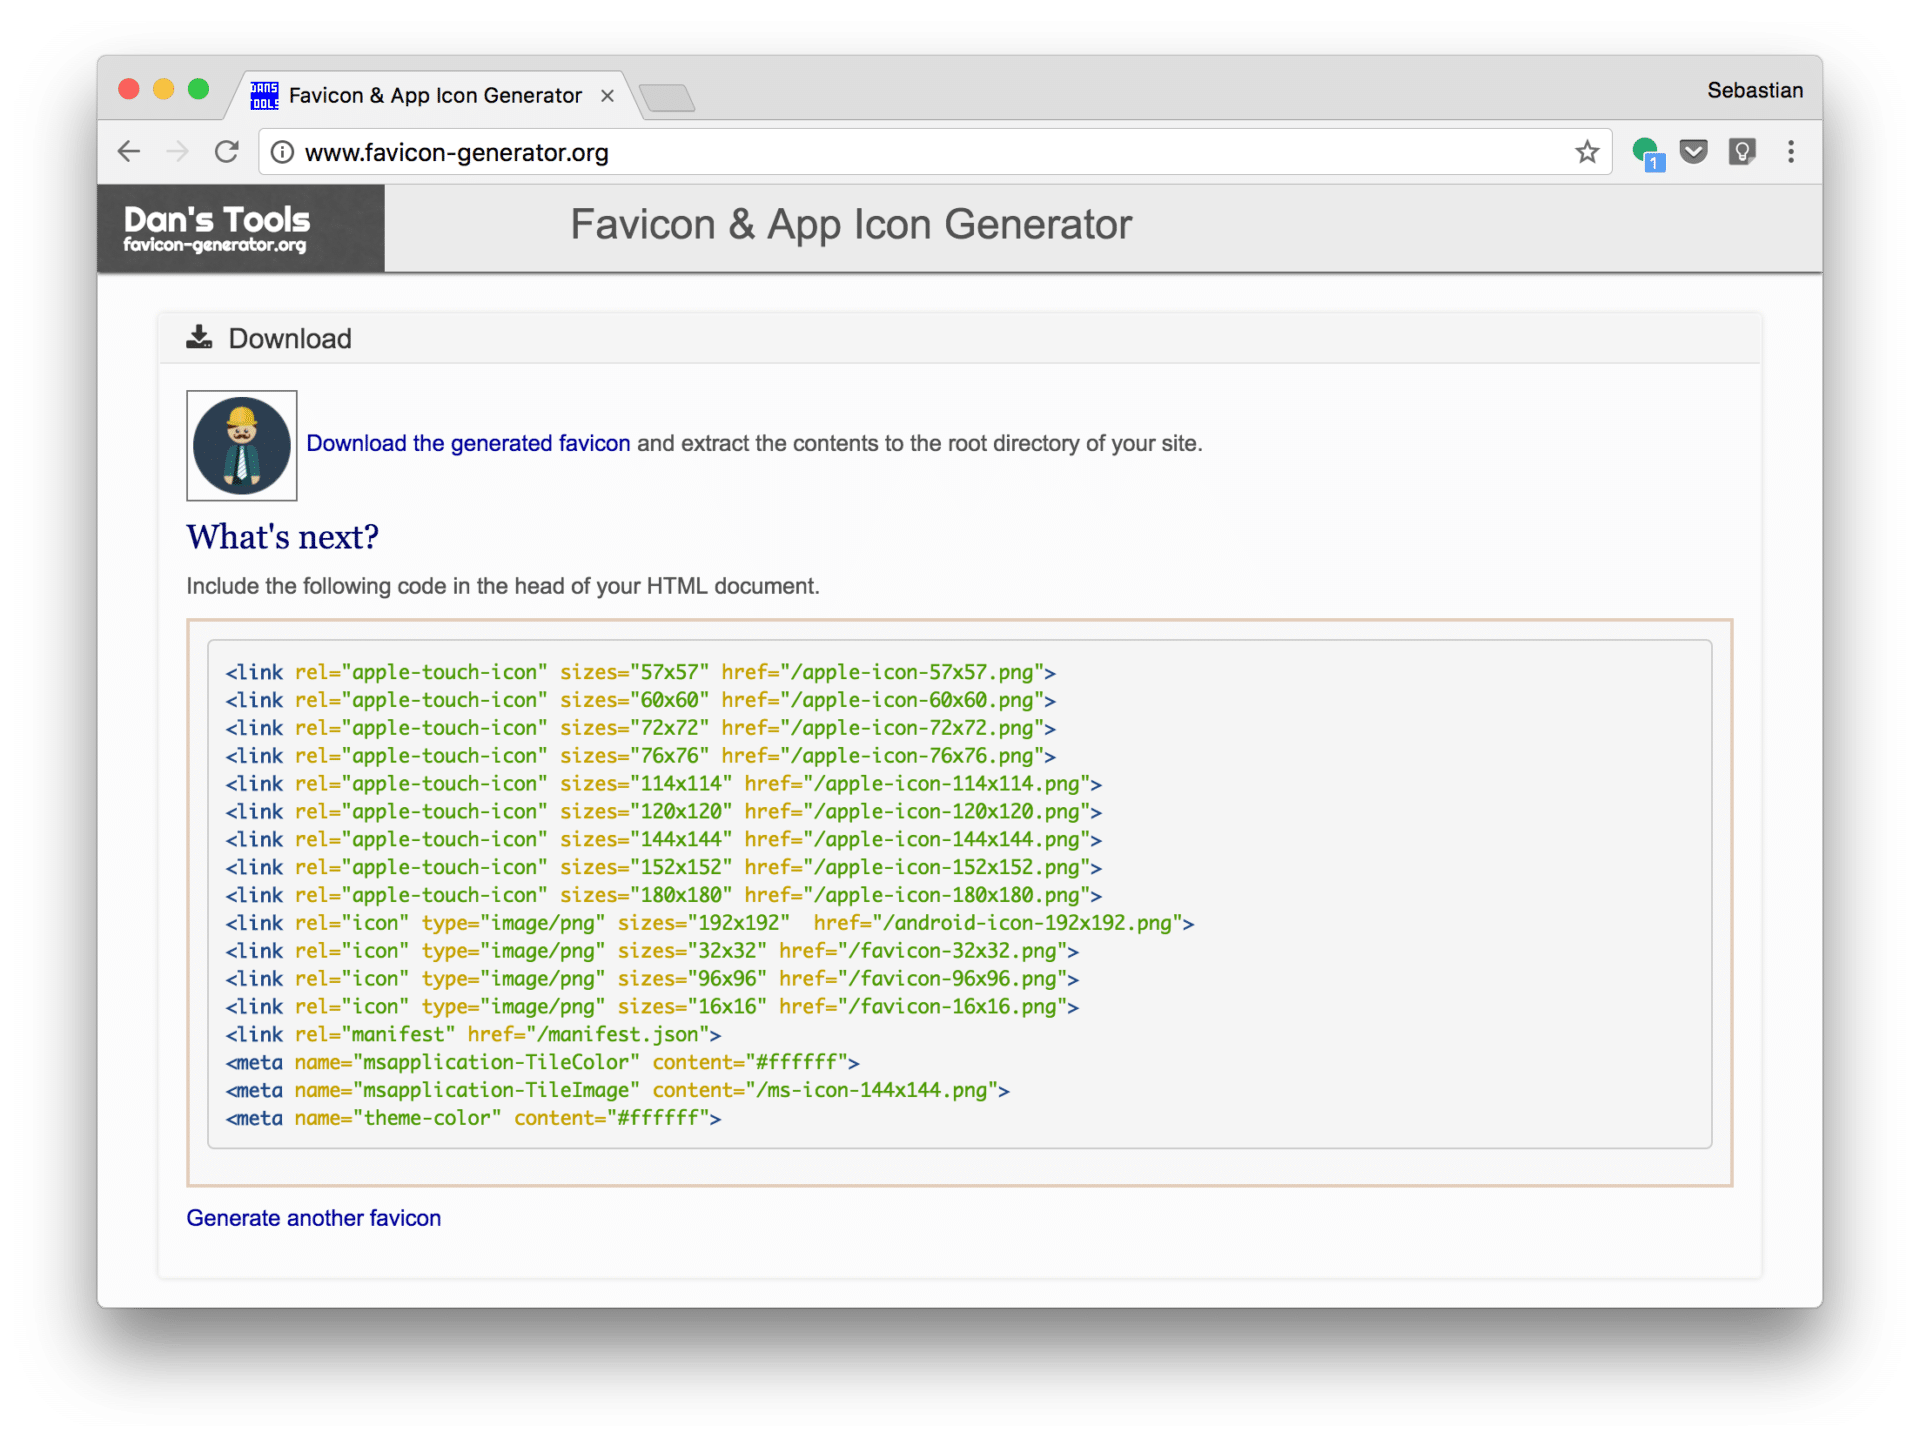
Now, Copy those code and paste it into our html head.Now the html file should look something like this:
<!DOCTYPE html>
<html>
  <link rel="apple-touch-icon" sizes="57x57" href="/apple-icon-57x57.png">
    <link rel="apple-touch-icon" sizes="60x60" href="/apple-icon-60x60.png">
    <link rel="apple-touch-icon" sizes="72x72" href="/apple-icon-72x72.png">
    <link rel="apple-touch-icon" sizes="76x76" href="/apple-icon-76x76.png">
    <link rel="apple-touch-icon" sizes="114x114" href="/apple-icon-114x114.png">
    <link rel="apple-touch-icon" sizes="120x120" href="/apple-icon-120x120.png">
    <link rel="apple-touch-icon" sizes="144x144" href="/apple-icon-144x144.png">
    <link rel="apple-touch-icon" sizes="152x152" href="/apple-icon-152x152.png">
    <link rel="apple-touch-icon" sizes="180x180" href="/apple-icon-180x180.png">
    <link rel="icon" type="image/png" sizes="192x192"  href="/android-icon-192x192.png">
    <link rel="icon" type="image/png" sizes="32x32" href="/favicon-32x32.png">
    <link rel="icon" type="image/png" sizes="96x96" href="/favicon-96x96.png">
    <link rel="icon" type="image/png" sizes="16x16" href="/favicon-16x16.png">
    <link rel="manifest" href="/manifest.json">
    <meta name="msapplication-TileColor" content="#ffffff">
    <meta name="msapplication-TileImage" content="/ms-icon-144x144.png">
    <meta name="theme-color" content="#ffffff">
    <meta charset="utf-8">
    <meta name="viewport" content="width=device-width, initial-scale=1">
    <title>PWA SAMPLE</title>
    <link rel="stylesheet" type="text/css" href="/stylesheets/style.css" media="all">
  </head>


  <body>
    <h1 class="vertical-container">SAMPLE</h1>
    <div class="vertical-container">
      <button class="vertical-container" id="addtohomescreenBtn" name="btnAdd" type="button">Add To Home Screen</button>
    </div>
  </body>

</html>
4. Create Manifest File
Now it is time for us to create the manifest. Note that it is very important to create the manifest file as the level with the root folder because the manifest file will contain the start url which contain the path to our index.html so it can deliver it to user when there offline.
- Manifest File
{
 "name": "My PWA Test",
 "short_name": "PWA Test",
 "lang": "en-US",
 "start_url": "/index.html",
 "background_color": "#2C3E50",
 "theme_color": "#18BC9C",
 "display": "standalone",
 "icons": [
   {
    "src": "android-icon-36x36.png",
   "sizes": "36x36",
   "type": "image\/png",
   "density": "0.75"
  },
  {
   "src": "android-icon-48x48.png",
   "sizes": "48x48",
   "type": "image\/png",
   "density": "1.0"
  },
  {
   "src": "android-icon-72x72.png",
   "sizes": "72x72",
   "type": "image\/png",
   "density": "1.5"
  },
  {
   "src": "android-icon-96x96.png",
   "sizes": "96x96",
   "type": "image\/png",
   "density": "2.0"
  },
  {
   "src": "android-icon-144x144.png",
   "sizes": "144x144",
   "type": "image\/png",
   "density": "3.0"
  },
  {
   "src": "android-icon-192x192.png",
   "sizes": "192x192",
   "type": "image\/png",
   "density": "4.0"
  }
 ]
}
5. Create Service Worker
After we create manifest file now it is time to create service worker. add following script to your html.
<!-- Service worker registration -->
  <script type="text/javascript">
    if (navigator.serviceWorker.controller) {
      console.log('[PWA Builder] active service worker found, no need to register')
    } else {
      //Register the ServiceWorker
      navigator.serviceWorker.register('/sw.js', {
        scope: './'
      }).then(function(reg) {
        console.log('Service worker has been registered for scope:'+ reg.scope);
      });
    }
  </script>
So this is a javascript script to detect and register a service worker. I will explain the code.
- First we checking whether there is service worker is available.
- If there is no service worker register.
- /sw.js is the path to our service worker.
now let create sw.js
var cacheName = 'CacheWeb';
var filesToCache = [
  '/',
  '/index.html',
  '/stylesheets/style.css'
];
self.addEventListener('install', function(e) {
  console.log('[ServiceWorker] Install');
  e.waitUntil(
    caches.open(cacheName).then(function(cache) {
      console.log('[ServiceWorker] Caching app shell');
      return cache.addAll(filesToCache);
    })
  );
});
self.addEventListener('activate',  event => {
  event.waitUntil(self.clients.claim());
});
self.addEventListener('fetch', event => {
  event.respondWith(
    caches.match(event.request, {ignoreSearch:true}).then(response => {
      return response || fetch(event.request);
    })
  );
});
so above code we are telling service worker to cache our html and css file so if there is no internet connection , the manifest.json can still delivery it to the user.
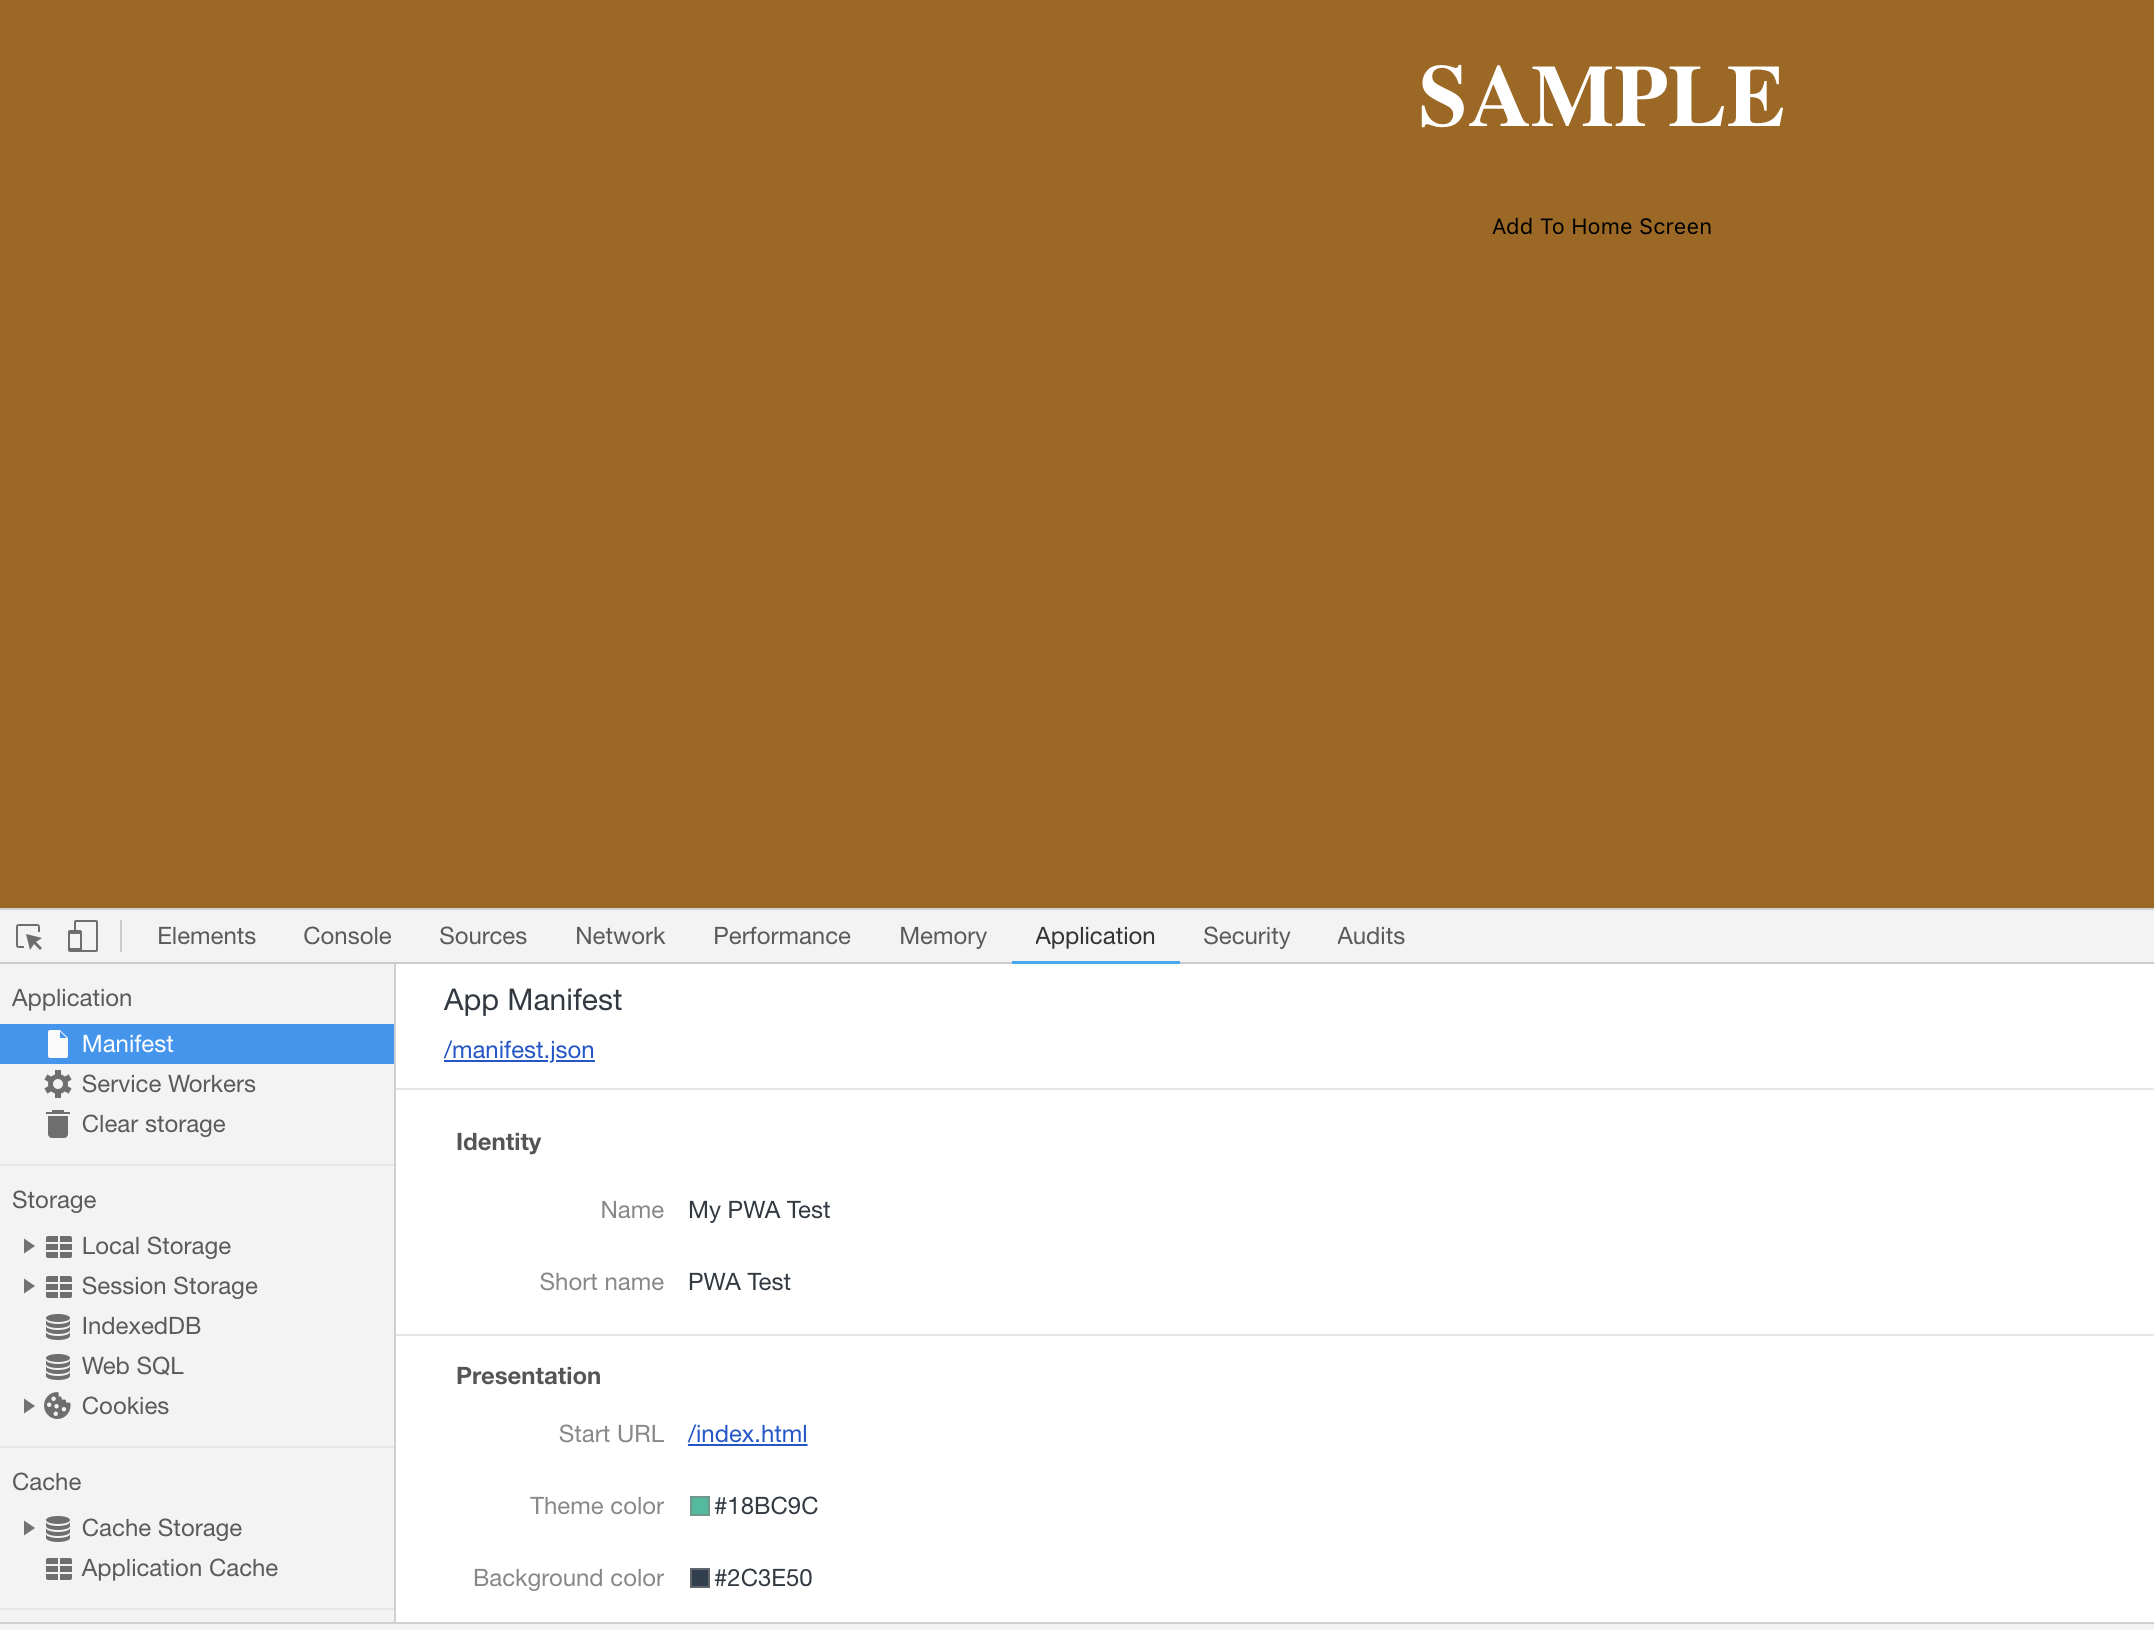
until this step, you can redeploy our app in firebase.Go to our website and use Chrome developer mode -> Application. You will see our manifest file being deliver.
-Select on cache Storage
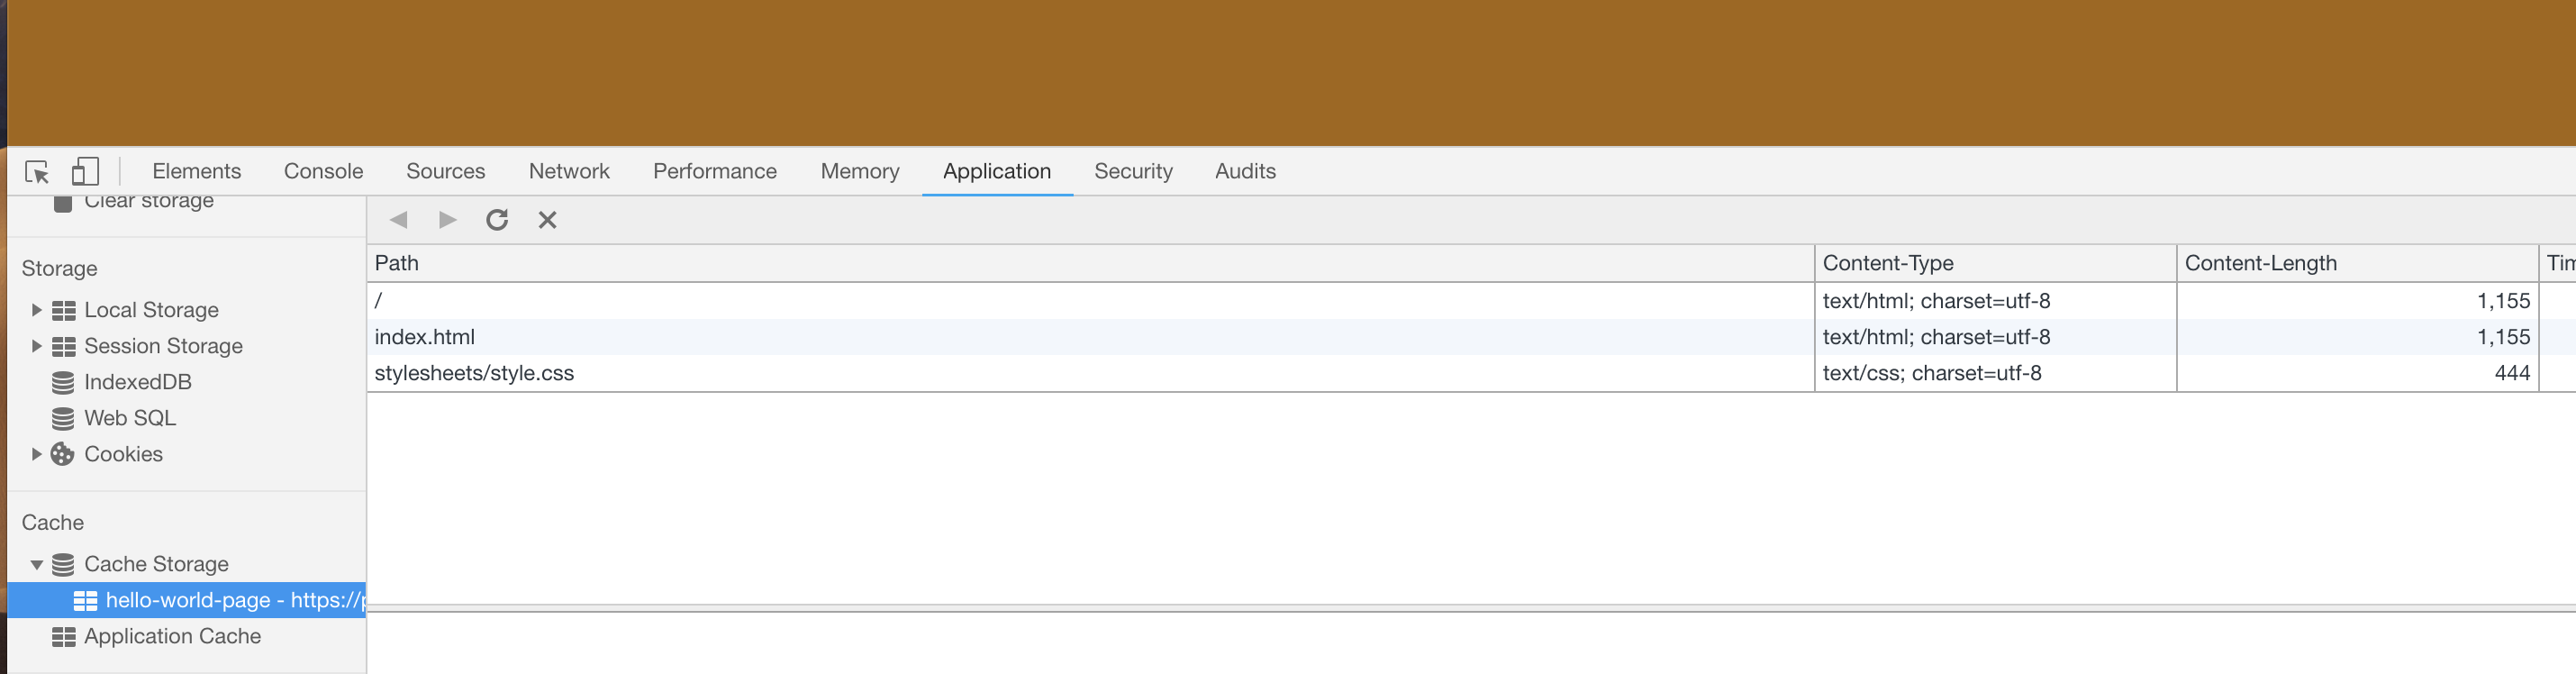
You will see our html and css being cache by service worker. To check how good is our pwa we can do it by Click on Audits Tab -> Perform Audit -> Run Audit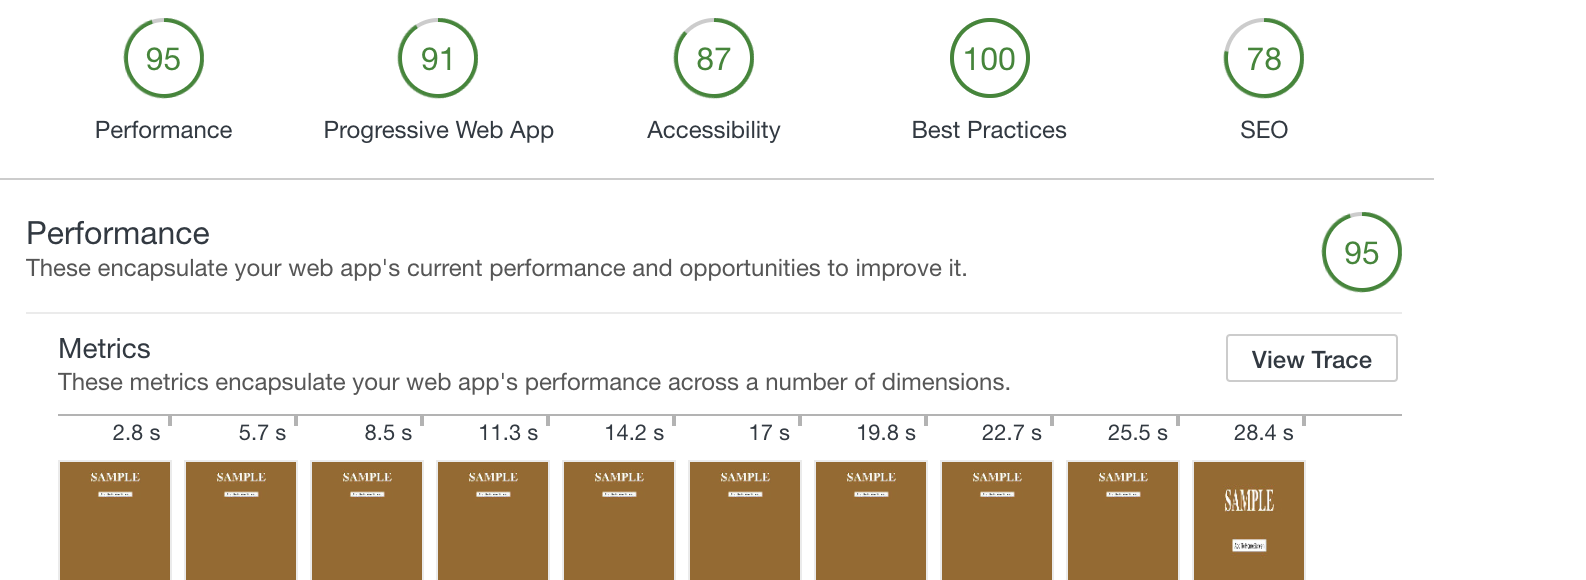
We got 91 PWA because we don't have 512 icon.