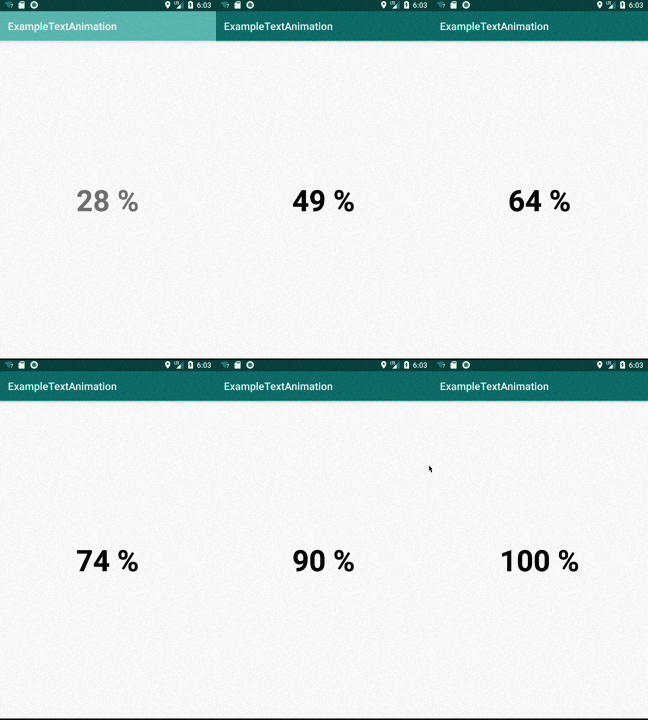
この記事はGoodpatch Advent Calendar 2018 11日目の記事です。
今年の振り返り
枠が空いていたので、今年を振り返るとAndroid開発でアニメーションを作るケースが多かったので
今日はそちらを紹介させていただきます。
概要
対象者
- 数字が表示されたテキストViewを指定した時間で表示させたい方
- デザイナーから「数値をデュルルルリンって表示」と言われた方
コード
    /**
     * start: アニメーション開始時の数値
     * end: アニメーション終了時の数値
     * duration: アニメーション表示期間
     * period: 更新時間
     */
    private fun textAnimation(start: Int, end: Int, duration: Int, period: Long) {
        val blockValue = ((end - start) * period / duration).toInt()
        val timer = Timer()
        val handler = Handler(Looper.getMainLooper())
        val animationText: TextView = this.findViewById(R.id.animationText)
        timer.schedule(object : TimerTask() {
            var value = 0
            override fun run() = if (value < end) {
                handler.post {
                    animationText.text = "$value %"
                }
                value += blockValue
            } else {
                value = end
                timer.cancel()
            }
        }, 0, period)
    }
まとめ
1. 表示終了までにカウントアップする数値を計算する
2. Timerを使って更新タイミングを指定(短ければ短いほど細かく動く)
3. 数値が超えたタイミングで更新処理を止める
このアニメーションが処理されるタイミングは画面が生成されるタイミングか、データが更新され画面を再描画されるタイミングのみをおすすめします。
画面が開かれたタイミング毎にアニメーションを実行されるとうっとおしく感じます。
追記
2020年のアドベントカレンダーの準備をしている最中、過去の記事を振り返ってみると
あんまりいけてないと思ったので修正させていただきます。
過去カウントアップをする際に自前でカウントアップするコードを書いたのですが
実はそんなことをする必要はなく ValueAnimation を使って表現することが可能なので
アップデートさせていただきます
今回のコードは以下の通りです、Animation 中の値を View に反映していくだけなので
さくっと使いたい時に使えると思います。
// kotlin
import android.animation.ValueAnimator
import android.os.Bundle
import androidx.appcompat.app.AppCompatActivity
import androidx.databinding.DataBindingUtil
import jp.co.goodpatch.databinding.ActivityMainBinding

class MainActivity : AppCompatActivity() {

    override fun onCreate(savedInstanceState: Bundle?) {
        super.onCreate(savedInstanceState)
        val binding =
            DataBindingUtil.setContentView<ActivityMainBinding>(this, R.layout.activity_main)

        val animation = ValueAnimator.ofInt(0, 100)
        animation.duration = 2000
        animation.addUpdateListener {
            binding.textView.text = "${it.animatedValue}"
        }

        binding.button.setOnClickListener {
            animation.start()
        }
    }
}
レイアウトは以下通りです
<?xml version="1.0" encoding="utf-8"?>
<layout xmlns:android="http://schemas.android.com/apk/res/android"
    xmlns:app="http://schemas.android.com/apk/res-auto"
    xmlns:tools="http://schemas.android.com/tools">

    <androidx.constraintlayout.widget.ConstraintLayout
        android:layout_width="match_parent"
        android:layout_height="match_parent"
        tools:context=".MainActivity">

        <androidx.appcompat.widget.AppCompatTextView
            android:id="@+id/text_view"
            android:layout_width="wrap_content"
            android:layout_height="wrap_content"
            android:gravity="end"
            android:text="0"
            app:layout_constraintBottom_toBottomOf="parent"
            app:layout_constraintEnd_toStartOf="@id/percent_text_view"
            app:layout_constraintTop_toTopOf="parent" />


        <androidx.appcompat.widget.AppCompatTextView
            android:id="@+id/percent_text_view"
            android:layout_width="wrap_content"
            android:layout_height="wrap_content"
            android:text="%"
            app:layout_constraintBottom_toBottomOf="parent"
            app:layout_constraintStart_toStartOf="parent"
            app:layout_constraintEnd_toEndOf="parent"
            app:layout_constraintTop_toTopOf="parent" />

        <Button
            android:id="@+id/button"
            android:layout_width="wrap_content"
            android:layout_height="wrap_content"
            android:text="START"
            app:layout_constraintBottom_toBottomOf="parent"
            app:layout_constraintEnd_toEndOf="parent"
            app:layout_constraintStart_toStartOf="parent"
            app:layout_constraintTop_toBottomOf="@id/text_view" />

    </androidx.constraintlayout.widget.ConstraintLayout>
</layout>

