EmployeeSearch -「座席+社員名簿」管理 -

はじめに
はじめまして。閲覧いただきありがとうございます。
今回、LaravelとAWSを用いてポートフォリオを作成したのでご説明します。
制作背景
”社員名簿”と”座席管理”を組み合わせ、どの席に社員が座っているかを探す、シンプルなサービスとなります。
背景として、座席のフリーアドレス化、コロナによる在宅と、自由な働き方が求められる一方で、自由に働く社員がどこにいるのかわからないケースがあります。
例えば、予算書類について、総務部の田口さんに話を聞きたいことがあるとします。そこで、総務部に着いても、「田口さんはどこにいますか…?」と探す手間が発生します。
そこで、本アプリにて、社員を検索すれば、いち早く、どこに座っているか確認できるサービスを作成しました。
使用技術
-
バックエンド
- Laravel 9.52.0 (PHP 8.1.10)
-
フロントエンド
- HTML / CSS (Bootstrap5)
- javascript (jQuery)
-
インフラ
- mysql
- AWS(EC2, S3, RDS, Route 53, ELB, ACM)
-
その他
- git(gitHub)
- Visual Studio Code
- Drawio(ER図・AWS構成図)
- phpMyadmin
機能一覧
-
認証機能
- 社員登録
- ログイン/ログアウト
- ゲストログイン
-
社員名簿
- 社員一覧表示
- 社員検索機能
- 社員詳細表示
-
座席表表示
- 座席表表示
- 座席表検索機能
- 着席ステータス更新機能
-
マイページ機能
- 退会機能(未実装)
- 社員情報変更
- パスワード変更
-
管理画面
- 認証機能
- 社員情報の一覧表示
- 社員情報の追加
ER図

インフラ構成図

何ができるのか
0.目次
1.座席表ページ
- 1-1.座席表及び着席情報の表示
- 1-2.着席ステータス更新
- 1-3.ユニットテスト
2.社員の着席位置を検索(社員一覧ページ)
- 2-1.社員一覧を表形式で表示(Grid.js)
- 2-2.各種詳細がモーダルウィンドウ表示(Bootstrap+jQuery(+Grid.js))
- 2-3.サイドメニューで部署の絞り込み
3.トップページ
4.ユーザー認証
5.管理画面ページ
6.マイページ
1.座席表ページ
1-1.座席表及び着席情報の表示
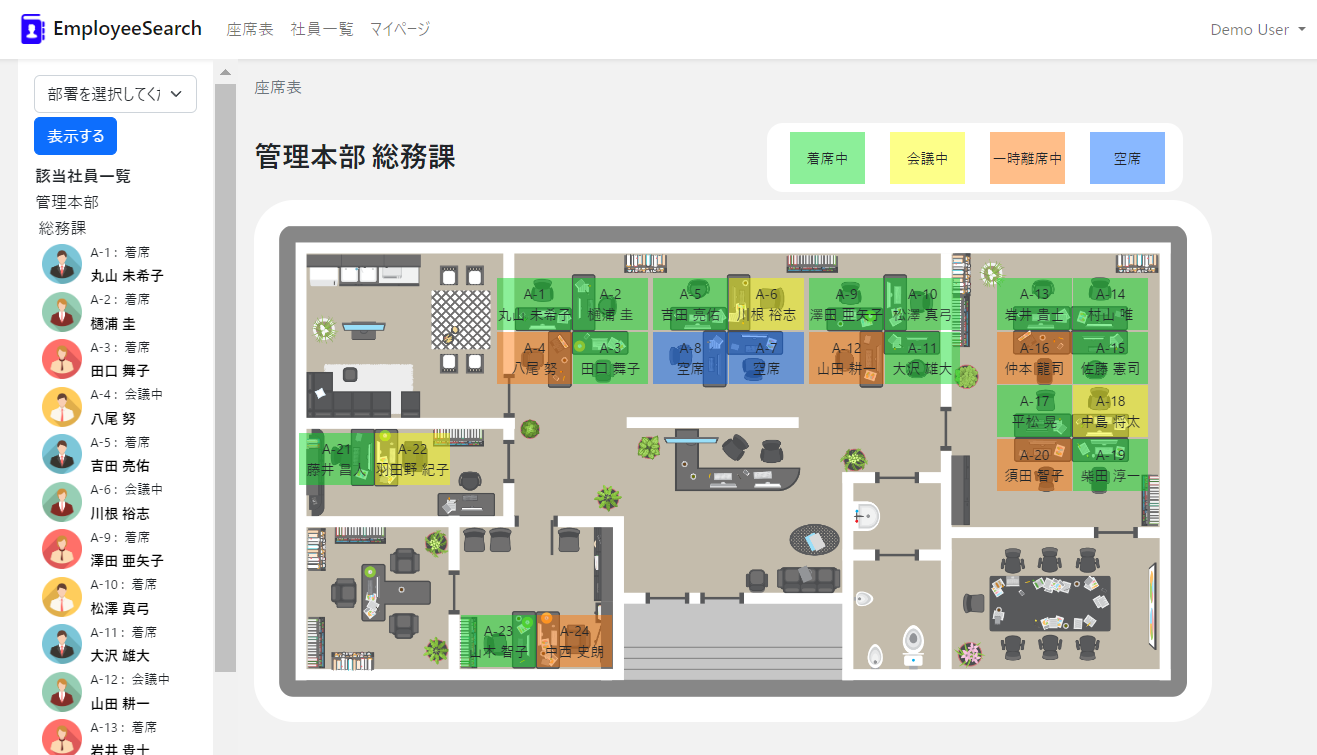
- 各部署の座席表ページが表示されます。
サイドメニューから表示したい部署で絞り込みかけると、
「該当部署の社員・座席表」が表示されます。 - 着席状況はアイコンの色を分け、視覚的に把握しやすくしました。
- 座席をクリックすると、着席の状況を変更できます。(参照:4-1.着席ステータス更新)

【コード概要】

保守性の良いコードとなるように努めました。ドメイン駆動開発(DDD)の考え方を意識し、
Controllerから、ビジネスロジックを担当するクラスを、切り離しました。
また、クラス内に、複数の役割を持たないようにし、
DTOの考えから、データは成形し、ひとまとめにした後、view側に渡すようにした。

(1)データ取得・成形

・ View側から部署の絞り込み用のkeywordをGET通信で送信。
・ SeetControllerにて、取得し、必要データをSeetIndexLogicクラスにて取得操作をする。

SeetIndexLogicでは、
・ メインロジック(1) Treeの構築
    ○ サイドメニューに、部署1-部署2-社員情報を表示する為に、データを取得

・ メインロジック(2) 座席情報の構築
    ○ 座席表を構築するデータを取得
    ○ MapBoxServiceにて、座席BOXを作成する座標データ成形(CSSに読み込めるように)

(2)ビューに表示

・ (社員情報)Controller側からTreeデータを取得し、sidebar.blade.phpへ表示。
・ (座席情報)Controller側からJson形式でデータを取得し、表示。


=======================================================================================


●app\Http\Controllers\SeetController.php

    public function index(Request $request, SeetIndexLogic $logic)
    {

        //準備: パラメーターの取得  座席表の初期値は"dept_id=1"
        $dept_id_keyword = isset($request->dept_id_keyword) ? $request->dept_id_keyword : 1;

        return view('seets.index', $logic->search($dept_id_keyword));
    }


●app\Http\Controllers\SeetController.php

    public function index(Request $request, SeetIndexLogic $logic){

        //準備: パラメーターの取得  座席表の初期値は"dept_id=1"
        $dept_id_keyword = isset($request->dept_id_keyword) ? $request->dept_id_keyword : 1;

        return view('seets.index',$logic->search($dept_id_keyword));

    }


●app\Http\Logic\SeetIndexLogic.php
    class SeetIndexLogic {

        function search($dept_id){

            //メインロジック(1) Treeの構築
            $tree = $this->getEmployeeTree($dept_id);
            $dept = $this->getDept($dept_id);

            //メインロジック(2) 座席情報の構築
            $map_image = $dept->map_image;
            $box_list = $this->getBoxList($dept);

            //Viewを構築するための変数の準備
            $depts = Dept::all();

            return [
                'tree' => $tree,
                'box_list' => $box_list,
                'depts' => $depts,
                'map_image' => $map_image
            ];
        }

        function getEmployeeTree($dept_id_keyword){

            $tree = [];

            $employees = Employee::all();


            foreach($employees as $employee){
                $first_dept = $employee->dept->first_dept;
                $second_dept = $employee->dept->second_dept;

                if (strpos($dept_id_keyword, $employee->dept->id) === false) {
                    continue;
                }

                // 変数をifで条件付けしてそれぞれ作成
                if(!isset($tree[$first_dept]))$tree[$first_dept] = [];
                if(!isset($tree[$first_dept][$second_dept]))$tree[$first_dept][$second_dept] = [];
                $tree[$first_dept][$second_dept][] = $employee;
            }

            return $tree;

        }

        function getDept($dept_id){
            //return Dept::where("id","=",$dept_id)->first();
            return Dept::find($dept_id);
        }

        function getBoxList($dept){

            $box_list = [];

            if(isset($dept->seet)){
                foreach($dept->seet as $seat){
                    $box_list[] = new MapBoxService(
                        $seat->seetnumber,
                        $user_name = isset($seat->sitdown->user->name) ? $seat->sitdown->user->name : '空席',
                        $seat->width,
                        $seat->height,
                        $seat->top,
                        $seat->left,
                        $seat_status = isset($seat->sitdown->status) ? $seat->sitdown->status : 'null',
                        $seat->id
                    );
                }
            }

            return $box_list;
        }
    }


●app\Services\MapBoxService.php

    class MapBoxService
    {

        // 座席表データリストの命名
        function __construct(
            public $label,
            public $seat_user,
            public $width,
            public $height,
            public $top,
            public $left,
            public $status,
            public $seet_id,
        ) {
        }

        // 座席アイコン_CSSに読み込めるようにデータ成形
        function toStyle()
        {
            $styles = [
                "width" => $this->width . "px",
                "height" => $this->height . "px",
                "top" => $this->top . "px",
                "left" => $this->left . "px",
            ];

            $ret = [];
            foreach($styles as $key => $value){
                $ret[] = $key . ": " . $value;
            }
            return implode(";", $ret);
        }
    }


●resources\views\seets\index.blade.php

    {{-- 座席Map画像を表示 --}}
    <div id="js-map"  class="map"></div>

    {{-- 座席画像、座席の座標データを取得 --}}
    <script>
        $(function(){
            const box_list = @json($box_list);
            const map_image = @json($map_image);
            const edit_url = "{{ route('seets.index') }}";
            setup_seat(box_list, map_image, edit_url);
        });
    </script>
1-2.着席ステータス更新
- 座席をクリックすると、ログインユーザーの着席ステータスを変更する。

【コード概要】
①seets/edit.blade.phpから、get通信で着席ステータス(着席・会議中・一時離席・離席)が送信され
SeetControllerで受け取る。
Sitdownsテーブルにある、着席ステータス情報を、SeatServiceで処理し、
更新していく。

※php8.1からデフォルトに導入された、enum型を使用し、着席ステータスがマジックナンバー化しないように、注意した。
=========================================================

●app\Http\Controllers\SeetController.php
    public function update_chakuseki($id)
    {
        $seat = Seet::find($id);

        // 選択した着席情報を削除
        $seat->sitdown->delete();

        // ログインユーザーの着席情報をsitdownテーブルに保存
        $user = Auth::user();
        $service = new SeatService($user);
        $service->着席($user, $seat);

        return redirect()->route('seets.index')->with('sitdown_delete_message', '着席情報を更新しました。');
    }

●app\Services\SeatService.php
class SeatService
{

    // 引数→user列データ取得(※状態依存になる為、auth::userとは記載しない。)
    function __construct(private User $user)
    {
    }

    function updateStatus(Seet $seat, $status_number)
    {

        $status = SeatStatusEnum::from($status_number);

        if ($status == SeatStatusEnum::着席) {
            $this->着席($this->user, $seat);
        } elseif ($status == SeatStatusEnum::会議中) {
            $this->会議中に変更($this->user, $seat);
        } elseif ($status == SeatStatusEnum::一時離席) {
            $this->一時的に離席した($this->user, $seat);
        } else {
            $this->離席($this->user, $seat);
        }
    }

    function is着席中(User $user): Bool
    {

        $着席情報 = Sitdown::where("user_id", "=", $user->id)->first();
        if (is_null($着席情報)) {
            return false;
        }

        return true;
    }

    function 着席(User $user, Seet $seat)
    {

        $着席情報 = Sitdown::where("user_id", "=", $user->id)->first();
        if (is_null($着席情報)) {
            $着席情報 = new Sitdown();
        }

        // 例外処理
        $seat_user = Sitdown::where("seet_id", "=", $seat->id)->first();
        if (isset($seat_user)) {
            throw new Exception("既に座っている人がいますが、着席しますか?");
        }

        $着席情報->user_id = $user->id;
        $着席情報->seet_id = $seat->id;
        $着席情報->status = Sitdown::STATUS_CHAKUSEKI;
        $着席情報->save();
    }

    function 会議中に変更(User $user)
    {

        if (!$this->is着席中($user)) {
            session()->flash('flash_message_notchakuseki', '着席していません');
        } else {
            $着席情報 = Sitdown::where("user_id", "=", $user->id)->first();
            $着席情報->status = Sitdown::STATUS_KAIGI;
            $着席情報->save();
        }
    }

    function 一時的に離席した(User $user)
    {

        if (!$this->is着席中($user)) {
            session()->flash('flash_message_notchakuseki', '着席していません');
        } else {
            $着席情報 = Sitdown::where("user_id", "=", $user->id)->first();
            $着席情報->status = Sitdown::STATUS_RISEKI;
            $着席情報->save();
        }
    }

    function 離席(User $user)
    {

        if (!$this->is着席中($user)) {
            session()->flash('flash_message_notchakuseki', '着席していません');
        } else {
            $着席情報 = Sitdown::where("user_id", "=", $user->id)->first();
            $着席情報->delete();
        }
    }
}

●app\Enums

// php8.1以上対応
enum SeatStatusEnum: int
{
    case 着席 = 1;
    case 会議中 = 2;
    case 一時離席 = 3;
    case 離席 = -1;

        // 日本語を追加
        public function label(): string
        {
            return match($this)
            {
                SeatStatusEnum::着席 => '着席',
                SeatStatusEnum::会議中 => '会議中',
                SeatStatusEnum::一時離席 => '一時離席',
                SeatStatusEnum::離席 => '離席',
            };
        }
}
1-3.ユニットテスト
【コード概要】
座席表に表示される、座席アイコンデータをCSSに読み込めるデータとして、
MapBoxServiceクラスで成形できているか、テストしました。

また、テスト駆動開発の考えから、テストが通る最小限の実装コードを作成後、
動作が保証(テストにより)された状態で、リファクタリングを行いました。
===============================================================

●tests\Unit\MapBoxServiceTest.php

    public function test_example()
    {

        /**
         * 座席表ページのMapBoxServiceクラスのテスト
         */

        $this->assertTrue(true);

        // テストデータを投入
        $box = new MapBoxService(
            "hoge",
            "1",
            "100",
            "200",
            "300",
            "400",
            10,
            500
        );

        // 値を指定の文字列へ変換
        $ret = $box->toStyle();

        // 指定どおりに文字列が変換できているかチェック
        $this->assertStringContainsString(
            "width: 100px",
            $ret
        );

        $this->assertStringContainsString(
            "height: 200px",
            $ret
        );

        $this->assertStringContainsString(
            "top: 300px",
            $ret
        );

        $this->assertStringContainsString(
            "left: 400px",
            $ret
        );

    }

●app\Services\MapBoxService.php

    class MapBoxService
    {

        // 座席表データリストの命名
        function __construct(
            public $label,
            public $seat_user,
            public $width,
            public $height,
            public $top,
            public $left,
            public $status,
            public $seet_id,
        ) {
        }

        // 座席アイコン_CSSに読み込めるようにデータ成形
        function toStyle()
        {
            $styles = [
                "width" => $this->width . "px",
                "height" => $this->height . "px",
                "top" => $this->top . "px",
                "left" => $this->left . "px",
            ];

            $ret = [];
            foreach($styles as $key => $value){
                $ret[] = $key . ": " . $value;
            }
            // 区切り文字を結合
            return implode(";", $ret);
        }
    }
2.社員の着席位置を検索(社員一覧ページ)
- 社員一覧ページにて、「部署のカテゴリによる絞り込み / キーワード検索」から該当の社員を 検索。(参考:3-1.社員一覧ページ)
- 該当の座席表ページがモーダルウィンドウで表示され、着席位置を確認できる。(参考:3-2.座席表ページ)

2-1.社員一覧を表形式で表示(Grid.js)
- Grid.jsを使用し、社員一覧表を表示。
- クリックするとモーダル表示
【コード概要】
DOMのリロード後、
	(1)HTMLのtable要素からデータ取得(jQuery)
	(2)Grid.jsにてデータ成形。
	(3)HTMLにデータを戻し、表示。
============================================

●resources\view\seets

    {{-- grid.jsにて再出力 --}}
    <div id="sample-table-wrapper"></div>

    {{--
    ・テーブルデータ
    ・Grid.jsでレンダリングするので"display:none;"とする
    --}}
    <table id="sample-table" style="display:none;">
        <thead>
            <tr>
                <th>氏名</th>
                            ~省略~
        </thead>
        <tbody>
            @foreach($employee_list as $employee)
            <tr>
                <td><a class="employees-show-link" href="{{ route('employees.show', $employee->id) }}">{{ $employee->name }}</a></td>
                ~省略~
            </tr>
            @endforeach
        </tbody>
    </table>


●public\js\employee-grid.js

    // DOM読み込み後、ルート要素(document)からtableタグを取得
    document.addEventListener('DOMContentLoaded', function () {
            //Grid.jsを用いた表データの作成
            const grid = new gridjs.Grid({
                        // table要素を取得
              from: document.getElementById("sample-table"),
                        // データ成形
              pagination: {
                  limit: 10
              },
              search: true,
              sort: true,
              fixedHeader: true,
              height: '700px',
              style: {
                  td: {
                      border: '1px solid #ccc',
                  },
                  th: {
                      color: "rgb(0, 0, 0)",
                      border: '1px solid #ccc',
                      'background-color': 'rgba(93, 193, 255, 0.267)',
                  },
                  table: {
                      'font-size': '15px',
                      'white-space': 'nowrap'
                  }
              }
            // HTMLの"sample-table-wrapper"へ出力
        }).render(document.getElementById("sample-table-wrapper"));
    });
2-2.各種詳細がモーダルウィンドウ表示(Bootstrap+jQuery(+Grid.js))
※【気をつけたこと】動的に取得したデータの為(Grid.jsでレンダリング)、イベントをルート要素を対象にした。
【コード概要】
(1) onclickイベントでURLを取得。
(2) JavaScriptでHTMLからモーダルウィンドウ(bootstrap)取得し、表示。
==========================================

●resources/views/employees/modal.blade.php
    {{-- 座席表をモーダル表示 --}}
    <div class="modal fade" id="modalSeat" data-bs-backdrop="static" data-bs-keyboard="false" tabindex="-1" aria-labelledby="modalSampleLabel" aria-hidden="true">
        <div class="modal-dialog">
        <div class="modal-content" style="width:1000px; margin-left: -70px;">
            <div class="modal-header">
            <h5 class="modal-title" id="modalSampleLabel">座席表</h5>
            <button type="button" class="btn-close" data-bs-dismiss="modal" aria-label="Close"></button>
            </div>
            <div class="modal-body ">
            ...
            </div>
            <div class="modal-footer">
            <button type="button" class="btn btn-secondary" data-bs-dismiss="modal">Close</button>
            <button type="button" class="btn btn-primary" onclick="location.href='{{ route('seets.index', [ 'dept_id_keyword' => $employee->dept_id]) }}'">詳細</button>
            </div>
        </div>
        </div>
    </div>

●modal.js
    // 動的に取得したデータの為(Grid.jsでレンダリング)、イベントをルート要素を対象にする。
    $(document).on('click', '.seats-show-link', function(){
        // クリック時に、URL取得
        const url = $(this).attr("href");

        // 関数実行
        openModalSeat(url);

        // ページ遷移防止
        return false;
    });

    function openModalSeat(url){
        // HTMLデータ取得
        $.get(url, function(res){
            $("#modalSeat .modal-body").html($(res).find(".modal-view").html());
        });

        // モーダルを作成から表示(Bootstrap5:Via JavaScript)
        const myModal = new bootstrap.Modal(document.getElementById('modalSeat'), {
        });
        myModal.show();
    }
2-3.サイドメニューで部署の絞り込み
(1) 部署カテゴリーをクリック。
(2) 社員一覧表のデータ絞り込まれて表示される。
【コードの概要】
①DTOの考えに基づき、必要なデータを取得し、データをひとまとめにし、ビュー側へ渡す。

①EmployeeInfoServiceクラスで変数宣言。
②EmployeeListServiceクラスにて、Formから送信されたキーワードを元に絞り込みをかけ、必要データを取得。
③まとめたデータをemployeeコントローラへ渡す。
===============================================

●app/Http/Controllers/EmployeeController.php

    public function index(Request $request)
    {
        // 社員一覧表用データの取得
        $employees = Employee::with('user')->get();

        $dept_keyword = $request->dept_keyword;

        $service = new EmployeeListService();

            // @throws Exception ホームページへリダイレクトかつエラー表示
            try{
            $employee_list = $service->employeeList($employees,$dept_keyword);
        }catch(Exception $e){
            return redirect()->route('home')->with('message', $e->getMessage());
        }

●app/Services/EmployeeListService.php

    // 社員一覧表用のデータリストを作成
    class EmployeeListService {

    function employeeList($employees,$dept_keyword){

        foreach($employees as $employee){
            $first_dept = $employee->dept->first_dept;
            $second_dept = $employee->dept->second_dept;
            $array = [$first_dept, $second_dept];


            // 「$dept_keywordに値がある」かつ「キーワード一致」すればスキップ
            if($dept_keyword && (array_search($dept_keyword, $array)) === false){
                continue;
            }

            $employee_list[] = new EmployeeInfoService (
                $employee->user->id,
                $employee->user->name,
                $employee->user->furigana,
                $employee->dept->first_dept,

    〜〜省略〜〜

        );
        }
    〜〜省略〜〜

        return $employee_list;
        }


●/app/Services/EmployeeInfoService.php

    namespace App\Services;

    // 変数を宣言
    class EmployeeInfoService {

        function __construct(
            public $id,
            public $name,
            public $furigana,
            public $first_dept,

    〜〜省略〜〜

        ){

        }
    }
3.トップページ
- 最初にアクセスするとアプリの紹介画面が表示されます。(非ログイン)
- ヘッダーロゴを押すと、トップページへリダイレクト。

4.ユーザー認証
- LaravelUIにて実装しています。
- 登録時、メールアドレスと連携して登録されます。
- ユーザー登録の有無を判別し、ログインページへリダイレクトかけます。

5.管理画面
- ユーザー一覧を確認できます。(キーワード検索あり)
- ユーザー情報を管理画面から追加できます。(直接入力と、CSVファイルをUPの2通り)

【コード概要】
CSVファイルをアップロードすると、Ajax処理にてCSVファイルを取り込みます。
=============================================================================

●app\Admin\Controllers\UserController.php
    // CSVデータ
    public function csvImport(Request $request)
    {
        $file = $request->file('file');


        $lexer_config = new LexerConfig();

        $lexer_config->setIgnoreHeaderLine(true);

        $lexer = new Lexer($lexer_config);

        $interpreter = new Interpreter();
        $interpreter->unstrict();

        $rows = array();
        $interpreter->addObserver(function (array $row) use (&$rows) {
            $rows[] = $row;
        });

        $counts = [
            "create" => 0,
            "skip" => 0,
            "__debug" => []
        ];

        $lexer->parse($file, $interpreter);
        foreach ($rows as $key => $value) {

            //CSVの項目数チェック
            if (count($value) < 16) {
                continue;
            }

            //名前が入力されていないデータを省く
            if (strlen($value[2]) < 1) {
                continue;
            }

            //メールアドレスの重複チェック
            $isExist = User::where('email',"=",$value[8])->first();
            if ($isExist) {
                continue;
            }

            User::create([
                'profile_picture' => $value[0],
                'user_number' => $value[1],
                'name' => $value[2],
                'furigana' => $value[3],
                'age' => $value[4],
                'date_of_Birth' => $value[5],
                'join_date' => $value[6],
                'gender' => $value[7],
                'email' => $value[8],
                'phone_number' => $value[9],
                'mobile_phone_number' => $value[10],
                'zip_code' => $value[11],
                'present_address' => $value[12],
                'password' => $value[15],
            ]);
            $counts["create"]++;

        }

        return response()->json(
            ['data' => '成功', 'counts' => $counts],
            200,
            [],
            JSON_UNESCAPED_UNICODE
        );
    }

●app\Admin\Extensions\Tools\CsvImport.php
    class CsvImport extends AbstractTool
     {
         protected function script()
         {
             return <<< SCRIPT

             //  「CSVインポート」をクリック時
             $('.csv-import').click(function() {
                 var select = document.getElementById('files');
                 document.getElementById("files").click();
                 select.addEventListener('change',function() {
                     var formdata = new FormData();
                     formdata.append( "file", $("input[name='user']").prop("files")[0] );

                    // Ajaxリクエストを送信する前に、共通の設定
                     $.ajaxSetup({
                         headers: {
                             'X-CSRF-TOKEN': $('meta[name="csrf-token"]').attr('content')
                         }
                     });

                     // Ajaxリクエストを送信
                     $.ajax({
                         type : "POST",
                         url : "users/import",
                         data : formdata,
                         processData : false,
                         contentType : false,
                         success: function (response) {
                             $.pjax.reload("#pjax-container");
                             toastr.success('CSVのアップロードが成功しました');
                         }
                     });
                 });
             });

             SCRIPT;
         }

         public function render()
         {
             Admin::script($this->script());
             return view('csv_upload');
         }
     }
6.マイページ
- 社員情報・パスワードの編集が出来ます。
