GoogleMapsAPIを触ってみたいと思い、公式サイトを見ながら地図上にいろんなものを表示させて遊んでみました。
今回はその中から、地図上に任意の画像とテキストを設置する方法を紹介したいと思います。
GoogleMapsAPIとは
Google Maps APIは、2005年2月にリリースされたGoogleマップのAPIです。
高機能なGoogleマップをwebサイトやアプリで使うことができ、地図上で様々な表現を行うことが可能です。
地図上に任意の画像とテキストを設置する方法
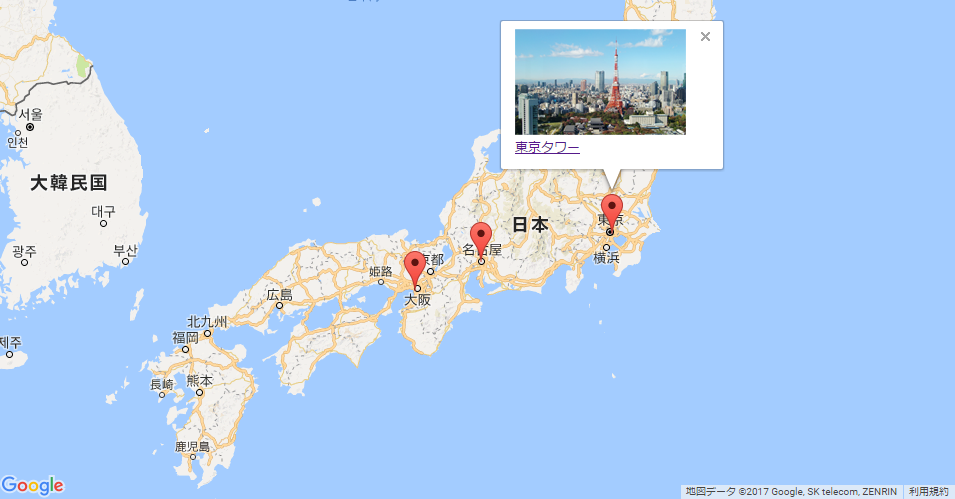
今回は下の写真のように地図上の任意の場所にマーカーを設置し、mouseoverすると任意の画像とテキストが表示されるという動きを作ってみたいと思います。
このような描写を再現するには、情報ウィンドウという機能を使います。
まずはGoogleMapAPIを利用するために下記のscriptを読み込ませます。
<script src="http://maps.google.com/maps/api/js?sensor=true"></script>
※GoogleMapsAPIをサーバ上で動かす場合は、APIkeyが必要になります。APIKeyの取得方法は下記でご確認下さい。
参考:Google Maps の APIキー を簡単に取得する
次はhtmlの記述。マップを表示したい場所をdivで囲みます。
<div id="map"></div>
width、heightを指定してあげないとマップが表示されないので、cssも記述。
# map {
  width: 600px;
  height: 400px;
}
下準備が終わったら、ここからマップを表示するためのscriptを記述していきます。
コードの内容はコメントアウト文を参考にして下さい。
var map = null;
var infowindow = new google.maps.InfoWindow();

function init() {

  //マップの初期状態を設定
  var option = {
  zoom: 6,
  center: new google.maps.LatLng(35.4093320, 136.7566470),
  mapTypeId: google.maps.MapTypeId.ROADMAP,
  disableDefaultUI: true
  };

  // 吹き出しを閉じる処理
  map = new google.maps.Map(document.getElementById("map"), option);
  google.maps.event.addListener(map, "click", function() {infowindow.close();});

  // 任意の位置にマーカーを追加
  var point = new google.maps.LatLng(35.673264, 139.760668);
  var marker = create_maker(point, "info", "<img src='画像パス' /><br><p>テキスト</p>");

  var point = new google.maps.LatLng(34.6545182, 135.4289645);
  var marker = create_maker(point, "info", "<img src='画像パス' /><br><p>テキスト</p>");

  var point = new google.maps.LatLng(35.1709150, 136.8815369);
  var marker = create_maker(point, "info", "<img src='画像パス' /><br><p>テキスト</p>");
}

function create_maker(latlng, label, html) {
  // マーカーを生成
  var marker = new google.maps.Marker({position: latlng, map: map, title: label});
  // マーカーをマウスオーバーした時の処理
  google.maps.event.addListener(marker, "mouseover", function() {
  infowindow.setContent(html);
  infowindow.open(map, marker);
  });
}

google.maps.event.addDomListener(window, "load", init);
まとめ
簡単になりますが、上記のような記述でGoogleMapAPIを用いて地図上に画像とテキストを設置することができました。
コンテンツ内に地図を用いたいケースは多々あると思うので、GoogleMapAPIで様々な表現をする手段を勉強していきたいと思います。
