スマホでサーボモータを制御!
今回は、スマホでサーボモータを制御するシリーズの第2回目です。
Raspberry Piを用いて簡単にIoTを作成できるライブラリ、WebIOPiを使用し、スマホからサーボモーターを制御します。
WebIOPiのインストールはこちらの記事を参考にしてください。
まだHTMLファイルを作成していない方は、こちらの記事も参考にしてください。
WebIOPiとJavaScript
今回は、前回作成したHTMLファイルにJavaScriptを追加します。
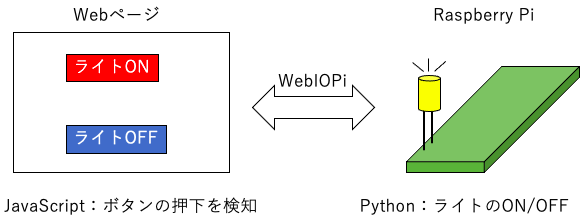
WebIOPiでは、JavaScriptを使用することで、Pythonとの連携が可能になります。
それでは作成していきます!
JavaScriptの実装
WebIOPiの公式ドキュメントには様々な機能が紹介されています(公式ドキュメント:機能紹介)。
その中でも、今回はWebiopi.callMacro()という関数を使用します。
この関数は、JavaScriptから特定のPython関数を実行することができます。
例えば、Webページ上のボタンが押されたら、PythonのLEDを光らせる関数を実行することも可能になります!

Webiopi.callMacro()について
WebIOPi.callMacro(macro, [args[, callback]])Call a macro on the server.
(string) macro : name of the macro to call
(string) arg (optional) : array containing arguments
(function) callback (optional) : function called when result received from the server
WebIOPi公式ドキュメントより
引数には以下を指定します。
- 1つ目:実行したいPython関数名
- 2つ目:Python関数に渡す引数(スライドバーの値など)
- 3つ目:Python関数が実行された後に実行するJavaScriptの関数
また、HTMLにJavaScriptを埋め込む際、headタグに
<head>
...

<script type="text/javascript" src="webiopi.js"></script>
</head>
を忘れないよう、記述してください。
コード
// 前半
var current1 = document.getElementById("myRange1");    // SERVO1 pin12
var output1 = document.getElementById("out1");
output1.innerHTML = current1.value;

var current2 = document.getElementById("myRange2");    // SERVO2 pin19
var output2 = document.getElementById("out2");
output2.innerHTML = current2.value;

// 後半
function func1(){
    var value1 = current1.value;
    output1.innerHTML = value1;
    webiopi().callMacro('GET1',value1);
}
function func2(){
    var value2 = current2.value;
    output2.innerHTML = value2;
    webiopi().callMacro('GET2',value2);
}
まず、前半はページにアクセスがあったとき、スライダの現在の値を取得して表示するプログラムです。
後半でwebiopi.callMacro関数を使用します。
function func1(){
    var value1 = current1.value;
    output1.innerHTML = value1;
    webiopi().callMacro('GET1',value1);
}
まず、2行目では現在のスライダの値を取得し、それをoutput1(idがout1の場所)に表示します。
そして、スライダの値をGET1というPython関数に渡します。
HTML全体
これまでのHTML/JavaScript全体は次のようになります。
<!DOCTYPE html>
<html lang="ja">
  <head>
    <meta charset="UTF-8">
    <meta name="mobile-web-app-capable" content="yes">
    <meta name="viewport" content="width=device-width,initial-scale=1.0,minimum-scale=1.0,maximum-scale=1.0,user-scalable=no">
    <title>Servo Controller</title>
    <script type="text/javascript" src="webiopi.js"></script>
    <link rel="stylesheet" type="text/css" href="controller.css">
  </head>
  <body>
    <div align="center">
        <tr>
          <td>
            <table>
              <tbody>
                <tr>
                  <!--SERVO 1-->
                  <td id="name1">SERVO 1</td>
                  <td class="SS1">
                    <div class="slidecontainer1">
                      <input type="range" min="1000" max="2500" value="2000" step="10" class="slider" id="myRange1" oninput="func1()">
                    </div>
                  </td>
                  <td id="out1"></td>
                  <!--SERVO 2-->
                  <td id="name2">SERVO 2</td>
                  <td class="SS2">
                    <div class="slidecontainer2">
                      <input type="range" min="1000" max="2500" value="2000" step="10" class="slider" id="myRange2" oninput="func2()">
                    </div>
                  </td>
                  <td id="out2"></td>
                </tr>
              </tbody>
            </table>
          </td>
        </tr>
    </div>
  </body>
  <script>
    var current1 = document.getElementById("myRange1");    //SERVO1 pin12
    var output1 = document.getElementById("out1");
    output1.innerHTML = current1.value;

    var current2 = document.getElementById("myRange2");    //SERVO2 pin19
    var output2 = document.getElementById("out2");
    output2.innerHTML = current2.value;

    function func1(){
        var value1 = current1.value;
        output1.innerHTML = value1;
        webiopi().callMacro('GET1',value1);
    }
    function func2(){
        var value2 = current2.value;
        output2.innerHTML = value2;
        webiopi().callMacro('GET2',value2);
    }

  </script>
</html>
最後に
次回、スライダの値に応じてサーボモーターを動かすPythonプログラムを作成していきます。