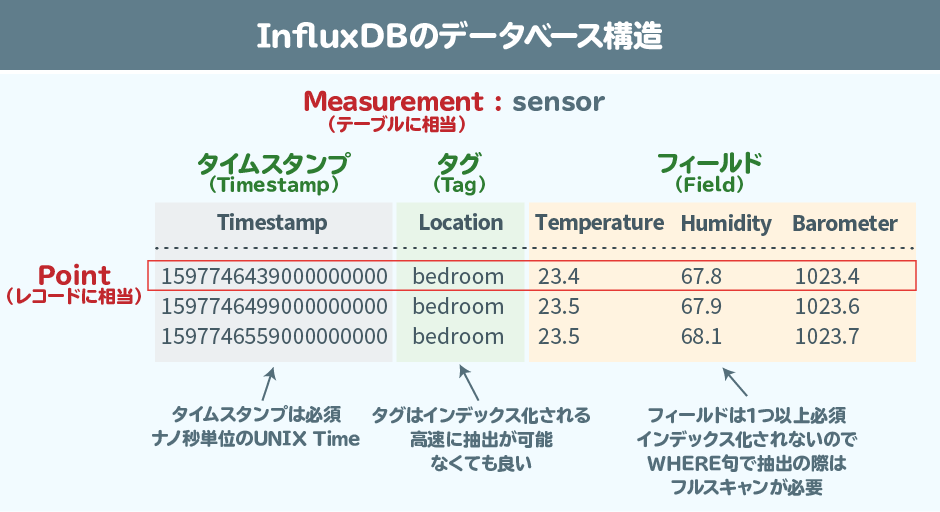
やったこと
・センサーデータ等の時系列データをGrafanaで可視化してダッシュボードにする。
システムの構成
今回RaspberryPiだけで完結させたいので、下記をすべてRaspberryPi上で構成。
- センサー値:ランダムに値を生成(ハードウエアの準備を省略するため)
- influx + Grafana
ハードウエア
- RaspbrryPi 3
※以下、ラズパイで実行する。
InfluxDB準備
- インストール Influxdbのリポジトリを登録します。
# ソースの設定
wget -qO- https://repos.influxdata.com/influxdb.key | sudo apt-key add -
source /etc/os-release
echo "deb https://repos.influxdata.com/debian $(lsb_release -cs) stable" | sudo tee /etc/apt/sources.list.d/influxdb.list

# インストール
sudo apt update
sudo apt install influxdb

# サービスの起動設定
sudo systemctl unmask influxdb.service
sudo systemctl start influxdb
sudo systemctl enable influxdb.service
ターミナルでinfluxコマンドを入力するとでInfluxDBの操作ができます。
InfluxDB初期設定
今回の為に下記の様なデータベースを作成します。
※必要に応じて変更してください。
・データベース名:sensor_test
・ユーザー:test01_user
・パスワード:test01_pass
influx
続けて、">"(大なり記号)にの後に"create"コマンド等を入力します。
> create database sensor_test
> use sensor_test
Using database test01
> create user test01_user with password 'test01_pass' with all privileges
> grant all privileges on sensor_test to test01_user
> show users
 #userとadminの確認
> exit
 #influxコマンドを終了。
センサーデータ生成と登録
今回は値をランダムに生成してInfluxDBに登録する。
ライブラリインストール
- InfluxDBへの書き込み:InfluxDB-Pythonライブラリを使う。
- Pythonで周期的に何かを実行する:scheduleライブラリを使う。
- 乱数の生成:randomモジュール(python標準ライブラリ)
pip install influxdb
pip install schedule
import influxdb
import schedule
import datetime
import sys, time
import random

# dbへのアクセス
influx = influxdb.InfluxDBClient(
    host='localhost',
    port=8086,
    database='sensor_test',
    username='test01_user',
    password='test01_pass'
)

device_id='sensor01'

def get_data():
    #センサー値をランダムに生成
    humidity=random.uniform(40, 100)
    temperature=random.uniform(20, 42)
    battery=random.uniform(0, 100)
    data = {}
    data['temperature'] = temperature
    data['humidity'] = humidity
    data['battery'] = battery
    return data

def write_to_influxdb(data):
    json_body = [{
        'measurement': 'sensor',
        'tags': {'macaddr': device_id},
        'time': datetime.datetime.utcnow(),
        'fields': data
    }]
    influx.write_points(json_body)

def on_minute():
    print('on_minute')
    try:
        data = get_data()
        print(data)
        write_to_influxdb(data)
    except KeyboardInterrupt:
        print("intrrupted Ctrl-C")
        sys.exit(1)

def main():
    try:
        schedule.every(10).seconds.do(on_minute)
        while True:
            schedule.run_pending()
            time.sleep(1)
    except KeyboardInterrupt:
        print("intrrupted Ctrl-C")
        time.sleep(1)
        print("Process end")
        time.sleep(1)
if __name__=='__main__':
    main()
データ内容の確認
$ influx
Connected to http://localhost:8086
> USE sensor_test
Using database sensor_test
> SELECT * FROM sensor

Grafanaで可視化
前手順でinfluxDBに一定時間データを蓄積したらGrafanaで可視化してみる。
詳細な手順は このリンクが大変わかりやすいため、それにならって実施。
Grafanaのインストール
# ソースの設定
wget -q -O - https://packages.grafana.com/gpg.key | sudo apt-key add -
echo "deb https://packages.grafana.com/oss/deb stable main" | sudo tee /etc/apt/sources.list.d/grafana.list

# インストール
sudo apt update
sudo apt install grafana

# サービスの起動設定
sudo systemctl unmask grafana-server.service
sudo systemctl start grafana-server
sudo systemctl enable grafana-server.service
可視化
ブラウザーを立ち上げ、http://raspberrypi.local:3000/ に接続。
初期IDはadmin
※「無効なホスト」と表示される等でアクセスできない場合はraspiのIPアドレスでアクセスする。参考
Ex:192.***.***.***:3000

HTTP URL : http://localhost:8086
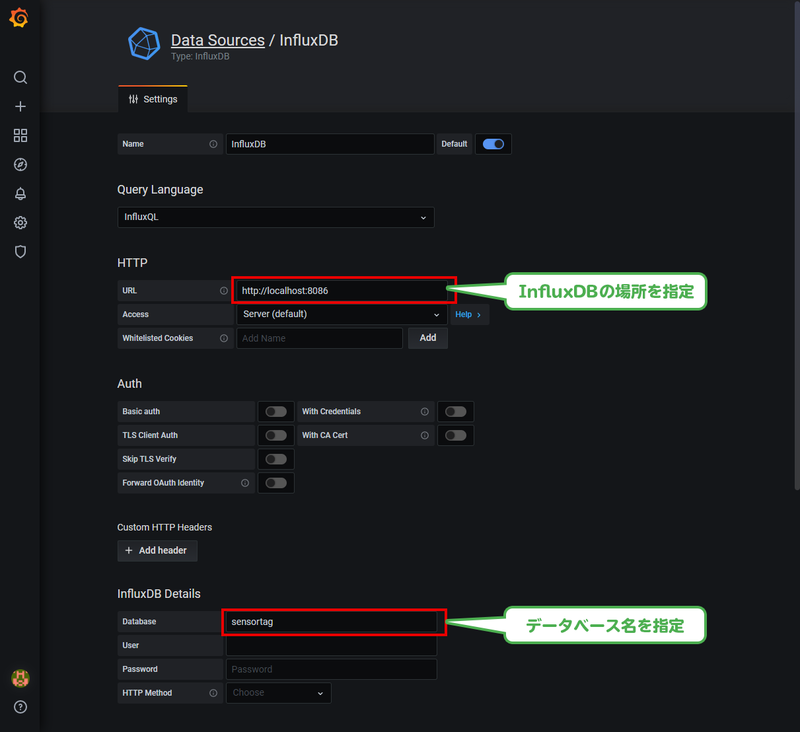
ダッシュボードの作成
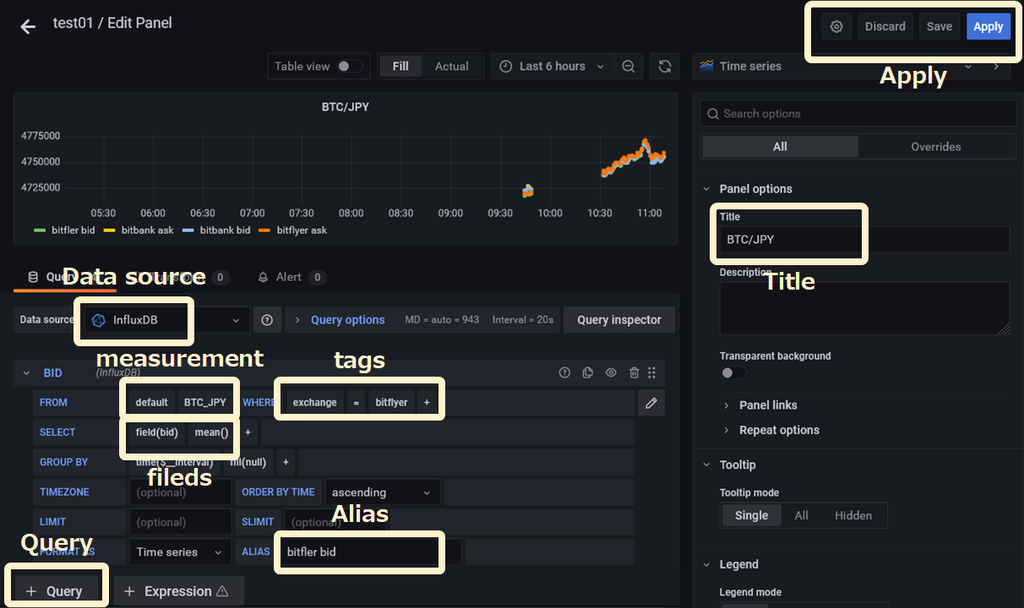
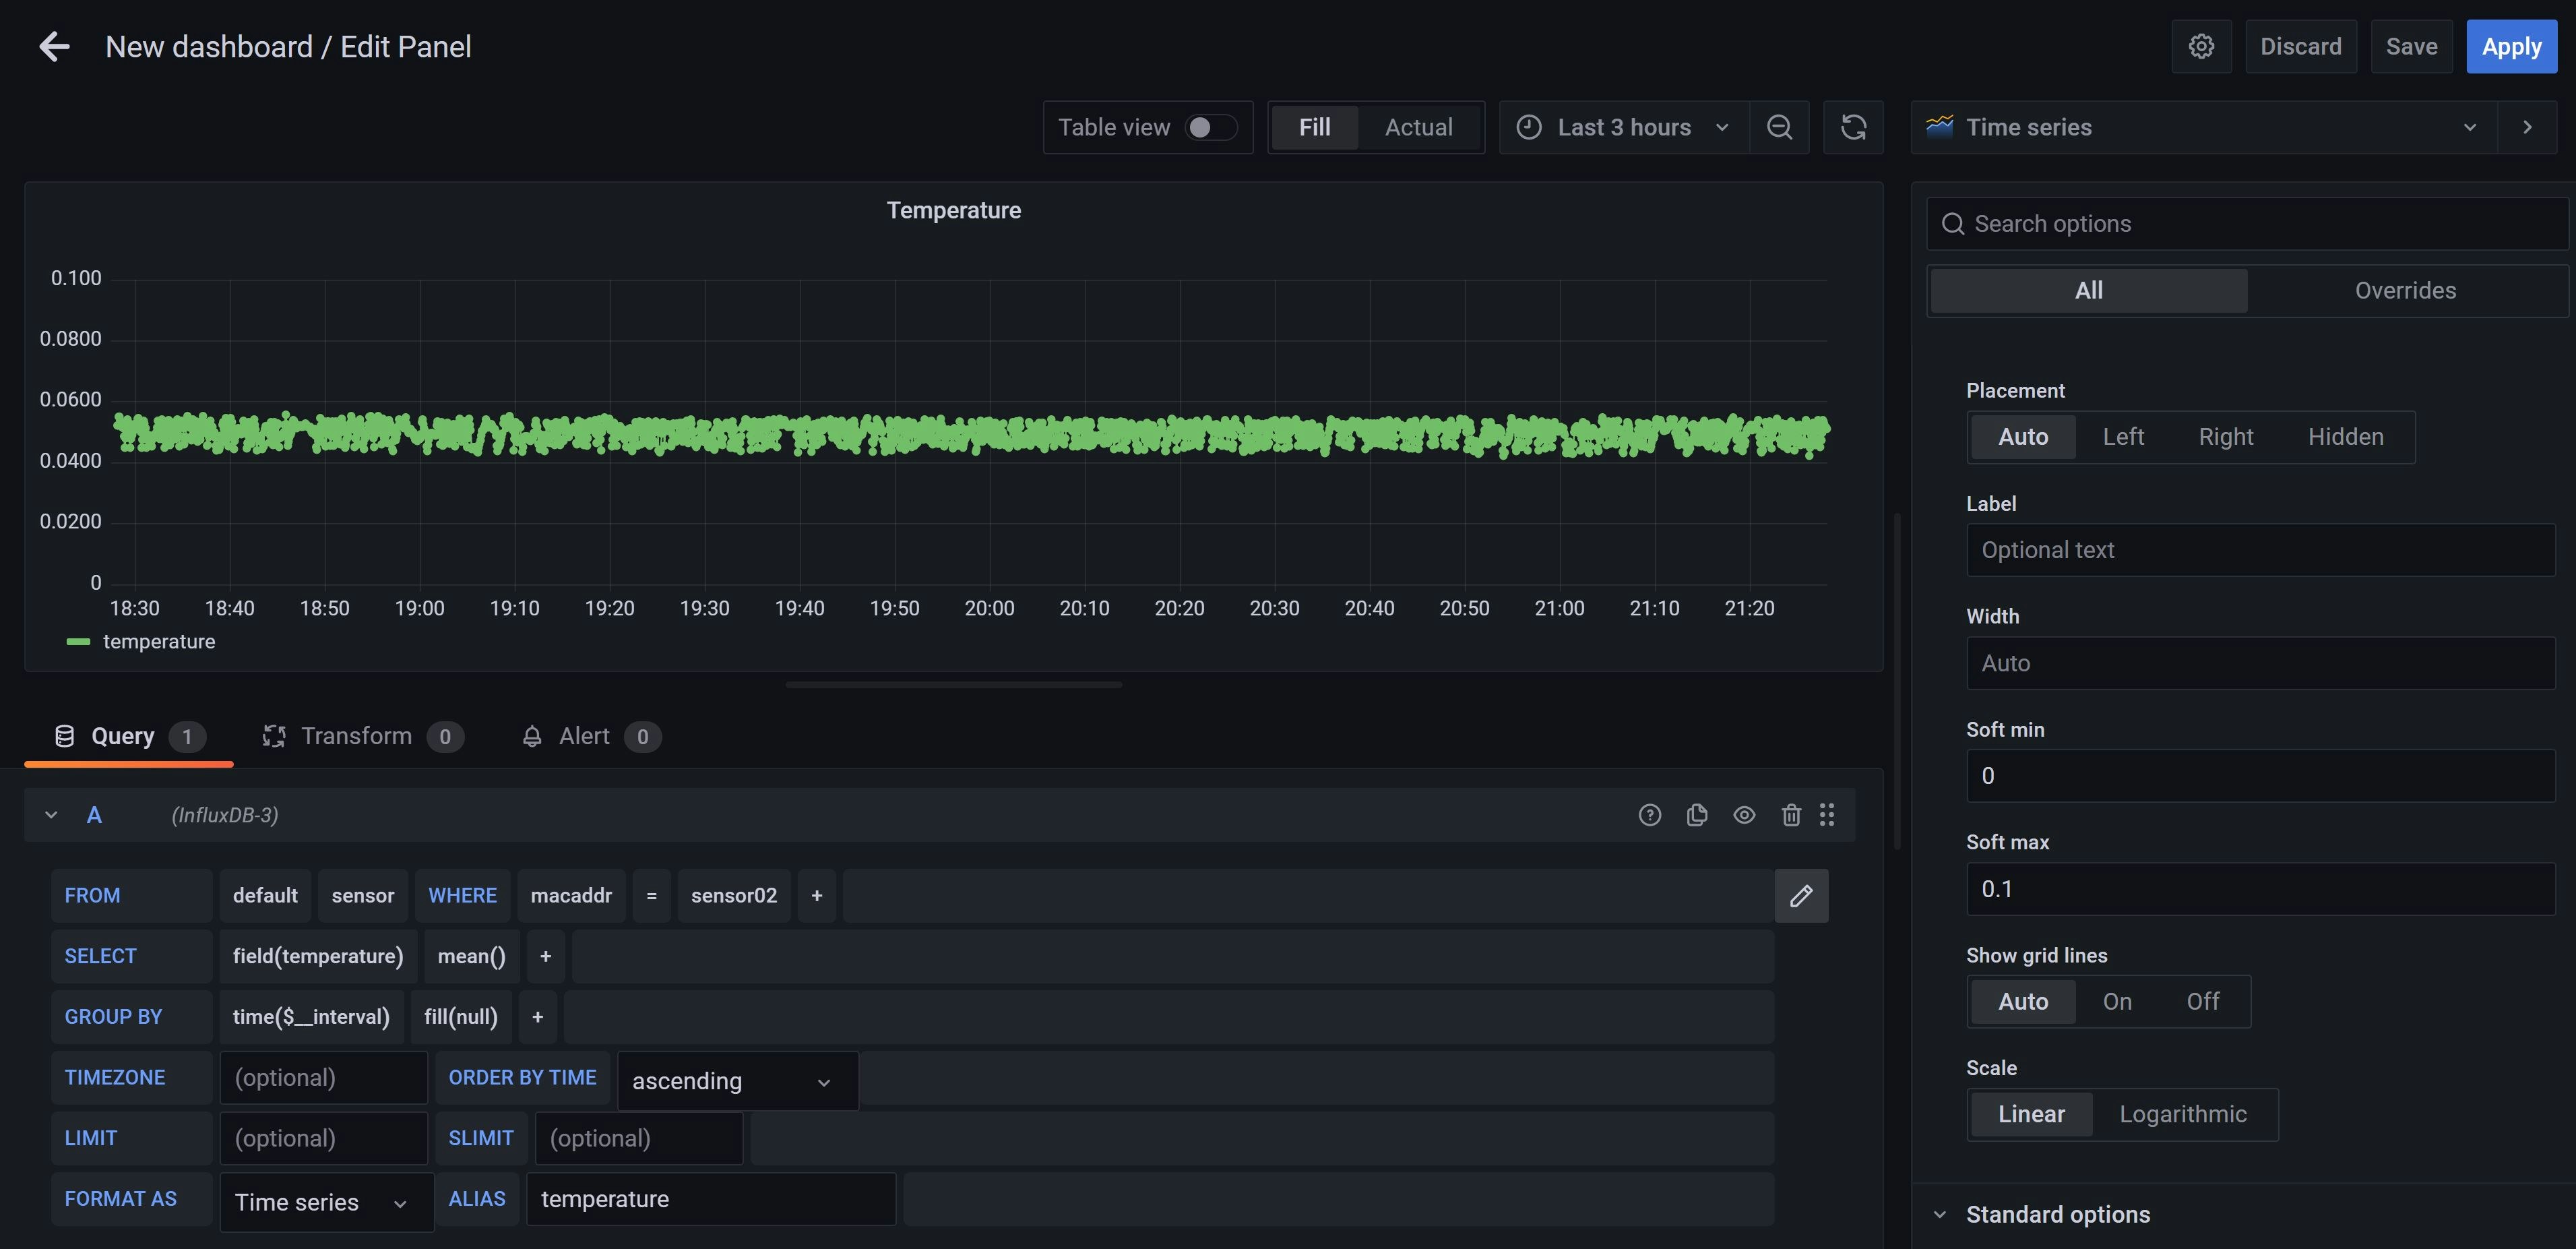
クエリの例
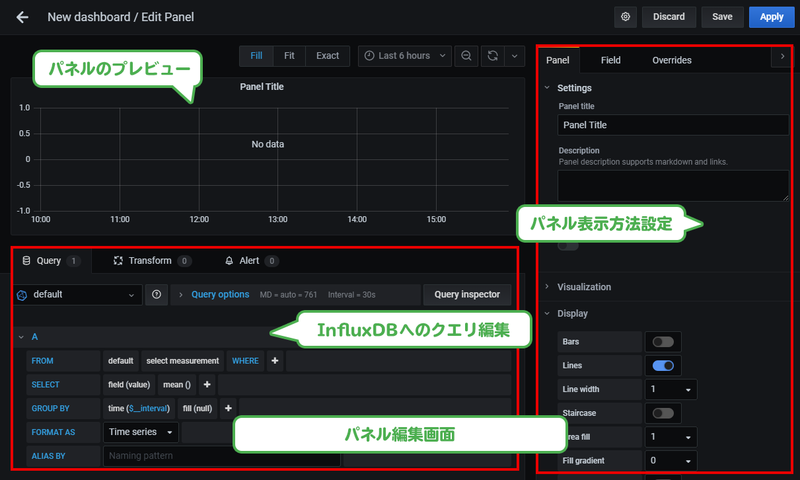
選択肢が出てくるのでほとんど迷わない。
右側の選択項目でグラフの縦横軸の設定を行う。
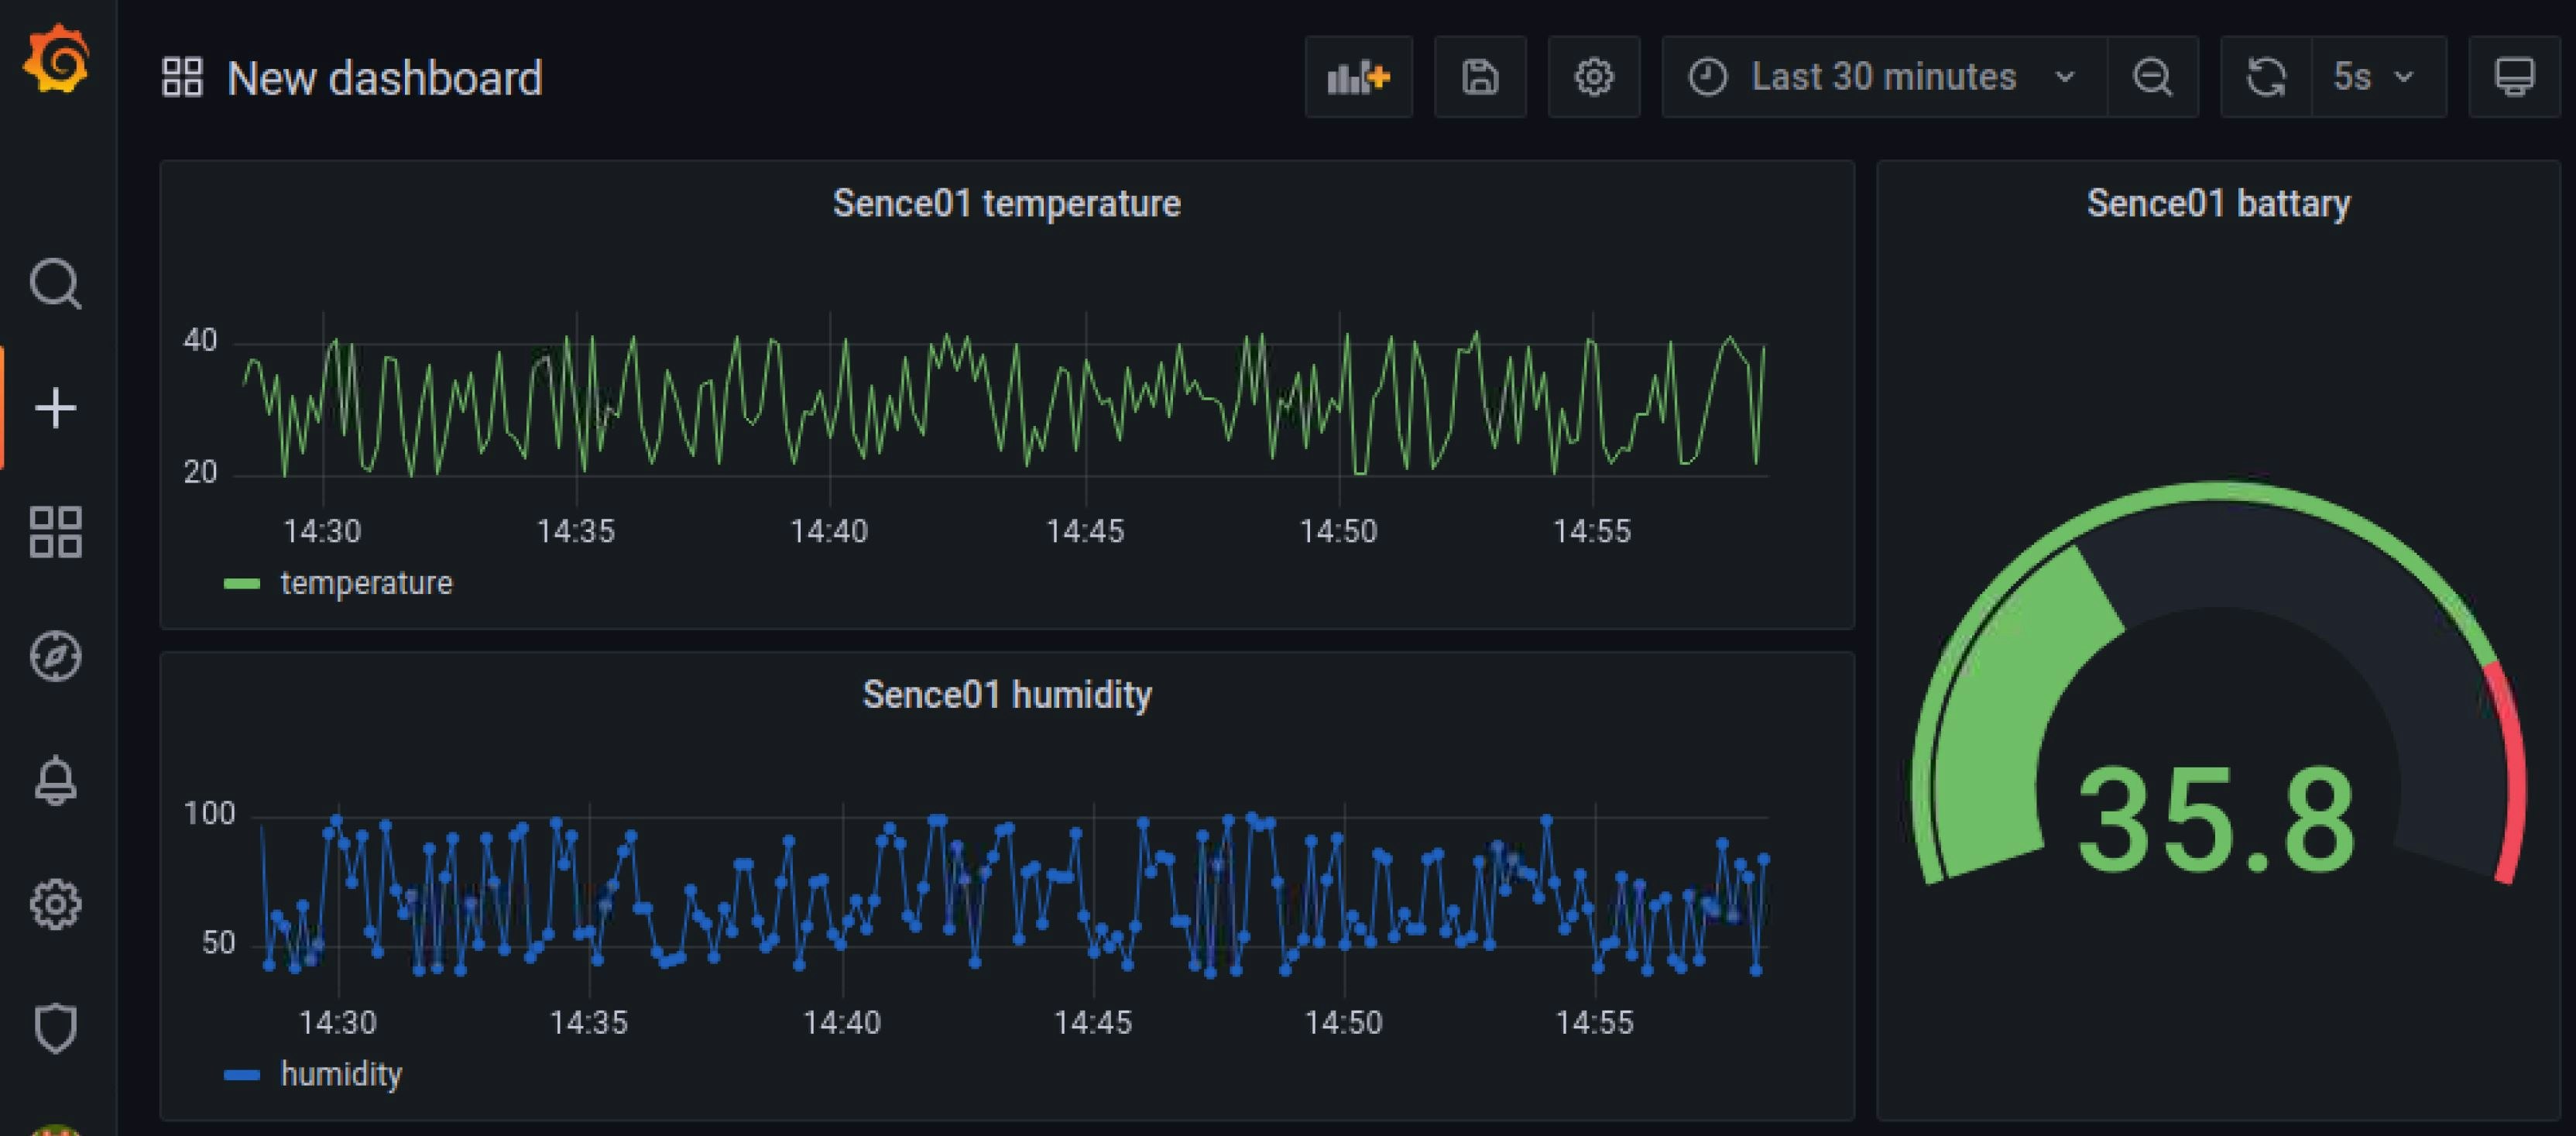
データ種類毎にパネルを作っていくと完成。
以上
参考 引用元
- Raspberry Piでセンサー情報グラフ化~その1 InfluxDBとGrafanaをインストール
- Raspberry Piでセンサー情報グラフ化~その2 センサー情報をInfluxDBに投入!
- Raspberry Piでセンサー情報グラフ化~その3 Grafanaでグラフ化
- 時系列データベースとは
- RaspberryPiでダッシュボードを作る(Grafana InfluxDB)備忘録
- [ラズパイ&Docker]GrafanaとInfluxDBでセンサデータをモニタリング
- Scheduleモジュールを用いたイベント定期実行|指定時間動作
- InfluxDB入門 - 闘うITエンジニアの覚え書き
- influxdbを触ってみた
- Pythonで収集したデータをInfluxDBに格納してGrafanaで可視化する
- 【Grafana】基礎から応用まで、これで網羅!
- InfluxDBについて最初に知るべき10のこと
- DBの構造
