expressとmongoDBを使って簡単なコミュニティーを作ろう
アプリの紹介
このアプリはコメントを残すアプリです コメントを読んだり、作成したり、編集したり、削除することができます!それだけです(笑)
目次
- 事前設定
- データベースのスキーマを作ろう
- CRUDのR
- CRUDのC
- CRUDのU
- CRUDのD
- 動作確認
事前設定
このアプリではexpress, mongoose, ejsを使うため、node環境が整っていることと、mongodbがインストールされていることを前提にします。まず、npmでexpress, mongoose, ejs,method-overrideをインストールします。
npm i express mongoose ejs method-override
そして、require関数を使って、index.jsに作り、次のコードを作成します。
あと、DELETEとputリクエストを使うため、method-overrideを使います
const express = require("express");
const app = express();
const path = require("path");
const mongoose = require("mongoose");
const methodOverride = require("method-override");
そして、次のコードでmongooseに接続し、expressを使って3000番のポートを開けます。
mongoose
  .connect("mongodb://localhost:27017/community")
  .then(() => {
    console.log("CONNECTION OPEN!");
  })
  .catch((err) => {
    console.log("ERROR!"), console.log(err);
  });

  app.listen(3000, () => {
  console.log("APP IS LISTENING ON PORT 3000!");
});
また、viewsというディレクトリを作り、その中にejsファイルを入れる予定なので、viewsディレクトリの絶対パスを探せるようにします。
そして、view engineとしてejsを使用するため、次のコードを書きます。
そしてreq.bodyをそのまま見られるようにしましょう!
app.set("views", path.join(__dirname, "views"));
app.set("view engine", "ejs");
app.use(express.urlencoded({ extended: true }));
app.use(methodOverride("_method"));
データベースのスキーマを作ろう
次にやることは、データベースのスキーマを作リます。まず、modelsというディレクトリを作ります。その後、その中にcomments.jsというファイルを作ります。 そのファイルでスキーマを定義し、exportする予定です。
コメントは、id、作成者の名前、コメントの内容、作成された時間の情報を持つ予定です。 よってスキーマを次のように定義します。
//comments.js
const { text } = require("express");
const mongoose = require("mongoose");

const commentSchema = mongoose.Schema(
  {
    creator: {
      type: String,
      required: true,
    },
    body: {
      type: String,
      required: true,
    },
  },
  { timestamps: true }
);
そしてこのスキーマでモデルを作ってexportします。
const Comment = mongoose.model("Comment", commentSchema);
module.exports = Comment;
そしてindex.jsで受け取ります。
const Comment = require("./models/comment");
CRUDのR
前提として、全てのejsファイルは、viewsの中に保存します。まず、/localhost:3000/commentsのページでは、全てのコメントを見れるようにするつもりです。 よって、/localhost:3000/commentsにgetリクエストが届いた時、先ほど作ったデータベースのモデルを使って、現在データベースの中の全ての情報を./views/index.ejsに渡し、./views/index.ejsをrenderする予定です。 まず、下のコードでmongodbのcommunity下のような適当なデータを入れて、ターミナルでmongoを開いてから、ちゃんと入力したデータが保存されたか確認します。
const c = new Comment({
  creator: "doraemon",
  body: "stop nobita!",
});
c.save();
結果
[> db.comments.find({})
{ "_id": ObjectId("669bb975accef4c9d951f268"), "creator": "doraemon", "body" : "stop
nobita!", "createdAt" : ISODate("2024-07-20T13:19:49.8357"), "updatedAt" : ISODate(
"2024-07-20T13:19:49.8357"), "_ v": 0 }
ちゃんとデータが保存されたことが確認できました!
それでは、Comment.find({})メソッドで全てのデータを検索して、index.ejsに渡しちゃいましょう!
app.get("/comments", async (req, res) => {
  const comments = await Comment.find({});
  res.render("index", { comments });
});
以下はindex.ejsのコードです!
作成者の名前と、内容、そしてコメントが作成された時間とアップデートされた時間を表示しましょう〜
<!DOCTYPE html>
<!DOCTYPE html>
<html lang="en">
  <head>
    <meta charset="UTF-8" />
    <meta name="viewport" content="width=device-width, initial-scale=1.0" />
    <title>All Comments</title>
  </head>
  <body>
    <h1>Comments</h1>

    <% for (let comment of comments) { %>
    <section>
      <strong><%= comment.creator %> </strong>- created: <%=
      comment.createdAt.toLocaleString() %> - updated: <%=
      comment.updatedAt.toLocaleString() %>
      <br />
      <%= comment.body %> <% } %>
    </section>
  </body>
</html>
そして、実際ページに入ってみると!

データベースのデータが表示されていることが見えます...!
それでは、次のステップにいきましょう!
CRUDのC
次はコメントを追加できるようにします!うーん〜まずはlocalhost:3000/comments/createにgetレクエストが来たらcreateのformをrenderするところからやりたいと思います!
そのために、getリクエストにrenderしましょう。
app.get("/comments/create", (req, res) => {
  res.render("create");
});
あとはcreate.ejsを書きましょうね
create.ejsには、formを使います!
formの中にはcreatorを書くinputと、bodyを書くtextareaを入れましょうね、あとsubmitボタンも入れましょう!
以下はcreate.ejsです
(methodはpostにしてsubmitした時/comments/createにpostリクエストをしましょう!)
<!DOCTYPE html>
<html lang="en">
  <head>
    <meta charset="UTF-8" />
    <meta name="viewport" content="width=device-width, initial-scale=1.0" />
    <title>create comment!</title>
  </head>
  <body>
    <form action="/comments/create" method="post">
      <label for="creator">creator:</label>
      <input type="text" name="creator" id="creator" placeholder="creator" />
      <br />
      <label for="body">body:</label>
      <textarea
        id="body"
        name="body"
        placeholder="body"
        rows="6"
        cols="30"
      ></textarea>
      <button>submit</button>
    </form>
  </body>
</html>
そして、フォームからpostリクエストが来たら、フォームの情報からパーシングしてあと、必要な情報を取ってデータベースに保存しましょう!
そして、毎回localhost:3000/commentsに直接移動するのもめんどくさいので作業が完了されたら、/commentsにリダイレクトして、/commentsに飛べるようにしましょう!笑
app.post("/comments/create", async (req, res) => {
  const comment = new Comment(req.body);
  await comment.save();
  res.redirect("/comments");
});
確認画面

2024/7/21の8:17:07に作成されたことが確認できましたね!
なんか毎回urlにcomments/createを打つの面倒なので/views/index.ejsにリンクを作って、comments画面に作成画面に飛べるリンクを作りましょう。
あと、作成画面でもcancelリンクを作って元の画面に戻れるようにするのもいいと思います!。
// /views/index.ejs
<a href="comments/create">create comment</a>

// /views/create.ejs
<a href="/comments">cancel</a>
これでコメント作成はバッチリです...!
次は既に作成されたコメントをアップデートしてみましょう!
CRUDのU
次は作成されたコメントをアップデートしましょうね コメントのbodyの下にeditボタンを入れて、それが押されたら、 /comment/:id/updateにgetリクエストをするようにします! そのためにまず、index.ejsに戻って、<%= comment.body %>の下に次のコードを入力してformを入れます。//<%= comment.body %>
<form action="/comments/<%= comment._id %>/update">
<button>edit</button>
</form>
comment._idを入れて送るようにして、受ける側がコメントを特定できるようになります!
そして、index.jsに戻って次のコードで/comments/comment._id/updateに来るgetリクエストを処理しましょう!
app.get("/comments/:id/update", async (req, res) => {
  const { id } = req.params;
  const comment = await Comment.findById(id);
  res.render("update", { comment });
});
このコードはidを受け取って、idを元にデータベースからオブジェクトを探してupdate.ejsに渡すコードです!
そして、views/update.ejsは次のように書きましょう
<!DOCTYPE html>
<html lang="en">
  <head>
    <meta charset="UTF-8" />
    <meta name="viewport" content="width=device-width, initial-scale=1.0" />
    <title>update comment!</title>
  </head>
  <body>
    <form action="/comments/<%= comment._id %>/update?_method=PUT" method="post">
      <label for="creator">creator:</label>
      <input
        type="text"
        name="creator"
        id="creator"
        placeholder="creator"
        value="<%= comment.creator %>"
      />
      <br />
      <label for="body">body:</label>
      <textarea id="body" name="body" placeholder="body" rows="6" cols="30">
<%= comment.body %></textarea
      >
      <button>submit</button>
      <a href="/comments">cancel</a>
    </form>
  </body>
</html>
空っぽな状態で書いて修正するより、元々あったvalueを修正する方がもっといいじゃないですか?(笑)
一文字だけ修正したい場合もありますからね
そのため、もらったcommentから情報を取り出して、元のcreatorのvalueとかbodyのvalueを最初の状態に入れておきます。そしたら、元のコメントの情報をeditに入れることができます!
そして、このformを送ると、/comments/<%= comment._id %>/updateにputリクエストが届きます!
送られたputリクエストを受け取って、その内容でデータベースのオブジェクトをアップデートするため、index.jsに次のコードを追加します
app.put("/comments/:id/update", async (req, res) => {
  const { id } = req.params;
  await Comment.findByIdAndUpdate(id, req.body);
  res.redirect("/comments");
});
idをうurlから取り出して、そのidを持っているオヴジェクトの内容をreq.bodyに変えるコードです!
それでは動作確認をしてみましょう!
動作確認

このコメントの下のeditボタンを押します!
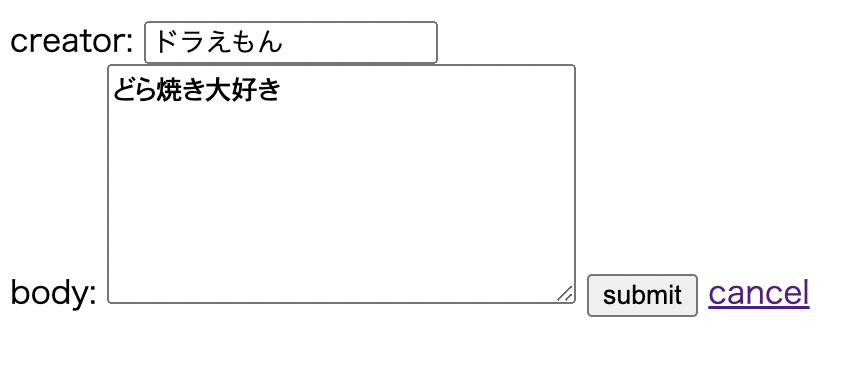
ドラえもんはどら焼きが大好きなんですよね
この内容に書き換えてsubmitを押します!

するとコメントの内容が変わりました...!
updatedも変わったことが見えます!
これでupdate成功ですね!
CRUDのD
DELETE機能を作るのは比較的に簡単です!idを受け取ってそのidを持っているオブジェクトを削除するだけです!
まずindex.ejsにdeleteのボタンを作りましょう!
<form
    method="post"
    action="/comments/<%= comment._id %>/delete?_method=DELETE"
    >
        <button>delete</button>
</form>
上のコードのようにcomments/<%= comment._id %>/deleteにdeleteリクエストをします!
そして送られたオブジェクトを特定させるために、urlに<%= comment._id %>を入れましょう
そのあと、index.jsに戻り、comments/<%= comment._id %>/deleteにdeleteリクエストが来た時の対応をします!
urlからidを取り出して、データベースからそのidを持っているオブジェクトを探して削除すれば良さそうですね!
そのため、次のコードを書きます
app.delete("/comments/:id/delete", async (req, res) => {
  const { id } = req.params;
  await Comment.findByIdAndDelete(id);
  res.redirect("/comments");
});
これて、index.ejsからdeleteレクエストが来たら、渡されたidと一致するオブジェクトのidを探し、そのオブジェクトをデータベースから削除することができるようになりました!
動作確認
これでアプリ完成です! エラーの処理もやってないし、セキュリティも全く考えてないので色々足りないですが、それでもCRUDを作ってみました! それではアプリがちゃんと起動しているか動作確認しましょう!
CREATE, READ, UPDATE, DELETE全部できることが確認で来ました!
見ていただき、ありがとうございました!
間違っているところがあったら、コメントお願いします!