ViT(Vision Transformer) を除くEnd-to-Endの物体検出AIの中で、COCOのベンチマークでトップレベルのモデル(YOLO, SSD, RetinaNet)のうち、今回は、YOLOの最新モデルv8の簡単な実装方法を紹介する。
Papers with Codeの物体検出AIベンチマーク
※一位はもちろん、Vision TransfomerのDETRの進化版 "Co-DETR"
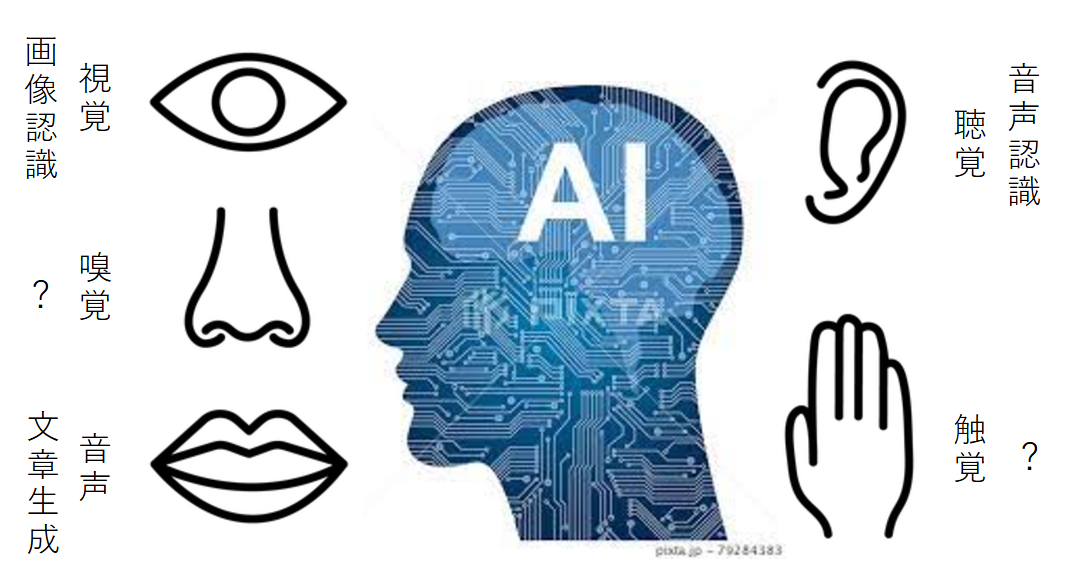
2022年8月拡散モデルを利用したStable Diffusionが公開され、2022年11月Transformerを利用したChatGPTが公開され、画像生成・文章生成AIが業界を席捲している。生成AI以外にも人間の五感を担うような優秀なAIは沢山あり、主なところでは画像認識AI(目)、音声認識AI(耳) がある。※嗅覚や触覚認識など他に優れた有名なAIがあれば、コメントお願いします。
その内、今回は画像認識AIの中で、リアルタイムで高性能なモデルYOLOv8について紹介する。
Ultralytics YOLO
YOLOは物体検出AIの代表的なモデルであり、そのPython SDK「ultralytics」が2023年1月にVersion8.0.0としてリリースされ、yoloモデルを使用した物体検出AIの開発が非常に容易になった。
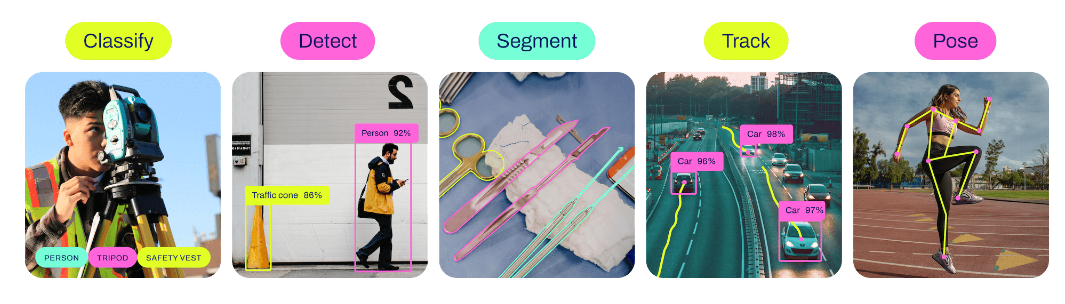
利用可能なAIタスク
物体検出以外にもセグメンテーション(meta社のSAMも利用可能!)や姿勢推定も可能である。
-
物体の検出(Detect):
画像やビデオ内で物体の存在を検出するタスク。 -
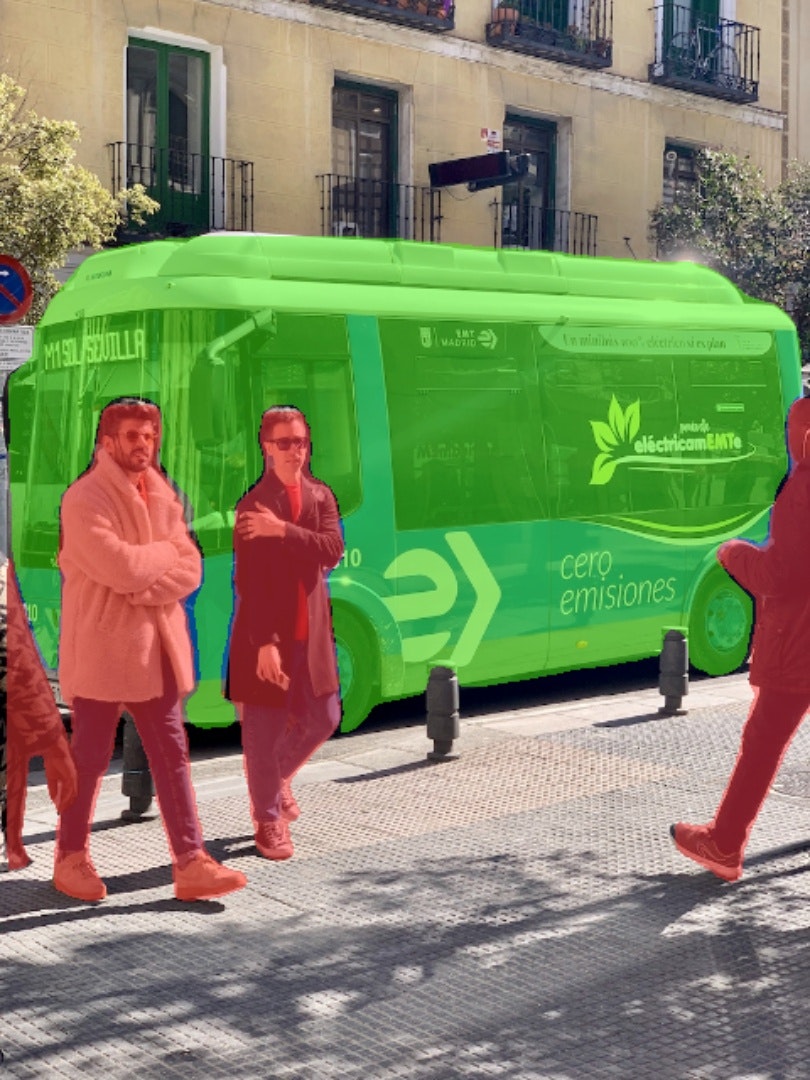
物体のセグメンテーション(Segmentation):
画像やビデオ内の各ピクセルを物体クラスに割り当てるタスク。 -
物体の分類(Classification):
画像やビデオ内の物体を事前に定義されたカテゴリに分類するタスク。 -
姿勢推定(Pose):
画像やビデオ内の物体の位置、角度、方向などの姿勢情報を推定するタスク。
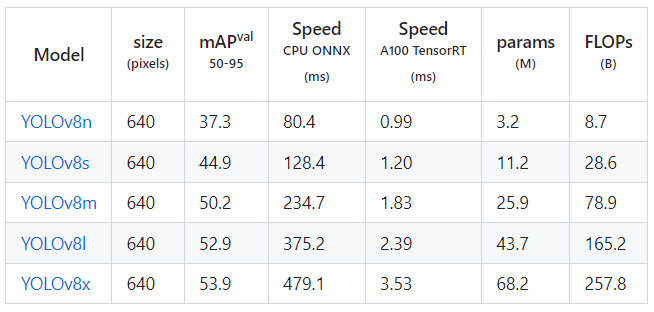
それぞれ利用可能なモデルは以下である
- 物体の検出(Detect)
- 物体のセグメンテーション(Segmentation)
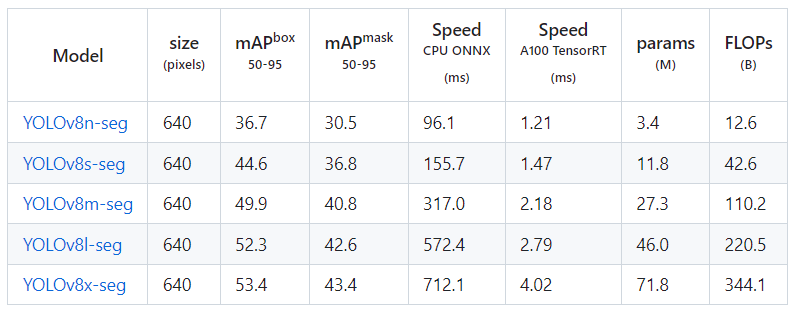
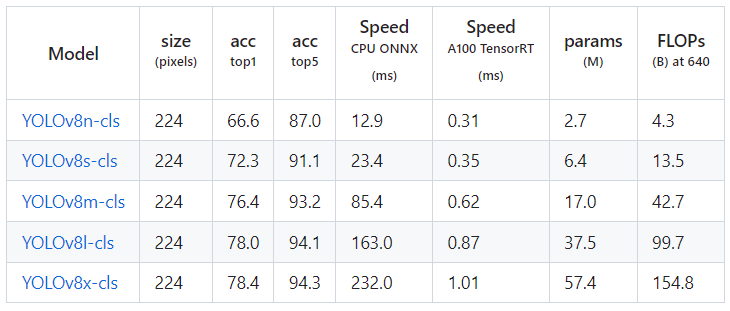
- 物体の分類(Classification)
- 姿勢推定(Pose)

QuickStart
ultralyticsライブラリのインストールとPyTorchのインストールをすれば可能(簡単)
インストール
ultralyticsライブラリのインストール
pip3 install ultralytics
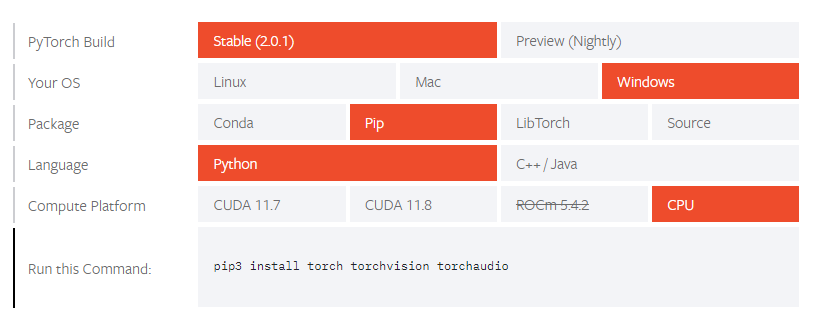
Pytorchのインストール ※CPU利用版
pip3 install torch torchvision torchaudio
実行
正常にインストール出来たら、下記を実行する。
from ultralytics import YOLO
if __name__ == '__main__':
# Load a model
model = YOLO('yolov8n.pt')
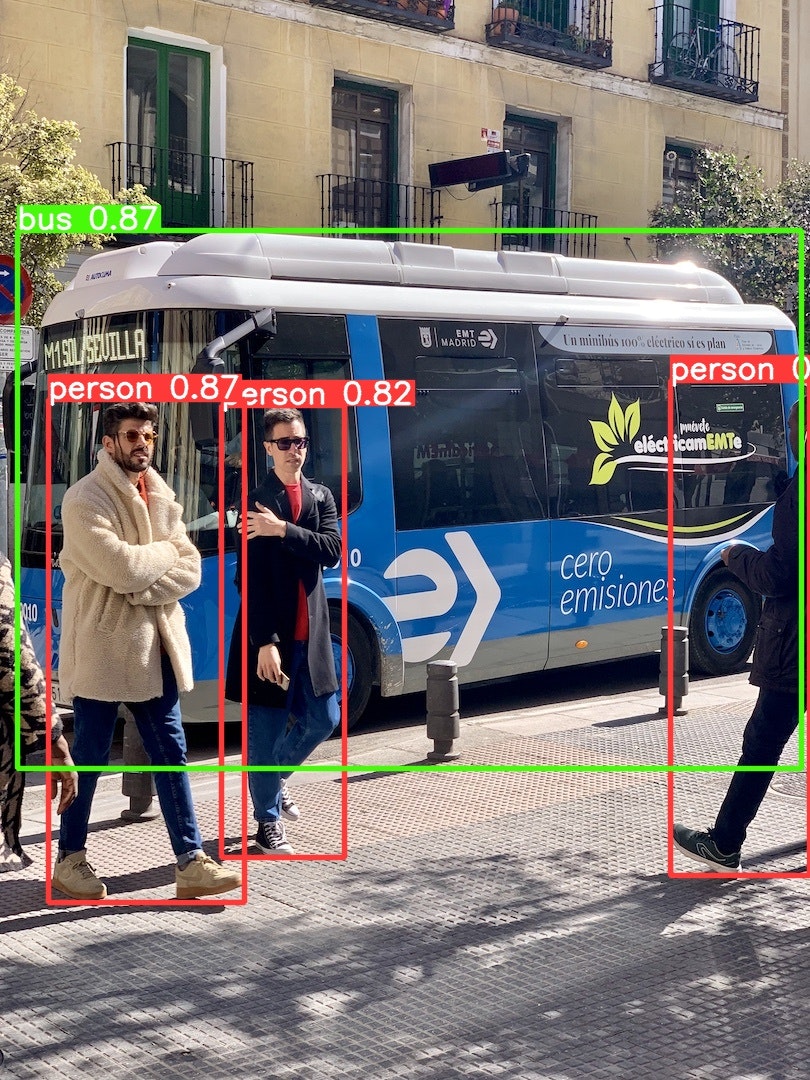
# Predict the model
model.predict('https://ultralytics.com/images/bus.jpg', save=True, conf=0.5)
from ultralytics import YOLO

if __name__ == '__main__':
    # Load a model
    model = YOLO("yolov8x-seg.pt")

    # Predict the model
    model.predict('https://ultralytics.com/images/bus.jpg', save=True, conf=0.5, boxes=False)
上記の通り、非常に簡単に推論を実装できる。ただ、これは学習済モデルで約80個しか検出できない。
独自ドメインのAIにするためには、下記で説明するように学習する必要がある。(学習の実装も簡単)
アノテーション画像の作成(Labelme版)
- pip3 install labelmeでライブラリインストール
- labelmeで実行
- 画像のあるフォルダを開く
- 右クリックでCreate Rectangleを押す
- 左クリックで対象の個所を囲む
- Next imageで次の画像をアノテーションする
- Jsonファイルとして保存されていく
Labelmeで保存したフォルダで、labelme2yoloライブラリのコードを実行する。
すると、下記のようにyolo学習用フォルダとして分けられる
pip install labelme2yolo
labelme2yolo --json_dir .\labelme_dir\ --val_size 0.15 --test_size 0.15 --output_format bbox

YOLODataset
├── images
│      ├── test
│      ├── train
│      └── val
├── labels
│      ├── test
│      ├── train
│      └── val
└── dataset.yaml
これをyolov8の学習用データフォルダの以下の構成に変更する
datasets
├── test
│      ├── images
│      └── labels
├── train
│      ├── images
│      └── labels
├── valid
│      ├── images
│      └── labels
└── data.yaml
また、data.tamlの中身を以下のように変更する
train: ../train/images
val: ../valid/images
test: ../test/images

nc: 1
names: ['LisencePlate']
アノテーション画像の作成(roboflow版)
非常に簡単にyolov8モデルの学習に対応したデータを作成・学習・利用できるツールとして、roboflowというものがある。3か月間の無料トライアル期間があるので、個人利用ならそちらで十分利用できる。
プロジェクト作成
- https://app.roboflow.com/ を開く
- アカウント作成
- Create New Projectを押す
- Project Typeを「Object Detection (Bounding Box)」
- What Are You Detecting?にラベルを並べる
- Project Nameにプロジェクトの名前を任意に決める
- Licenseは商用利用不可のBY-NC-SA 4.0を選択する
※それ以外の選択肢は公開して商用利用可
画像アップロード
- Drag and drop imagesへ画像をドラッグする
- 左上のSave and Continueを押す
- 次に誰にアノテーションをAssinするか決める
右側でユーザーを指定して、右下のAssin Imagesを押す - 右上のStart Annotatingを押す
- Ctrlを押しながら、バウンディングボックスを当てはめていく
- 左上の戻るを押す
- 右上のAdd *** images to Datasetを押す
- Add Imagesを押す
- 右上のGenerate New Versionを押す※なければ一回他の左タブを開く
- PreProcessningでAuto-Orientとresize640×640を選ぶ
- AugmentationでCrop、Rotation15°、Shear15°、Saturation25%を選ぶ
- Generateを押す
- Export Datasetを押す
- FormatでYOLOv8を選ぶ
学習
"""
@software{yolov8_ultralytics,
  author       = {Glenn Jocher and Ayush Chaurasia and Jing Qiu},
  title        = {YOLO by Ultralytics},
  version      = {8.0.0},
  year         = {2023},
  url          = {https://github.com/ultralytics/ultralytics},
  orcid        = {0000-0001-5950-6979, 0000-0002-7603-6750, 0000-0003-3783-7069},
  license      = {AGPL-3.0}
}
"""
from ultralytics import YOLO

if __name__ == '__main__':
    # Load a model
    model = YOLO('yolov8n.pt')  # load a pretrained model (recommended for training)

    # Train the model
    results = model.train(data=r"path/to/data.yaml", epochs=100, imgsz=640, batch=12, device=0)

    # Export the model
    model.export(format="torchscript")
検証
from ultralytics import YOLO

if __name__ == '__main__':
    # Load a model
    model = YOLO(r'runs\detect\train\weights\best.pt')

    # Validate the model
    metrics = model.val()  # no arguments needed, dataset and settings remembered
    metrics.box.map    # map50-95
    metrics.box.map50  # map50
    metrics.box.map75  # map75
    metrics.box.maps   # a list contains map50-95 of each category
    print(metrics)

    # Predict the model
    model.predict('https://ultralytics.com/images/bus.jpg', save=True, conf=0.5)
推論
"""
@software{yolov8_ultralytics,
  author       = {Glenn Jocher and Ayush Chaurasia and Jing Qiu},
  title        = {YOLO by Ultralytics},
  version      = {8.0.0},
  year         = {2023},
  url          = {https://github.com/ultralytics/ultralytics},
  orcid        = {0000-0001-5950-6979, 0000-0002-7603-6750, 0000-0003-3783-7069},
  license      = {AGPL-3.0}
}
"""

import os
import sys
import random
import time
import datetime
import glob
import re
import shutil
import cv2
import numpy as np
import torch

from ultralytics import YOLO

# Load a model
# detect: yolov8n.pt yolov8s.pt yolov8m.pt yolov8l.pt yolov8x.pt
# segment: yolov8s-seg.pt yolov8m-seg.pt yolov8l-seg.pt yolov8x-seg.pt
# pose: yolov8s-pose.pt yolov8m-pose.pt yolov8l-pose.pt yolov8x-pose.pt yolov8x-pose-p6
# classification: yolov8s-cls.pt yolov8m-cls.pt yolov8l-cls.pt yolov8x-cls.pt
model = YOLO(r'runs\detect\train\weights\best.pt')


print('モデルの概要', model.info())
# モデルの構造の保存
with open('./model_structure.txt', 'w') as f:
    f.write(str(model.model))
print('モデルの行うタスク', model.task) # detect
# モデルのcheckpoint objectの保存
with open('./model_checkpoint.txt', 'w') as f:
    f.write(str(model.ckpt))
print('モデルの*.yaml file', model.cfg) # None
print('モデルの*.pt file', model.ckpt_path) # yolov8x.pt
print('モデルの詳細', model.overrides) # {'task': 'detect', 'data': 'coco.yaml', 'imgsz': 640, 'single_cls': False, 'model': 'yolov8x.pt'}

# Display preds. Accepts all YOLO predict arguments
video_path = "sample.mp4"
#ここから持ってきても良い
#https://whitewell.sakura.ne.jp/OpenCV/py_tutorials/py_gui/py_video_display/vtest.avi
cap = cv2.VideoCapture(video_path)
fps = int(cap.get(cv2.CAP_PROP_FPS))
w = int(cap.get(cv2.CAP_PROP_FRAME_WIDTH))
h = int(cap.get(cv2.CAP_PROP_FRAME_HEIGHT))
brightness = int(cap.get(cv2.CAP_PROP_BRIGHTNESS))
contrast = int(cap.get(cv2.CAP_PROP_CONTRAST))
auto_exposure = int(cap.get(cv2.CAP_PROP_AUTO_EXPOSURE))
auto_focus = int(cap.get(cv2.CAP_PROP_AUTOFOCUS))
auto_WB = int(cap.get(cv2.CAP_PROP_AUTO_WB))
fourcc = int(cap.get(cv2.CAP_PROP_FOURCC))

# Display size scale
scale = 0.3

# Loop through the video frames
while cap.isOpened():
    # Read a frame from the video
    success, frame = cap.read()
    if success:
        # Run YOLOv8 inference on the frame
        results = model.track(source=frame, show=False, save=True, device=0, conf=0.5, save_txt=True, save_conf=True, tracker="bytetrack.yaml")

        # get predict result
        for result in results:
            boxes = result.boxes  # Boxes object for bbox outputs
            masks = result.masks  # Masks object for segmentation masks outputs
            names = result.names
            orig_img = result.orig_img
            orig_shape = result.orig_shape
            speed = result.speed

        # Display the annotated frame
        if len(results[0]) > 0:
            results_frame = results[0].plot(line_width=5, font_size=1)
            results_frame = cv2.resize(results_frame , (int(w*scale), int(h*scale)))
            cv2.imshow("YOLOv8 Inference", results_frame)
        else:
            frame = cv2.resize(frame , (int(w*scale), int(h*scale)))
            cv2.imshow("YOLOv8 Inference", frame)

        # Break the loop if 'q' is pressed
        if cv2.waitKey(1) & 0xFF == ord("q"):
            break
    else:
        # Break the loop if the end of the video is reached
        break

# Release the video capture object and close the display window
cap.release()
cv2.destroyAllWindows()
学習済モデルで認識可能なラベルは以下に記載されている。
ライセンスについて
Ultralyticsは、デフォルトでAGPL-3.0ライセンスの下ですべてのユースケースに対してオープンソースソフトウェアとして無料で提供している。AGPL-3.0ライセンスは、コピーレフトを強制するライセンスであり、商用目的で開発したソフトウェアはソースコードを公開する必要がある。 これは、コピーライト(著作権)の反対の考えのもので、二次開発品にオープンソースの性質を引き継がせる目的がある。プロプライエタリとして利用したいような、商用製品開発の組織向けにエンタープライズライセンスも提供している。会社でUltralyticsソフトウェアとAIモデルを商用製品やアプリケーションに埋め込みたい場合で、かつAGPL-3.0のオープンソースの要件を満たしたくない場合、年間費用を払って契約する必要がある。
参考文献
他のエンジニアが作ったサンプルツール
ライブラリのソースコード