はじめに
前回の環境 を元に rswag を組み込んで API の組み込みと Spec の実装までを進めます。
目標
swagger による docs ページの出力と API RSpec の実装です。
前提
前回の環境に手を加えていきます。
今回も sudo chown -R $USER:$USER . と docker compose stop + docker compose up あるいは docker compose up --build が大活躍するため、手元の動作に異変を感じたら適宜実行していきましょう。
最終的なファイル構成
今回追加、修正するファイル群となります。
コマンドで自動追加されるものも含めたものです。
.myapp/
├── app/
| ├── controllers/
| | ├── api/
| | | ├── application_controller.rb
| | | └── v1/
| | |   └── users_controller.rb
| | ├── concerns/
| | | └── users.rb
| | └── users_controller.rb
| ├── models/
| | └── user.rb
| └── serializers/
|   └── user_serializer.rb
├── config/
| ├── initializers/
| | ├── rswag_api.rb
| | └── rswag_ui.rb
| └── routes.rb
├── spec/
| ├── requests/api/v1/
| | └── users_spec.rb
| ├── rails_helper.rb
| ├── spec_helper.rb
| └── swagger_helper.rb
├── swagger/v1/
| └── swagger.yaml
└── .spec
手順
gem 追加
gem 'active_model_serializers', '~> 0.10.13'

gem 'rswag-api'
gem 'rswag-ui'

group :development, :test do
  gem "debug", platforms: %i[ mri mingw x64_mingw ]
  gem 'rspec-rails'
  gem 'rswag-specs'
end
Gemfile に上記を追加して次のコマンドを実行します。
$ docker compose run frontend bundle install
$ docker compose run frontend rails g rspec:install
$ docker compose run frontend rails g rswag:install
$ docker compose run frontend rails rswag:specs:swaggerize
API 用設定
本来はエラーやレスポンスの http ステータスコードを気にしないといけないのですが、今回はざっくりと進めていきます。
class Api::ApplicationController < ActionController::API
end
class Api::V1::UsersController < Api::ApplicationController
  include Users

  before_action :set_user, only: %i[ show update destroy ]

  # GET /api/v1/users.json
  def index
    @users = User.all
    return head :not_found if @users.blank?

    render json: @users, each_serializer: UserSerializer
  end

  # GET /api/v1/users/1.json
  def show
    return head :not_found if @user.blank?

    render json: @user, serializer: UserSerializer
  end

  # POST /api/v1/users.json
  def create
    @user = User.new(user_params)

    if @user.save
      render json: @user, status: :created
    else
      render json: @user.errors, status: :unprocessable_entity
    end
  end

  # PATCH/PUT /api/v1/users/1.json
  def update
    return head :not_found if @user.blank?

    if @user.update(user_params)
      render json: @user, status: :ok
    else
      render json: @user.errors, status: :unprocessable_entity
    end
  end

  # DELETE /api/v1/users/1.json
  def destroy
    return head :no_content if @user.blank?

    @user.destroy
    head :no_content
  end
end
通常のブラウザ機能と共通化を図ろうとしたら巧くいかなかった例ですね。
module Users
  extend ActiveSupport::Concern

  private

  # Use callbacks to share common setup or constraints between actions.
  def set_user
    @user = User.find_by(id: params[:id].presence)
  end

  # Only allow a list of trusted parameters through.
  def user_params
    params.require(:user).permit(:name, :email)
  end
end
class UsersController < ApplicationController
  before_action :set_user, only: %i[ show edit update destroy ]

  # GET /users or /users.json
  def index
    @users = User.all
  end

  # GET /users/1 or /users/1.json
  def show
    return head :not_found if @user.blank?
  end

  # GET /users/new
  def new
    @user = User.new
  end

  # GET /users/1/edit
  def edit
    return head :not_found if @user.blank?
  end

  # POST /users or /users.json
  def create
    @user = User.new(user_params)

    respond_to do |format|
      if @user.save
        format.html { redirect_to user_url(@user), notice: "User was successfully created." }
        format.json { render :show, status: :created, location: @user }
      else
        format.html { render :new, status: :unprocessable_entity }
        format.json { render json: @user.errors, status: :unprocessable_entity }
      end
    end
  end

  # PATCH/PUT /users/1 or /users/1.json
  def update
    return head :not_found if @user.blank?

    respond_to do |format|
      if @user.update(user_params)
        format.html { redirect_to user_url(@user), notice: "User was successfully updated." }
        format.json { render :show, status: :ok, location: @user }
      else
        format.html { render :edit, status: :unprocessable_entity }
        format.json { render json: @user.errors, status: :unprocessable_entity }
      end
    end
  end

  # DELETE /users/1 or /users/1.json
  def destroy
    return head :not_found if @user.blank?

    @user.destroy

    respond_to do |format|
      format.html { redirect_to users_url, notice: "User was successfully destroyed." }
      format.json { head :no_content }
    end
  end
end
class User < ApplicationRecord
  validates :name, :email, presence: true
end
class UserSerializer < ActiveModel::Serializer
  attributes :id, :name, :email
end
Rails.application.routes.draw do
  mount Rswag::Ui::Engine => '/api-docs'
  mount Rswag::Api::Engine => '/api-docs'
  resources :users

  namespace :api, format: 'json' do
    namespace :v1 do
      resources :users
    end
  end
end
ここまでの設定で、いやゆる CRUD API としては機能するはずです。
rswag 設定
以前に打ったコマンド rails g rspec:install と rails g rswag:install で自動生成されたファイルがあるので、必要な箇所だけ修正していきます。
修正が不要なファイル
- config/initializers/rswag_api.rb
- config/initializers/rswag_ui.rb
- spec/rails_helper.rb
- spec/spec_helper.rb
- .rspec
swagger_helper.rb は url や defaultHost を修正します。
# frozen_string_literal: true

require 'rails_helper'

RSpec.configure do |config|
  # Specify a root folder where Swagger JSON files are generated
  # NOTE: If you're using the rswag-api to serve API descriptions, you'll need
  # to ensure that it's configured to serve Swagger from the same folder
  config.swagger_root = Rails.root.join('swagger').to_s

  # Define one or more Swagger documents and provide global metadata for each one
  # When you run the 'rswag:specs:swaggerize' rake task, the complete Swagger will
  # be generated at the provided relative path under swagger_root
  # By default, the operations defined in spec files are added to the first
  # document below. You can override this behavior by adding a swagger_doc tag to the
  # the root example_group in your specs, e.g. describe '...', swagger_doc: 'v2/swagger.json'
  config.swagger_docs = {
    'v1/swagger.yaml' => {
      openapi: '3.0.1',
      info: {
        title: 'API V1',
        version: 'v1'
      },
      paths: {},
      servers: [
        {
          url: 'http://{defaultHost}',
          variables: {
            defaultHost: {
              default: 'www.example.com'
            }
          }
        }
      ]
    }
  }

  # Specify the format of the output Swagger file when running 'rswag:specs:swaggerize'.
  # The swagger_docs configuration option has the filename including format in
  # the key, this may want to be changed to avoid putting yaml in json files.
  # Defaults to json. Accepts ':json' and ':yaml'.
  config.swagger_format = :yaml
end
この yaml が今回の肝となります。
CRUD ごとに設定を記述し、それがサーバー上のページになります。
詳細な設定については Swagger 本家 などをご確認ください。
---
openapi: 3.0.1
info:
  title: API V1
  version: v1
paths:
  "/api/v1/users":
    post:
      summary: Creates a user
      tags:
      - Users
      parameters: []
      responses:
        '201':
          description: user created
        '422':
          description: invalid request
      requestBody:
        content:
          application/json:
            schema:
              type: object
              properties:
                name:
                  type: string
                email:
                  type: string
              required:
              - name
              - email
    get:
      summary: Retrieves users
      tags:
      - Users
      responses:
        '200':
          description: user found
          content:
            application/json:
              schema:
                type: array
                items:
                  type: object
                  properties:
                    id:
                      type: integer
                    name:
                      type: string
                    email:
                      type: string
                  required:
                  - id
                  - name
                  - email
            application/xml:
              schema:
                type: array
                items:
                  type: object
                  properties:
                    id:
                      type: integer
                    name:
                      type: string
                    email:
                      type: string
                required:
                - id
                - name
                - email
        '404':
          description: user not found
        '406':
          description: unsupported accept header
  "/api/v1/users/{id}":
    patch:
      summary: Updates a user
      tags:
      - Users
      parameters:
      - name: id
        in: path
        required: true
        schema:
          type: string
      responses:
        '200':
          description: user updated
        '422':
          description: invalid request
      requestBody:
        content:
          application/json:
            schema:
              type: object
              properties:
                name:
                  type: string
                email:
                  type: string
              required:
              - id
              - name
              - email
    delete:
      summary: Deletes a user
      tags:
      - Users
      parameters:
      - name: id
        in: path
        required: true
        schema:
          type: string
      responses:
        '204':
          description: no content
        '422':
          description: invalid request
    get:
      summary: Retrieves a user
      tags:
      - Users
      parameters:
      - name: id
        in: path
        required: true
        schema:
          type: string
      responses:
        '200':
          description: user found
          content:
            application/json:
              schema:
                type: object
                properties:
                  id:
                    type: integer
                  name:
                    type: string
                  email:
                    type: string
                required:
                - id
                - name
                - email
            application/xml:
              schema:
                type: object
                properties:
                  id:
                    type: integer
                  name:
                    type: string
                  email:
                    type: string
                required:
                - id
                - name
                - email
        '404':
          description: user not found
        '406':
          description: unsupported accept header
servers:
- url: http://localhost:3000
  variables:
    defaultHost:
      default: localhost:3000
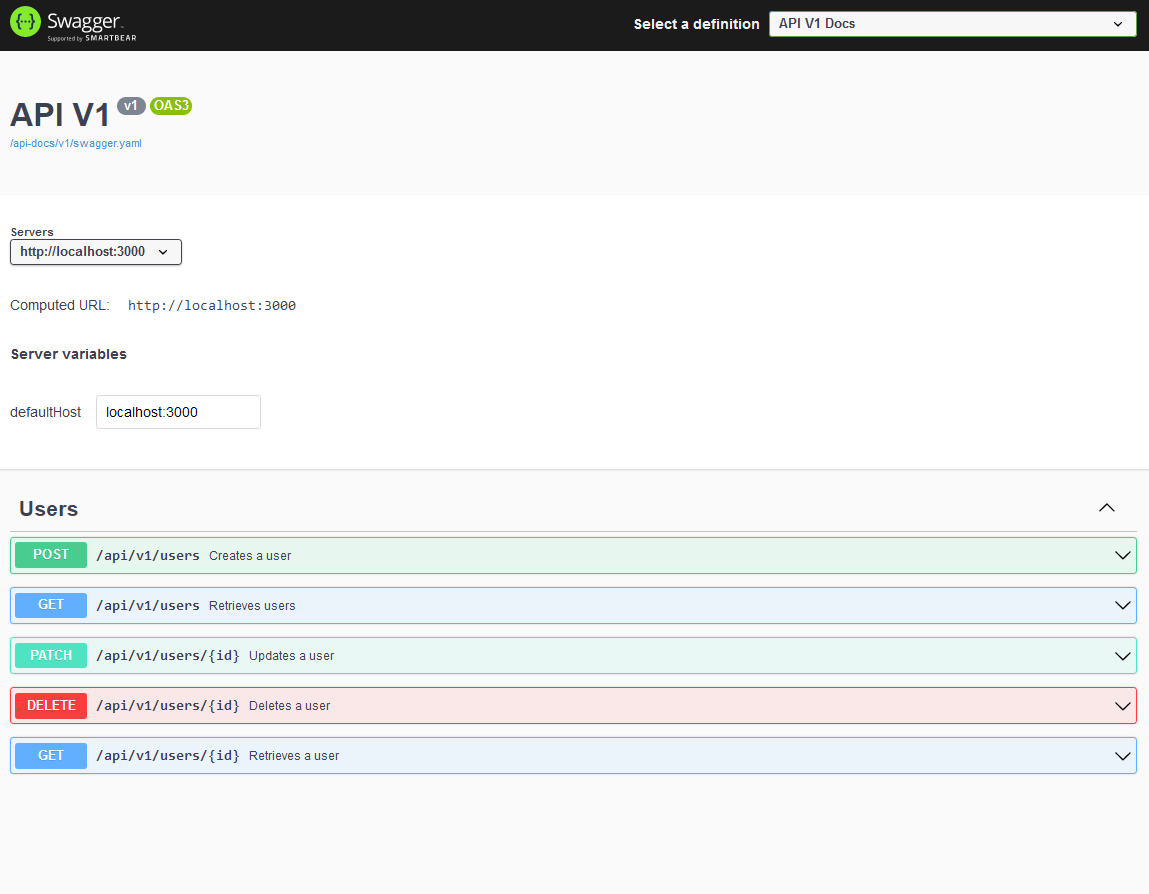
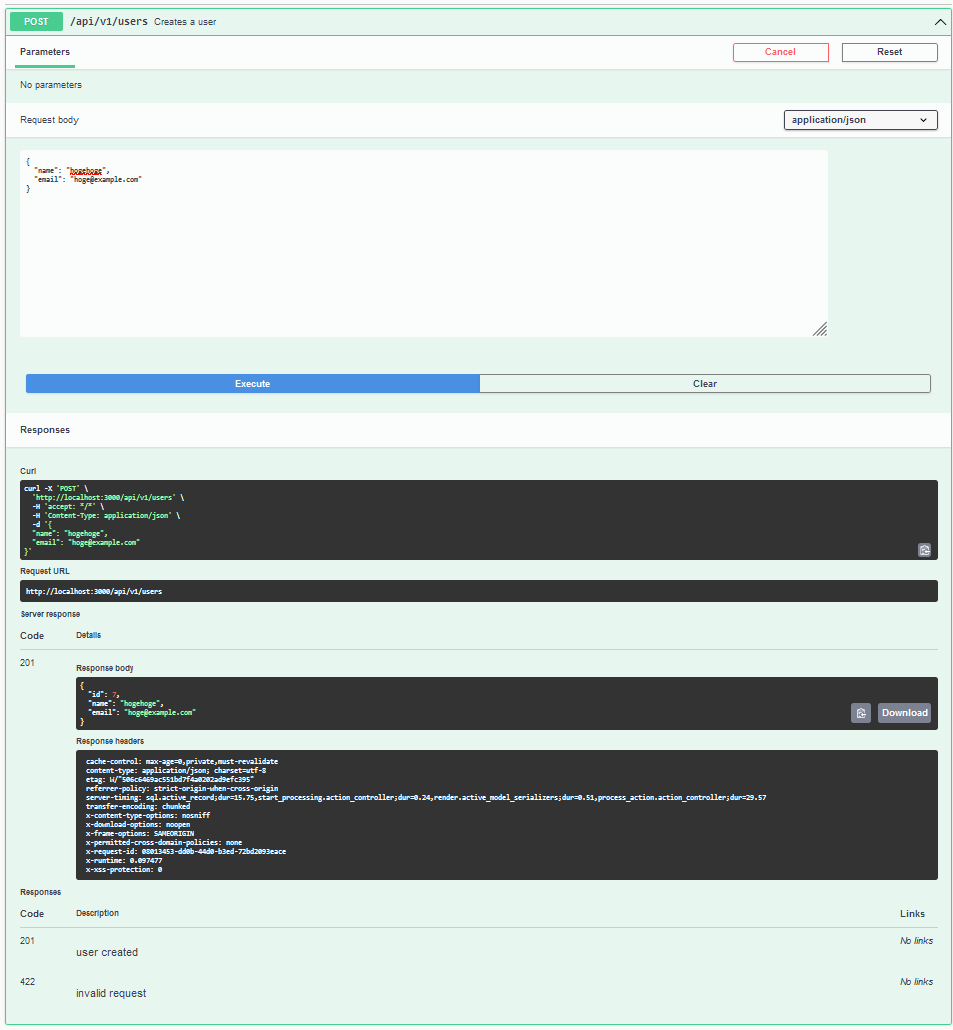
上記の設定を行った後、http://localhost:3000/api-docs/index.html にアクセスすることで以下のようなページが閲覧し、実際にローカルサーバに対してブラウザ上から各種 API を発行できるようになります。
create user
RSpec の実装
ざっくりとしたものですが、API 用の Spec です。
require 'swagger_helper'

RSpec.describe '/api/v1/users', type: :request do

  path '/api/v1//users' do
    post 'Creates a user' do
      tags 'Users'
      consumes 'application/json'
      parameter name: :user, in: :body, schema: {
        type: :object,
        properties: {
          name: { type: :string },
          email: { type: :string }
        },
        required: [ 'name', 'email' ]
      }

      response '201', 'user created' do
        let(:user) { { name: 'foo', email: 'bar' } }
        run_test!
      end

      response '422', 'invalid request' do
        let(:user) { { name: 'foo' } }
        run_test!
      end
    end

    get 'Retrieves users' do
      tags 'Users'
      consumes 'application/json'

      response '200', 'user found' do
        schema type: :array,
          items: :object,
            properties: {
              id: { type: :integer },
              name: { type: :string },
              email: { type: :string }
            },
          required: [ 'id', 'name', 'email' ]

        before { User.create(name: 'foo', email: 'bar') }
        run_test!
      end

      response '404', 'user not found' do
        run_test!
      end
    end
  end

  path '/api/v1//users/{id}' do
    patch 'Updates a user' do
      tags 'Users'
      consumes 'application/json'
      parameter name: :id, in: :path, type: :string
      parameter name: :user, in: :body, schema: {
        type: :object,
        properties: {
          name: { type: :string },
          email: { type: :string }
        },
        required: [ 'name', 'email' ]
      }

      request_body_example value: { some_field: 'Foo' }, name: 'basic', summary: 'Request example description'

      response '200', 'user updated' do
        schema type: :object,
          properties: {
            id: { type: :integer },
            name: { type: :string },
            email: { type: :string }
          },
          required: [ 'id', 'name', 'email' ]

        let(:id) { User.create(name: 'foo', email: 'bar').id }
        let(:user) { { name: 'hoge', email: 'hoge' } }
        run_test!
      end

      response '404', 'user not found' do
        let(:id) { 0 }
        let(:user) { { name: 'hoge', email: 'hoge' } }
        run_test!
      end
    end

    delete 'Deletes a user' do
      tags 'Users', 'Another Tag'
      produces 'application/json', 'application/xml'
      parameter name: :id, in: :path, type: :string

      response '204', 'user deleted' do
        let(:id) { User.create(name: 'foo', email: 'bar').id }
        run_test!
      end

      response '204', 'user not found' do
        let(:id) { 'invalid' }
        run_test!
      end
    end

    get 'Retrieves a user' do
      tags 'Users', 'Another Tag'
      produces 'application/json', 'application/xml'
      parameter name: :id, in: :path, type: :string

      response '200', 'user found' do
        schema type: :object,
          properties: {
            id: { type: :integer },
            name: { type: :string },
            email: { type: :string }
          },
          required: [ 'id', 'name', 'email' ]

        let(:id) { User.create(name: 'foo', email: 'bar').id }
        run_test!
      end

      response '404', 'user not found' do
        let(:id) { 'invalid' }
        run_test!
      end
    end
  end
end
この spec ファイルを実装後、以下のコマンドを叩くと spec が実行されます。
$ docker compose run frontend rails spec
以上
駆け足になりましたが、ざっくりと Swagger を利用した Rails API の組み込みをしてみました。
もちろん、このままだとエラーやレスポンスの制御がおざなり過ぎてまるで実践には向きませんし、本来ならブラウザ側も JS で API で制御をするようにして ./app/controllers/users_controller.rb 側では view を呼び出すだけにするなどが適正だと思われます。
その辺りは作り込みの課題だと思いますので、この記事では取り上げません。
あと、redoc-rails が更新停止されアーカイブ化されるとのことで、慌てて Swagger に切り替えたのは内緒です。
参考資料
以下の記事、情報を参考にさせていただきました。
ありがとうございます。

