概要
SpringBootとPostgreSQLの開発環境をdocker-composeで用意していく入門記事です。
長いので、上下に分けて記事を書いていきます。(この記事は下です!)
- SpringBootとPostgreSQLの開発環境をdocker-composeだけで用意する!上
- SpringBootとPostgreSQLの開発環境をdocker-composeだけで用意する!下
さて、前半ではdocker-compose.ymlを作成して、DBの初期化処理を用意して下地を整えていきましたね。
そこで、後半では実際にSpringBootのサンプルアプリを用意して実際にDockerコンテナ上で動かしていきたいと思います!
ということで、以下のような事柄を書いていきます。
- サンプルアプリを作成する。
- 実際にコンテナを動かしてみる。
少し長くなりますが、手順みたいな感じでコード自体の説明はなるべくせずに全てコピペで行けるようにしています。
なので、思ったよりもサクサク進むと思うので、是非最後まで頑張っていきましょう!
それでは、後半スタートです。
サンプルアプリを作成する。
サンプルアプリの概要はSpring BootにSpring Dataを足して、DBのデータをとってくるといったものです。
まずは、eclipseでGradleProjectを作成していきます。
プロジェクト作成
Gradleプロジェクトを作成していきます。
まずは、packegeエクスプローラ上で右クリックをして、以下の画像のように進んでいきましょう。
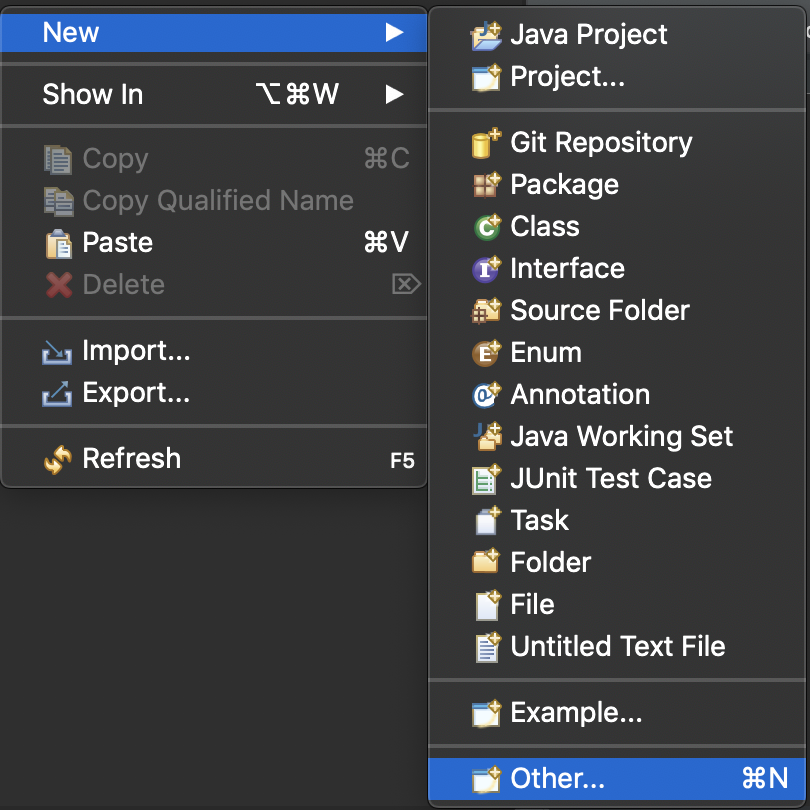
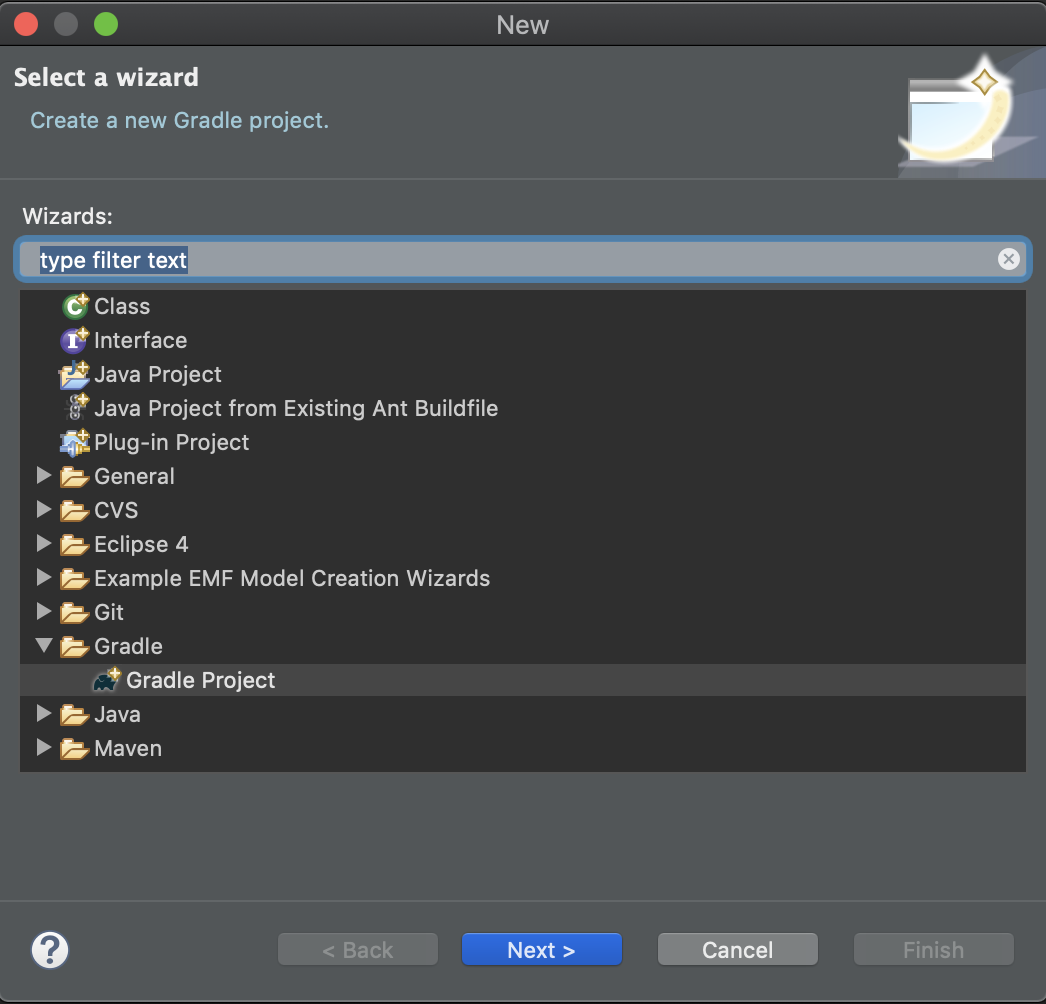
nextボタンを2回ほど押したら、プロジェクト作成画面になります。
Project Nameとlocationを入力します。locationにはdocker-compose.ymlがあるディレクトリを指定します。
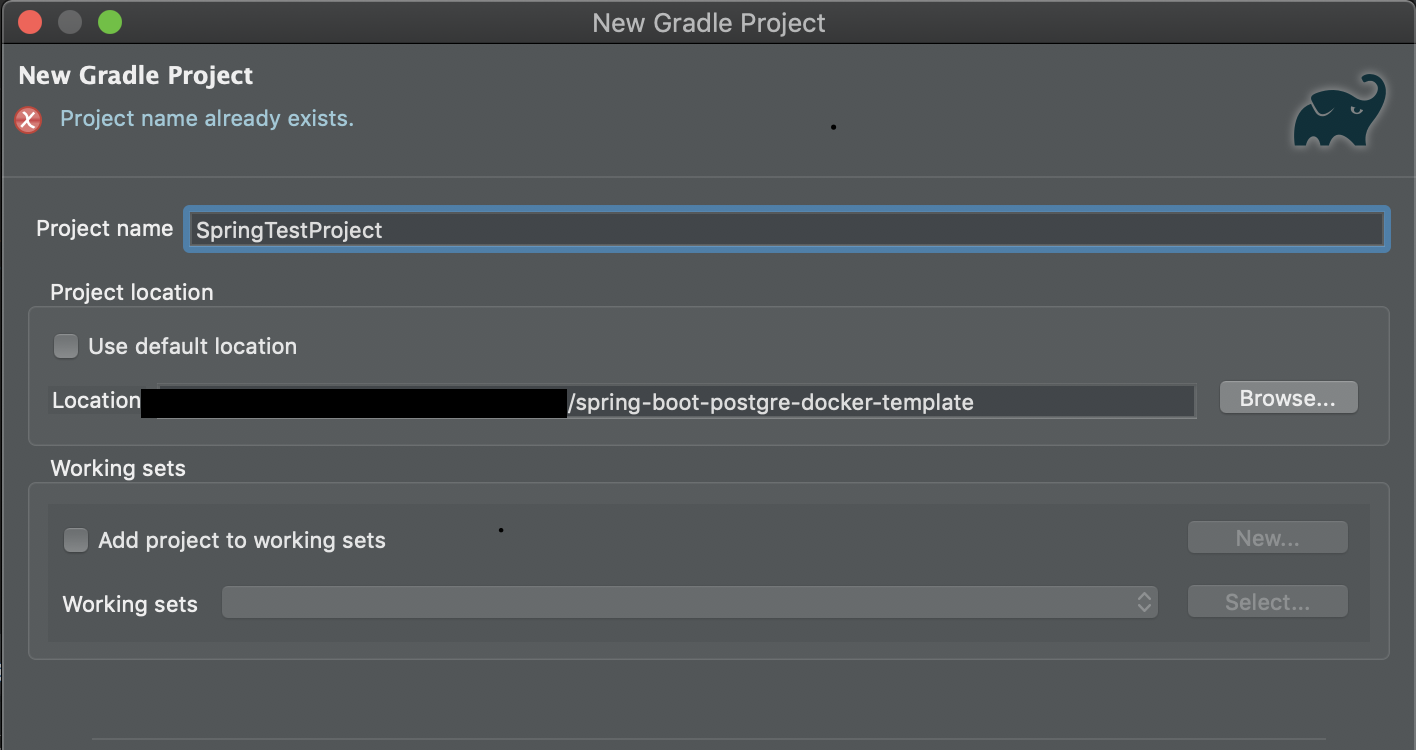
エラーは気にしないでください。(最初にキャプチャを取りそこねたので、、、)
入力を終えたらfinishを入力して終わりです!
Gradle修正
プロジェクトが作成されたら、build.graldeを修正してサンプルアプリに必要な外部ライブラリ(SpringBootなど)を追加していきます。
build.graldeの解説は長くなってしまうので省力します。
以下の内容をとりあえず何も考えずにコピペしてください。
plugins {
    id 'java'
    id 'application'
    id 'eclipse'
    id 'com.gradle.build-scan' version '2.3'
    id 'org.springframework.boot' version '2.1.6.RELEASE'
    id 'io.spring.dependency-management' version '1.0.8.RELEASE'
}

repositories {
    jcenter()
}

dependencies {
    implementation 'com.google.guava:guava:27.1-jre'
    // Spring boot と Spring data関連のライブラリを読み込みます。
    implementation 'org.springframework.boot:spring-boot-dependencies:2.1.8.RELEASE'
    implementation 'org.springframework.boot:spring-boot-starter-web:2.1.8.RELEASE'
    implementation 'org.springframework.boot:spring-boot-starter-data-jpa:2.1.8.RELEASE'
    implementation 'org.springframework:spring-core:5.1.9.RELEASE'
    implementation 'org.springframework:spring-aspects:5.1.9.RELEASE'
    // postgresn関連のライブラリを読み込みます。
    implementation 'org.postgresql:postgresql:42.2.8'

    // テスト関連のライブラリを読み込みます。
	testImplementation 'org.springframework.boot:spring-boot-starter-test:2.1.6.RELEASE'
    testImplementation 'org.junit.jupiter:junit-jupiter-api:5.4.2'
    testRuntimeOnly 'org.junit.jupiter:junit-jupiter-engine:5.4.2'

    components {
        withModule('org.springframework:spring-beans') {
            allVariants {
                withDependencyConstraints {
                    it.findAll { it.name == 'snakeyaml' }.each { it.version { strictly '1.19' } }
                }
            }
        }
    }
}

bootJar {
    // 作成されるjarファイルの名前を設定します。 今回の場合は、app.jarとなります。
    baseName = 'app'
    // spring boot 起動のクラス名を設定します。
    mainClassName = 'jp.co.test.App'
}

buildScan {
    termsOfServiceUrl = 'https://gradle.com/terms-of-service'
    termsOfServiceAgree = 'yes'
    publishAlways()
}

test {
    useJUnitPlatform()
}
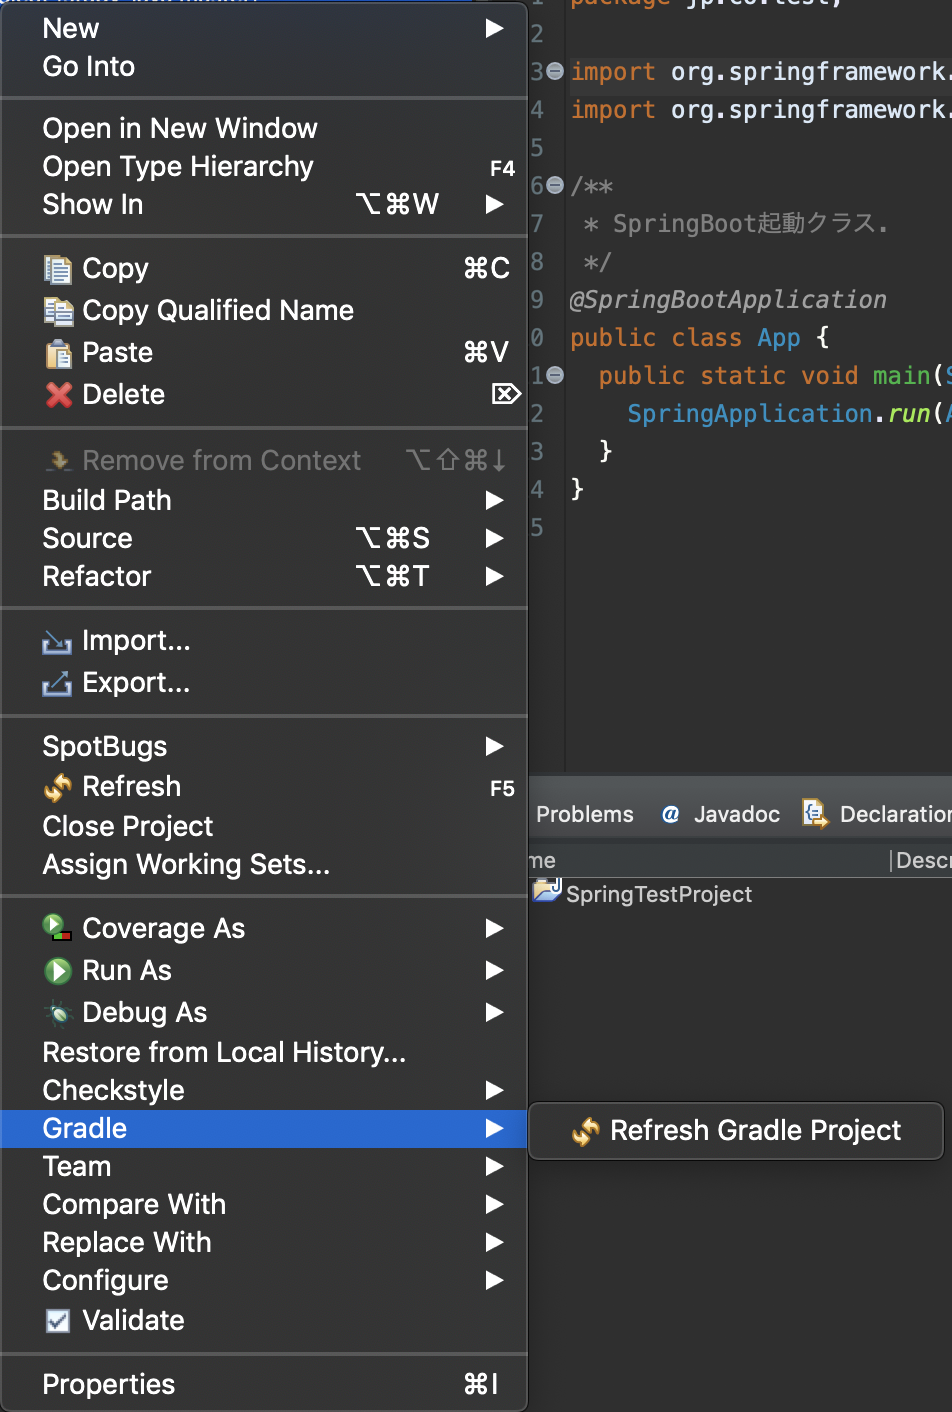
修正が完了したら、eclipse の依存関係を更新します。以下の画像のRefresh Gradle Projectを押下してください。
アプリ作成
さて、あとはSpringのサンプルコードを書くだけです!
下のような構成でファイルを作成していきましょう。
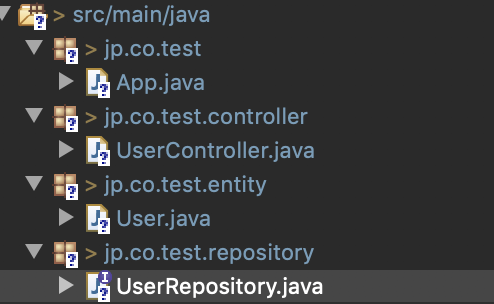
何も考えずにソースをコピペしていってください!
1.boot起動クラス
spring-boot起動するためのクラスを作成します。
package jp.co.test;

import org.springframework.boot.SpringApplication;
import org.springframework.boot.autoconfigure.SpringBootApplication;

/**
 * SpringBoot起動クラス.
 */
@SpringBootApplication
public class App {
  public static void main(String[] args) {
    SpringApplication.run(App.class, args);
  }
}
2.Entityクラス
O/Rマッパーを使用するためテーブルに該当するEntitiyクラスを作成していきます。
package jp.co.test.entity;

import javax.persistence.Entity;
import javax.persistence.GeneratedValue;
import javax.persistence.GenerationType;
import javax.persistence.Id;
import javax.persistence.Table;

@Entity
@Table(name = "users")
public class User {

  @Id
  @GeneratedValue(strategy = GenerationType.AUTO)
  private Long id;
  private String name;

  protected User() {}

  /**
   * コンストラクタ.
   *
   * @param name ユーザ名
   */
  public User(String name) {
    this.name = name;
  }

  public Long getId() {
    return id;
  }

  public String getName() {
    return name;
  }

  @Override
  public String toString() {
    return String.format("{id:%d,name:%s}", id, name);
  }

}
3.データベース操作をするRepositoryクラス
O/RマッパーなのでSQLは書きませんが、データベース操作をするクラスです。
package jp.co.test.repository;

import org.springframework.data.repository.CrudRepository;
import org.springframework.stereotype.Repository;
import jp.co.test.entity.User;

@Repository
public interface UserRepository extends CrudRepository<User, Long> {
}
4.リクエストを受け付けるContollerクラス
package jp.co.test.controller;

import org.springframework.beans.factory.annotation.Autowired;
import org.springframework.web.bind.annotation.RequestMapping;
import org.springframework.web.bind.annotation.RestController;
import jp.co.test.repository.UserRepository;

@RestController
public class UserController {

  private final UserRepository repository;

  @Autowired
  public UserController(UserRepository repository) {
    this.repository = repository;
  }

  @RequestMapping("/")
  public String user() {
    return String.valueOf(repository.findAll());
  }
}
忘れちゃいけないapplication.properties
そして、よく忘れてしまうのですが、application.propertiesを用意して、DB接続情報を記載します。
src/main/resourcesの下にapplication.propertiesを作成しましょう。
# DB接続先
spring.datasource.url=jdbc:postgresql://db:5432/test
# DBユーザ名
spring.datasource.username=testuser
# DBパスワード
spring.datasource.password=testpass
# JDBCドライバ
spring.datasource.driverClassName=org.postgresql.Driver
# hibername設定(これないと起動しません。)
spring.jpa.database-platform=org.hibernate.dialect.PostgreSQLDialect
spring.jpa.show-sql=false
spring.jpa.hibernate.ddl-auto=none
実際にコンテナを動かしてみる。
さて、サンプルアプリが完成しました!
あとは、jarを作ってコマンドを打つだけです。後少しだけ頑張りましょう!
jarの作成
サンプルアプリのjarを作成していきましょう。
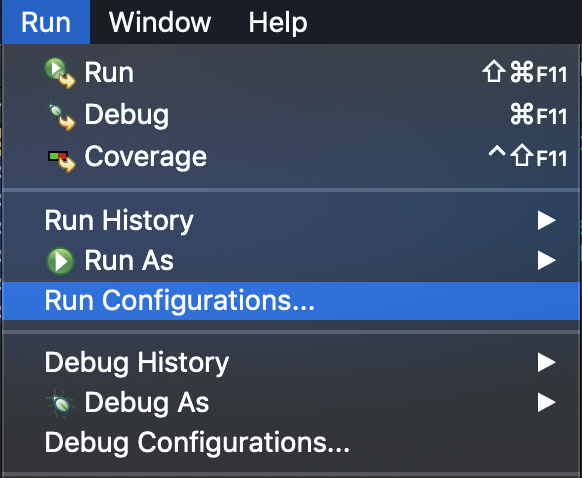
GradleタスクのbootJarを使用してjarを作成するため、以下のようにタスクを定義していきましょう。
Name、Tasks、Working Directoryを設定していきます。
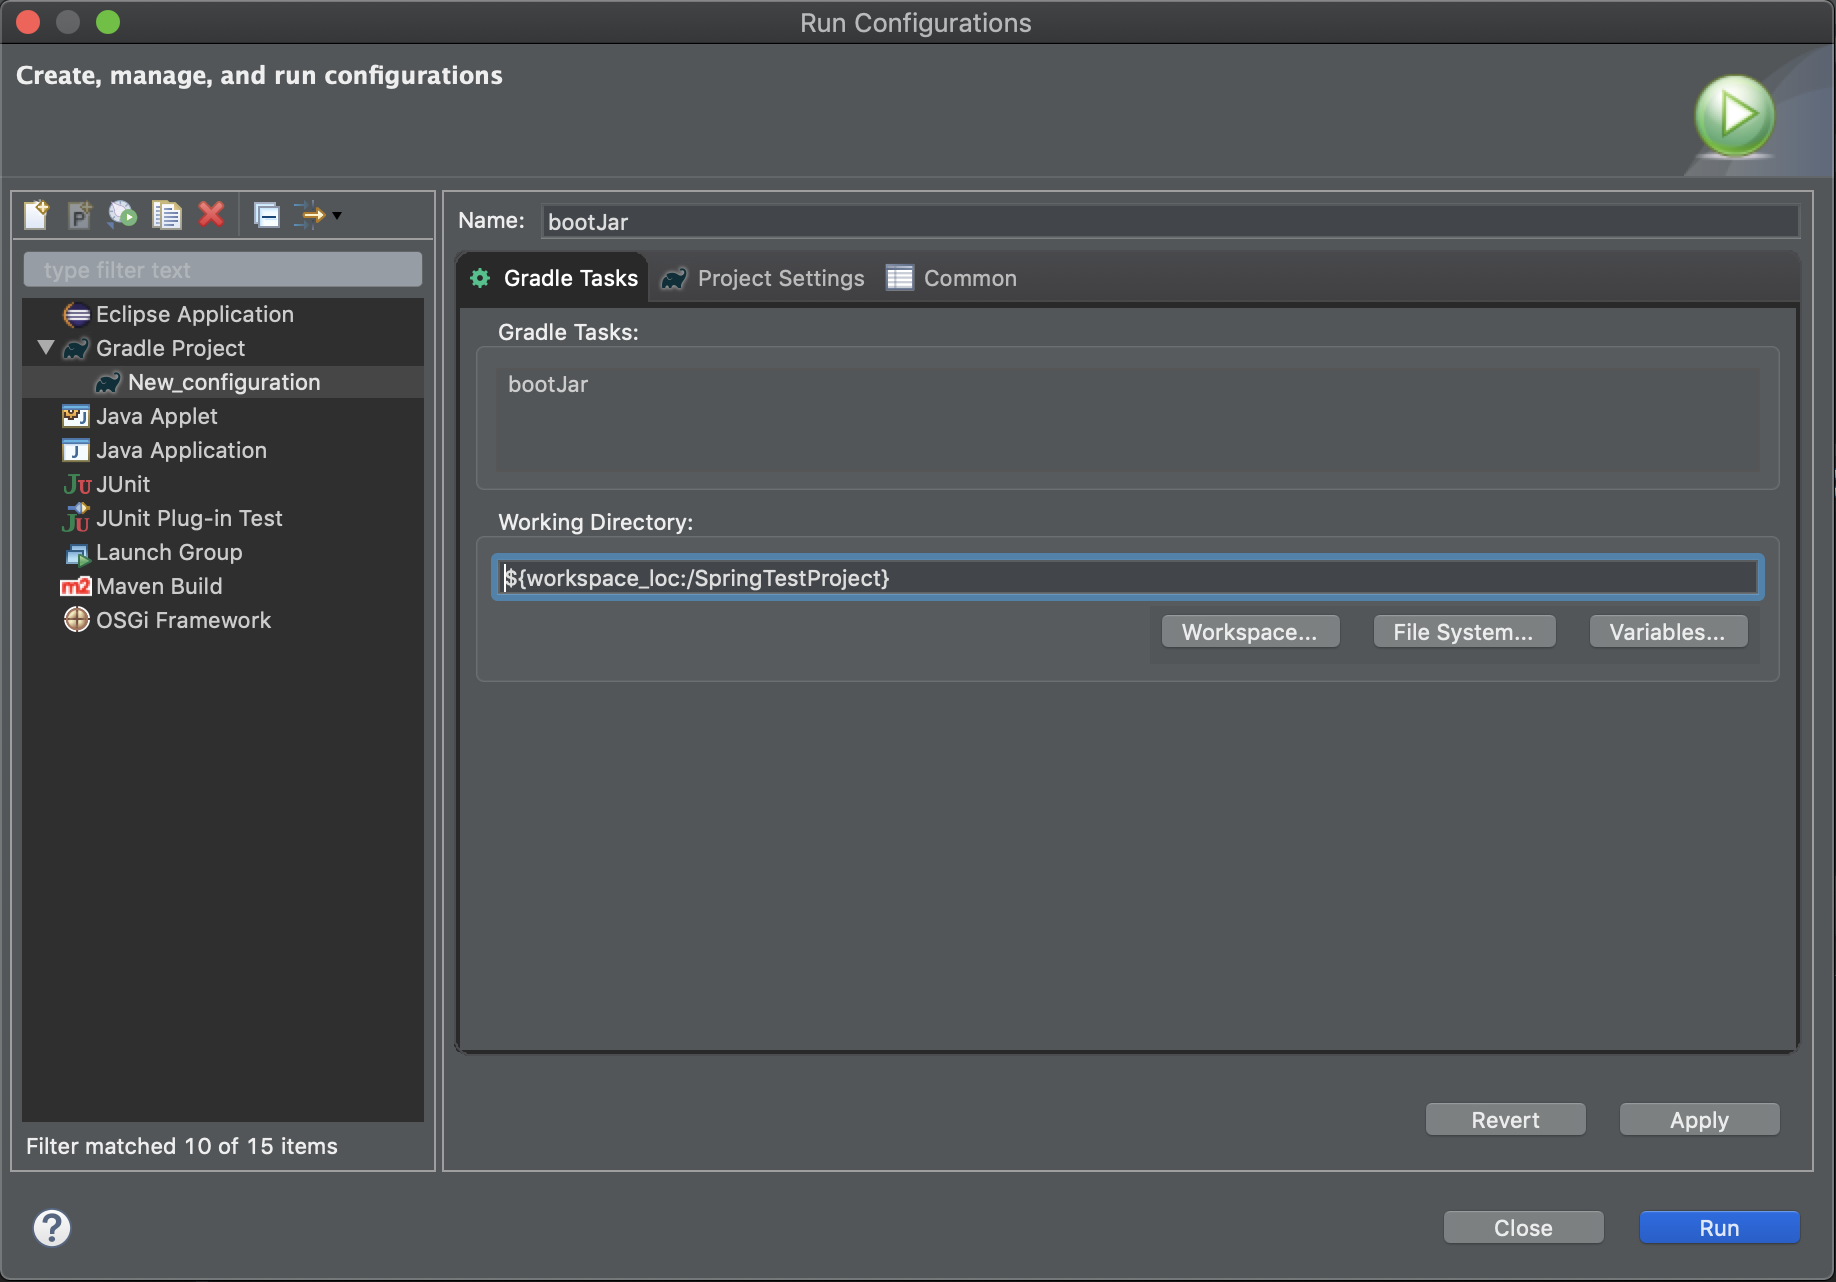
Apply、Runの順番にボタンを押下してください。
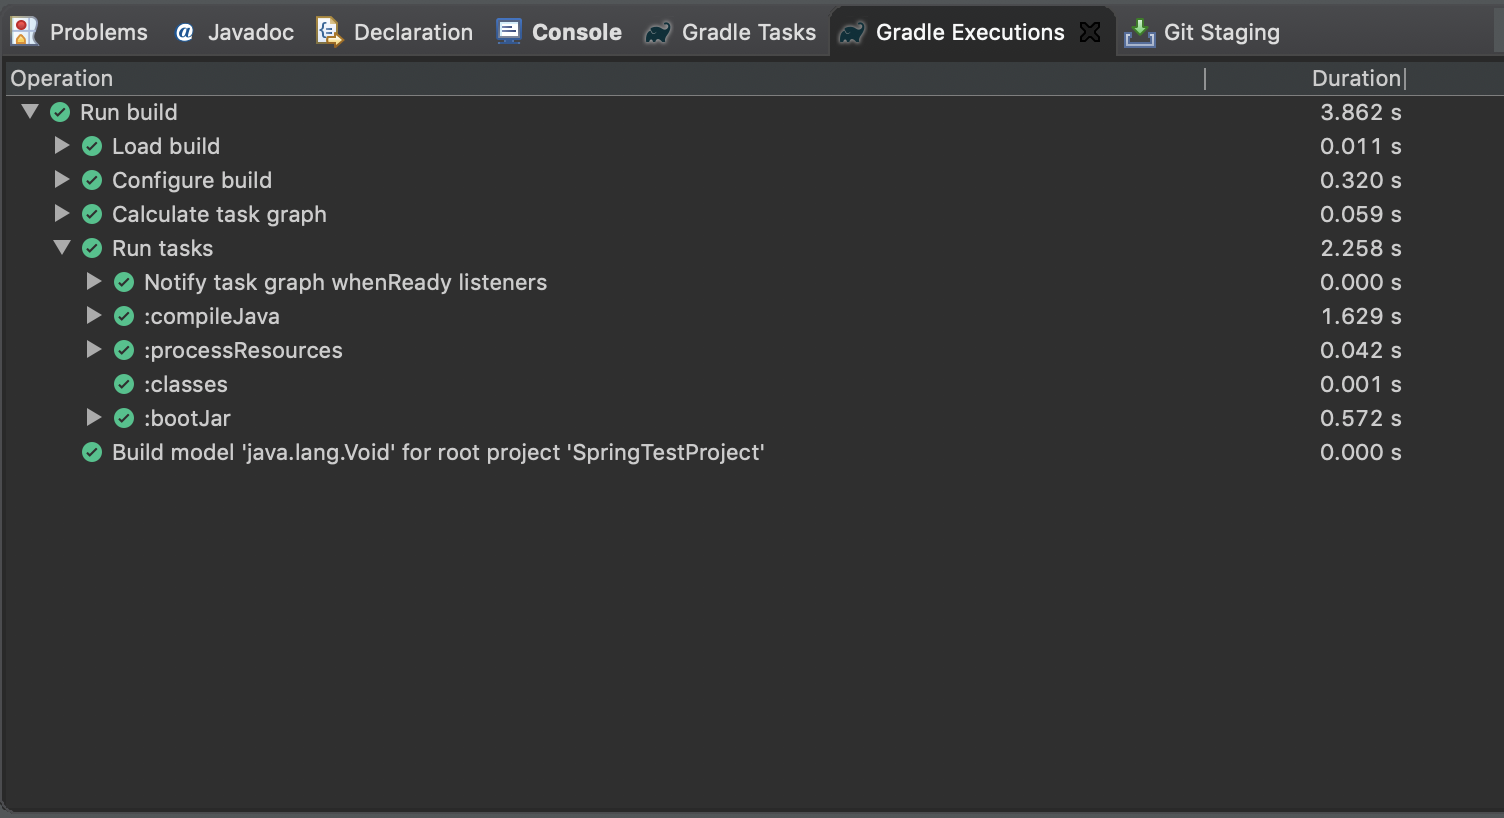
以下のように全て緑になったら正常に終了してjarの作成が完了しています。
コンテナを起動しよう!
お待たせいたしました!コンテナを起動して、サンプルアプリが動作するか確認していきましょう!
コンソールを開き、docker-compose.ymlが置いてあるディレクトリまで移動します。
そして、以下のコマンドで、コンテナを起動します。
docker-compose up -d
そしたらこんな感じのメッセージが出てくると思います。
Creating spring-boot-postgre-docker-template_db_1 ... done
Creating spring-boot-postgre-docker-template_app_1 ... done
念のため、コンテナが立ち上がっているかを下記のコマンドで確認
docker-compose ps
StateがUpとなっていたら成功です!
                 Name                                 Command               State           Ports
-----------------------------------------------------------------------------------------------------------
spring-boot-postgre-docker-template_app_1   java -Djava.security.egd=f ...   Up      0.0.0.0:8080->8080/tcp
spring-boot-postgre-docker-template_db_1    docker-entrypoint.sh postgres    Up      0.0.0.0:5432->5432/tcp
早速、アプリにアクセスして見ましょう!
http://localhost:8080/
まとめ
長かったですが、以上で終了です!記事は長いんですけどサクサク来れたのではないかなと思っています!
これで、あなたのローカル環境にはLinuxで動くSpringBoot開発環境を整えることができました。
なるべく、本番環境との差異を少なくて開発環境を整えることができるので、結構、役に立つと思います!
(DB環境を楽に作れるし、みんなで同じdocker-compose.yml使えば設定ミスなどの細かいミスが無くなりますし)
それでは、いい開発を!
サンプル