はじめに
Bonding について
Bonding は複数のインターフェースを1つの仮想的なNICに結合し、冗長構成を実現する技術です。
例えば、片系がダウンしてもネットワークの安定性を保つことができ、もう一方のインターフェースが自動的にトラフィックを引き継ぎ、ユーザーはパケットロスなしで通信を継続することができます。
以下、RedHat Customer Portal より抜粋です。
Red Hat Enterprise Linux 7 では、管理者が複数のネットワークインターフェイスを単一のチャンネルにまとめること (ボンディング) ができます。
このチャンネルボンディングにより、複数のネットワークインターフェイスが 1 つとして機能できるようになり、また同時に帯域幅が増加し、冗長性を提供します。
- 引用元URL
今回は、この Bonding の設定をして、設定後は冗長性テストを実際に行う所までやってみます。
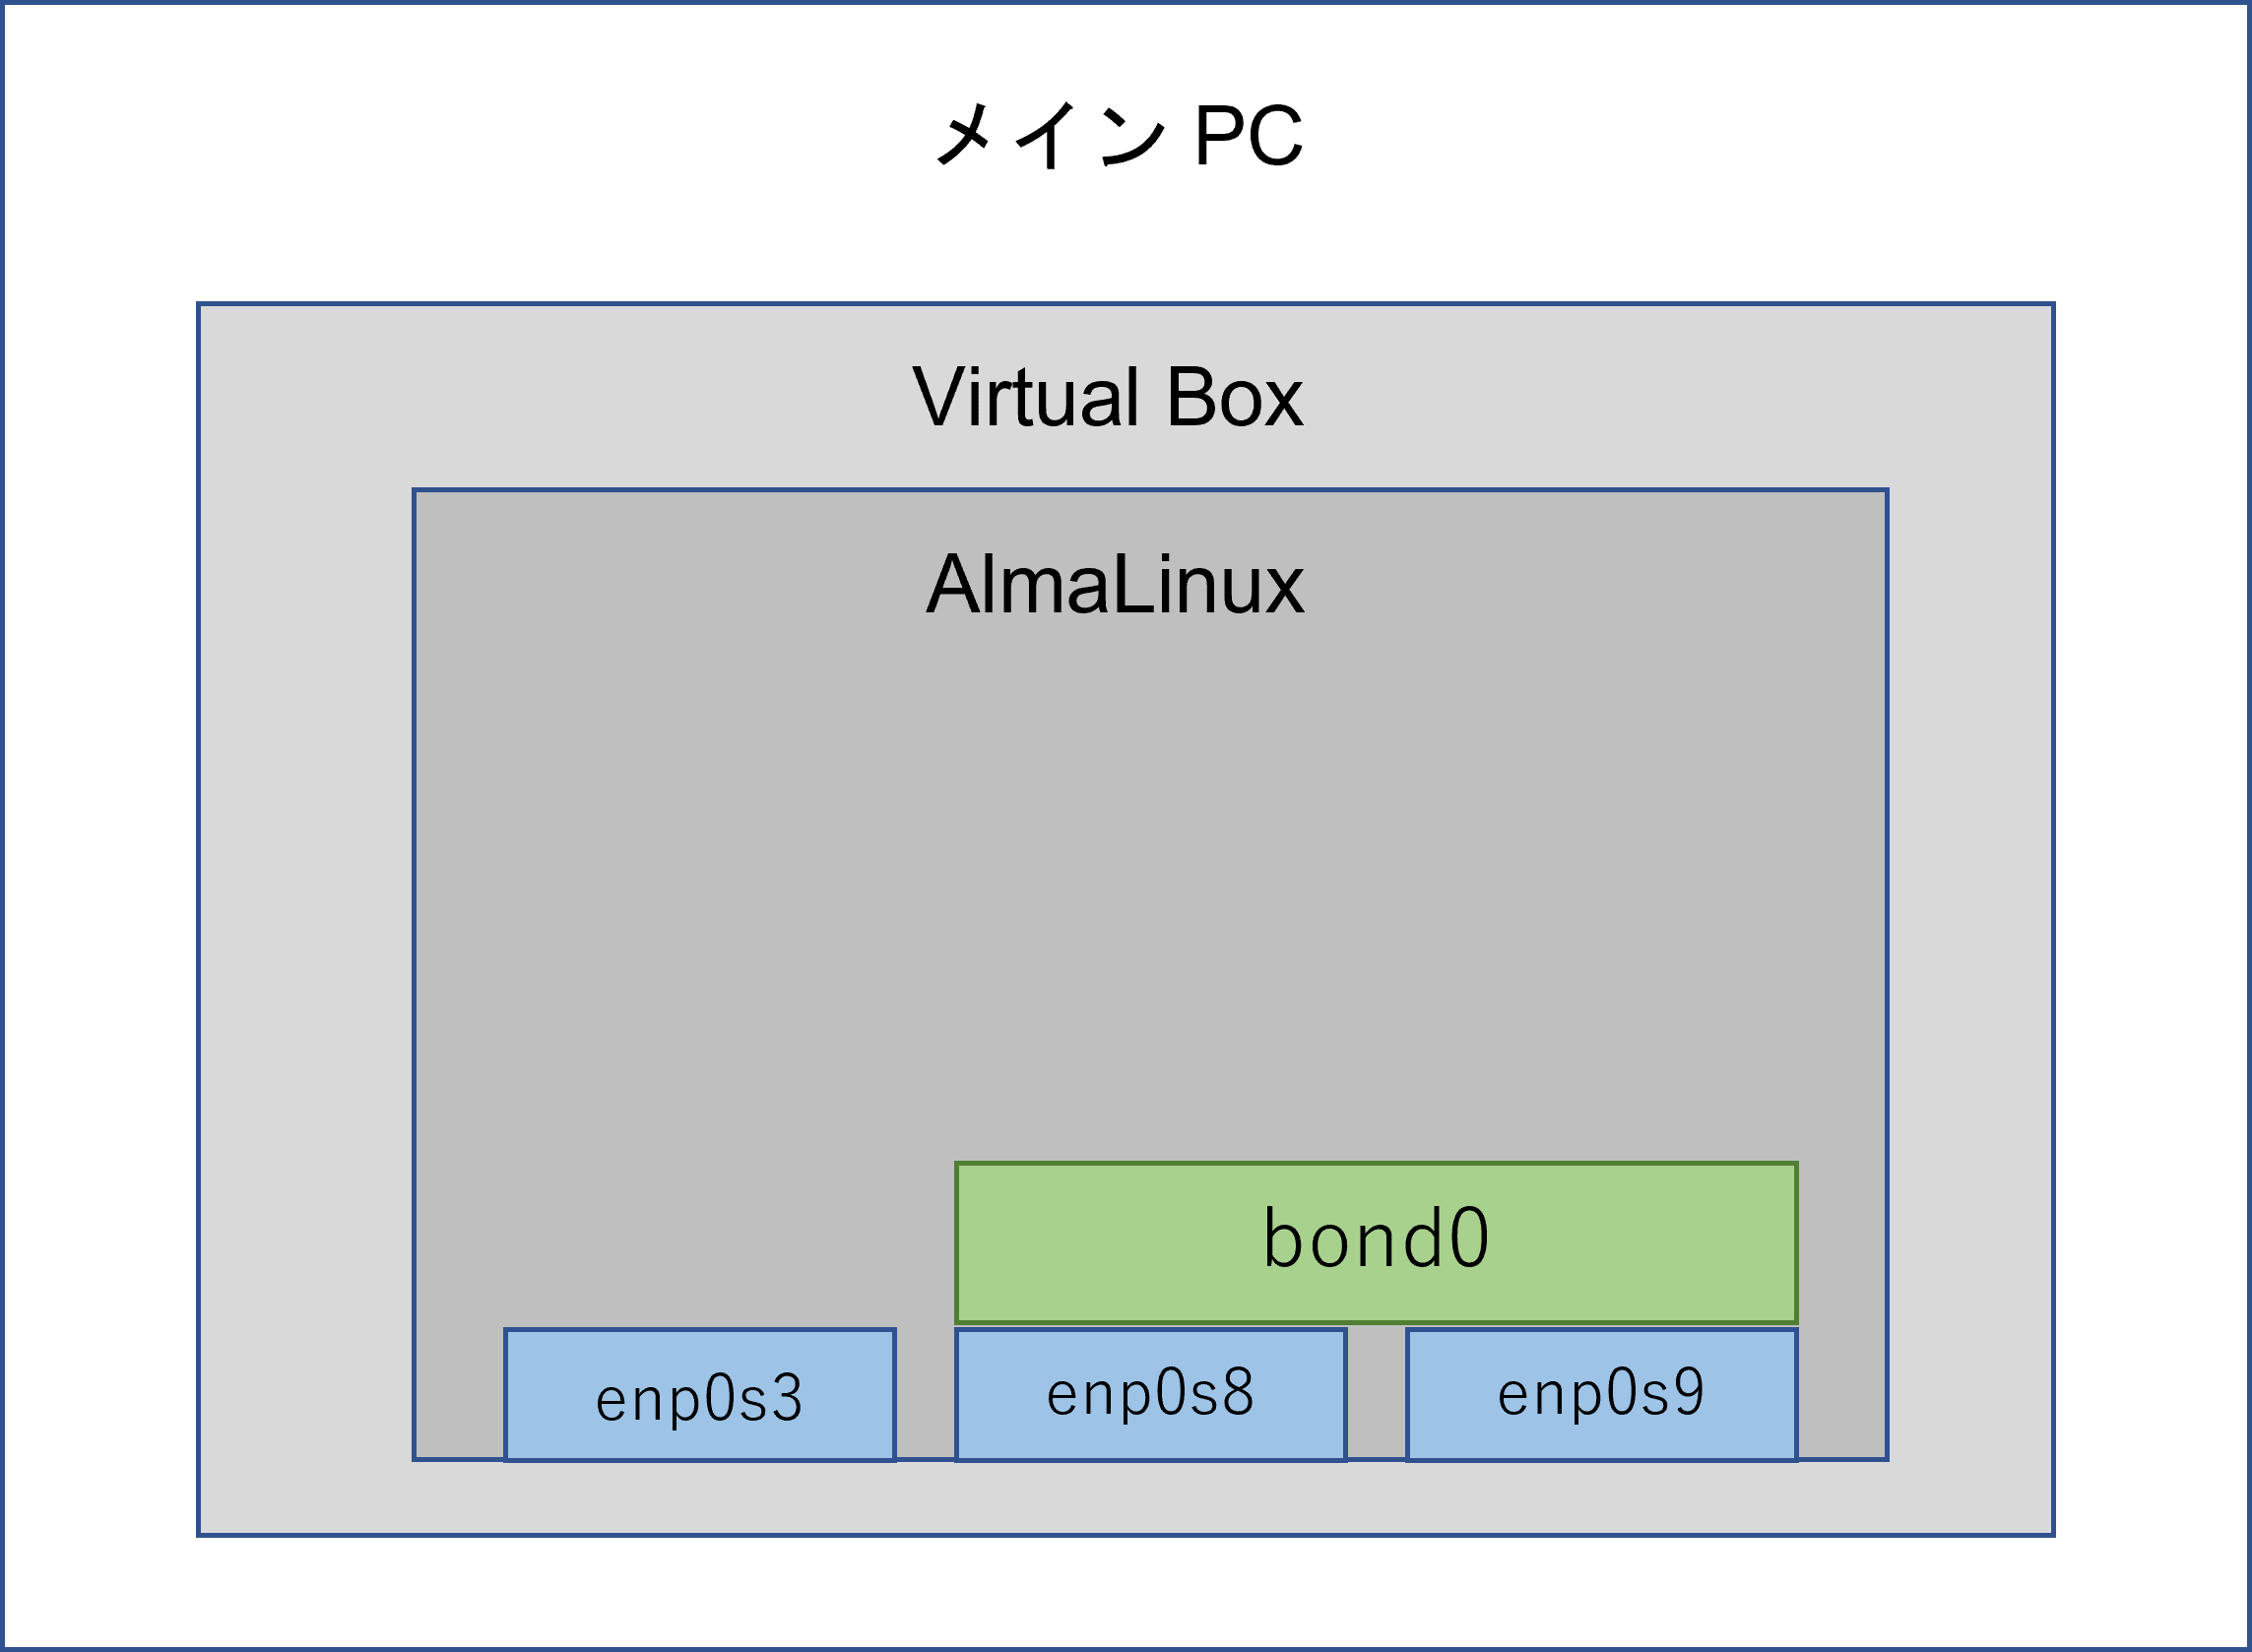
環境
- Windows 11 home
- VirtualBox 7.0.2
- AlmaLinux 9.1
NIC 構成
- enp0s3 : ポートフォワーディング設定して自端末のターミナルから SSH接続している
- enp0s8 : Bonding 用
- enp0s9 : Bonding 用
- bond0 : enp0s8 と enp0s8 を所属させる
以下、イメージ図
Bonding の用語
-
マスターインタフェース
Bonding を行う論理インタフェースのこと -
スレーブインタフェース
Bonding を行う物理インタフェースのこと
手順
1. Bonding の設定
1.1 ボンディングを行う前に、NICが正常に動作(UP状態)していることの状態確認します。
-
コマンド
ip link show (ip l でも可) -
実行結果
[stack@local ~]$ ip link show
1: lo: <LOOPBACK,UP,LOWER_UP> mtu 65536 qdisc noqueue state UNKNOWN mode DEFAULT group default qlen 1000
    link/loopback 00:00:00:00:00:00 brd 00:00:00:00:00:00
2: enp0s3: <BROADCAST,MULTICAST,UP,LOWER_UP> mtu 1500 qdisc fq_codel state UP mode DEFAULT group default qlen 1000
    link/ether 08:00:27:df:63:ad brd ff:ff:ff:ff:ff:ff
3: enp0s8: <BROADCAST,MULTICAST,UP,LOWER_UP> mtu 1500 qdisc fq_codel state UP mode DEFAULT group default qlen 1000
    link/ether 08:00:27:43:35:55 brd ff:ff:ff:ff:ff:ff
4: enp0s9: <BROADCAST,MULTICAST,UP,LOWER_UP> mtu 1500 qdisc fq_codel state UP mode DEFAULT group default qlen 1000
    link/ether 08:00:27:3e:d2:1f brd ff:ff:ff:ff:ff:ff
[stack@local ~]$
1.2 ボンディングインターフェースの作成前にネットワークデバイスのリストを確認します。
-
コマンド
nmcli d -
実行結果
[stack@local ~]$ nmcli d
DEVICE  TYPE      STATE      CONNECTION
enp0s3  ethernet  connected  enp0s3
enp0s8  ethernet  connected  Wired connection 1
enp0s9  ethernet  connected  Wired connection 2
lo      loopback  unmanaged  --
[stack@local ~]$
1.3 ボンディングインターフェースの作成します。
-
コマンド
構文:sudo nmcli c add type bond con-name <マスターの名前> ifname <インターフェースの名前> mode <モードの名前> 実行コマンド:sudo nmcli c add type bond con-name bound0 ifname bond0 mode balance-rr -
実行結果
[stack@local ~]$ sudo nmcli c add type bond con-name bound0 ifname bond0 mode balance-rr

We trust you have received the usual lecture from the local System
Administrator. It usually boils down to these three things:

    #1) Respect the privacy of others.
    #2) Think before you type.
    #3) With great power comes great responsibility.

[sudo] password for stack:
Connection 'bound0' (4497a716-461a-4a35-9b45-1661b8c5608a) successfully added.
[stack@local ~]$
1.4 マスターにスレーブを追加する前にネットワークデバイスのリストでボンディングインターフェースが追加されている事を確認します。
-
コマンド
nmcli d -
実行結果
[stack@local ~]$ nmcli d
DEVICE  TYPE      STATE                                  CONNECTION
enp0s3  ethernet  connected                              enp0s3
enp0s8  ethernet  connected                              Wired connection 1
enp0s9  ethernet  connected                              Wired connection 2
bond0   bond      connecting (getting IP configuration)  bound0
lo      loopback  unmanaged                              --
[stack@local ~]$
1.5 NIC の状態確認、bond0 が追加されていることを確認します。
-
コマンド
ip link show (ip l でも可) -
実行結果
[stack@local ~]$ ip link show
1: lo: <LOOPBACK,UP,LOWER_UP> mtu 65536 qdisc noqueue state UNKNOWN mode DEFAULT group default qlen 1000
    link/loopback 00:00:00:00:00:00 brd 00:00:00:00:00:00
2: enp0s3: <BROADCAST,MULTICAST,UP,LOWER_UP> mtu 1500 qdisc fq_codel state UP mode DEFAULT group default qlen 1000
    link/ether 08:00:27:df:63:ad brd ff:ff:ff:ff:ff:ff
3: enp0s8: <BROADCAST,MULTICAST,UP,LOWER_UP> mtu 1500 qdisc fq_codel state UP mode DEFAULT group default qlen 1000
    link/ether 08:00:27:43:35:55 brd ff:ff:ff:ff:ff:ff
4: enp0s9: <BROADCAST,MULTICAST,UP,LOWER_UP> mtu 1500 qdisc fq_codel state UP mode DEFAULT group default qlen 1000
    link/ether 08:00:27:3e:d2:1f brd ff:ff:ff:ff:ff:ff
5: bond0: <NO-CARRIER,BROADCAST,MULTICAST,MASTER,UP> mtu 1500 qdisc noqueue state DOWN mode DEFAULT group default qlen 1000
    link/ether 06:a1:15:c5:a6:9d brd ff:ff:ff:ff:ff:ff
[stack@local ~]$
1.6 マスターにスレーブを追加します。(1つ目のインターフェース)
-
コマンド
構文:sudo nmcli c add type ethernet ifname <インターフェースの名前> master <マスターインターフェースの名前> 実行コマンド:sudo nmcli c add type ethernet ifname enp0s8 master bound0 -
実行結果
[stack@local ~]$ sudo nmcli c add type ethernet ifname enp0s8 master bound0
Connection 'bond-slave-enp0s8' (97964c25-97f7-45a2-b715-d2979b9eb21c) successfully added.
[stack@local ~]$
1.7 マスターにスレーブを追加します。(2つ目のインターフェース)
-
コマンド
構文:sudo nmcli c add type ethernet ifname <インターフェースの名前> master <マスターインターフェースの名前> 実行コマンド:sudo nmcli c add type ethernet ifname enp0s9 master bound0 -
実行結果
[stack@localhost ~]$ sudo nmcli c add type ethernet ifname enp0s9 master bound0
Connection 'bond-slave-enp0s9' (0b7a690e-ccff-46d2-92cd-a801dacf2385) successfully added.
[stack@localhost ~]$
1.8 スレーブをアクティブ化します。(1つ目のインターフェース)
-
コマンド
構文:sudo nmcli c up bond-slave-<インターフェース名> 実行コマンド:sudo nmcli c up bond-slave-enp0s8 -
実行結果
[stack@local ~]$ sudo nmcli c up bond-slave-enp0s8
Connection successfully activated (D-Bus active path: /org/freedesktop/NetworkManager/ActiveConnection/5)
[stack@local ~]$
1.9 スレーブをアクティブ化します。(2つ目のインターフェース)
-
コマンド
構文:sudo nmcli c up bond-slave-<インターフェース名> 実行コマンド:sudo nmcli c up bond-slave-enp0s9 -
実行結果
[stack@local ~]$ sudo nmcli c up bond-slave-enp0s9
Connection successfully activated (D-Bus active path: /org/freedesktop/NetworkManager/ActiveConnection/6)
[stack@local ~]$
1.1.0 ボンディングの設定および状態確認します。
-
コマンド
構文:cat /proc/net/bonding/<マスターインターフェースの名前> 実行コマンド:cat /proc/net/bonding/bond0 -
実行結果
[stack@local ~]$ cat /proc/net/bonding/bond0
Ethernet Channel Bonding Driver: v5.14.0-162.18.1.el9_1.x86_64

Bonding Mode: load balancing (round-robin)
MII Status: up
MII Polling Interval (ms): 100
Up Delay (ms): 0
Down Delay (ms): 0
Peer Notification Delay (ms): 0

Slave Interface: enp0s8
MII Status: up
Speed: 1000 Mbps
Duplex: full
Link Failure Count: 0
Permanent HW addr: 08:00:27:43:35:55
Slave queue ID: 0

Slave Interface: enp0s9
MII Status: up
Speed: 1000 Mbps
Duplex: full
Link Failure Count: 0
Permanent HW addr: 08:00:27:3e:d2:1f
Slave queue ID: 0
[stack@local ~]$
1.1.1 ボンディングモードが正しく設定されているか確認します。
-
コマンド
cat /sys/class/net/bond0/bonding/mode -
実行結果
[stack@local ~]$ cat /sys/class/net/bond0/bonding/mode
balance-rr 0
[stack@local ~]$
ボンディング設定が完了
2. 【冗長性テスト】片系のインターフェースを Down させても packet loss が発生しない事を確認
ping による疎通テストを行うため、別ターミナルを開いておいて下さい。
現在作業しているターミナルは「ターミナルA」、ping 送信用のターミナルは「ターミナルB」とします。
2.1 ボンディングの IP address を確認します。
-
コマンド
ターミナルAip addr show (ip a でも可) -
実行結果
ターミナルA[stack@local ~]$ ip addr show 1: lo: <LOOPBACK,UP,LOWER_UP> mtu 65536 qdisc noqueue state UNKNOWN group default qlen 1000 link/loopback 00:00:00:00:00:00 brd 00:00:00:00:00:00 inet 127.0.0.1/8 scope host lo valid_lft forever preferred_lft forever inet6 ::1/128 scope host valid_lft forever preferred_lft forever 2: enp0s3: <BROADCAST,MULTICAST,UP,LOWER_UP> mtu 1500 qdisc fq_codel state UP group default qlen 1000 link/ether 08:00:27:df:63:ad brd ff:ff:ff:ff:ff:ff inet 10.0.2.15/24 brd 10.0.2.255 scope global dynamic noprefixroute enp0s3 valid_lft 84390sec preferred_lft 84390sec inet6 fe80::a00:27ff:fedf:63ad/64 scope link noprefixroute valid_lft forever preferred_lft forever 3: enp0s8: <BROADCAST,MULTICAST,SLAVE,UP,LOWER_UP> mtu 1500 qdisc fq_codel master bond0 state UP group default qlen 1000 link/ether 08:00:27:43:35:55 brd ff:ff:ff:ff:ff:ff 4: enp0s9: <BROADCAST,MULTICAST,SLAVE,UP,LOWER_UP> mtu 1500 qdisc fq_codel master bond0 state UP group default qlen 1000 link/ether 08:00:27:43:35:55 brd ff:ff:ff:ff:ff:ff permaddr 08:00:27:3e:d2:1f 5: bond0: <BROADCAST,MULTICAST,MASTER,UP,LOWER_UP> mtu 1500 qdisc noqueue state UP group default qlen 1000 link/ether 08:00:27:43:35:55 brd ff:ff:ff:ff:ff:ff inet 192.168.56.106/24 brd 192.168.56.255 scope global dynamic noprefixroute bond0 valid_lft 437sec preferred_lft 437sec inet6 fe80::6e37:e529:24d5:4807/64 scope link noprefixroute valid_lft forever preferred_lft forever [stack@local ~]$
2.2 マスターインターフェースの IP address に ping を打ちます。(打ちっぱなしにします)
-
コマンド
ターミナルB構文:ping -i 0.5 <マスターインターフェースの IP address> 実行コマンド:ping -i 0.5 192.168.56.106 -
実行結果
ターミナルB[stack@local ~]$ ping -i 0.5 192.168.56.106 PING 192.168.56.106 (192.168.56.106) 56(84) bytes of data. 64 bytes from 192.168.56.106: icmp_seq=1 ttl=64 time=0.049 ms 64 bytes from 192.168.56.106: icmp_seq=2 ttl=64 time=0.194 ms 64 bytes from 192.168.56.106: icmp_seq=3 ttl=64 time=0.116 ms 64 bytes from 192.168.56.106: icmp_seq=4 ttl=64 time=0.142 ms 64 bytes from 192.168.56.106: icmp_seq=5 ttl=64 time=0.193 ms 64 bytes from 192.168.56.106: icmp_seq=6 ttl=64 time=0.276 ms 64 bytes from 192.168.56.106: icmp_seq=7 ttl=64 time=0.167 ms 64 bytes from 192.168.56.106: icmp_seq=8 ttl=64 time=0.153 ms 64 bytes from 192.168.56.106: icmp_seq=9 ttl=64 time=0.194 ms 64 bytes from 192.168.56.106: icmp_seq=10 ttl=64 time=0.977 ms 64 bytes from 192.168.56.106: icmp_seq=11 ttl=64 time=0.175 ms 64 bytes from 192.168.56.106: icmp_seq=12 ttl=64 time=0.140 ms 64 bytes from 192.168.56.106: icmp_seq=13 ttl=64 time=0.170 ms 64 bytes from 192.168.56.106: icmp_seq=14 ttl=64 time=1.49 ms 64 bytes from 192.168.56.106: icmp_seq=15 ttl=64 time=0.150 ms
2.3 1つ目のインターフェースを Down させます。
-
コマンド
ターミナルA構文:sudo ip link set <インターフェース名> down 実行コマンド:sudo ip link set enp0s8 down -
実行結果
ターミナルA[stack@local ~]$ sudo ip link set enp0s8 down [sudo] password for stack: [stack@local ~]$
2.4 インターフェースが Down したことを確認します。
-
コマンド
ターミナルA構文:ip l | grep <インターフェース名> 実行コマンド:ip l | grep enp0s8 -
実行結果
ターミナルA[stack@local ~]$ ip l | grep enp0s8 3: enp0s8: <BROADCAST,MULTICAST,SLAVE> mtu 1500 qdisc pfifo_fast master bond0 state DOWN mode DEFAULT group default qlen 1000 [stack@local ~]$
2.5 インターフェースを UP させます。
-
コマンド
ターミナルA構文:sudo ip link set <インターフェース名> up 実行コマンド:sudo ip link set enp0s8 up -
実行結果
ターミナルA[stack@local ~]$ sudo ip link set enp0s8 up [stack@local ~]$
2.6 インターフェースが UP したことを確認します。
-
コマンド
ターミナルA構文:ip l | grep <インターフェース名> 実行コマンド:ip l | grep enp0s8 -
実行結果
ターミナルA[stack@local ~]$ ip l | grep enp0s8 3: enp0s8: <BROADCAST,MULTICAST,SLAVE,UP,LOWER_UP> mtu 1500 qdisc pfifo_fast master bond0 state UP mode DEFAULT group default qlen 1000 [stack@local ~]$
2.7 2つ目のインターフェースを Down させます。
-
コマンド
ターミナルA構文:sudo ip link set <インターフェース名> down 実行コマンド:sudo ip link set enp0s9 down -
実行結果
ターミナルA[stack@local ~]$ sudo ip link set enp0s9 down [stack@local ~]$
2.8 インターフェースが Down したことを確認します。
-
コマンド
ターミナルA構文:ip l | grep <インターフェース名> 実行コマンド:ip l | grep enp0s9 -
実行結果
ターミナルA[stack@local ~]$ ip l | grep enp0s9 4: enp0s9: <BROADCAST,MULTICAST,SLAVE> mtu 1500 qdisc pfifo_fast master bond0 state DOWN mode DEFAULT group default qlen 1000 [stack@local ~]$
2.9 インターフェースを UP させます。
-
コマンド
ターミナルA構文:sudo ip link set <インターフェース名> up 実行コマンド:sudo ip link set enp0s9 up -
実行結果
ターミナルA[stack@local ~]$ sudo ip link set enp0s9 up [stack@local ~]$
2.1.0 インターフェースが UP したことを確認します。
-
コマンド
ターミナルA構文:ip l | grep <インターフェース名> 実行コマンド:ip l | grep enp0s9 -
実行結果
ターミナルA[stack@local ~]$ ip l | grep enp0s9 4: enp0s9: <BROADCAST,MULTICAST,SLAVE,UP,LOWER_UP> mtu 1500 qdisc pfifo_fast master bond0 state UP mode DEFAULT group default qlen 1000 [stack@local ~]$
2.1.1 2つのインターフェースがUP(元通り)になっている事を確認します。
-
コマンド
ターミナルA構文:ip a sh <1つ目のインターフェース名> ; ip a sh <2つ目のインターフェース名> 実行コマンド:ip a sh enp0s8 ; ip a sh enp0s9 -
実行結果
ターミナルA[stack@local ~]$ ip l sh enp0s8 ; ip l sh enp0s9 3: enp0s8: <BROADCAST,MULTICAST,SLAVE,UP,LOWER_UP> mtu 1500 qdisc pfifo_fast master bond0 state UP mode DEFAULT group default qlen 1000 link/ether 08:00:27:b1:26:ae brd ff:ff:ff:ff:ff:ff 4: enp0s9: <BROADCAST,MULTICAST,SLAVE,UP,LOWER_UP> mtu 1500 qdisc pfifo_fast master bond0 state UP mode DEFAULT group default qlen 1000 link/ether 08:00:27:b1:26:ae brd ff:ff:ff:ff:ff:ff [stack@local ~]$
2.1.2 ping を止めます。
-
コマンド
ターミナルBCtrl + c を押下 -
実行結果
ターミナルB[stack@local ~]$ ping -i 0.5 192.168.56.106 PING 192.168.56.106 (192.168.56.106) 56(84) bytes of data. 64 bytes from 192.168.56.106: icmp_seq=1 ttl=64 time=0.049 ms 64 bytes from 192.168.56.106: icmp_seq=2 ttl=64 time=0.194 ms 64 bytes from 192.168.56.106: icmp_seq=3 ttl=64 time=0.116 ms 64 bytes from 192.168.56.106: icmp_seq=4 ttl=64 time=0.142 ms 64 bytes from 192.168.56.106: icmp_seq=5 ttl=64 time=0.193 ms <snip> 64 bytes from 192.168.56.106: icmp_seq=323 ttl=64 time=0.098 ms 64 bytes from 192.168.56.106: icmp_seq=324 ttl=64 time=0.115 ms 64 bytes from 192.168.56.106: icmp_seq=325 ttl=64 time=0.063 ms 64 bytes from 192.168.56.106: icmp_seq=326 ttl=64 time=0.091 ms 64 bytes from 192.168.56.106: icmp_seq=327 ttl=64 time=0.099 ms ^C --- 192.168.56.106 ping statistics --- 327 packets transmitted, 327 received, 0% packet loss, time 164767ms rtt min/avg/max/mdev = 0.047/0.159/2.540/0.258 ms [stack@local ~]$
2.1.3 logout します。
-
コマンド
ターミナル A & Bexit -
実行結果
ターミナル A & B[stack@local ~]$ exit logout
実験結果
「2.1.2」の ping 結果から、327個のパケットが送信され、packet loss(失敗)は 0% だという事が確認出来ました。
片系のインターフェースが Down しても冗長構成を組んでいるので、問題なく安定した通信が行われていることがわかります。実験は成功です。
まとめ
今回は Bonding の設定や冗長性テストを実際に行う所までまとめてみました。
お恥ずかしながら、つい最近知った言葉で学習の一環で実際に作業してみたので、ついでに Qiita に書かせていただきました!
そのため、過不足あるかもしれませんがその場合はご指摘ください。
ここまで見ていただき、ありがとうございました!