目次
・はじめに
・結果
・準備
・Arduinoのスケッチ
・Unity
はじめに
Arduinoからの数値をUDPを用い有線LAN経由でUnityで受信してみた。
以下のサイトを参考にしてコードを書いた。
https://codeday.me/jp/qa/20190309/388687.html
https://dobon.net/vb/dotnet/internet/udpclient.html
https://qiita.com/nenjiru/items/8fa8dfb27f55c0205651
が、なぜかエラーが出てきた。Unityでデータを受信できなかった。
System.Net.Sockets.SocketException (0x80004005): 接続済みの呼び出し先が一定の時間を過ぎても正しく応答しなかったため、接続できませんでした。または接続済みのホストが応答しなかったため、確立された接続は失敗しました。
いろいろネットを漁ったところ以下のサイトで原因を見つけた。
https://qiita.com/comocc/items/e44d1d642215940481d5
なんとWindowのファイアウォールが邪魔しているとのこと。
忘備録代わりに試行錯誤の結果を残す。
結果
ファイアウォールの詳細を確認すると【Unity Editor】がブロックされていたので変更した。
コントロールパネル→Windows Defender ファイアウォール→詳細設定→受信の規則→Unity関係をすべて許可

許可にするとデータを受け取れた。
なぜ勝手にブロックしてしまうのか・・・。 # 準備 ArduinoとUnityを有線LANで接続するため以下のように準備した。 以前の記事の準備と一緒 https://qiita.com/get_itchy_feet/items/36a8f9fa5983fb11ac6a 1.ハード他の準備 必要なもの ①PC ②ArduinoUNO ③LANケーブル ④EthernetShield ⑤USBケーブル(書込み用) ⑥MACアドレスUnityにArduinoからUDPで数値を送信。ようやく成功。
— いっちー (@get_itchy_feet) April 30, 2019
Arduino+EthernetShield -> 有線LAN -> PC
Qiitaに覚書を残しておきたい。
なんでWindowsは勝手にUnityにファイアウォールかけとんねん。
GWの貴重な一日返してよ。ひどいや。 pic.twitter.com/vV317s7qyY
 ③・・・PCとArduinoは直接ケーブルでつなげてみた。
④・・・秋月電子で購入。DFROBOTのEthernet Shield V2.2。チップはW5100が搭載されている。
http://akizukidenshi.com/catalog/g/gM-13165/
⑥・・・④にはMACアドレスがついていない。適当な数値は使ってはだめらしい。今回は別機器(使っていないAmazonEcho)の物を流用した。
# Arduinoのスケッチ
Arduinoに以下のスケッチを書き込んだ。
③・・・PCとArduinoは直接ケーブルでつなげてみた。
④・・・秋月電子で購入。DFROBOTのEthernet Shield V2.2。チップはW5100が搭載されている。
http://akizukidenshi.com/catalog/g/gM-13165/
⑥・・・④にはMACアドレスがついていない。適当な数値は使ってはだめらしい。今回は別機器(使っていないAmazonEcho)の物を流用した。
# Arduinoのスケッチ
Arduinoに以下のスケッチを書き込んだ。
# include <Ethernet.h>
# include <EthernetUdp.h>

byte mac[] = {
  0x00,0x71,0x??,0x??,0x??,0x??
};
IPAddress ip(192,168,2,101);
unsigned int localPort = 8888;

IPAddress remote(192,168,2,100);
unsigned int PClocalPort = 18887;

int i = 97;

EthernetUDP Udp;

void setup() {
  Ethernet.begin(mac, ip);

  if (Ethernet.hardwareStatus() == EthernetNoHardware) {
    while (true) {
      delay(1);
    }
  }
  if (Ethernet.linkStatus() == LinkOFF) {
  }
  Udp.begin(localPort);
}

void loop() {
  Udp.beginPacket(remote,PClocalPort);
  if(i < 100) i = i + 1;
  else i = 97;
  Udp.write(i);
  Udp.endPacket();
  delay(500);
}
以前の記事と基本一緒。500ms毎に数値97~100を順にPCへ送る。数値を文字に変換するとA~Dになる(ASCIIコード参照)。
https://qiita.com/get_itchy_feet/items/4101a08a25d6448ac223
MACアドレスはさすがに公開できないので?を入れ「0x00,0x71,0x??,0x??,0x??,0x??」としている。
Unity
以下のようにC#のスクリプトを作り、カメラ(とりあえず)に添付してみた。
using System.Collections;
using System.Collections.Generic;
using UnityEngine;
using System.Net;
using System.Net.Sockets;
using System.Threading;
using System.Text;
using UnityEngine.UI;

public class ReceiveTest : MonoBehaviour
{
    string localIpString = "192.168.2.100";
    int localPort = 18887;
    string ArduinoIpString = "192.168.2.101";
    int ArduinoPort = 8888;
    static bool isReceiving;
    static IPEndPoint remoteEP;
    static UdpClient udp;
    Thread thread;

    public Text textData;
    static string ltext;

    void Start()
    {
        isReceiving = true;
        IPAddress localAddress = IPAddress.Parse(localIpString);
        IPEndPoint localEP = new IPEndPoint(localAddress, localPort);
        udp = new UdpClient(localEP);
        udp.Client.ReceiveTimeout = 3000;
        IPAddress ArduinoAddress = IPAddress.Parse(ArduinoIpString);
        IPEndPoint ArduinoEP = new IPEndPoint(ArduinoAddress, ArduinoPort);
        udp.Connect(ArduinoEP);
        thread = new Thread(new ThreadStart(ThreadMethod));
        thread.Start();
    }

    void Update()
    {
        textData.text = ltext;
    }

    void OnApplicationQuit()
    {
        isReceiving = false;
        if (thread != null) thread.Abort();
        if (udp != null) udp.Close();
    }

    private static void ThreadMethod()
    {
        while (isReceiving)
        {
            try
            {
                IPEndPoint remoteEP = null;
                byte[] data = udp.Receive(ref remoteEP);
                ltext = Encoding.ASCII.GetString(data);
                Debug.Log(ltext);
            }
            catch (System.Exception e)
            {
                Debug.Log(e.ToString());
            }
        }
    }
}
修正 udp.Connect("192.168.2.101", 8888); → udp.Connect(ArduinoEP);
参考サイトにある内容で十分なのだが、いろいろいじってみている。
なお、終了時の「udp.Close();」は注意。忘れずに入れよう。
接続先のIPとかは入れる必要はないのだが、どうなっているのか勉強のためにやってみた。
Unityの画面にText表示させるため、
using UnityEngine.UI;
public Text textData;
textData.text = ltext;
とか入っているが、ログに出すだけなら不要。
あと、PC側のIPアドレスの設定は前回・前々回と一緒
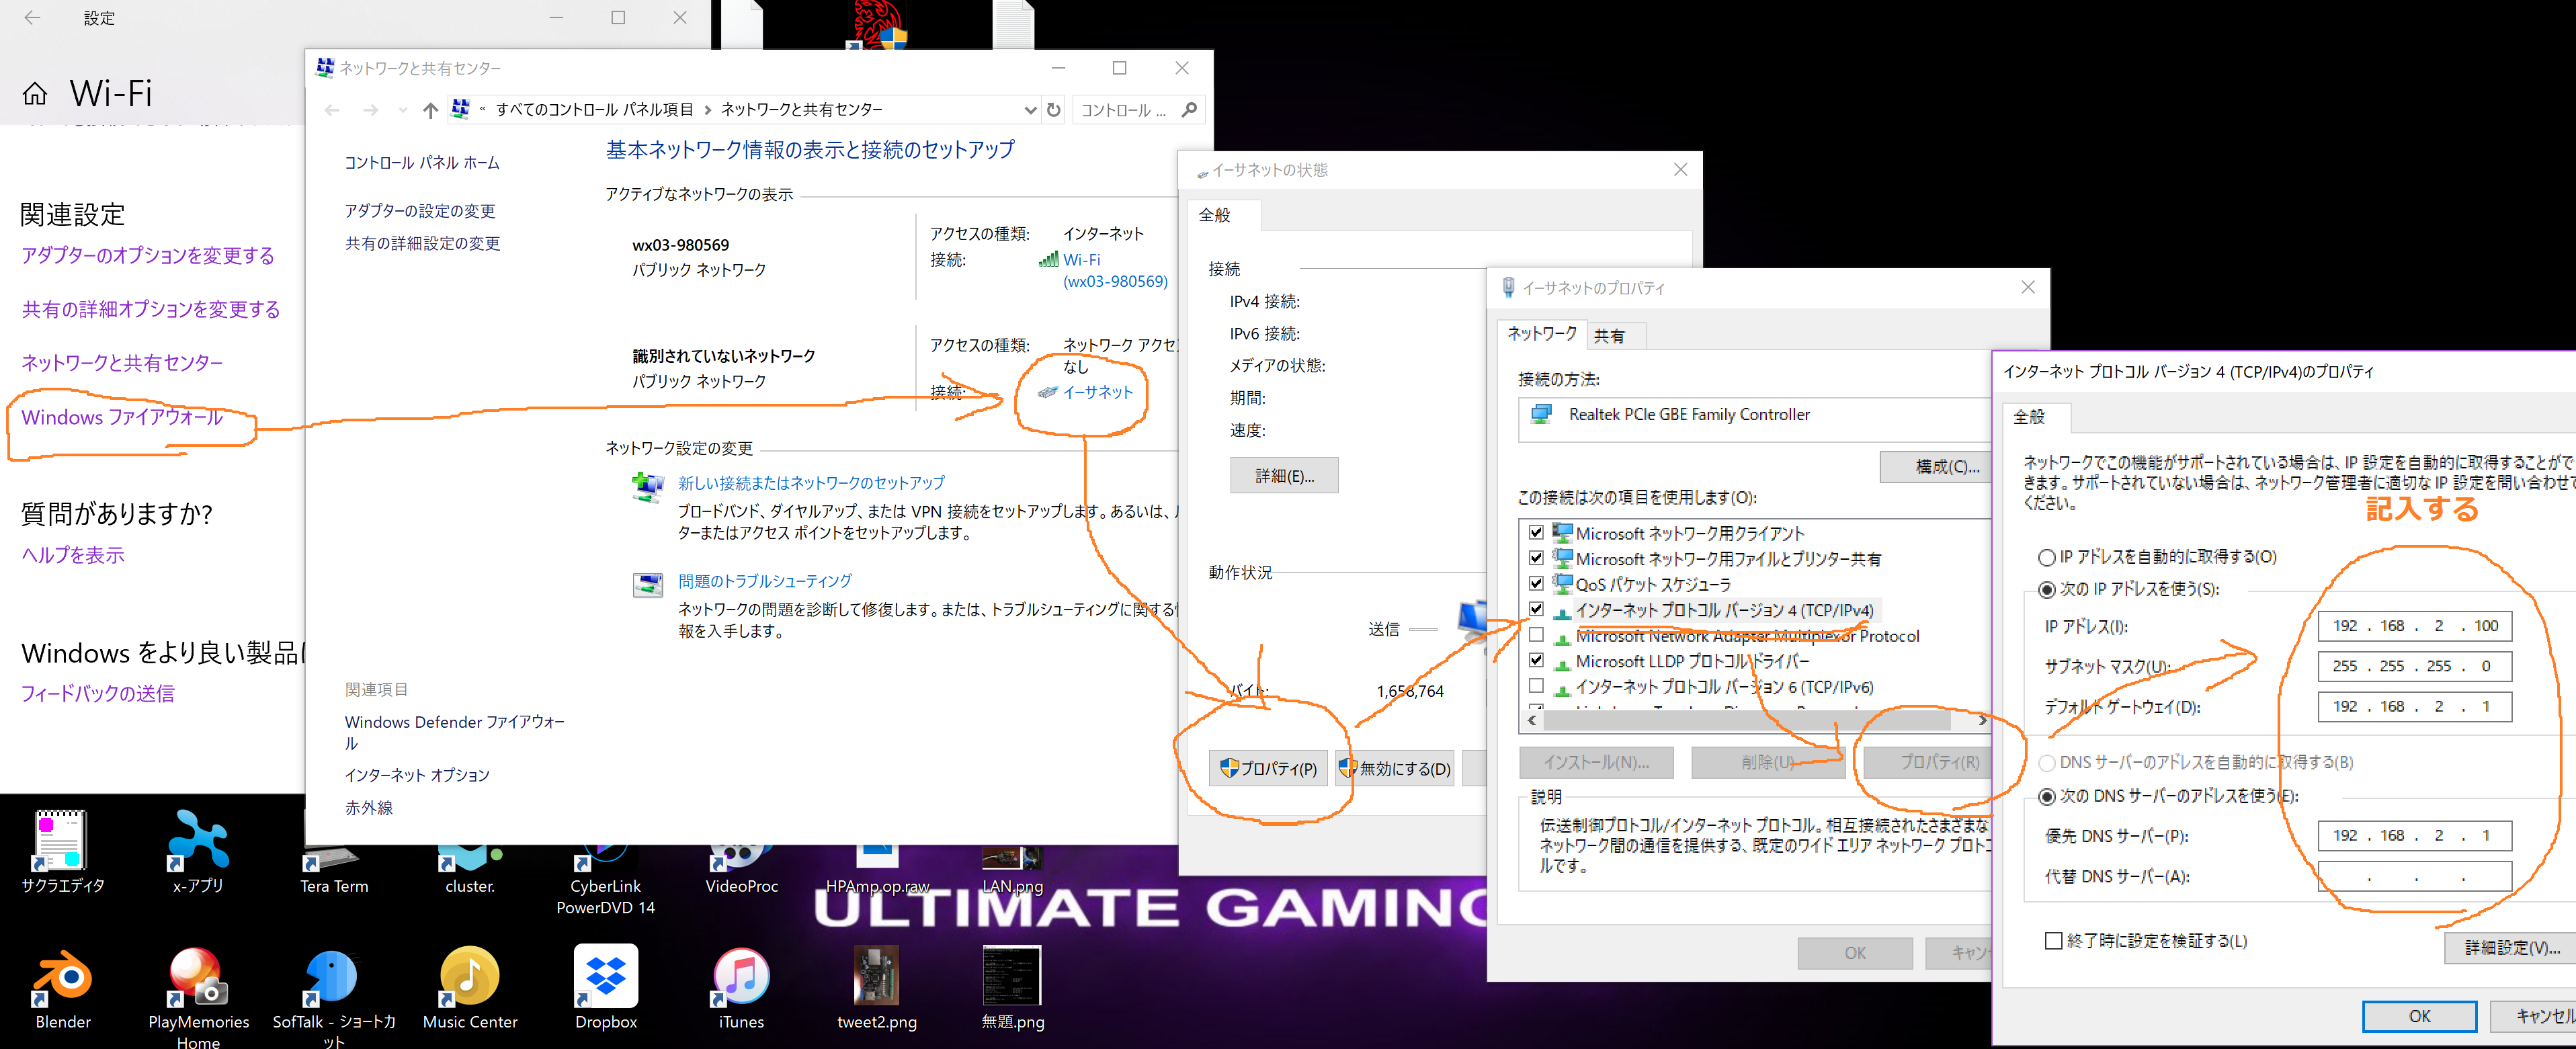
あとはファイアウォールの設定に注意すれば通信できるはず。
こんなことで一日使ってしまうとは・・・。
ハード屋にはソフトきついねぇ、以上。