目次
・はじめに
・結果
・準備
・スケッチ例を使ったUDPによる送受信
・UDPによる連続送信
はじめに
前回の記事に引き続きPCとArduino間で通信する。
https://qiita.com/get_itchy_feet/items/36a8f9fa5983fb11ac6a
今度はUDPを使用してみた。いろいろ便利が良いらしい。
「UDPSendReceiveString」を参考にしてトライする。データを送るだけのプログラムにも改造してみた。
結果
UDPでのデータ送信に成功した。
結果は以下のツイート
# 準備 必要なもの ①PC ②ArduinoUNO ③LANケーブル ④EthernetShield ⑤USBケーブル(書込み用) ⑥MACアドレス ⑦udp/ipテストツール有線LANでArduinoからPCにデータを送ってみる。
— いっちー (@get_itchy_feet) 2019年4月19日
TCPに続きUDPでもデータの送付に成功。 pic.twitter.com/E61lnZoVJu
 ③・・・PCとArduinoは直接ケーブルでつなげている。
④・・・秋月電子で購入。DFROBOTのEthernet Shield V2.2。チップはW5100が搭載されている。
http://akizukidenshi.com/catalog/g/gM-13165/
⑥・・・④にはMACアドレスがついていない。別機器(使っていないAmazonEcho)から拝借
⑦・・・パソコン側でUDPの送受信を試すためのアプリをインストール。以下のHPからお借りした。
http://nonsoft.la.coocan.jp/Download/UdpTool/index.html
# UDPによる送受信
Arduinoを起動し、「ファイル」→「スケッチ例」→「Ethernet」からUDPSendReceiveStringを開く。
MACアドレスを書き換える。アドレスはさすがに公開できないので?を入れてある。下記の「0x??,0x??,0x??,0x??,0x??,0x??」の?に使用するアドレスの数値を記入。
IPアドレスを書き換える。「IPAddress ip(192,168,2,101);」としている。
改造した以下のプログラムをArduinoに書き込む。
③・・・PCとArduinoは直接ケーブルでつなげている。
④・・・秋月電子で購入。DFROBOTのEthernet Shield V2.2。チップはW5100が搭載されている。
http://akizukidenshi.com/catalog/g/gM-13165/
⑥・・・④にはMACアドレスがついていない。別機器(使っていないAmazonEcho)から拝借
⑦・・・パソコン側でUDPの送受信を試すためのアプリをインストール。以下のHPからお借りした。
http://nonsoft.la.coocan.jp/Download/UdpTool/index.html
# UDPによる送受信
Arduinoを起動し、「ファイル」→「スケッチ例」→「Ethernet」からUDPSendReceiveStringを開く。
MACアドレスを書き換える。アドレスはさすがに公開できないので?を入れてある。下記の「0x??,0x??,0x??,0x??,0x??,0x??」の?に使用するアドレスの数値を記入。
IPアドレスを書き換える。「IPAddress ip(192,168,2,101);」としている。
改造した以下のプログラムをArduinoに書き込む。
/*
 UDPSendReceiveString:
 This sketch receives UDP message strings, prints them to the serial port
 and sends an "acknowledge" string back to the sender

 A Processing sketch is included at the end of file that can be used to send
 and received messages for testing with a computer.

 created 21 Aug 2010
 by Michael Margolis

 This code is in the public domain.
 */


# include <Ethernet.h>
# include <EthernetUdp.h>

// Enter a MAC address and IP address for your controller below.
// The IP address will be dependent on your local network:
byte mac[] = {
  0x??,0x??,0x??,0x??,0x??,0x??
};
IPAddress ip(192,168,2,101);

unsigned int localPort = 8888;      // local port to listen on

// buffers for receiving and sending data
char packetBuffer[UDP_TX_PACKET_MAX_SIZE];  // buffer to hold incoming packet,
char ReplyBuffer[] = "acknowledged";        // a string to send back

// An EthernetUDP instance to let us send and receive packets over UDP
EthernetUDP Udp;

void setup() {
  // You can use Ethernet.init(pin) to configure the CS pin
  //Ethernet.init(10);  // Most Arduino shields
  //Ethernet.init(5);   // MKR ETH shield
  //Ethernet.init(0);   // Teensy 2.0
  //Ethernet.init(20);  // Teensy++ 2.0
  //Ethernet.init(15);  // ESP8266 with Adafruit Featherwing Ethernet
  //Ethernet.init(33);  // ESP32 with Adafruit Featherwing Ethernet

  // start the Ethernet
  Ethernet.begin(mac, ip);

  // Open serial communications and wait for port to open:
  Serial.begin(9600);
  while (!Serial) {
    ; // wait for serial port to connect. Needed for native USB port only
  }

  // Check for Ethernet hardware present
  if (Ethernet.hardwareStatus() == EthernetNoHardware) {
    Serial.println("Ethernet shield was not found.  Sorry, can't run without hardware. :(");
    while (true) {
      delay(1); // do nothing, no point running without Ethernet hardware
    }
  }
  if (Ethernet.linkStatus() == LinkOFF) {
    Serial.println("Ethernet cable is not connected.");
  }

  // start UDP
  Udp.begin(localPort);
}

void loop() {
  // if there's data available, read a packet
  int packetSize = Udp.parsePacket();
  if (packetSize) {
    Serial.print("Received packet of size ");
    Serial.println(packetSize);
    Serial.print("From ");
    IPAddress remote = Udp.remoteIP();
    for (int i=0; i < 4; i++) {
      Serial.print(remote[i], DEC);
      if (i < 3) {
        Serial.print(".");
      }
    }
    Serial.print(", port ");
    Serial.println(Udp.remotePort());

    // read the packet into packetBufffer
    Udp.read(packetBuffer, UDP_TX_PACKET_MAX_SIZE);
    Serial.println("Contents:");
    Serial.println(packetBuffer);

    // send a reply to the IP address and port that sent us the packet we received
    Udp.beginPacket(Udp.remoteIP(), Udp.remotePort());
    Udp.write(ReplyBuffer);
    Udp.endPacket();
  }
  delay(10);
}


/*
  Processing sketch to run with this example
 =====================================================

 // Processing UDP example to send and receive string data from Arduino
 // press any key to send the "Hello Arduino" message


 import hypermedia.net.*;

 UDP udp;  // define the UDP object


 void setup() {
 udp = new UDP( this, 6000 );  // create a new datagram connection on port 6000
 //udp.log( true ); 		// <-- printout the connection activity
 udp.listen( true );           // and wait for incoming message
 }

 void draw()
 {
 }

 void keyPressed() {
 String ip       = "192.168.1.177";	// the remote IP address
 int port        = 8888;		// the destination port

 udp.send("Hello World", ip, port );   // the message to send

 }

 void receive( byte[] data ) { 			// <-- default handler
 //void receive( byte[] data, String ip, int port ) {	// <-- extended handler

 for(int i=0; i < data.length; i++)
 print(char(data[i]));
 println();
 }
 */
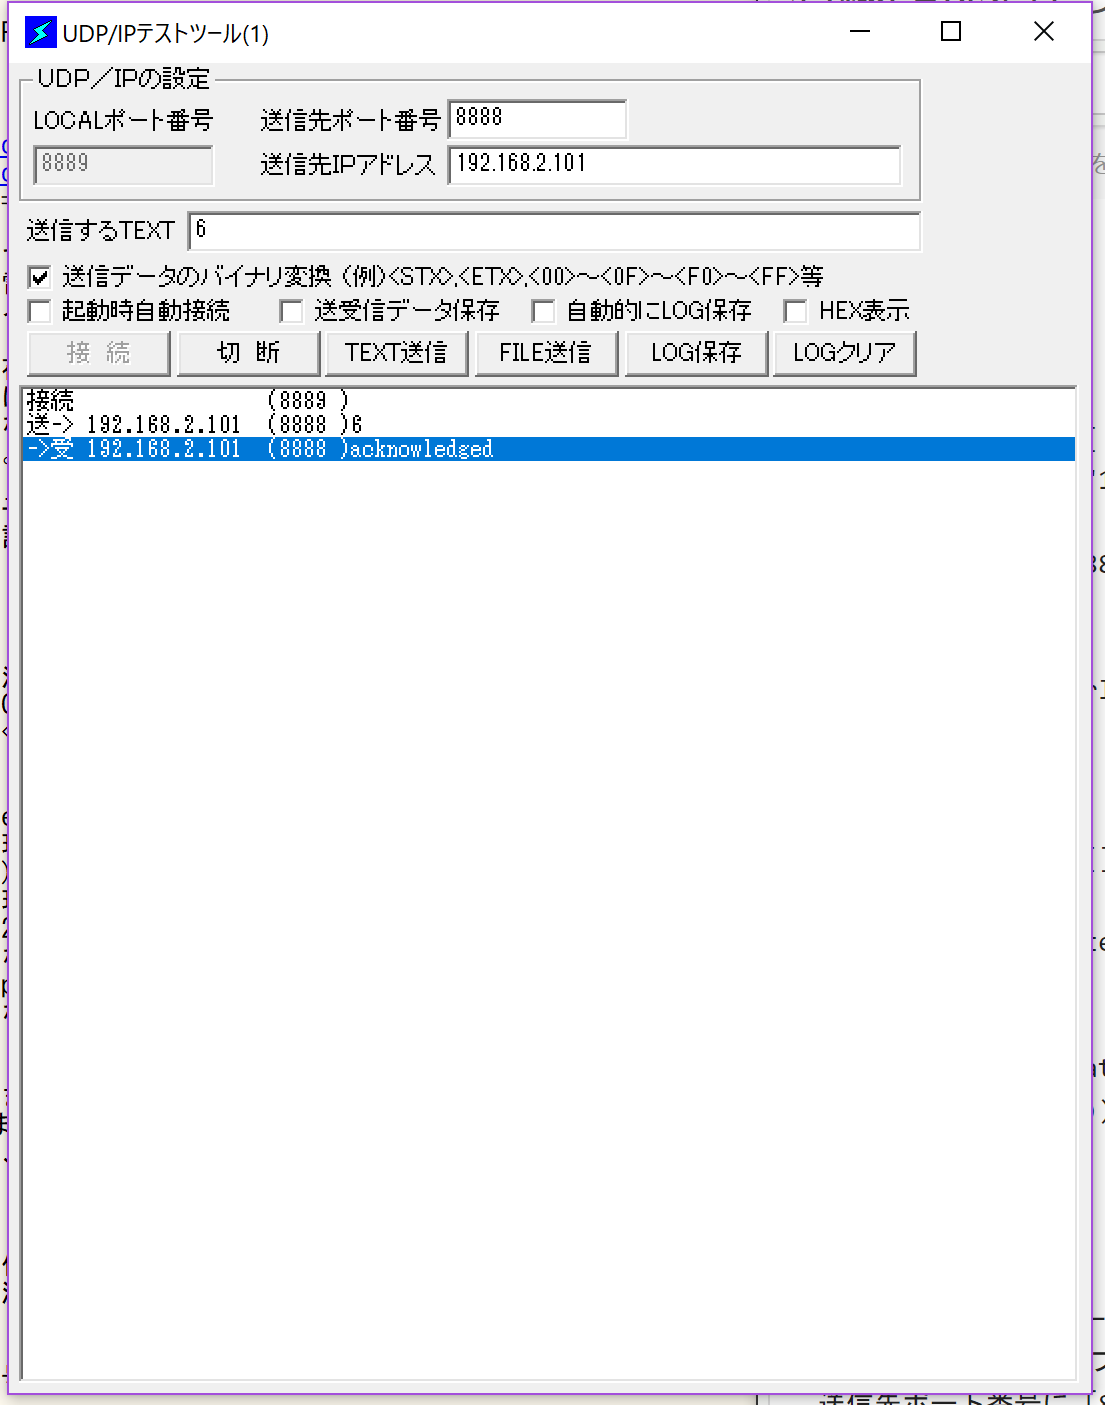
次にudp/ipテストツールを立ち上げる。ダウンロードしたファイルを解凍し、exeファイルをダブルクリック。
送信先ポート番号に「8888」、送信先IPアドレスに「192.168.2.101」と記入し、接続ボタンをクリック。
送信するテキストに文字を記入し、TEXT送信ボタンをクリックすると送受信に成功、以下のように出てきた。
UDPによる連続送信
次にArduino側から連続してデータを送る。
ちなみにパソコン側のIPアドレスは「192.168.2.100」にしてある。以下のように設定した。。PC左下のWindowsマークを右クリックし、「ネットワークの状態」を開く。下の方の「ネットワークと共有センター」を開き、「イーサネット」をクリック、「イーサネットの状態」が出てきたら、「プロパティ」をクリックし、「イーサネット プロトコル バージョン4」を選び「プロパティ」を開く。
(ちなみにWindow10です。)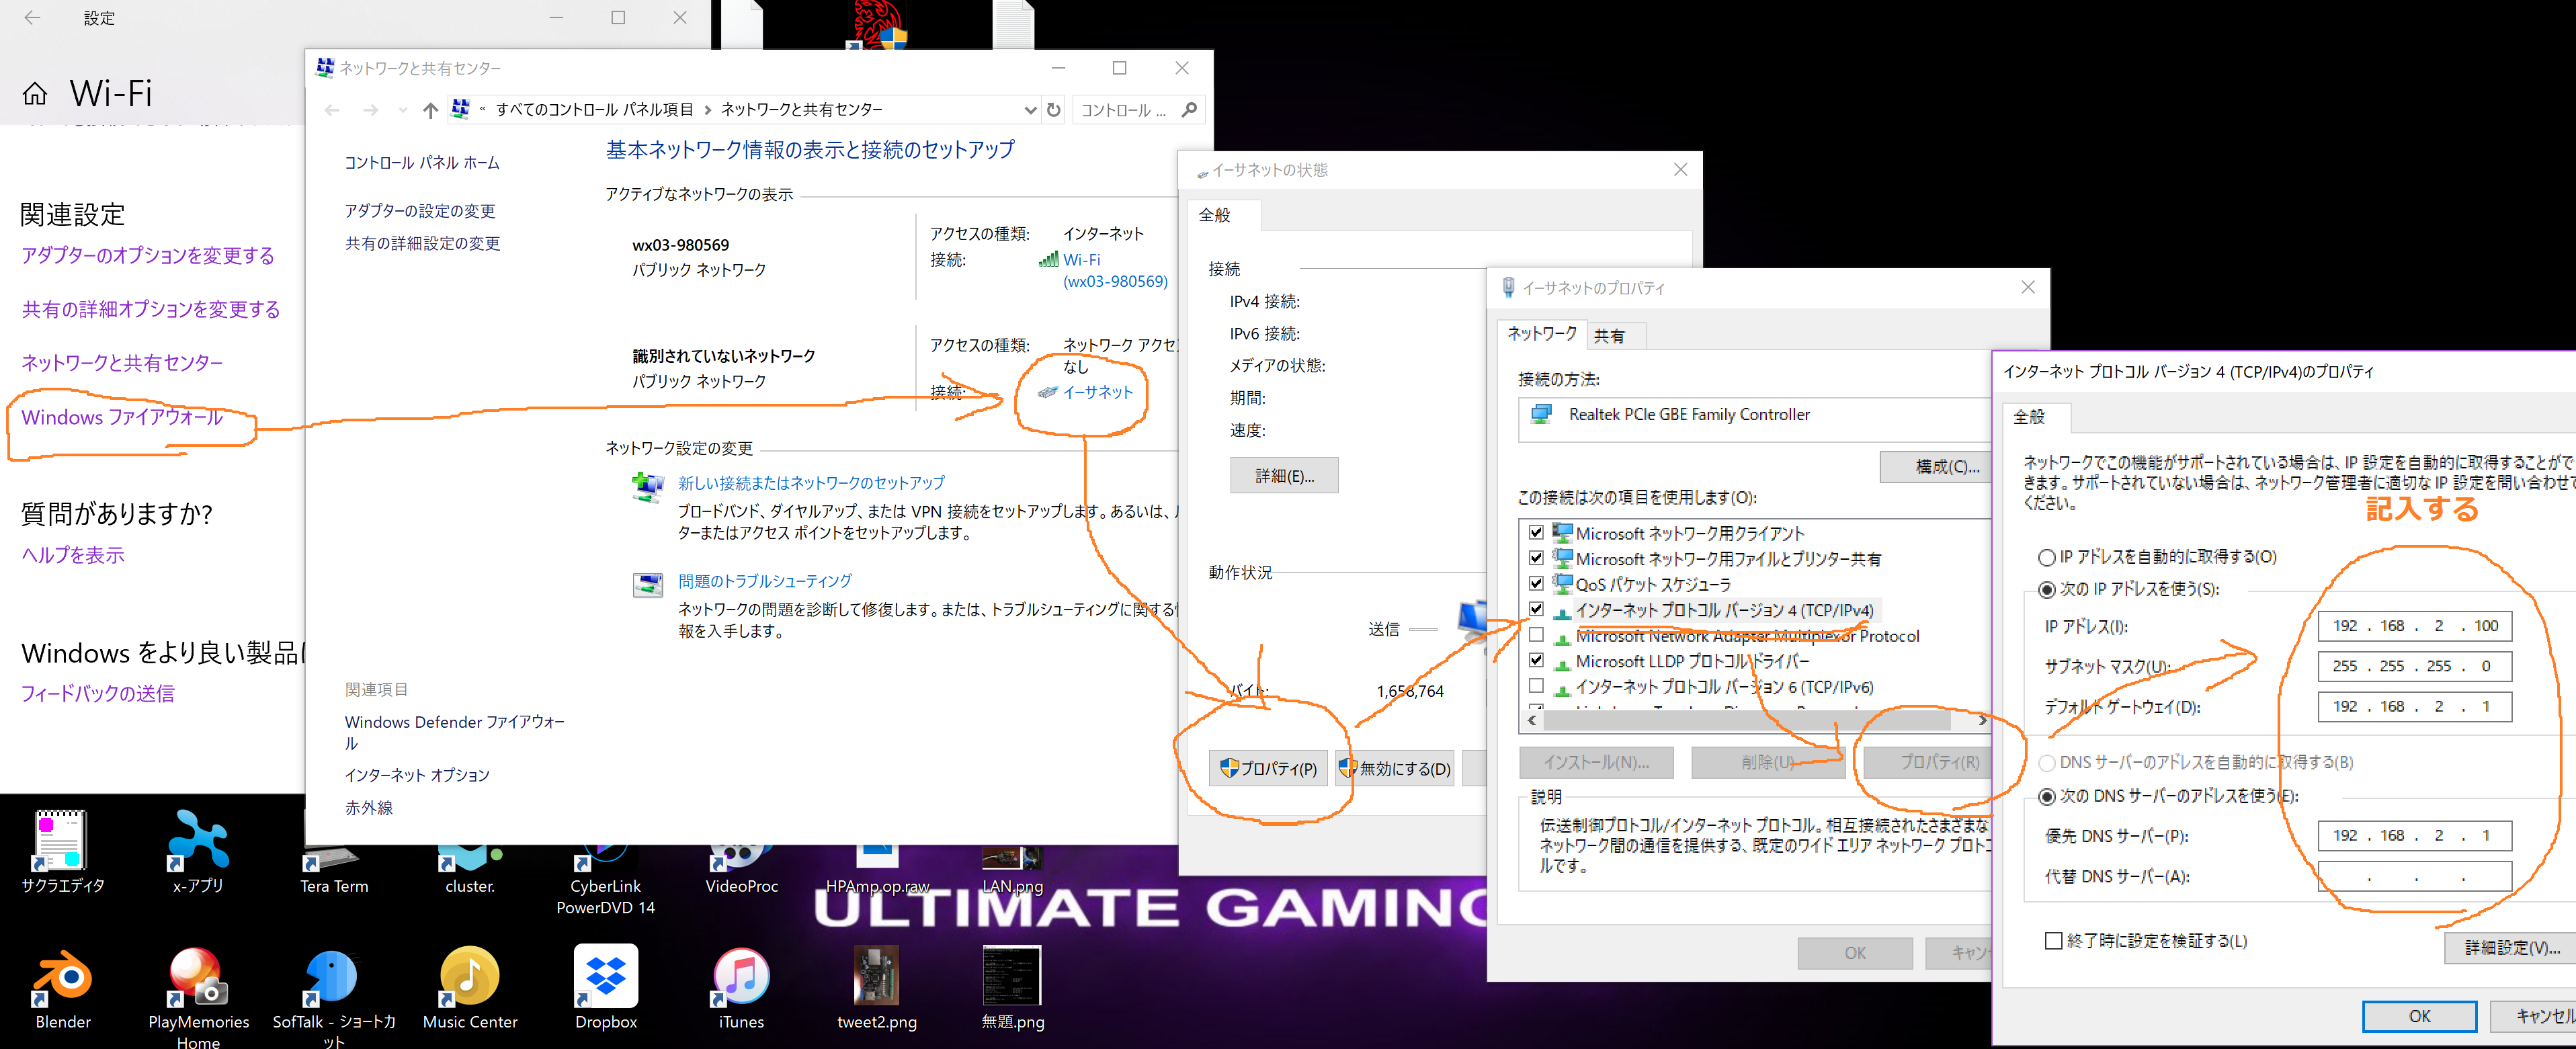
ここでPC側の設定ができるので、「次のIPアドレスを使う」にチェックを入れ、IPアドレスを「192.168.2.100」にした。
デフォルトゲートウェイ・DNSサーバーには適当に「192.168.2.1」とし、サブネットマスクは勝手に出てきた。OKを押し設定を変更。
つぎに以下のようなプログラムをArduinoに書き込んだ。PC側のIPアドレスは設定した通り「192.168.2.100」ポート番号ははudp/ipテストツールのLOCALポートに書き込んだ番号(ここでは「8889」)とした。
# include <Ethernet.h>
# include <EthernetUdp.h>

byte mac[] = {
  0x00,0x71,0x47,0xB7,0x5A,0x3A
};
IPAddress ip(192,168,2,101);
unsigned int localPort = 8888;

IPAddress remote(192,168,2,100);
int pClocalPort = 8889;

int i = 97;

EthernetUDP Udp;

void setup() {
  Ethernet.begin(mac, ip);

  if (Ethernet.hardwareStatus() == EthernetNoHardware) {
    while (true) {
      delay(1);
    }
  }
  if (Ethernet.linkStatus() == LinkOFF) {
  }
  Udp.begin(localPort);
}

void loop() {
  Udp.beginPacket(remote,pClocalPort);
  if(i < 116) i = i + 1;
  else i = 97;
  Udp.write(i);
  Udp.endPacket();
  delay(500);
}
udp/ipテストツールを立ち上げ、LOCALポートに「8889」と記入、接続するとa-zを繰り返し表示するようになった。
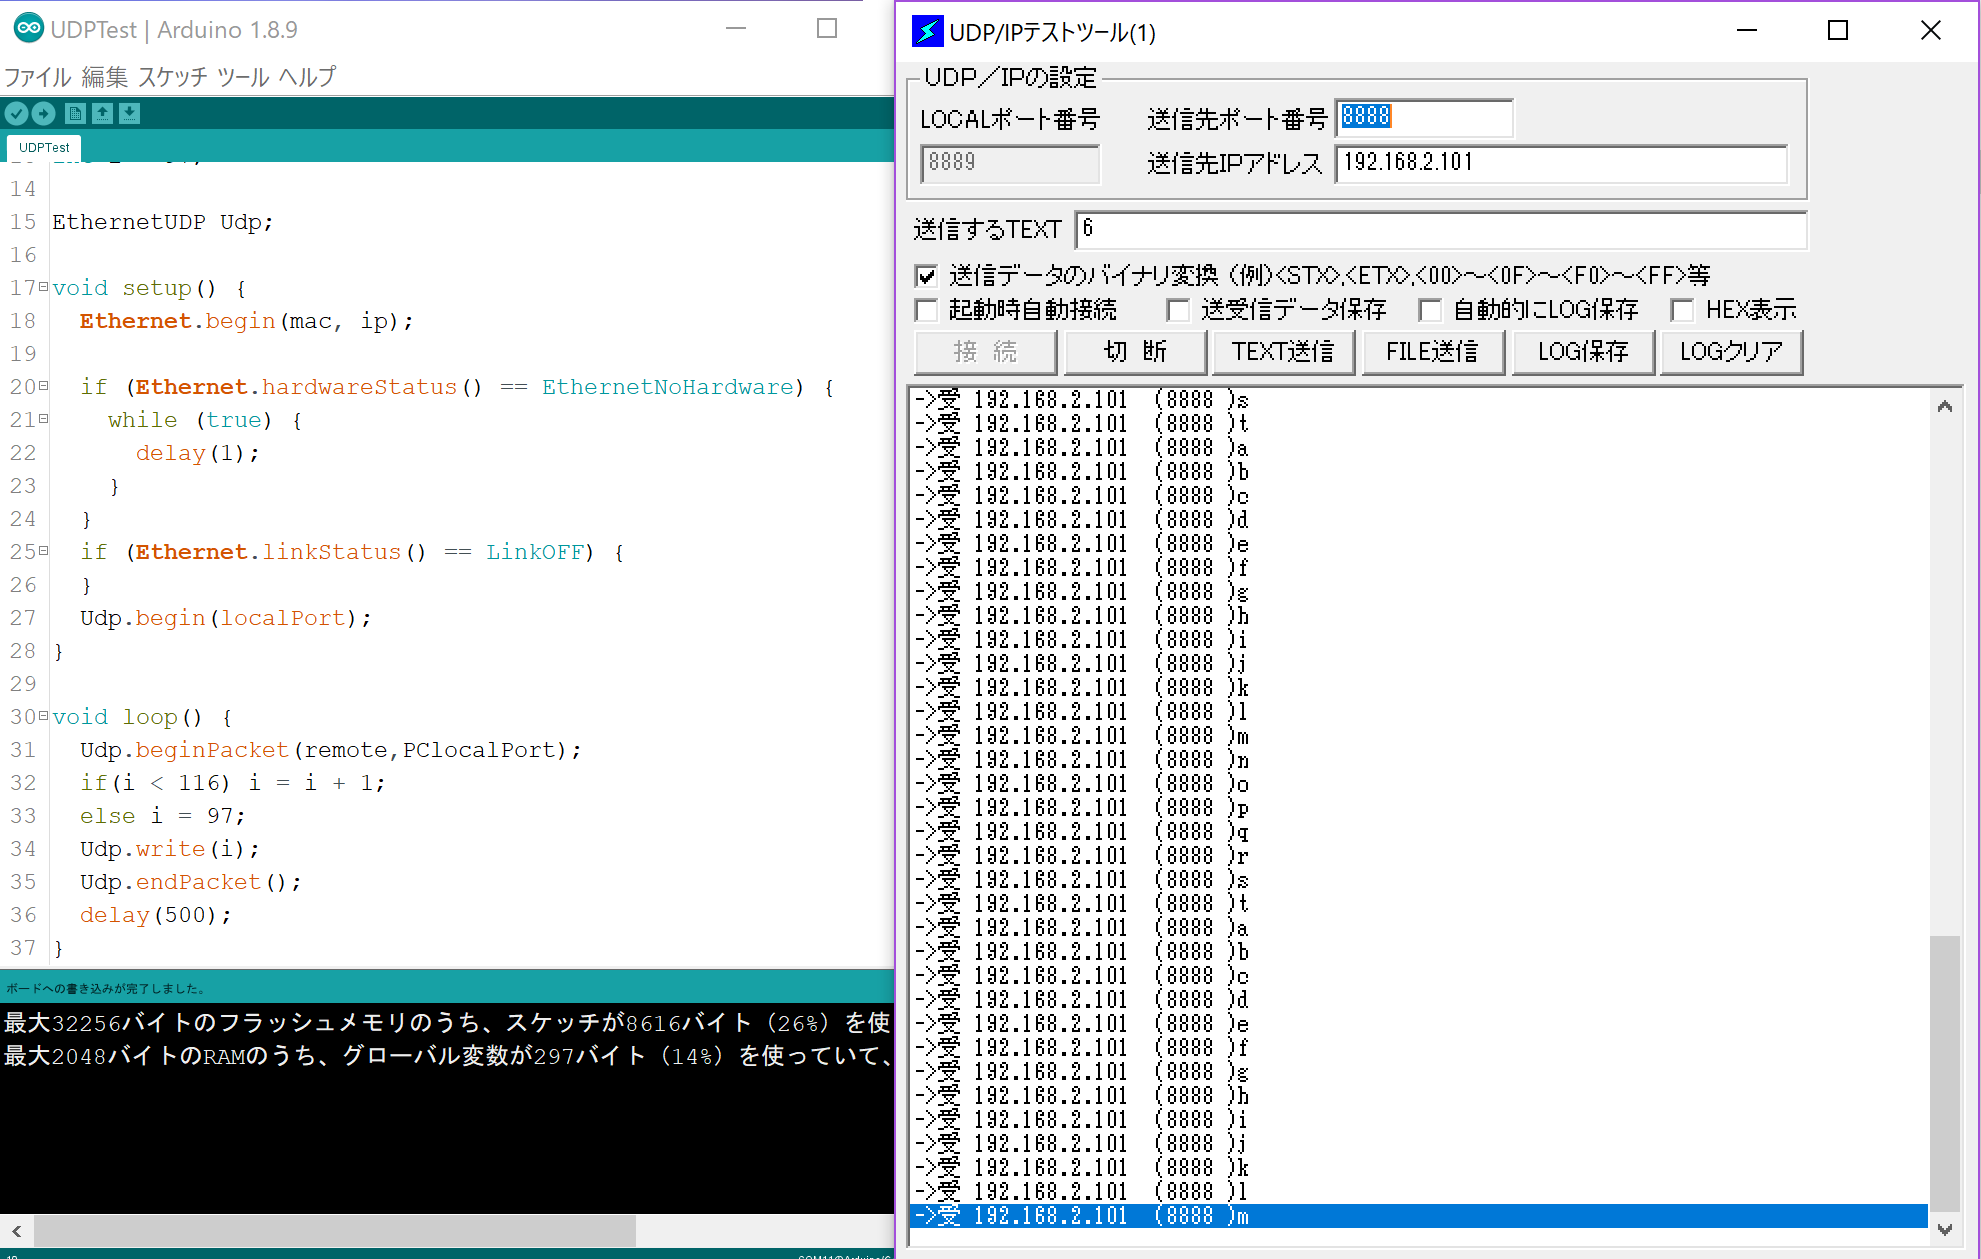
UDPでの送信のみのプログラムの作成にも成功した。
以上である。