目次
・はじめに
・結論
・所感
・やり方
はじめに
ArduinoとPC間で通信を行いたい。
これまでUSBケーブルでデータをやりしてきたが、世の中にはLANケーブルでつなげるという方法があることを知った。
LANケーブルの方が便利ならば、電子工作は今後このやり方でつなげていきたい。ただし、LANとかわからんので、まずはArduinoとつなげられるかを試してみる。
結論
EthernetShieldを使えば有線LANでArduinoとPCをつなげられる。
Arduinoのプログラムはスケッチ例にある「WebServer」を参考にした。これだとTCPとかいう通信方法になるらしい。Arduinoから送られたデータをPCのブラウザに表示してみた。結果は以下のツイート
秋月でEthernet Shield買ってきて、有線LANでPCとArduinoつなげてみた。
— いっちー (@get_itchy_feet) 2019年4月6日
苦戦したが、スケッチ例コピペしたら、ブラウザになんか数値出てきた。
なんでつながったかようわからんが、どっかにまとめておきたいなぁ、 pic.twitter.com/3a4jwqaUq4
所感
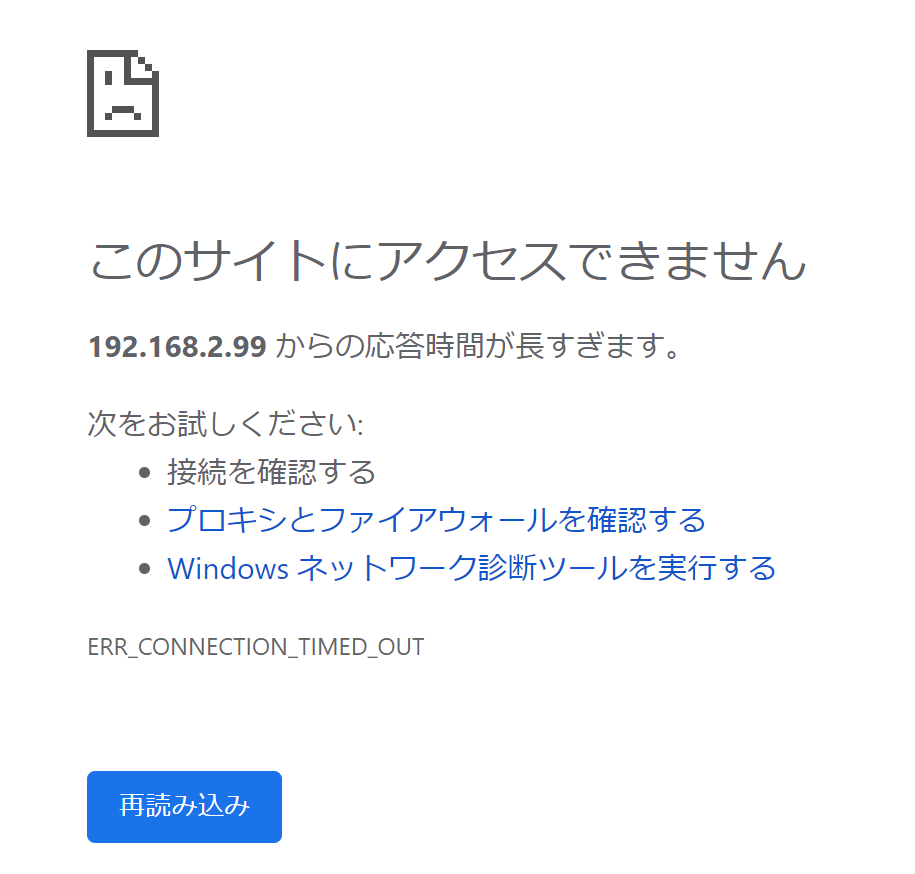
最初はつながらなかった。ブラウザにIPアドレスを入力してみても以下の表示しか出てこなかった。

ただ、IPアドレスの数字をいろいろいじってみると突然つながるようになった。それ以降は以前試してつながらなかった数字でもつながるようになった。なぜだ?
なんかPC側で自動で頑張ってくれるようになったのか?PCわからん。なので、試行錯誤の結果をメモ代わりに残す。文章が冗長になってしまうが何が効果あったかわからんのでやむなしか…
やり方
1.ハード他の準備
必要なもの ①PC ②ArduinoUNO ③LANケーブル ④EthernetShield ⑤USBケーブル(書込み用) ⑥MACアドレス

③・・・ストレートとクロスの二種類がある。両方試してみたが、両方つながった。PCとArduinoは直接ケーブルでつなげてみた。
④・・・秋月電子で購入。DFROBOTのEthernet Shield V2.2。チップはW5100が搭載されている。
http://akizukidenshi.com/catalog/g/gM-13165/
⑥・・・④にはMACアドレスがついていない。適当な数値は使ってはだめらしい。今回は別機器(使っていないAmazonEcho)の物を流用した。
2.Arduinoの準備
Arduinoを起動し、「ファイル」→「スケッチ例」→「Ethernet」からWebServerを開く。
MACアドレスを書き換える。アドレスはさすがに公開できないので?を入れてある。下記の「0x??,0x??,0x??,0x??,0x??,0x??」の?に使用するアドレスの数値を記入。
IPアドレスを書き換える。「IPAddress ip(192,168,2,101);」としている。
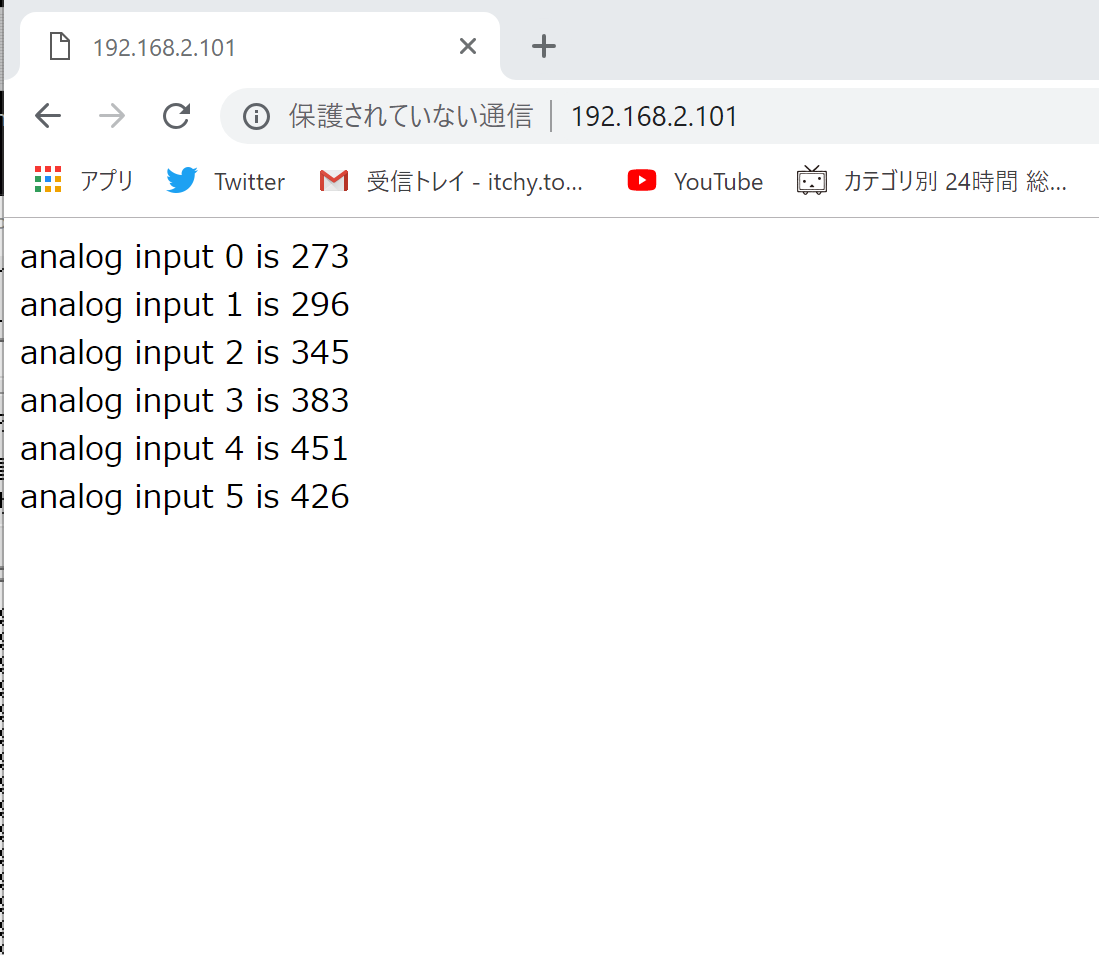
Arduinoに書き込み後、ブラウザ(google chrome)を立ち上げ、アドレスに「192,168,2,101」と記入してみると数値が表示される。
表示画面と今回のプログラム

/*
  Web Server

 A simple web server that shows the value of the analog input pins.
 using an Arduino Wiznet Ethernet shield.

 Circuit:
 * Ethernet shield attached to pins 10, 11, 12, 13
 * Analog inputs attached to pins A0 through A5 (optional)

 created 18 Dec 2009
 by David A. Mellis
 modified 9 Apr 2012
 by Tom Igoe
 modified 02 Sept 2015
 by Arturo Guadalupi

 */

# include <SPI.h>
# include <Ethernet.h>

// Enter a MAC address and IP address for your controller below.
// The IP address will be dependent on your local network:
byte mac[] = {
  0x??,0x??,0x??,0x??,0x??,0x??
};
IPAddress ip(192,168,2,101);

// Initialize the Ethernet server library
// with the IP address and port you want to use
// (port 80 is default for HTTP):
EthernetServer server(80);

void setup() {
  // You can use Ethernet.init(pin) to configure the CS pin
  //Ethernet.init(10);  // Most Arduino shields
  //Ethernet.init(5);   // MKR ETH shield
  //Ethernet.init(0);   // Teensy 2.0
  //Ethernet.init(20);  // Teensy++ 2.0
  //Ethernet.init(15);  // ESP8266 with Adafruit Featherwing Ethernet
  //Ethernet.init(33);  // ESP32 with Adafruit Featherwing Ethernet

  // Open serial communications and wait for port to open:
  Serial.begin(9600);
  while (!Serial) {
    ; // wait for serial port to connect. Needed for native USB port only
  }
  Serial.println("Ethernet WebServer Example");

  // start the Ethernet connection and the server:
  Ethernet.begin(mac, ip);

  // Check for Ethernet hardware present
  if (Ethernet.hardwareStatus() == EthernetNoHardware) {
    Serial.println("Ethernet shield was not found.  Sorry, can't run without hardware. :(");
    while (true) {
      delay(1); // do nothing, no point running without Ethernet hardware
    }
  }
  if (Ethernet.linkStatus() == LinkOFF) {
    Serial.println("Ethernet cable is not connected.");
  }

  // start the server
  server.begin();
  Serial.print("server is at ");
  Serial.println(Ethernet.localIP());
}


void loop() {
  // listen for incoming clients
  EthernetClient client = server.available();
  if (client) {
    Serial.println("new client");
    // an http request ends with a blank line
    boolean currentLineIsBlank = true;
    while (client.connected()) {
      if (client.available()) {
        char c = client.read();
        Serial.write(c);
        // if you've gotten to the end of the line (received a newline
        // character) and the line is blank, the http request has ended,
        // so you can send a reply
        if (c == '\n' && currentLineIsBlank) {
          // send a standard http response header
          client.println("HTTP/1.1 200 OK");
          client.println("Content-Type: text/html");
          client.println("Connection: close");  // the connection will be closed after completion of the response
          client.println("Refresh: 5");  // refresh the page automatically every 5 sec
          client.println();
          client.println("<!DOCTYPE HTML>");
          client.println("<html>");
          // output the value of each analog input pin
          for (int analogChannel = 0; analogChannel < 6; analogChannel++) {
            int sensorReading = analogRead(analogChannel);
            client.print("analog input ");
            client.print(analogChannel);
            client.print(" is ");
            client.print(sensorReading);
            client.println("<br />");
          }
          client.println("</html>");
          break;
        }
        if (c == '\n') {
          // you're starting a new line
          currentLineIsBlank = true;
        } else if (c != '\r') {
          // you've gotten a character on the current line
          currentLineIsBlank = false;
        }
      }
    }
    // give the web browser time to receive the data
    delay(1);
    // close the connection:
    client.stop();
    Serial.println("client disconnected");
  }
}
2.問題点と解決
最初はつながらなかった。どうもIPアドレスの選び方に何か問題があったらしい。ここから試行錯誤。
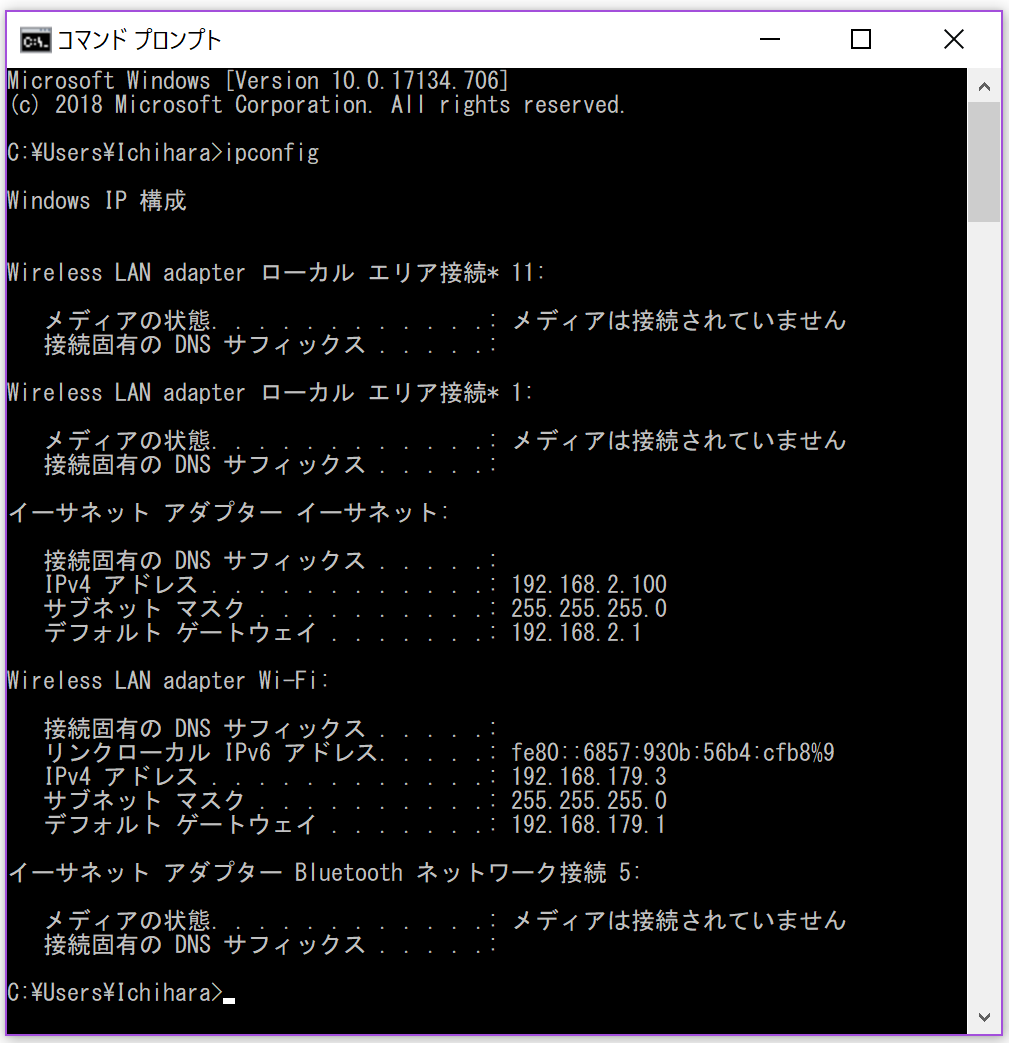
まずはPCのTCP/IPネットワークの設定を確認してみた。コマンドプロンプトを立ち上げ、ipconfigと書きEnterキーを押す。イーサネットアダプターの内容を確認した。
ほかのPC では数値が異なるかもしれんが、少なくとも私のPCでは「192.168.2.100/24」みたいなことが書かれていた(記憶あいまい)「192.168.2.100」あたりが良さげらしい(良さげってのは表現ひどいが私の理解ではこれが限界…)。いまは「192.168.2.100」に設定されているのでその値が出てきている(下図参照)

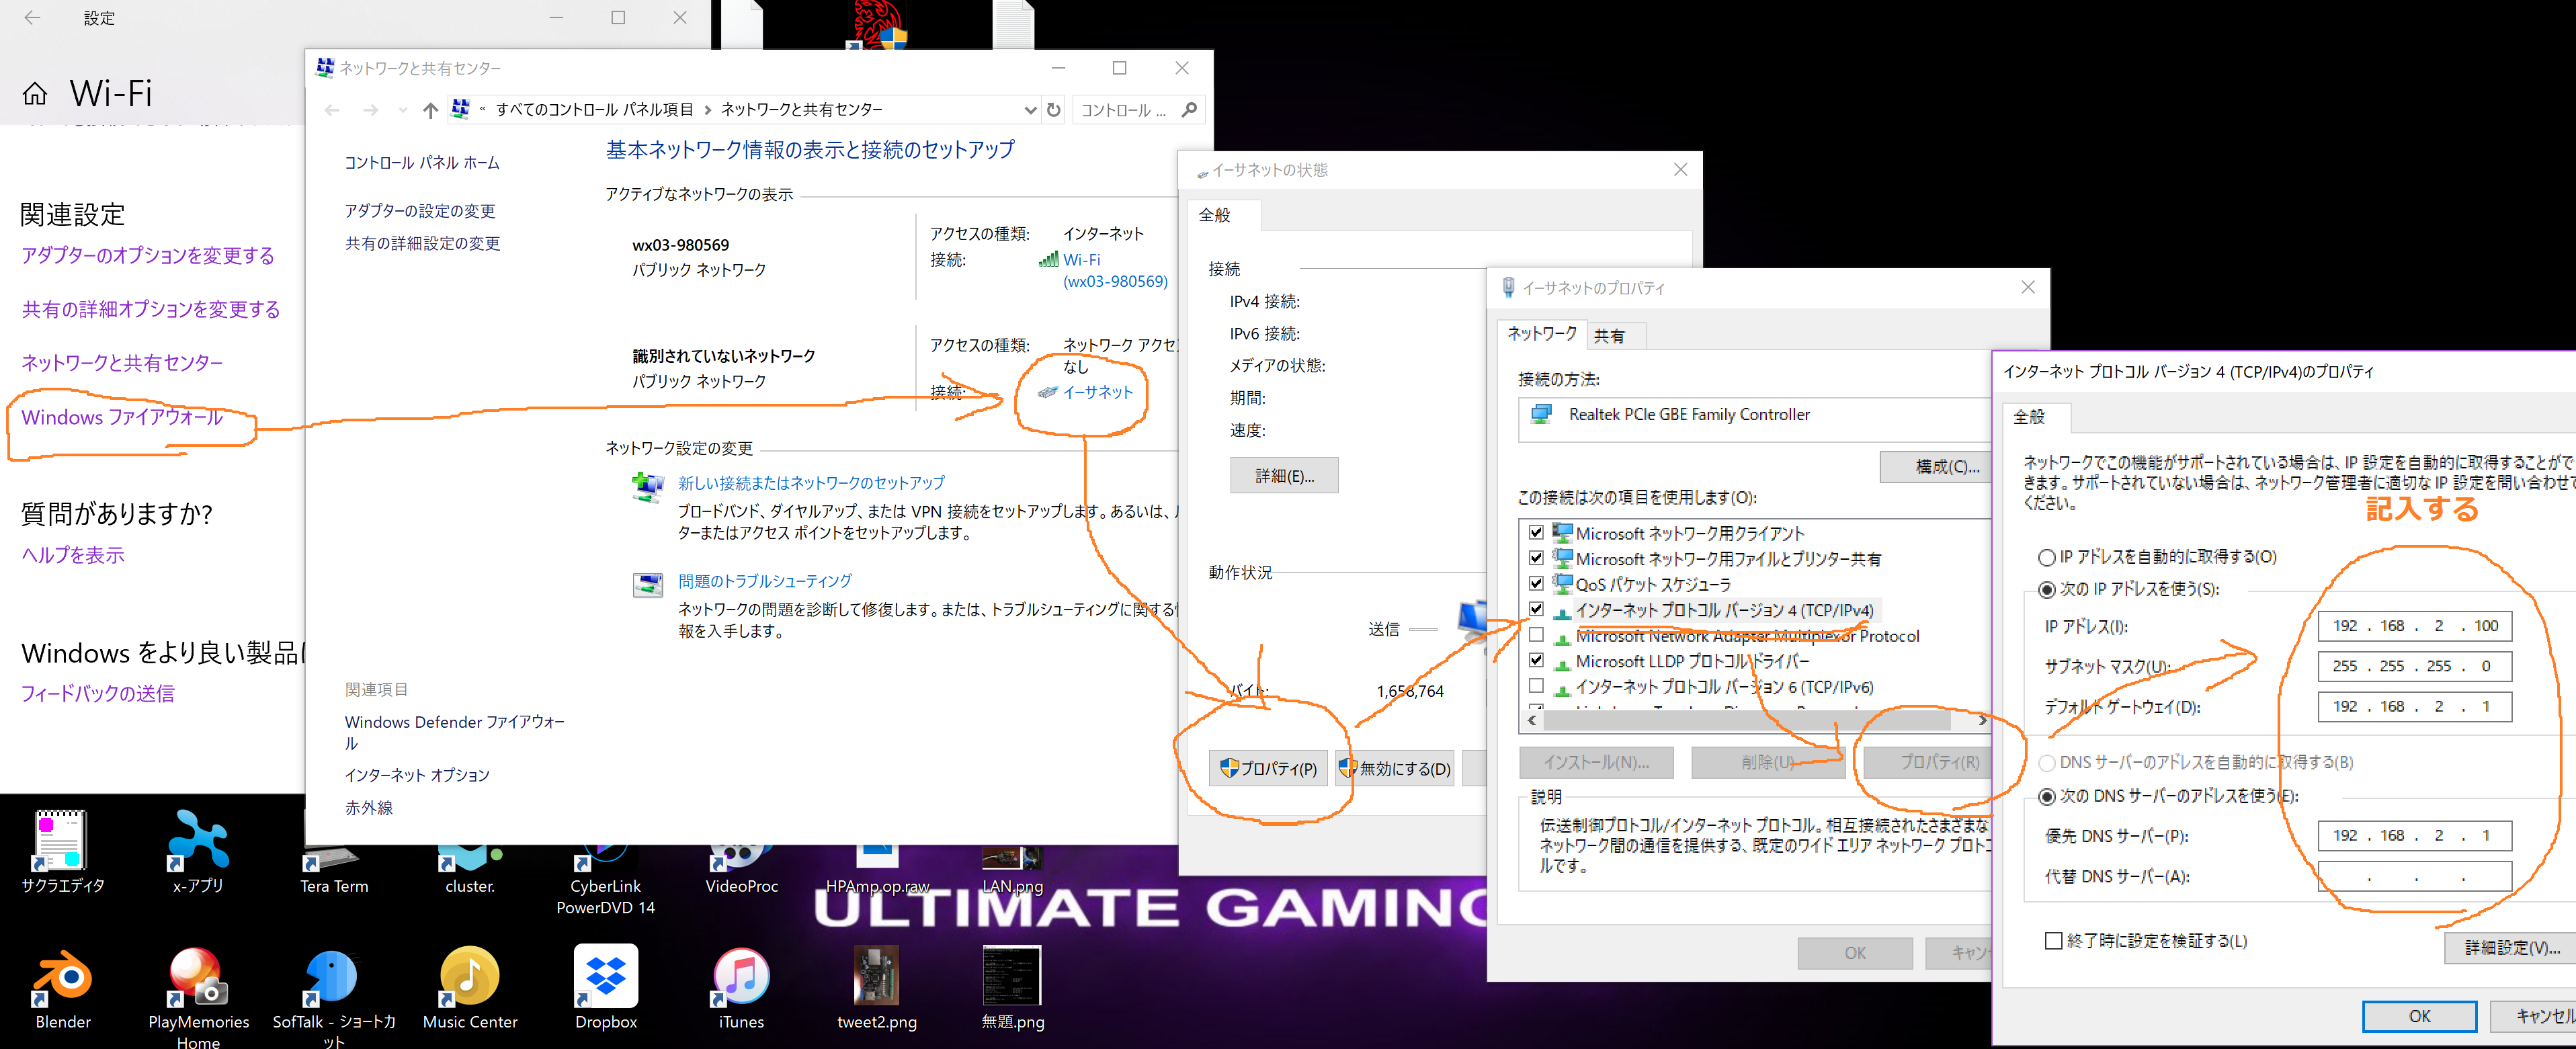
つぎにPC左下のWindowsマークを右クリックし、「ネットワークの状態」を開く。下の方の「ネットワークと共有センター」を開き、「イーサネット」をクリック、「イーサネットの状態」が出てきたら、「プロパティ」をクリックし、「イーサネット プロトコル バージョン4」を選び「プロパティ」を開く。
(ちなみにWindow10です。)
ここでPC側の設定ができるので、「次のIPアドレスを使う」にチェックを入れ、IPアドレスを「192.168.2.100」にした。
デフォルトゲートウェイ・DNSサーバーには適当に「192.168.2.1」とし、サブネットマスクは勝手に出てきた。OKを押し設定を変更。
PCをこの状態にし、Arduino側のIPアドレスを「192.168.2.101」とすると通信に成功した。
3.蛇足
この成功したというのが謎でこの通信成功以降はIPアドレスの上三つ(192.168.2のとこまで)がPCとArduinoであっていれば通信できるようになった。
「192.168.1.100」と「192.168.1.101」とか。
通信が成功する前は上と同じ数値(192.168.1.100)を入力しても通信はできず、ブラウザには何の数値も出てこなかったにもかかわらずだ。
PC厄介すぎるやろ。どうなってるの?
試行錯誤の中で見落とした設定もあるだろうし、今同じことやっても成功する気がしない。どこいじったか忘れないためのメモ書き程度だが、参考までに。