はじめに
CNNやRNNと並んで重要なニューラルネットワークの仕組みとして、アテンション機構が挙げられます。
アテンション機構は入力データのどこに注目するべきかを学習することが可能です。
従来、アテンション機構はRNNやCNNなどと組み合わせて実装されることが専らでしたが、
「Attention Is All You Need」にてアテンション機構のみを用いたモデル(RNNやCNNを用いない!)「Transformer」が登場しました。
本モデルの特徴として、高い精度と容易に並列処理が可能な点が挙げられます。
登場直後は自然言語処理を中心として利用されてきましたが、現在では異なるタスクでも派生モデルが良い結果を残しています。(画像分類のViT、セグメンテーションのSegFormerなど)
そこで今回は、近年のニューラルネットワークモデルを学ぶ上で重要なTransfomerの理解を深めるため、PytorchでTransformerの実装を行いました。
Transformerとは
【原著論文】Attention Is All You Need
【参考】作って理解する Transformer / Attention
【参考】深層学習界の大前提Transformerの論文解説!/ Attention
【参考】図で理解するTransformer / Attention
【参考】How to code The Transformer in Pytorch
モデルの詳細な構造は上記の【参考】をご参照ください。とても分かり易いです。
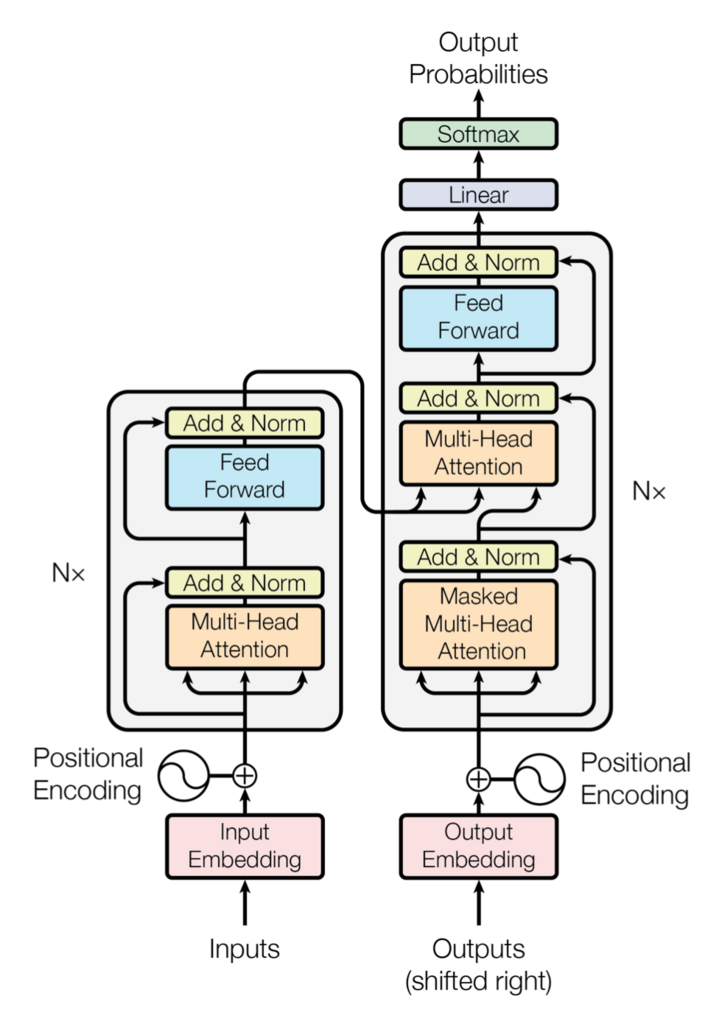
Transformerは以下のようなエンコーダ/デコーダ構造のモデルです。

(原著論文より)
エンコーダは以下のような構造になっています。
1.【Embedding層】各言葉を固有の特徴ベクトルに変換する。ex)「私」⇒[0.1,0.2,0.4]、「猫」⇒[0.2,0.3,0.1]
2.【Positional Encoding】Transformer自体はデータの順序を学習することが出来ません(「私は猫が好き」と「猫は私が好き」が同じデータになります)。そこで各言葉が何番目の値であるかを表す値を足します。
3.【Multi-Head Attention】入力データの各言葉同士の関連性を抽出します。
4.【Add(残差接続) & Norm(Layer normalization)】ResNetでおなじみの残差接続+ミニバッチ毎の標準化Layer normalizationで、勾配消失を軽減しつつ層数を増やすことが出来ます。
5.【Feed Forward】全結合層+活性化関数(ReLU)+全結合層の構造です。
6.【Add(残差接続) & Norm(Layer normalization)】
7. 3.~6.を6回繰り返す。(Normの場所を変えて繰り返す回数を増やす研究もあります)
デコーダは以下のような構造になっています。
1.【Embedding層】
2.【Positional Encoding】
3.【Masked Multi-Head Attention(Self-Attention)】未来の情報を参照できないようにするため、入力データの一部をマスクして各言葉同士の関連性を抽出します。
4.【Add(残差接続) & Norm(Layer normalization)】
5.【Multi-Head Attention(SourceTarget-Attention)】エンコーダの出力と4.の出力における各言葉同士の関連性を抽出します。
6.【Add(残差接続) & Norm(Layer normalization)】
7.【Feed Forward】
8.【Add(残差接続) & Norm(Layer normalization)】
9. 3.~8.を6回繰り返す
10.【Linear & Softmax】全結合層で特徴ベクトルを各言葉に変換し、Softmaxで確率を計算します。
データセット
データセットとして京都大学黒橋・河原研究室様の「英語中国語基本文データ」を使用させていただきました(HP内のJEC_basic_sentence_v1-3.zip>JEC_basic_sentence_v1-3.xlsx)。本データセットは日英中の同じ意味の文章を1対1対1で含みます(下記サンプル参照)。本記事では中国語のデータは使用せず、英語⇒日本語の翻訳タスクとして学習を行います。
【URL】英語中国語基本文データ
#0001
  日: Xではないかとつくづく疑問に思う
  英: I often wonder if it might be X.
  中: 难道不会是X吗,我实在是感到怀疑。
#1000
  日: 私はXを視野にしっかり入れています
  英: I put more focus on X.
  中: 我非常重视X。
#2000
  日: 彼がレストランで昼食をとる
  英: He eats lunch at a restaurant.
  中: 他在餐馆吃午饭。
環境
- Google Colaboratory Pro
コード
モジュールのimport
!pip install janome

import matplotlib.pyplot as plt
import pandas as pd
import torch
from torch import nn, Tensor
import torch.nn.functional as F
from torchtext.vocab import vocab
import torchtext.transforms as T
import torch.optim as optim
from torch.utils.data import Dataset, DataLoader
from torchvision import transforms
import numpy as np
import math
import janome
from janome.tokenizer import Tokenizer
import spacy
from collections import Counter
データセットの作成
まずデータフレームとしてxlsxファイルを読み込みます。
df = pd.read_excel("./JEC_basic_sentence_v1-3.xlsx", header = None)
| 日本語 | 英語 |
|---|---|
| Xではないかとつくづく疑問に思う | I often wonder if it might be X. |
| Xがいいなといつも思います | I always think X would be nice. |
| ~省略~ | ~省略~ |
各言語のトークン生成関数を作成します。
#日本語用のトークン変換関数を作成
j_t = Tokenizer()
def j_tokenizer(text):
    return [tok for tok in j_t.tokenize(text, wakati=True)]

#英語用のトークン変換関数を作成
e_t = spacy.load('en_core_web_sm')
def e_tokenizer(text):
    return [tok.text for tok in e_t.tokenizer(text)]

#各文章をトークンに変換
texts = df.iloc[:,0].apply(j_tokenizer)
targets = df.iloc[:,1].apply(e_tokenizer)

print(texts)
| 日本語 |
|---|
| [X, で, は, ない, か, と, つくづく, 疑問, に, 思う] |
| [X, が, いい, な, と, いつも, 思い, ます] |
| ~省略~ |
各言語のトークン数(単語数)をカウントします。
#日本語のトークン数(単語数)をカウント
j_list = []
for i in range(len(texts)):
  j_list.extend(texts[i])
j_counter = Counter()
j_counter.update(j_list)
j_v = vocab(j_counter, specials=(['<unk>', '<pad>', '<bos>', '<eos>']))   #特殊文字の定義
j_v.set_default_index(j_v['<unk>'])

#英語のトークン数(単語数)をカウント
e_list = []
for i in range(len(targets)):
  e_list.extend(targets[i])
e_counter = Counter()
e_counter.update(e_list)
e_v = vocab(e_counter, specials=(['<unk>', '<pad>', '<bos>', '<eos>']))   #特殊文字の定義
e_v.set_default_index(e_v['<unk>'])

enc_vocab_size, dec_vocab_size = len(j_v), len(e_v)
print(enc_vocab_size, dec_vocab_size)   #6446 6072
データセット・データローダーを作成します。自然言語処理のデータセット作成はtorchtextを使うべきですが、今回は動けばよいということで使い慣れたDataset・DataLoaderを使用します。
#各言語ごとに単語数を合わせる必要がある為、1文当たりの単語数を14に指定
j_word_count = 14
e_word_count = 14

j_text_transform = T.Sequential(
  T.VocabTransform(j_v),   #トークンに変換
  T.Truncate(j_word_count),   #14語以上の文章を14語で切る
  T.AddToken(token=j_v['<bos>'], begin=True),   #文頭に'<bos>
  T.AddToken(token=j_v['<eos>'], begin=False),   #文末に'<eos>'を追加
  T.ToTensor(),   #テンソルに変換
  T.PadTransform(j_word_count + 2, j_v['<pad>'])   #14語に満たない文章を'<pad>'で埋めて14語に合わせる
)

e_text_transform = T.Sequential(
  T.VocabTransform(e_v),   #トークンに変換
  T.Truncate(e_word_count),   #14語以上の文章を14語で切る
  T.AddToken(token=e_v['<bos>'], begin=True),   #文頭に'<bos>
  T.AddToken(token=e_v['<eos>'], begin=False),   #文末に'<eos>'を追加
  T.ToTensor(),   #テンソルに変換
  T.PadTransform(e_word_count + 2, e_v['<pad>'])   #14語に満たない文章を'<pad>'で埋めて14語に合わせる
)

class Dataset(Dataset):
  def __init__(
      self,
      df,
      j_text_transform,
      e_text_transform,
      ):

    self.texts = df.iloc[:,0].apply(j_tokenizer)
    self.targets = df.iloc[:,1].apply(e_tokenizer)
    self.j_text_transform = j_text_transform
    self.e_text_transform = e_text_transform

  def max_word(self):
    return len(self.j_v), len(self.e_v)

  def __getitem__(self, i):
    text = self.texts[i]
    text = self.j_text_transform([text]).squeeze()

    target = self.targets[i]
    target = self.e_text_transform([target]).squeeze()

    dec_input = target[:-1]
    dec_target = target[1:]   #右に1つずらす
    data = {"text": text, "dec_input": dec_input, "dec_target": dec_target}
    return data

  def __len__(self):
    return len(self.texts)
データローダーを作成します
BATCH_SIZE = 8

dataset = Dataset(df, j_text_transform, e_text_transform)
data_loader = DataLoader(dataset,
                          batch_size=BATCH_SIZE,
                          num_workers=4,
                          drop_last=True,
                          shuffle=True)

data = next(iter(data_loader))
text, dec_input, target = data["text"], data["dec_input"], data["dec_target"]
print(text[0], dec_input[0], target[0], sep="\n")
実行結果
tensor([   2,  386, 1789,  831,   84, 1790, 1791,  828,   31,   26,  178,   12,
         252, 1772,   83,    3])
tensor([   2,  166, 1775, 2004,   28,   99,  459, 2005,   65,  537,   40, 1801,
        1784,   17,    3])
tensor([ 166, 1775, 2004,   28,   99,  459, 2005,   65,  537,   40, 1801, 1784,
          17,    3,    1])
Transformerの実装
PositionalEncodingのコードはこちらからお借りしております。
class PositionalEncoding(nn.Module):

  def __init__(self, dim, dropout = 0.1, max_len = 5000):
    super().__init__()
    self.dropout = nn.Dropout(p=dropout)
    position = torch.arange(max_len).unsqueeze(1).to(device)
    div_term = torch.exp(torch.arange(0, dim, 2) * (-math.log(10000.0) / dim)).to(device)
    pe = torch.zeros(max_len, 1, dim).to(device)
    pe[:, 0, 0::2] = torch.sin(position * div_term)
    pe[:, 0, 1::2] = torch.cos(position * div_term)
    self.register_buffer('pe', pe)

  def forward(self, x):
    x = x + self.pe[:x.size(0)]
    return self.dropout(x)

class MultiHeadAttention(nn.Module):

  def __init__(self, dim, head_num, dropout = 0.1):
    super().__init__()
    self.dim = dim
    self.head_num = head_num
    self.linear_Q = nn.Linear(dim, dim, bias = False)
    self.linear_K = nn.Linear(dim, dim, bias = False)
    self.linear_V = nn.Linear(dim, dim, bias = False)
    self.linear = nn.Linear(dim, dim, bias = False)
    self.soft = nn.Softmax(dim = 3)
    self.dropout = nn.Dropout(dropout)

  def split_head(self, x):
    x = torch.tensor_split(x, self.head_num, dim = 2)
    x = torch.stack(x, dim = 1)
    return x

  def concat_head(self, x):
    x = torch.tensor_split(x, x.size()[1], dim = 1)
    x = torch.concat(x, dim = 3).squeeze(dim = 1)
    return x

  def forward(self, Q, K, V, mask = None):
    Q = self.linear_Q(Q)   #(BATCH_SIZE,word_count,dim)
    K = self.linear_K(K)
    V = self.linear_V(V)

    Q = self.split_head(Q)   #(BATCH_SIZE,head_num,word_count//head_num,dim)
    K = self.split_head(K)
    V = self.split_head(V)

    QK = torch.matmul(Q, torch.transpose(K, 3, 2))
    QK = QK/((self.dim//self.head_num)**0.5)

    if mask is not None:
      QK = QK + mask

    softmax_QK = self.soft(QK)
    softmax_QK = self.dropout(softmax_QK)

    QKV = torch.matmul(softmax_QK, V)
    QKV = self.concat_head(QKV)
    QKV = self.linear(QKV)
    return QKV

class FeedForward(nn.Module):

  def __init__(self, dim, hidden_dim = 2048, dropout = 0.1):
    super().__init__()
    self.dropout = nn.Dropout(dropout)
    self.linear_1 = nn.Linear(dim, hidden_dim)
    self.relu = nn.ReLU()
    self.linear_2 = nn.Linear(hidden_dim, dim)

  def forward(self, x):
    x = self.linear_1(x)
    x = self.relu(x)
    x = self.dropout(x)
    x = self.linear_2(x)
    return x

class EncoderBlock(nn.Module):

  def __init__(self, dim, head_num, dropout = 0.1):
    super().__init__()
    self.MHA = MultiHeadAttention(dim, head_num)
    self.layer_norm_1 = nn.LayerNorm([dim])
    self.layer_norm_2 = nn.LayerNorm([dim])
    self.FF = FeedForward(dim)
    self.dropout_1 = nn.Dropout(dropout)
    self.dropout_2 = nn.Dropout(dropout)

  def forward(self, x):
    Q = K = V = x
    x = self.MHA(Q, K, V)
    x = self.dropout_1(x)
    x = x + Q
    x = self.layer_norm_1(x)
    _x = x
    x = self.FF(x)
    x = self.dropout_2(x)
    x = x + _x
    x = self.layer_norm_2(x)
    return x

class Encoder(nn.Module):

  def __init__(self, enc_vocab_size, dim, head_num, dropout = 0.1):
    super().__init__()
    self.dim = dim
    self.embed = nn.Embedding(enc_vocab_size, dim)
    self.PE = PositionalEncoding(dim)
    self.dropout = nn.Dropout(dropout)
    self.EncoderBlocks = nn.ModuleList([EncoderBlock(dim, head_num) for _ in range(6)])

  def forward(self, x):
    x = self.embed(x)
    x = x*(self.dim**0.5)
    x = self.PE(x)
    x = self.dropout(x)
    for i in range(6):
      x = self.EncoderBlocks[i](x)
    return x

class DecoderBlock(nn.Module):

  def __init__(self, dim, head_num, dropout = 0.1):
    super().__init__()
    self.MMHA = MultiHeadAttention(dim, head_num)
    self.MHA = MultiHeadAttention(dim, head_num)
    self.layer_norm_1 = nn.LayerNorm([dim])
    self.layer_norm_2 = nn.LayerNorm([dim])
    self.layer_norm_3 = nn.LayerNorm([dim])
    self.FF = FeedForward(dim)
    self.dropout_1 = nn.Dropout(dropout)
    self.dropout_2 = nn.Dropout(dropout)
    self.dropout_3 = nn.Dropout(dropout)

  def forward(self, x, y, mask):
    Q = K = V = x
    x = self.MMHA(Q, K, V, mask)
    x = self.dropout_1(x)
    x = x + Q
    x = self.layer_norm_1(x)
    Q = x
    K = V = y
    x = self.MHA(Q, K, V)
    x = self.dropout_2(x)
    x = x + Q
    x = self.layer_norm_2(x)
    _x = x
    x = self.FF(x)
    x = self.dropout_3(x)
    x = x + _x
    x = self.layer_norm_3(x)
    return x

class Decoder(nn.Module):

  def __init__(self, dec_vocab_size, dim, head_num, dropout = 0.1):
    super().__init__()
    self.dim = dim
    self.embed = nn.Embedding(dec_vocab_size, dim)
    self.PE = PositionalEncoding(dim)
    self.DecoderBlocks = nn.ModuleList([DecoderBlock(dim, head_num) for _ in range(6)])
    self.dropout = nn.Dropout(dropout)
    self.linear = nn.Linear(dim, dec_vocab_size)

  def forward(self, x, y, mask):
    x = self.embed(x)
    x = x*(self.dim**0.5)
    x = self.PE(x)
    x = self.dropout(x)
    for i in range(6):
      x = self.DecoderBlocks[i](x, y, mask)
    x = self.linear(x)   #損失の計算にnn.CrossEntropyLoss()を使用する為、Softmax層を挿入しない
    return x

class Transformer(nn.Module):

  def __init__(self, enc_vocab_size, dec_vocab_size, dim, head_num):
    super().__init__()
    self.encoder = Encoder(enc_vocab_size, dim, head_num)
    self.decoder = Decoder(dec_vocab_size, dim, head_num)

  def forward(self, enc_input, dec_input, mask):
    enc_output = self.encoder(enc_input)
    output = self.decoder(dec_input, enc_output, mask)
    return output
学習
損失関数としてクロスエントロピー、最適化関数としてAdamを使用します。
device = torch.device("cuda:0" if torch.cuda.is_available() else "cpu")
model = Transformer(enc_vocab_size, dec_vocab_size, dim = 512, head_num = 8).to(device)
criterion = nn.CrossEntropyLoss()
optimizer = optim.Adam(model.parameters(), lr=0.0001)

epoch_num = 200
print_coef = 10
train_length = len(dataset)

history = {"train_loss": []}
n = 0
train_loss = 0

for epoch in range(epoch_num):
  model.train()
  for i, data in enumerate(data_loader):
    optimizer.zero_grad()
    text, dec_input, target = data["text"].to(device), data["dec_input"].to(device), data["dec_target"].to(device)
    mask = nn.Transformer.generate_square_subsequent_mask(j_word_count + 1).to(device)   #マスクの作成

    outputs = model(text, dec_input, mask)
    target = nn.functional.one_hot(target, dec_vocab_size).to(torch.float32)

    loss = criterion(outputs, target)
    loss.backward()
    optimizer.step()

    train_loss += loss.item()
    history["train_loss"].append(loss.item())
    n += 1
    if i % ((train_length//BATCH_SIZE)//print_coef) == (train_length//BATCH_SIZE)//print_coef - 1:
      print(f"epoch:{epoch+1}  index:{i+1}  loss:{train_loss/n:.10f}")
      train_loss = 0
      n = 0
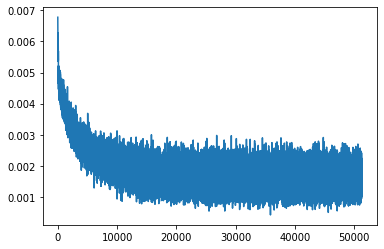
plt.plot(history["train_loss"])

縦軸が損失、横軸がstepを表します。
振動しながら損失が逓減しているため、学習自体は進んでいると思われます。
結果は示しませんが、テストデータで予測を行ったところ、意味不明な文章が出力されました。
pytorchで標準実装されているTransformerで確認しましたが、同じ結果でした。
Transformerは大きなデータセットに対して威力を発揮するモデルなので、本データセットでは十分な学習ができなかったと考えられます。
おまけ(nn.Transformer.generate_square_subsequent_mask())
Transfomerの実装においてマスク生成関数の定義は避けて通れません。
しかし、PytorchにはMasked Multi-Head Attentionのマスクを作成する関数が標準実装されています。
それがnn.Transformer.generate_square_subsequent_mask()です。
この関数は任意の値(n)を引数として、右上三角形を-inf(-∞)とするn*nのテンソルを返します。
コードが簡潔に書けるため、特に自作関数にこだわらない方にはお勧めです。
nn.Transformer.generate_square_subsequent_mask(7)
実行結果
tensor([[0., -inf, -inf, -inf, -inf, -inf, -inf],
        [0., 0., -inf, -inf, -inf, -inf, -inf],
        [0., 0., 0., -inf, -inf, -inf, -inf],
        [0., 0., 0., 0., -inf, -inf, -inf],
        [0., 0., 0., 0., 0., -inf, -inf],
        [0., 0., 0., 0., 0., 0., -inf],
        [0., 0., 0., 0., 0., 0., 0.]])