こちらの続きです
Sampleを使ってみます
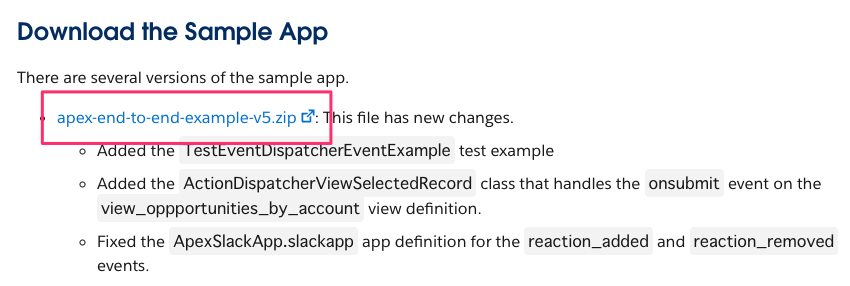
Zipファイルをダウンロード
Download the Sample APPセクションにあるzipファイルをDLして展開します。
DLしたファイルは、1で作成したスクラッチ組織で構わないので(別に作ってももちろん構いません)、フォルダ構造のとおりに配置してください。
sfdx-project.jsonなどの設定ファイルが重複しますが、中身は同じなのでコピペで上書きしてしまって構いません。
配置が終わったら、 sfdx force:source:push コマンドでファイルをpushします。
この際に、足りないファイルなどがある場合はエラーが出ると思います。
Slackアプリを新規作成します
1で作ったアプリを使う事もできるのですが、マージが面倒なので新規に作ったほうが楽でしょう。
貼ってあるマニフェストファイルは、権限設定が若干足りないのと、一部インデントがおかしいのでそのままでは使えません。
整形しておいたものを貼っておきます
_metadata:
    major_version: 1
    minor_version: 1
display_information:
    name: Apex Example App
features:
    app_home:
        home_tab_enabled: true
        messages_tab_enabled: false
        messages_tab_read_only_enabled: false
    bot_user:
        display_name: apex-end-to-end-example-app
        always_online: true
    shortcuts:
        - name: apex create record
          type: message
          callback_id: apex-create-record-message
          description: apex create record global
        - name: apex create record
          type: global
          callback_id: apex-create-record-global
          description: Create a record with Apex
        - name: apex reactions get
          type: message
          callback_id: apex-reactions-get
          description: Retrieve reactions for a message with the ReactionsGet api
    slash_commands:
        - command: /apex-create-record
          url: https://slack-apps.salesforce.com:9443/a/<your-app-ID>
          description: Create a record with Apex
          should_escape: false
        - command: /apex-view-record
          url: https://slack-apps.salesforce.com:9443/a/<your-app-ID>
          description: View a record with Apex
          should_escape: false
        - command: /apex-find-opp-by-account-id
          url: https://slack-apps.salesforce.com:9443/a/<your-app-ID>
          description: view opportunities by accountId
          should_escape: false
oauth_config:
    redirect_urls:
        - https://auth.slack-apps.salesforce.com/slack_oauth_callback/<your-app-ID>
    scopes:
        user:
            - channels:read
        bot:
            - chat:write
            - commands
            - channels:history
            - groups:history
            - im:history
            - reactions:read
            - groups:read
            - channels:read
settings:
    event_subscriptions:
        bot_events:
            - app_home_opened
            - app_uninstalled
            - channel_rename
            - group_rename
            - reaction_added
            - reaction_removed
            - tokens_revoked
        request_url: https://slack-apps.salesforce.com:9443/a/<your-app-ID>
    interactivity:
        is_enabled: true
        message_menu_options_url: https://slack-apps.salesforce.com:9443/a/<your-app-Id>
        request_url: https://slack-apps.salesforce.com:9443/a/<your-app-ID>
    org_deploy_enabled: false
    socket_mode_enabled: false
    token_rotation_enabled: false
作成したら、1と同様にまずワークスペースにインストールしてApp IDを取得しましょう。
App IDが取得できたら、マニフェスト画面に戻り、を置換して保存してください。
App-Level Tokensを作る
こちらも1で説明した手順と同じです。
ApexSlackApp.slackapp-meta.xmlを編集する
slackapps/ApexSlackApp.slackapp-meta.xml
を編集しましょう。
appKey,appToken,clientKey,clientSecret,signingSecretの*を書き換えて保存してpushします。
これで完成ですね。
Slack側からテストしましょう
/apex-view-record
とうつと、Salesforceへの接続手順がスタートします。
ということでここまででインストールは完了です。
アプリで何ができるのか確認していく
アプリのホーム画面を開いた時
こんな表示になります。

シンプルにメッセージを表示しているだけですね。
  app_home_opened:
    action:
        definition: apex__action__EventDispatcherAppHomeOpened
    title: Example event handler for app_home_opened
    description: The event fires when a user opens the home tab.
開いたときのアクションはapex__action__EventDispatcherAppHomeOpened となっていますので、classes/EventDispatcherAppHomeOpened.clsに挙動が書いてあります
/*
    This example apex class is responsible for responding to the App Home "opened" event.
*/
public class EventDispatcherAppHomeOpened extends Slack.EventDispatcher {
    public override Slack.ActionHandler invoke(Slack.EventParameters parameters, Slack.RequestContext context) {
        return Slack.ActionHandler.ack(new Handler(parameters, context));
    }

    public class Handler implements Slack.RunnableHandler {
        Slack.EventParameters parameters;
        Slack.RequestContext context;

        public Handler(Slack.EventParameters parameters, Slack.RequestContext context) {
            this.parameters = parameters;
            this.context = context;
        }

        public void run() {
            // Name must match the DeveloperName of your SlackApp.
            Slack.App app = Slack.App.ApexSlackApp.get();
            Slack.BotClient botClient = app.getBotClientForTeam(context.getTeamId());
            Slack.AppHomeOpenedEvent appHomeOpened = (Slack.AppHomeOpenedEvent) parameters.getEvent();
            String userId = appHomeOpened.getUser();

            Slack.ViewReference viewReference = Slack.View.app_home.get();
            viewReference.setParameter('headerText', 'Welcome to the Apex Slack App Example.');
            viewReference.setParameter('bodyText', 'To see how this custom home view was created, see the EventDispatcherAppHomeOpened apex class.');
            Slack.HomeView homeView = new Slack.HomeView.builder().viewReference(viewReference).build();

            Slack.ViewsPublishRequest req = new Slack.ViewsPublishRequest.builder().userId(userId).view(homeView).build();

            Slack.ViewsPublishResponse response = botClient.viewsPublish(req);
            if (response.getError() != null) {
                System.debug(response.getResponseMetadata().getMessages());
            }
        }
    }
}
アプリホーム画面オープンイベントを受け取ると、このクラスが呼び出されます。
このApexの書き方はバッチ処理の書き方に似てますね。
parameters と context に何が入っているのかを確認していきましょう。
parameters について
12:16:53:048 USER_DEBUG [16]|DEBUG|parameters:
	EventParameters:[
		EVENT_ID_PARAM=eventId,
		EVENT_PARAM=event,
		EVENT_TIME_PARAM=eventTime,
		event=AppHomeOpenedEvent:[
			delegate=AppHomeOpenedEvent(
				type=app_home_opened,
				user=U03K7xxxxxxxx,
				channel=D03xxxxxxxx,
				tab=home,
				eventTs=1657595811.716321,
				view=View(
					id=V03Pxxxxxxx,
					teamId=T0xxxxxx,
					type=home,
					title=ViewTitle(
						type=plain_text,
						text=View Title,
						emoji=true
					),
					submit=null,
					close=null,
					blocks=[
						HeaderBlock(
							type=header,
							blockId=e1=,
							text=PlainTextObject(
								type=plain_text,
								text=Welcome to the Ap
ログが切れてしまったので途中までですが、こんな感じですね。
contextについて
12:16:53:049 USER_DEBUG [17]|DEBUG|
context: RequestContext:[
	actionPayload=null,
	appId=A03P4AW7HK5,
	channelId=null,
	enterpriseId=E0xxxxxxxx,
	formData=null,
	messageContext=null,
	teamId=T0xxxxxxxx,
	triggerId=null,
	userId=null,
	viewContext=null
	]
app_home_opendの場合は返ってくる情報が少ないですね。contextはboltを使った開発に慣れている人であればおなじみのパラメータだと思います。
Handlerで受け取ったパラメータをこの辺でオブジェクトに詰めてます。
            Slack.App app = Slack.App.ApexSlackApp.get();
            Slack.BotClient botClient = app.getBotClientForTeam(context.getTeamId());
            Slack.AppHomeOpenedEvent appHomeOpened = (Slack.AppHomeOpenedEvent) parameters.getEvent();
            String userId = appHomeOpened.getUser();
どうやら、Slack.ViewReference でブロックをビルドする形になるみたいです。
            Slack.ViewReference viewReference = Slack.View.app_home.get();
            viewReference.setParameter('headerText', 'Welcome to the Apex Slack App Example.');
            viewReference.setParameter('bodyText', 'To see how this custom home view was created, see the EventDispatcherAppHomeOpened apex class.');
            Slack.HomeView homeView = new Slack.HomeView.builder().viewReference(viewReference).build();
Blocksが出来たら、それをパブリッシュするためのリクエストを送ります。
            Slack.ViewsPublishRequest req = new Slack.ViewsPublishRequest.builder().userId(userId).view(homeView).build();

            Slack.ViewsPublishResponse response = botClient.viewsPublish(req);
ホーム画面を提供するには、該当ユーザーのuserIdが必要になるのでそれを渡すのと、先程作ったblocksが入っているhomeViewを渡してリクエストを行うことでホーム画面が描画されるという仕組みです。
チャンネル名をリネームしてみる
  channel_rename:
    action:
        definition: apex__action__EventDispatcherEventExample
    title: Example channel rename event
    description: example event that fires when a user renames a channel.
EventDispatcherEventExample.clsを開いてみてみましょう。
少し長めですね。
/*
	This example apex class is responsible for responding to the channel_rename event
*/
public class EventDispatcherEventExample extends Slack.EventDispatcher {
    public override Slack.ActionHandler invoke(Slack.EventParameters parameters, Slack.RequestContext context) {
        return Slack.ActionHandler.ack(new Handler(parameters, context));
    }

    public class Handler implements Slack.RunnableHandler {
        Slack.EventParameters parameters;
        Slack.RequestContext context;

        public Handler(Slack.EventParameters parameters, Slack.RequestContext context) {
            this.parameters = parameters;
            this.context = context;
        }

        public void run() {
            // Name must match the DeveloperName of your SlackApp.
            Slack.App app = Slack.App.ApexSlackApp.get();
            Slack.BotClient botClient = app.getBotClientForTeam(this.context.getTeamId());
            Slack.Event event = this.parameters.getEvent();
            String channelId = '';
            String channelName = '';
            String text = getBaseText(event);

            if (event instanceof Slack.GroupRenameEvent) {
                Slack.GroupRenameEvent groupRenameEvent = (Slack.GroupRenameEvent) event;
                channelId = groupRenameEvent.getChannel().getId();
                channelName = groupRenameEvent.getChannel().getName();
                text += channelName;
            } else if (event instanceof Slack.ChannelRenameEvent) {
                // Group rename will only work if the app is added as an integration to the private channel.
                Slack.ChannelRenameEvent channelRenameEvent = (Slack.ChannelRenameEvent) event;
                channelId = channelRenameEvent.getChannel().getId();
                channelName = channelRenameEvent.getChannel().getName();
                text += channelName;
            } else if (event instanceof Slack.ReactionAddedEvent) {
                Slack.ReactionAddedEvent reactionAddedEvent = (Slack.ReactionAddedEvent) event;
                channelId = reactionAddedEvent.getItem().getChannel();
                text += reactionAddedEvent.getReaction();
            } else if (event instanceof Slack.ReactionRemovedEvent) {
                Slack.ReactionRemovedEvent reactionRemovedEvent = (Slack.ReactionRemovedEvent) event;
                channelId = reactionRemovedEvent.getItem().getChannel();
                text += reactionRemovedEvent.getReaction();
            }

            Slack.ChatPostMessageResponse response = botClient.chatPostMessage(
                Slack.ChatPostMessageRequest.builder().channel(channelId).text(text).build()
            );

            if (response.getError() != null) {
                System.debug(response.getResponseMetadata().getMessages());
            }
        }

        private String getBaseText(Slack.Event event) {
            if (event instanceof Slack.GroupRenameEvent || event instanceof Slack.ChannelRenameEvent) {
                return 'The channel was renamed to: ';
            } else if (event instanceof Slack.ReactionAddedEvent) {
                return 'Reaction added is: ';
            } else if (event instanceof Slack.ReactionRemovedEvent) {
                return 'Reaction removed is: ';
            } else {
                return '';
            }
        }
    }
}
Handlerまでは全く同じです。変わっているのはrunの中身だけですね。
チャンネルリネームに関係するのはこの部分です
            } else if (event instanceof Slack.ChannelRenameEvent) {
                // Group rename will only work if the app is added as an integration to the private channel.
                Slack.ChannelRenameEvent channelRenameEvent = (Slack.ChannelRenameEvent) event;
                channelId = channelRenameEvent.getChannel().getId();
                channelName = channelRenameEvent.getChannel().getName();
                text += channelName;
イベントはそうやって取るのか、という感じですね。
チャンネルIDとチャンネル名を取得して、textに詰めています。
最終的にはメッセージを投稿する関数を呼んで、そこにtextを投げる形になっています。
            Slack.ChatPostMessageResponse response = botClient.chatPostMessage(
                Slack.ChatPostMessageRequest.builder().channel(channelId).text(text).build()
            );

            if (response.getError() != null) {
                System.debug(response.getResponseMetadata().getMessages());
            }
botClient.chatPostMessage この辺はSlackアプリ開発者ならおなじみのAPIですね。
/apex-view-record コマンドの使い方
使い方は以下の通りです
/apex-view-record Account <AccountID>
/apex-view-record Contact <ContactID>
/apex-view-record Opportunity <OpportunityID>
スクラッチ組織にはレコードが存在していないと思うので、適当な商談を作ってみましょう。
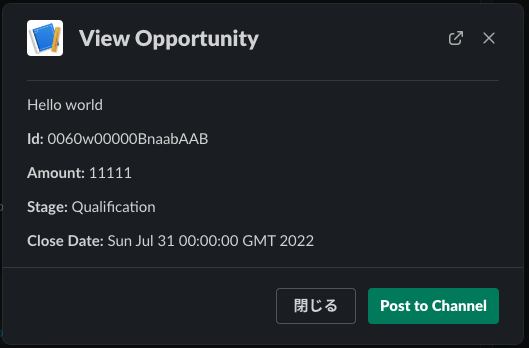
/apex-view-record Opportunity 0060w00000BnaabAAB
とコマンドを打つとこんな風にモーダルが返ってきます。
/*
    This example apex class extends Slack.SlashCommandDispatcher and is responsible for
    responding to the Slack slash command registered with the Slack application.

    This command will open a modal to view record details for Accounts, Contacts, and Opportunities

    sample command:
    /apex-view-record Contact 003xx000004WhrYAAS
    /apex-view-record Account 00Bxx0000029bnsEAA
    /apex-view-record Opportunity 006xx000001a3f5AAA

    If you run the command in a slack channel, you will see the option to post a message with record details there.
*/
public class CommandDispatcherViewRecord extends Slack.SlashCommandDispatcher {
    public override Slack.ActionHandler invoke(Slack.SlashCommandParameters parameters, Slack.RequestContext context) {
        return Slack.ActionHandler.modal(new Handler(parameters, context));
    }

    public class Handler implements Slack.ModalHandler {
        Slack.SlashCommandParameters parameters;
        Slack.RequestContext context;

        public Handler(Slack.SlashCommandParameters parameters, Slack.RequestContext context) {
            this.parameters = parameters;
            this.context = context;
        }

        public Slack.ModalView call() {
            String commandText = this.parameters.getText();
            String[] commandSegments = commandText.split(' ');
            String errMessage = 'The view record command requires 2 arguments: objectApiName and recordId.';
            if (commandSegments.size() < 2) {
                return MessageModal.getMessageModalView('Invalid Parameters', new List<String>{ errMessage });
            }

            String objectApiName = commandSegments[0];
            String recordId = commandSegments[1];

            return viewRecord(objectApiName, recordId);
        }

        private Slack.ModalView viewRecord(String objectApiName, String recordId) {
            String errMessage = 'The objectApiName was not a valid option. The view record command supports Account, Contact, or Opportunity.';
            Slack.ViewReference viewReference;
            switch on objectApiName {
                when 'Account' {
                    viewReference = Slack.View.view_account.get();
                }
                when 'Contact' {
                    viewReference = Slack.View.view_contact.get();
                }
                when 'Opportunity' {
                    viewReference = Slack.View.view_opportunity.get();
                }
                when else {
                    return MessageModal.getMessageModalView('Invalid Object', new List<String>{ errMessage });
                }
            }
            viewReference.setParameter('recordId', recordId);
            viewReference.setParameter('channelId', this.context.getchannelId());
            Slack.ModalView modalView = new Slack.ModalView.builder().viewReference(viewReference).build();
            return modalView;
        }
    }
}
商談の場合は
viewReference = Slack.View.view_opportunity.get();
これが呼ばれているのですが、これが何かというとブロックの定義です。
ブロックの定義は viewdefinitions フォルダに格納されており、view_opportunityは以下の通りです。
description: "View that displays an opportunity"
schema:
  properties:
    title:
      type: string
      defaultValue: "View Opportunity"
    recordId:
      type: string
      required: true
    channelId:
      type: string
      required: false
dataproviders:
  opportunity:
    definition: "apex__DataProviderSObjectRecord.getOpportunityById"
    properties:
      recordId: "{!view.properties.recordId}"
components:
  - definition: modal
    properties:
      title: "{!view.properties.title}"
      submitLabel: "Post to Channel"
    events:
      onsubmit:
        definition: "apex__action__ActionDispatcherPostRecordDetailMessage"
        properties:
          objectApiName: "Opportunity"
          recordId: "{!view.properties.recordId}"
          channelId: "{!view.properties.channelId}"
    components:
      - definition: divider
      - definition: section
        properties:
          text: "{!opportunity.Name}"
      - definition: section
        properties:
          text:
            text: "*Id:* {!opportunity.Id}"
            type: mrkdwn
      - definition: section
        properties:
          text:
            text: "*Amount:* {!opportunity.Amount}"
            type: mrkdwn
      - definition: section
        properties:
          text:
            text: "*Stage:* {!opportunity.StageName}"
            type: mrkdwn
      - definition: section
        properties:
          text:
            text: "*Close Date:* {!opportunity.CloseDate}"
            type: mrkdwn
schemaのpropertiesで変数定義してますね。
            viewReference.setParameter('recordId', recordId);
            viewReference.setParameter('channelId', this.context.getchannelId());
こんな形で渡しているようです。
messageイベントの取り方
classes/EventDispatcherEventExample.cls にこんな形でMessageEventメソッドを呼び出します。
Event Classes詳細はこちらを参照
 else if (event instanceof Slack.MessageEvent) {
                Slack.MessageEvent messageEvent = (Slack.MessageEvent) event;
                channelId = messageEvent.getChannel();
                text += messageEvent.getText();
            }
ApexSlackApp.slackapp に記述を加えます
  message:
    action:
        definition: apex__action__EventDispatcherEventExample
    title: Catch all messages
    description: messages.
こうすることで、チャンネルに投げられたメッセージをそのチャンネルにリポストしてくれるようにすることができるのですが、無限ループになるのでこの実装はやめましょう(笑
クラス関連の詳細はこちらがドキュメント担っているので一通り目を通しておくと実装が楽になると思われます。
アクションがいっぱいあるのですが、それに対応したクラスがかなり定義されています。素晴らしいですね。
トリガーとかバッチ処理から呼び出せるのかな
書き方が不明。どうやるのだろう。
まとめ
- Slack側のイベント関連をトリガーにした処理の書き方の理解が進んだ。なんとかなるような気がする。
- Slackから活動報告をSalesforceに投稿するためのアプリを提供中なのだが、それのリプレースが可能になるかもしれない。(もちろんパッケージ化が必要になるので、そのへんの知見が必要になるけど)
- 逆に、Salesforce側を起点としたSlackへの投稿方法が分からなかった。サンプルに、トリガやバッチ処理の場合の書き方が入ってくれると嬉しい
関連リンク
続きはコチラ


