目的
3か月ほど前からIntel社のD435という赤外線カメラを使っています。
せっかく3次元座標を手軽に取得できるで、何かしらの3次元トラッキングシステムを作りたくなりました。
ということで作りました。
D435とは?
詳しくは公式サイトなどを見てください。Depthデータを最大で90fpsで取得できるどえらいカメラです。KinectV2の3倍です。
Intel® RealSense™ Depth Camera D435 - Click Intel
Dlib
pythonで使えるdeep learningのパッケージです。
今回はその中でも「顔の特徴点68点座標」を取得できる機能を使いました。
これをするときはshape_predictor_68_face_landmarks.datをダウンロードしてください
そのほかにも色々できるみたいです。
- Qiita 機械学習のライブラリ dlib
環境
windows10、JupyterNotebook
pyrealsense2
pip install pyrealsense2
これでrealsenseのモジュールはインストールできる。
Dlibは色々とめんどくさかったので仮想環境つくって以下の方法で入れました。
Easy Installation of dlib python in Windows
コード
realsenseのストリーム再生時に顔認識をするだけです。
ストリーム設定
ざっくりと書いておきます
config = rs.config()
# 録画ファイルから再生
config.enable_device_from_file('##.bag')
# 録画フィルを作成
config.enable_record_to_file('##.bag')
# 用途に合わせてどちらかを選択、両方オフにすると映像を流すだけ

# ストリーム時の縦横の解像度、fpsを指定。colorとdepthは違う解像度でもいい
config.enable_stream(rs.stream.color, width, height, rs.format.bgr8, fps)
config.enable_stream(rs.stream.depth, width, height, rs.format.z16, fps)

# Alignオブジェクト生成。これをしないとcolorとdepthで画角がずれる
align_to = rs.stream.color
align = rs.align(align_to)

# ストリーミング開始
pipeline = rs.pipeline()
profile = pipeline.start(config)
ストリーム
try:
    while (True):
        # フレーム待ち(Color & Depth)
        frames = pipeline.wait_for_frames()
        # 画角を合わせたフレームからカラー・デプスを取得
        aligned_frames = align.process(frames)
        color_frame = aligned_frames.get_color_frame()
        depth_frame = aligned_frames.get_depth_frame()

        # フィルター処理
        depth_frame = decimate.process(depth_frame)
        depth_frame = depth_to_disparity.process(depth_frame)
        depth_frame = spatial.process(depth_frame)
        depth_frame = temporal.process(depth_frame)
        depth_frame = disparity_to_depth.process(depth_frame)
        depth_frame = hole_filling.process(depth_frame)

        if not depth_frame or not color_frame:
            continue

        # デプスにカラー処理
        depth_color_frame = rs.colorizer().colorize(depth_frame)

        # 画像の配列化
        depth_image = np.asanyarray(depth_color_frame.get_data())
        color_image = np.asanyarray(color_frame.get_data())

        # 表示
        cv2.namedWindow('ColorImage', cv2.WINDOW_NORMAL)
        cv2.imshow('ColorImage', color_image)
        cv2.namedWindow('DepthImage', cv2.WINDOW_NORMAL)
        cv2.imshow('DepthImage', depth_image)

        #qを押すとストリーム停止
        key = cv2.waitKey(1)&0xff
        if key == ord('q'):
            break

finally:
    pipeline.stop()
    cv2.destroyAllWindows()
Depthデータのフィルター処理ですが、再生前にざっくりと設定する必要があります。
今回の設定はDocumentationから推奨されている値にしています。
また、今回は高accuracyモードを適応してます。こっちはあってもなくてもあんまり変わらないです。
フィルターについてはIntelのドキュメンテーションに解説があります。
depth_filters.ipynb
class AppState:
    def __init__(self, *args, **kwargs):
        self.WIN_NAME = 'RealSense'
        self.pitch, self.yaw = math.radians(-10), math.radians(-15)
        self.translation = np.array([0, 0, -1], dtype=np.float32)
        self.distance = 2
        self.prev_mouse = 0, 0
        self.mouse_btns = [False, False, False]
        self.paused = False
        self.decimate = 1
        self.scale = True
        self.color = True

    def reset(self):
        self.pitch, self.yaw, self.distance = 0, 0, 2
        self.translation[:] = 0, 0, -1

    @property
    def rotation(self):
        Rx, _ = cv2.Rodrigues((self.pitch, 0, 0))
        Ry, _ = cv2.Rodrigues((0, self.yaw, 0))
        return np.dot(Ry, Rx).astype(np.float32)

    @property
    def pivot(self):
        return self.translation + np.array((0, 0, self.distance), dtype=np.float32)

# filter設定
state = AppState()
decimate = rs.decimation_filter()
decimate.set_option(rs.option.filter_magnitude, 1 ** state.decimate)
depth_to_disparity = rs.disparity_transform(True)
disparity_to_depth = rs.disparity_transform(False)
spatial = rs.spatial_filter()
spatial.set_option(rs.option.filter_smooth_alpha, 0.6)
spatial.set_option(rs.option.filter_smooth_delta, 8)
temporal = rs.temporal_filter()
temporal.set_option(rs.option.filter_smooth_alpha, 0.5)
temporal.set_option(rs.option.filter_smooth_delta, 20)
hole_filling = rs.hole_filling_filter()
顔認識
以下の記事を参考にさせていただきました。
今回はリアルタイム処理を目指さないので顔検出・顔特徴点検出両方にDlibを使います。
流れとして、
1.colorで顔領域を検出
2.顔領域の中から顔特徴点68個の座標(x, y)を検出
3.color(x, y)に対応するdeprh(z)を抽出
4.68x3の座標をpandas.dataframeに入れていく
ていう感じです。
pyrealsense2で(x, y)に対応するzを指定するときは以下の方法でします
z = depth.get_distance(x, y)
このとき、Alignしておかないとcolorとdepthの座標が一致しません。
以下顔認識メインコードです
# 顔領域検出器
face_detector = dlib.get_frontal_face_detector()
# 顔器官検出器
face_parts_detector =
dlib.shape_predictor("C:/Users/SCL/Desktop/shape_predictor_68_face_landmarks.dat")
# colorフレームをグレー化
frame_gs = cv2.cvtColor(color_image, cv2.COLOR_RGB2GRAY)
# Dlibの機能で顔領域検出
faces = face_detector(frame_gs)
# 顔が検出されたとき
if len(faces) == 1:
    # 顔の大きさを取得
    face = faces[0]
    # 顔を四角形で囲む
    cv2.rectangle(color_image, (face.left(), face.top()), (face.right(), face.bottom()), (255, 0, 0), 2)
    # 顔特徴点の検出
    face_parts = face_parts_detector(frame_gs, face)
    face_parts = face_utils.shape_to_np(face_parts)
    # 顔特徴点座標検出のため
    parts = face_parts_detector(frame_gs, face).parts()
    # 顔特徴点68点をループで回す
    for i, ((x, y)) in enumerate(face_parts[:]):
        # 顔特徴点68点に〇を表示
        cv2.circle(color_image, (x, y), 1, (0, 255, 0), -1)
        # 顔特徴点68点に番号を表示
        cv2.putText(color_image, str(i), (x + 2, y - 2), cv2.FONT_HERSHEY_SIMPLEX, 0.3, (0, 255, 0), 1)
        # 顔特徴点の座標(x, y)を検出
        parts_x, parts_y = parts[i].x, parts[i].y
        # x, y座標からzを取得
        parts_z = depth.get_distance(parts_x, parts_y)
        # 顔特徴点の座標(x, y)をlist化
        parts_x_list.append(parts_x)
        parts_y_list.append(parts_y)
        parts_z_list.append(parts_z)

    # 顔特徴点の座標(x, y,z)をDataFrame化
    tmp_x_se = pd.Series( parts_x_list, index=coord_x_df.columns)
    tmp_y_se = pd.Series( parts_y_list, index=coord_y_df.columns)
    tmp_z_se = pd.Series( parts_z_list, index=coord_z_df.columns)
    coord_x_df = coord_x_df.append( tmp_x_se, ignore_index=True )
    coord_y_df = coord_y_df.append( tmp_y_se, ignore_index=True )
    coord_z_df = coord_z_df.append( tmp_z_se, ignore_index=True )
座標をDataframeに入れていってます。
今回はめんどくさかったのでx, y, zを別々のDataframeに入れてます。なので[n, 68]*3です。
一緒に入れて [n, 204] の形にしてあげたほうがCSVで出すときに便利だと思います。
このとき、逐次Datframeに行を追加していく作業にかなり苦戦しました。
以下の記事がとても参考になりました。
本番
以上のコードを組み合わせると顔の3次元座標が撮れます。
僕は処理にかかる時間が知りたかったり一定時間で終わって欲しかったりするので
その辺のコードが書いてあります
あと、基本的にポスト処理しかしなかったので画像の表示とかはしてません。
import os,sys
import cv2
import dlib
from imutils import face_utils
import pyrealsense2 as rs
import math
import numpy as np
import pandas as pd
from pandas import DataFrame
import datetime
from datetime import datetime

face_detector = dlib.get_frontal_face_detector()
face_parts_detector = dlib.shape_predictor("./shape_predictor_68_face_landmarks.dat")

class AppState:
    def __init__(self, *args, **kwargs):
        self.WIN_NAME = 'RealSense'
        self.pitch, self.yaw = math.radians(-10), math.radians(-15)
        self.translation = np.array([0, 0, -1], dtype=np.float32)
        self.distance = 2
        self.prev_mouse = 0, 0
        self.mouse_btns = [False, False, False]
        self.paused = False
        self.decimate = 1
        self.scale = True
        self.color = True

    def reset(self):
        self.pitch, self.yaw, self.distance = 0, 0, 2
        self.translation[:] = 0, 0, -1

    @property
    def rotation(self):
        Rx, _ = cv2.Rodrigues((self.pitch, 0, 0))
        Ry, _ = cv2.Rodrigues((0, self.yaw, 0))
        return np.dot(Ry, Rx).astype(np.float32)

    @property
    def pivot(self):
        return self.translation + np.array((0, 0, self.distance), dtype=np.float32)

# filter設定
state = AppState()
decimate = rs.decimation_filter()
decimate.set_option(rs.option.filter_magnitude, 1 ** state.decimate)
depth_to_disparity = rs.disparity_transform(True)
disparity_to_depth = rs.disparity_transform(False)
spatial = rs.spatial_filter()
spatial.set_option(rs.option.filter_smooth_alpha, 0.6)
spatial.set_option(rs.option.filter_smooth_delta, 8)
temporal = rs.temporal_filter()
temporal.set_option(rs.option.filter_smooth_alpha, 0.5)
temporal.set_option(rs.option.filter_smooth_delta, 20)
hole_filling = rs.hole_filling_filter()

# 空Data_Frameの作成
name_list = []
for i in range (68):
    name = str(i)
    name_list.append(name)

src = '##.bag'
fps = 30
width = 1280
height = 720

frame_count = 0
parts_x_list = []
parts_y_list = []
parts_z_list = []

coord_x_df = pd.DataFrame( columns = name_list )
coord_y_df = pd.DataFrame( columns = name_list )
coord_z_df = pd.DataFrame( columns = name_list )

config = rs.config()
# 再生 or 保存、streamのみの場合は無効
config.enable_device_from_file(src)
# config.enable_record_to_file('##')

# 動画関係準備
config.enable_stream(rs.stream.color, width, height, rs.format.bgr8, fps)
config.enable_stream(rs.stream.depth, width, height, rs.format.z16, fps)

# Alignオブジェクト生成
align_to = rs.stream.color
align = rs.align(align_to)

# ストリーミング開始
pipeline = rs.pipeline()
profile = pipeline.start(config)
print(datetime.now().strftime("%H:%M:%S") + "-- Start" )
try:
    while (True):
        # 空行列の作成
        parts_x_list = []
        parts_y_list = []
        parts_z_list = []

        # フレーム待ち(Color & Depth)
        frames = pipeline.wait_for_frames()
        # 画角を合わせたフレームからカラー・デプスを取得
        aligned_frames = align.process(frames)
        color_frame = aligned_frames.get_color_frame()
        depth_frame = aligned_frames.get_depth_frame()

        # フィルター処理
        depth_frame = decimate.process(depth_frame)
        depth_frame = depth_to_disparity.process(depth_frame)
        depth_frame = spatial.process(depth_frame)
        depth_frame = temporal.process(depth_frame)
        depth_frame = disparity_to_depth.process(depth_frame)
        depth_frame = hole_filling.process(depth_frame)

        if not depth_frame or not color_frame:
            continue

        depth = frames.get_depth_frame()
        # デプスにカラー処理
        depth_color_frame = rs.colorizer().colorize(depth_frame)
        # 画像の配列化
        depth_image = np.asanyarray(depth_color_frame.get_data())
        color_image = np.asanyarray(color_frame.get_data())

        # 顔認識の実行
        frame_gs = cv2.cvtColor(color_image, cv2.COLOR_RGB2GRAY)
        faces = face_detector(frame_gs)
        # 顔が検出されたとき
        if len(faces) == 1:
            # 顔の大きさを取得
            face = faces[0]
            # 顔を四角形で囲む
            cv2.rectangle(color_image, (face.left(), face.top()), (face.right(), face.bottom()), (255, 0, 0), 2)
            # 顔特徴点の検出
            face_parts = face_parts_detector(frame_gs, face)
            face_parts = face_utils.shape_to_np(face_parts)
            # 顔特徴点座標検出のため
            parts = face_parts_detector(frame_gs, face).parts()
            # 顔特徴点68点をループで回す
            for i, ((x, y)) in enumerate(face_parts[:]):
                # 顔特徴点68点に〇を表示
                cv2.circle(color_image, (x, y), 1, (0, 255, 0), -1)
                # 顔特徴点68点に番号を表示
                #cv2.putText(color_image, str(i), (x + 2, y - 2), cv2.FONT_HERSHEY_SIMPLEX, 0.3, (0, 255, 0), 1)
                # 顔特徴点の座標(x, y)を検出
                parts_x, parts_y = parts[i].x, parts[i].y
                # x, y座標からzを取得
                parts_z = depth.get_distance(parts_x, parts_y)
                # 顔特徴点の座標(x, y)をlist化
                parts_x_list.append(parts_x)
                parts_y_list.append(parts_y)
                parts_z_list.append(parts_z)

            # 顔特徴点の座標(x, y,z)をDataFrame化
            tmp_x_se = pd.Series( parts_x_list, index=coord_x_df.columns)
            tmp_y_se = pd.Series( parts_y_list, index=coord_y_df.columns)
            tmp_z_se = pd.Series( parts_z_list, index=coord_z_df.columns)
            coord_x_df = coord_x_df.append( tmp_x_se, ignore_index=True )
            coord_y_df = coord_y_df.append( tmp_y_se, ignore_index=True )
            coord_z_df = coord_z_df.append( tmp_z_se, ignore_index=True )

        # 表示
        #cv2.namedWindow('ColorImage', cv2.WINDOW_NORMAL)
        #cv2.imshow('ColorImage', color_image)
        #cv2.namedWindow('DepthImage', cv2.WINDOW_NORMAL)
        #cv2.imshow('DepthImage', depth_image)

        # フレーム毎に+1カウント
        frame_count += 1
        """
        key = cv2.waitKey(1)&0xff
        if key == ord('q'):
            break
        """
        if frame_count == 300:
            break
finally:
    pipeline.stop()
    cv2.destroyAllWindows()
    print(datetime.now().strftime("%H:%M:%S") + "-- Finish" )
実長換算
無事に3次元座標をとれました。
なので可視化しました。
import numpy as np
import matplotlib.pyplot as plt
from matplotlib import animation
from mpl_toolkits.mplot3d import Axes3D

fig = plt.figure()
ax = Axes3D(fig)
i = 50
x = coord_x_df.iloc[i,:]
y = coord_y_df.iloc[i,:]
z = coord_z_df.iloc[i,:]

ax.plot(x, z, -(y), marker="o", linestyle='None')

# 軸ラベルの設定
ax.set_xlabel("X-axis")
ax.set_ylabel("Y-axis")
ax.set_zlabel("Z-axis")

plt.title("Face")
plt.axis('equal')
plt.show()

ほとんど平面ですね。
(x, y)がpixel、zのみ実長(m)だからです。単位があってません。
なので、カメラ座標系を変換する必要があります。
今回は僕の目頭から目頭の距離を0.04mと定義して実長換算しました。
まず、僕の目頭間の距離は不変です。
なので、目頭間ベクトルのノルムは常に0.04(m)となるはずです。
右目頭をA、左目頭をBとします。
A-Bのノルムが0.04となる定数rを見つければいいのです。
式で書くと、
sqrt( (r^2)(Xa-Xb)^2 + (r^2)(Xa-Xb)^2 + (Za-Zb)^2) = (0.04)^2
のはずです。
rの解をsympyで解かせ、listに格納していきます。
多少のずれはあるで、平均値をR_meanをとります。
そしてrをx, yに掛けます。zはそのまんまです。
これで3軸の単位が合います。
from sympy import *
r=Symbol('r', positive=True)
Rs = np.array([])
for i  in range(len(coord_x_df)):
    Xa, Ya, Za = coord_x_df.iloc[i, 39], coord_y_df.iloc[i, 39], coord_z_df.iloc[i, 39]
    Xb, Yb, Zb = coord_x_df.iloc[i, 42], coord_y_df.iloc[i, 42], coord_z_df.iloc[i, 42]
    expr = sqrt( (r**2)*(Xa-Xb)**2 + (r**2)*(Xa-Xb)**2 + (Za-Zb)**2) - 0.04
    R = np.array([solve(expr)])
    #R = float(R)
    Rs = np.append(Rs, R)

R_mean = np.mean(Rs)

dist_x_df = coord_x_df * R_mean
dist_y_df = coord_y_df * R_mean
dist_z_df = coord_z_df
可視化
実長換算した(x, y, z)を可視化してみましょう。
fig = plt.figure()
# ax = Axes3D(fig)
ax = fig.add_subplot(111, projection='3d')
ax.set_aspect('equal')

# 単位をmからmmに変換
i = 200
x = np.array((dist_x_df.iloc[i, :])*1000)
y = np.array((dist_y_df.iloc[i, :])*1000)
z = np.array((dist_z_df.iloc[i, :])*1000)

# 処理を軽くするため整数化
x = np.round(x.astype(np.double))
y = np.round(y.astype(np.double))
z = np.round(z.astype(np.double))

ax.plot(x, y, z, marker="o",linestyle='None')

# 軸ラベルの設定
ax.set_xlabel("X-axis")
ax.set_ylabel("Y-axis")
ax.set_zlabel("Z-axis")
ax.set_zlim(400, 800)

plt.title("Face")
plt.show()
意外と立体的ですね。
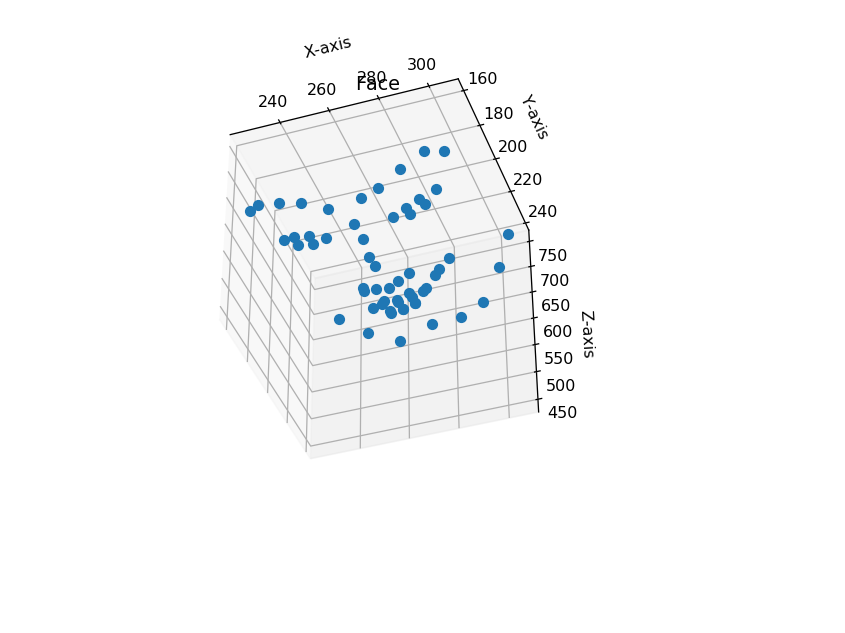
しかし、赤外線の誤差が大きいようでz軸はところどころ飛んでいます。
とくに顎の輪郭は(x, y)が1pixelでもずれると首まで落ち込みます。
最後に
顔の3次元トラッキングシステムができたわけですが、まるで使い道が思いつきません。
基本的に顔の情報って顔認証でもない限り2次元でいいのでは?って思います。
時間があれば何かしらに利用してみようと思います。