本稿では、KerasベースのSeq2Seq(Sequence to Sequence)モデルによるチャットボットを、LSTM(Long short-term memory)単層のアーキテクチャで作成し、Google Colaboratory上で動作させてみます。
1. はじめに
本稿はSeq2SeqをKerasで構築し、チャットボットの作成を目指す投稿の2回目です。前回の投稿で、訓練データを準備しましたので、今回は単層LSTMのSeq2Seqニューラルネットワークを構築して、訓練と応答文生成を行います。
2. 本稿のゴール
以下のとおりです。
- ニューラルネットワーク(単層LSTM)の構築と、訓練
- 応答文生成
なお、本稿の前提となる動作環境は、冒頭でも触れたとおり、Google Colaboratoryです。
ただし、Google Colaboratoryでは、TensorflowやKerasのバージョンが知らないうちに上がっていることがあるので、注意が必要です。本稿が前提とするTensorflowおよびKerasのバージョンは以下のとおりです。
- Tensorflow: 2.3.0
- Keras: 2.4.3
3. Google Colaboratory上でのJuman++環境構築
3−1. Juman++のインストール
まず、Google Driveの適当な場所に、Juman++のアーカイブファイルを置きます。今回はv2.0.0rcをインストールしましたので、以下、それに合わせた手順になっています。
次にGoogle Colaboratoryの新規ノートブックをオープンし、セル内でcdコマンドを実行して、アーカイブファイルの置き場に移動します。手順はこちらの記事を参考にさせていただきました。
Google Driveは/content/drive/My Drive配下にマウントされています。なお、他のコマンドもすべて、セル内で実行します。
%cd /content/drive/My Drive/アーカイブファイルの置き場
アーカイブファイルを解凍します。
!tar xvf jumanpp-2.0.0-rc2.tar.xz
jumanpp-2.0.0-rc2というフォルダができていますので、そこに遷移し、さらにビルド用のフォルダbuildを作成して、そこに遷移します。
%cd jumanpp-2.0.0-rc2/
%mkdir build
%cd build/
cmakeを実行します。インストール先は/usr/localを指定してあります。
!cmake .. -DCMAKE_BUILD_TYPE=Release -DCMAKE_INSTALL_PREFIX=/usr/local
makeを実行します。
!make
インストールします。
!sudo make install
これでJuman++のインストールが出来ました。動作確認してみます。
!echo "覚書として記載しておきます。" | jumanpp
覚書 おぼえがき 覚書 名詞 6 普通名詞 1 * 0 * 0 "代表表記:覚え書き/おぼえがき カテゴリ:人工物-その他"
と と と 助詞 9 格助詞 1 * 0 * 0 NIL
して して する 動詞 2 * 0 サ変動詞 16 タ系連用テ形 14 "代表表記:する/する 自他動詞:自:成る/なる 付属動詞候補(基本)"
記載 きさい 記載 名詞 6 サ変名詞 2 * 0 * 0 "代表表記:記載/きさい カテゴリ:抽象物"
して して する 動詞 2 * 0 サ変動詞 16 タ系連用テ形 14 "代表表記:する/する 自他動詞:自:成る/なる 付属動詞候補(基本)"
おき おき おく 接尾辞 14 動詞性接尾辞 7 子音動詞カ行 2 基本連用形 8 "代表表記:おく/おく"
ます ます ます 接尾辞 14 動詞性接尾辞 7 動詞性接尾辞ます型 31 基本形 2 "代表表記:ます/ます"
。 。 。 特殊 1 句点 1 * 0 * 0 NIL
EOS
3−2. pyknpのインストール
pythonからJuman++を利用するためのパッケージpyknpをインストールします。これは普通にpipでインストールできます。
!pip install pyknp
動作確認してみます。
from pyknp import Juman
jumanpp = Juman()
result = jumanpp.analysis("国境の長いトンネルを抜けると雪国だった。")
for mrph in result.mrph_list() :
  print(mrph.midasi)
国境
の
長い
トンネル
を
抜ける
と
雪国
だった
。
3−3. 実行ファイルのセーブとロード
せっかくインストールしたJuman++ですが、Google Colaboratoryのランタイムが終了すると、チャラになってしまいます。
そこで、こちらのページを参考に、Juman++の実行ファイルをGoogle Driveに退避し、改めてGoogle Colaboratoryを利用する際に、退避先から書き戻すことにします。
退避先への実行ファイルコピー手順は、以下のとおりです。Juman++をGoogle Colaboratory実行環境にインストールした時に、1度だけ実行します。
!cp -rf /usr/local/bin/jumanpp 退避先/juman/bin/
!cp -rf /usr/local/libexec/jumanpp 退避先/juman/libexec/
退避先からGoogle Colaboratory実行環境への書き戻し手順は、以下のとおりです。notobookごとに実行が必要なようなので、Juman++を使用するnotebookの先頭で実行します。
%cd /content/drive/My Drive/退避先
!cp -rvf ./juman/bin/jumanpp /usr/local/bin/
%mkdir /usr/local/libexec/
!cp -rvf ./juman/libexec/jumanpp /usr/local/libexec/
!chmod 755 /usr/local/bin/jumanpp
!chmod 755 /usr/local/libexec/jumanpp/jumandic.config
!chmod 755 /usr/local/libexec/jumanpp/jumandic.jppmdl
!ls -l /usr/local/bin/jumanpp
!ls -l /usr/local/libexec/jumanpp/*
!pip install pyknp
4. Google Colaboratoryのその他の設定
4−1. インデントの設定
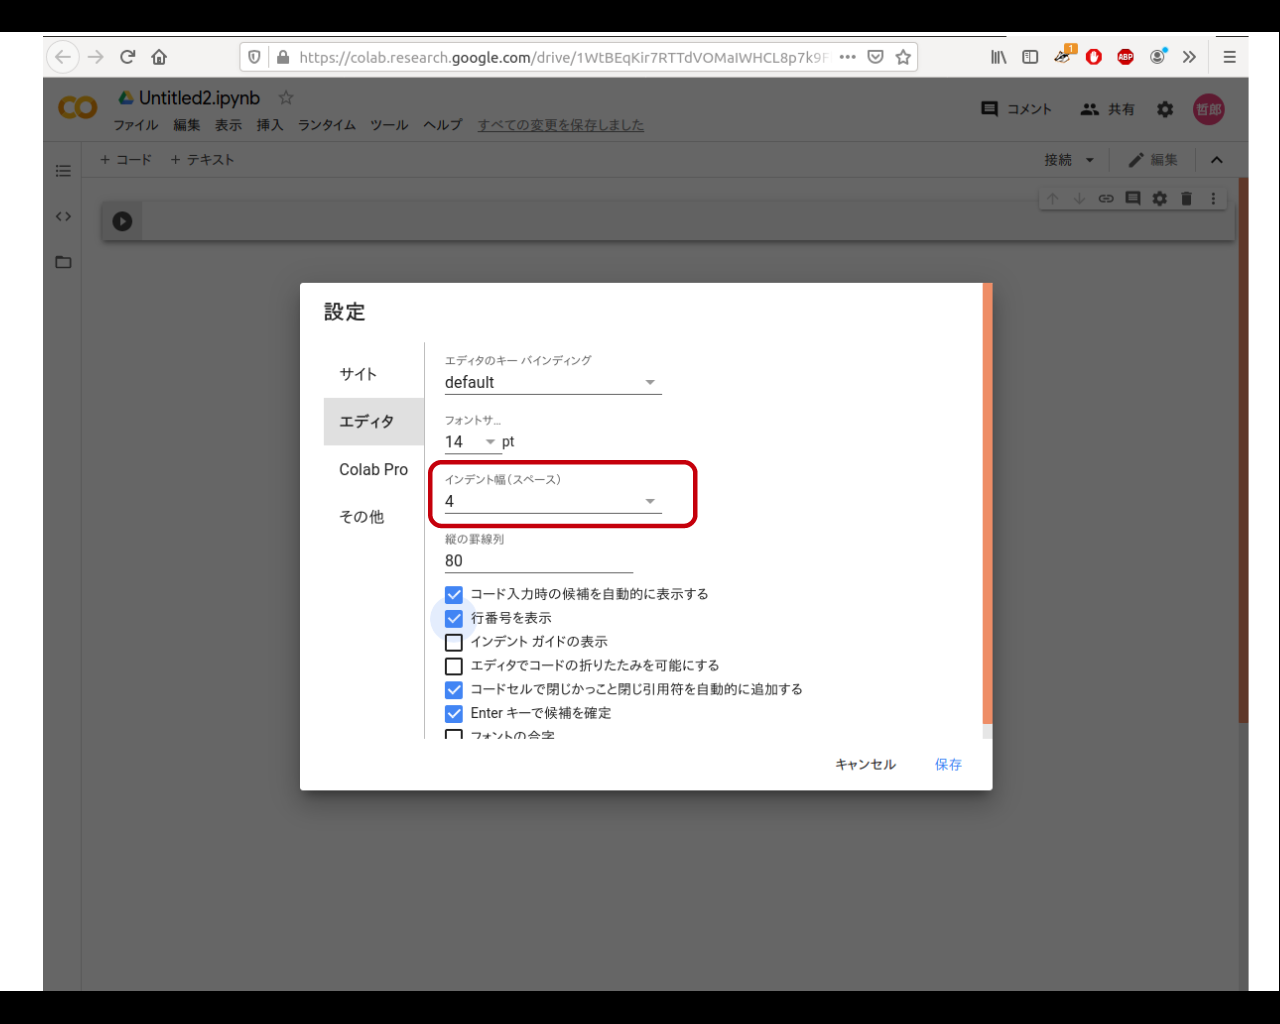
デフォルトではコードのインデントが2カラムなので、これを4に変更します。
Google Colaboratory画面の右上の歯車アイコンをクリックすると、設定画面が開きます。そこで「エディタ」メニューを選択すると、インデント設定画面が現れるので、「4」を設定します。
4−2. GPU設定
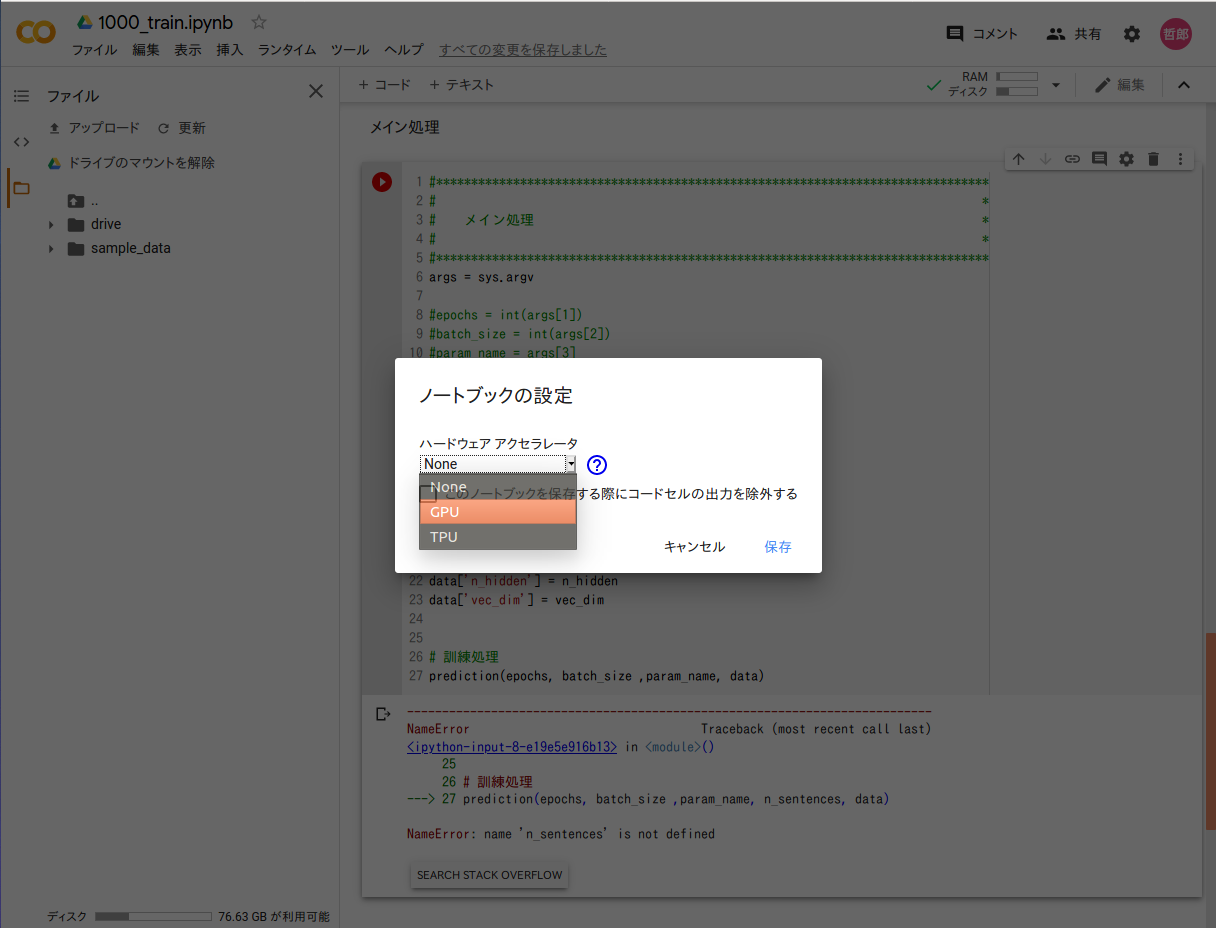
notebook実行にあたって、GPUが使えるようにします。Google Colaboratory画面の上の方にある「ランタイム」タブをクリックし、「ランタイムのタイプを変更」を選択します。「ノートブックの設定」画面が現れるので、ハードウェアアクセラレータの種別を「GPU」に変えます。
これだけで、GPUが使えるようになります。自前のPCでGPUが使えるようにするためにはえらく苦労したので、実に画期的です。
なお、この設定もnotebookごとです。
5. ニューラルネットワーク構築
5−1. ソースコード
Keras : Ex-Tutorials : Seq2Seq 学習へのイントロを参考に、コードを組んでみました。
作成したソースコードは、以下の3ファイルです。
| ファイル名 | 説明 |
|---|---|
| class_dialog.py | ニューラルネットワークのクラス定義 |
| 1000_train.ipynb | 訓練実行処理 |
| 2000_response.ipynb | 応答文章生成処理 |
ノートブック形式の1000_train.ipynbを実行すると、ニューラルネットワークの訓練が始まります。2000_response.ipynbを実行すると、入力文章に対する応答文の生成を、対話形式で行うことが出来ます。これらの2ファイルは、好きな名称を付与して構いません。
class_dialog.pyはこれらのプログラムからimportされることで動作します。これ単独で動かすことはありません。
また、前回の投稿で作成した以下のファイルを、class_dialog.pyと同じGoogle Driveのフォルダに格納しておいてください。
| ファイル名 | 説明 |
|---|---|
| d.pickle | 訓練データ(デコーダーインプット) |
| e.pickle | 訓練データ(エンコーダーインプット) |
| t.pickle | ラベルデータ |
| indices_word.pickle | インデックス→単語変換辞書 |
| word_indices.pickle | 単語→インデックス変換辞書 |
| maxlen.pickle | 系列長 |
| words.pickle | 単語一覧 |
5-1-1. ニューラルネットワーク定義クラス(class_dialog.py)
ニューラルネットワークを定義したプログラムファイルです。
クリックして表示
# coding: utf-8
from keras.layers.core import Dense
from keras.layers.core import Masking
from keras.layers.core import Activation
from keras.layers.core import Dropout
from keras.layers import Input
from keras.layers import Lambda
from keras.layers import Multiply
from keras.layers import Maximum
from keras.layers import Concatenate
from keras.layers import Add
from keras.layers import Reshape
from keras.models import Model
from keras.layers.recurrent import SimpleRNN
from keras.layers.recurrent import LSTM
from keras.layers.embeddings import Embedding
from keras.layers.normalization import BatchNormalization
from keras.initializers import glorot_uniform
# from keras.initializers import uniform
from keras.initializers import orthogonal
from keras.initializers import TruncatedNormal
from keras.initializers import Ones
from keras import regularizers
from keras import backend as K
from keras.utils import np_utils
from keras.utils import plot_model
from keras.constraints import max_norm
from keras.constraints import unit_norm
import tensorflow as tf
from tensorflow.data import Dataset
import numpy as np
import csv
import random
import numpy.random as nr
import keras
import sys
import math
import pickle
import time
import glob
import gc
import os
# TF2.Xになったので、eager modeが必要になった
tf.config.experimental_run_functions_eagerly(True)
class Color:
BLACK = '\033[30m'
RED = '\033[31m'
GREEN = '\033[38;5;10m'
YELLOW = '\033[33m'
BLUE = '\033[34m'
PURPLE = '\033[35m'
CYAN = '\033[38;5;14m'
WHITE = '\033[37m'
END = '\033[0m'
BOLD = '\038[1m'
UNDERLINE = '\033[4m'
INVISIBLE = '\033[08m'
REVERCE = '\033[07m'
# *******************************************************************************
# *
# レイヤークラス定義 *
# *
# *******************************************************************************
class Layer_LSTM :
def __init__(self, reg_lambda=0.01, seed=20170719):
self.seed = seed
self.reg_lambda = reg_lambda
def create_LSTM(self, lstm_units,
lstm_return_state=False, lstm_return_sequences=False,
lstm_go_backwards=False, lstm_name='LSTM') :
layer = LSTM(lstm_units, name=lstm_name ,
return_state=lstm_return_state,
return_sequences=lstm_return_sequences,
recurrent_activation='sigmoid',
go_backwards=lstm_go_backwards,
recurrent_regularizer=regularizers.l2(self.reg_lambda) ,
kernel_regularizer=regularizers.l2(self.reg_lambda) ,
kernel_initializer=glorot_uniform(seed=self.seed),
recurrent_initializer=orthogonal(gain=1.0, seed=self.seed),
bias_initializer=Ones(),
dropout=0.0, recurrent_dropout=0.0
)
return layer
class Layer_Dense :
def __init__(self, reg_lambda=0.01, seed=20170719):
self.seed = seed
self.reg_lambda = reg_lambda
def create_Dense(self,
dense_units, dense_activation=None, dense_name='Dense'):
if dense_activation==None :
act_reg = None
else :
act_reg = regularizers.l1(self.reg_lambda)
layer = Dense(dense_units, name=dense_name,
activation=dense_activation,
kernel_initializer=glorot_uniform(seed=self.seed),
kernel_regularizer=regularizers.l2(self.reg_lambda) ,
bias_regularizer=regularizers.l2(self.reg_lambda) ,
activity_regularizer=act_reg,
)
return layer
class Layer_BatchNorm :
def __init__(self, max_value=2, reg_lambda=0.01):
self.max_value = max_value
self.reg_lambda = reg_lambda
def create_BatchNorm(self, bn_name='BatchNorm'):
layer = BatchNormalization(axis=-1,
name=bn_name,
beta_regularizer=regularizers.l2(self.reg_lambda) ,
gamma_regularizer=regularizers.l2(self.reg_lambda) ,
beta_constraint=max_norm(max_value=self.max_value, axis=0),
gamma_constraint=max_norm(max_value=self.max_value, axis=0)
)
return layer
# *******************************************************************************
# *
# ニューラルネットワーククラス定義 *
# *
# *******************************************************************************
class Dialog :
def __init__(self, maxlen_e, maxlen_d, n_hidden,
input_dim, vec_dim, output_dim):
self.n_hidden = n_hidden
self.maxlen_e = maxlen_e
self.maxlen_d = maxlen_d
self.input_dim = input_dim
self.vec_dim = vec_dim
self.output_dim = output_dim
#***************************************************************************
# *
# ニューラルネットワーク定義 *
# *
#***************************************************************************
def create_model(self):
len_norm = 2 # constraintの最大ノルム長
r_lambda = 0.0001 # regularizerのラムダ
#***********************************************************************
# *
# レイヤクラス生成 *
# *
#***********************************************************************
class_Dense = Layer_Dense(reg_lambda=r_lambda)
class_LSTM = Layer_LSTM(reg_lambda=r_lambda)
class_BatchNorm = Layer_BatchNorm(max_value=len_norm,
reg_lambda=r_lambda)
print('#3')
#***********************************************************************
# *
# エンコーダー(学習/応答文作成兼用) *
# *
#***********************************************************************
#---------------------------------------------------------
#レイヤー定義
#---------------------------------------------------------
embedding = Embedding(output_dim=self.vec_dim, input_dim=self.input_dim,
mask_zero=True, name='Embedding',
# embeddings_initializer=uniform(seed=20170719),
embeddings_regularizer=regularizers.l2(r_lambda),
)
input_mask = Masking(mask_value=0, name="input_Mask")
encoder_BatchNorm \
= class_BatchNorm.create_BatchNorm(bn_name='encoder_BatchNorm')
encoder_LSTM = class_LSTM.create_LSTM(self.n_hidden,
lstm_return_state=True,
lstm_name='encoder_LSTM')
#---------------------------------------------------------
# 入力定義
#---------------------------------------------------------
encoder_input = Input(shape=(self.maxlen_e,),
dtype='int32',
name='encorder_input')
e_input = input_mask(encoder_input)
e_input = embedding(e_input)
e_input = encoder_BatchNorm(e_input)
#---------------------------------------------------------
# メイン処理
#---------------------------------------------------------
encoder_outputs, \
encoder_state_h, \
encoder_state_c = encoder_LSTM(e_input)
#---------------------------------------------------------
# エンコーダモデル定義
#---------------------------------------------------------
encoder_model = Model(inputs=encoder_input,
outputs=[encoder_outputs,
encoder_state_h,
encoder_state_c
])
print('#4')
#***********************************************************************
# デコーダー(学習用) *
# デコーダを、完全な出力シークエンスを返し、内部状態もまた返すように *
# 設定します。 *
# 訓練モデルではreturn_sequencesを使用しませんが、推論では使用します。 *
#***********************************************************************
#=======================================================================
#レイヤー定義
#=======================================================================
#---------------------------------------------------------
# デコーダー入力Batch Normalization
#---------------------------------------------------------
decoder_BatchNorm \
= class_BatchNorm.create_BatchNorm(bn_name='decoder_BatchNorm')
#---------------------------------------------------------
# デコーダーLSTM
#---------------------------------------------------------
decoder_LSTM = class_LSTM.create_LSTM(self.n_hidden,
lstm_return_state=True,
lstm_return_sequences=True,
lstm_name='decode_LSTM')
#---------------------------------------------------------
# 全結合
#---------------------------------------------------------
decoder_Dense = class_Dense.create_Dense(self.output_dim,
dense_activation='softmax',
dense_name='decoder_Dense')
#=======================================================================
# 関数定義
#=======================================================================
#--------------------------------------------------------
# decoderメイン処理
#--------------------------------------------------------
def decoder_main(d_i, encoder_states) :
# LSTM
d_outputs, \
decoder_state_h, \
decoder_state_c = decoder_LSTM(d_i, initial_state=encoder_states)
# 全結合
decoder_outputs = decoder_Dense(d_outputs)
return decoder_outputs, decoder_state_h, decoder_state_c
#=======================================================================
# 手続き部
#=======================================================================
#---------------------------------------------------------
#入力定義
#---------------------------------------------------------
decoder_inputs = Input(shape=(self.maxlen_d,),
dtype='int32', name='decoder_inputs')
d_i = Masking(mask_value=0)(decoder_inputs)
d_i = embedding(d_i)
d_i = decoder_BatchNorm(d_i)
d_input = d_i # 応答文生成で使う
#-----------------------------------------------------
# decoder処理実行
#-----------------------------------------------------
encoder_states = [encoder_state_h, encoder_state_c]
d_out, _, _ = decoder_main(d_i, encoder_states)
# マスク処理
mask = Lambda(lambda x: K.sign(x))(decoder_inputs)
mask = Lambda(lambda x: K.cast(x,dtype='float32'))(mask)
mask = Reshape((self.maxlen_d,1))(mask)
mask = Lambda(lambda x: K.repeat_elements(x, self.output_dim, -1))(mask)
decoder_outputs = Multiply()([d_out, mask])
#=======================================================================
# 損失関数、評価関数とモデル定義
#=======================================================================
#---------------------------------------------------------
# 損失関数
#---------------------------------------------------------
def cross_loss(y_true, y_pred) :
perp_mask = K.sign((y_pred))
perp_mask = perp_mask[:, :, 0]
#print(perp_mask.numpy()[0, :])
sum_mask = K.sum(perp_mask, axis=-1, keepdims= True)
#print('perp_mask1',K.int_shape(perp_mask))
epsilons = 1 / 2 * y_pred + K.epsilon()
cliped = K.maximum(y_pred, epsilons)
log_pred = -K.log(cliped)
cross_e = y_true * log_pred
cross_e = K.sum(cross_e, axis=-1)
masked_entropy = perp_mask * cross_e
sum_entropy = K.sum(masked_entropy, axis=-1, keepdims= True)
celoss = sum_entropy / sum_mask
#print('celoss',K.int_shape(celoss))
return K.mean(celoss)
#---------------------------------------------------------
# perplexity
#---------------------------------------------------------
def get_perplexity(y_true, y_pred) :
perp_mask = K.sign((y_pred))
perp_mask = perp_mask[:, :, 0]
sum_mask = K.sum(perp_mask, axis=-1, keepdims= True)
epsilons = 1 / 2 * y_pred + K.epsilon()
cliped = K.maximum(y_pred, epsilons)
log_pred = -K.log(cliped)
cross_e = y_true * log_pred
cross_e = K.sum(cross_e, axis=-1)
masked_entropy = perp_mask * cross_e
sum_entropy = K.sum(masked_entropy, axis=-1, keepdims= True)
perplexity = sum_entropy / sum_mask
perplexity = K.exp(perplexity)
#perplexity = K.repeat(perplexity , self.maxlen_d)
return K.mean(perplexity)
#---------------------------------------------------------
# 評価関数
#---------------------------------------------------------
def get_accuracy(y_true, y_pred) :
perp_mask = K.sign((y_pred))
perp_mask = perp_mask[:, :, 0]
perp_mask = K.cast(perp_mask,dtype='int32')
y_pred_argmax = K.argmax(y_pred, axis=-1)
y_true_argmax = K.argmax(y_true, axis=-1)
n_correct = K.abs(y_true_argmax - y_pred_argmax)
n_correct = K.sign(n_correct)
n_correct = K.ones_like(n_correct, dtype='int64') - n_correct
n_correct = K.cast(n_correct, dtype='int32')
n_correct = n_correct * perp_mask
n_correct = K.cast(K.sum(n_correct, axis=-1, keepdims= True),
dtype='float32')
n_total = K.cast(K.sum(perp_mask,axis=-1, keepdims= True),
dtype='float32')
accuracy = n_correct / n_total
#print('accuracy',K.int_shape(accuracy))
return K.mean(accuracy)
#---------------------------------------------------------
# モデル定義、コンパイル
#---------------------------------------------------------
model = Model(inputs=[encoder_input, decoder_inputs],
outputs=decoder_outputs)
model.compile(loss=cross_loss,
optimizer="Adam", metrics=[get_perplexity, get_accuracy])
#***********************************************************************
# *
# デコーダー(応答文作成) *
# *
#***********************************************************************
print('#6')
#---------------------------------------------------------
#入力定義
#---------------------------------------------------------
decoder_input_state_h = Input(shape=(self.n_hidden,),
name='decoder_input_state_h')
decoder_input_state_c = Input(shape=(self.n_hidden,),
name='decoder_input_state_c')
#---------------------------------------------------------
# デコーダー実行
#---------------------------------------------------------
decoder_input_state = [decoder_input_state_h, decoder_input_state_c]
res_decoder_outputs, \
res_decoder_state_h, \
res_decoder_state_c = decoder_main(d_input, decoder_input_state)
print('#7')
#---------------------------------------------------------
# モデル定義
#---------------------------------------------------------
decoder_model = Model(inputs= [decoder_inputs,
decoder_input_state_h,
decoder_input_state_c],
outputs=[res_decoder_outputs,
res_decoder_state_h,
res_decoder_state_c] )
return model, encoder_model, decoder_model
#***********************************************************************
# *
# 学習 *
# *
#***********************************************************************
def train(self, e_input, d_input, target,
batch_size, epochs, emb_param) :
print ('#2',target.shape)
model ,encoder_model , decoder_model = self.create_model()
if os.path.isfile(emb_param) :
model.load_weights(emb_param) #埋め込みパラメータセット
# ネットワーク図出力
plot_model(model, show_shapes=True,to_file='model.png')
plot_model(encoder_model, show_shapes=True,
to_file='encoder_model.png')
plot_model(decoder_model, show_shapes=True,
to_file='decoder_model.png')
print ('#8 number of params :', model.count_params())
#===================================================================
# train on batch
#===================================================================
loss_bk = 10000
perplexity_bk = 10000
accuracy_bk = 0
patience = 0
# tensorflow2だとmetrics_nameが空なのでコメントアウト
#print(Color.CYAN,model.metrics_names[0]+" "
# +model.metrics_names[1]+" "
# +model.metrics_names[2] ,
# Color.END)
for j in range(0,epochs) :
print(Color.CYAN,"Epoch ",j+1,"/",epochs,Color.END)
loss, \
perplexity, \
accuracy = self.on_batch(model,
e_input, d_input, target,
batch_size, emb_param)
#-----------------------------------------------------
# EarlyStopping
#-----------------------------------------------------
if j == 0 or (loss <= loss_bk and
perplexity <= perplexity_bk and
accuracy >= accuracy_bk):
loss_bk = loss
perplexity_bk = perplexity
accuracy_bk = accuracy
patience = 0
elif patience < 1 :
patience += 1
else :
print('EarlyStopping')
break
return model
#***********************************************************************
# *
# train_on_batch処理 *
# *
#***********************************************************************
def on_batch(self, model, e_input, d_input, target,
batch_size, emb_param) :
n_split = int(d_input.shape[0]*0.1)
e_val = e_input[:n_split,:]
d_val = d_input[:n_split,:]
t_val = target[:n_split,:]
e_train = e_input[n_split:,:]
d_train = d_input[n_split:,:]
t_train = target[n_split:,:]
params = {'model' : model,
'batch_size': batch_size,
'emb_param' : emb_param }
_, _, _ = self.train_test_main('train',
e_train, d_train, t_train, params)
model.save_weights(emb_param)
return self.eval_perplexity(model, e_val, d_val, t_val, batch_size)
#***********************************************************************
# *
# perplexity計算 *
# *
#***********************************************************************
def eval_perplexity(self, model, e_test, d_test, t_test, batch_size) :
params = {'model' : model,
'save_model': '',
'batch_size': batch_size,
'emb_param' : '' }
return self.train_test_main('test', e_test, d_test, t_test, params)
#***********************************************************************
# *
# 訓練/テストメイン計算 *
# *
#***********************************************************************
def train_test_main(self, kind, e_train, d_train, t_train, params) :
model = params['model']
batch_size = params['batch_size']
emb_param = params['emb_param']
#損失関数、評価関数の平均計算用リスト
list_loss = []
list_perplexity =[]
list_accuracy =[]
s_time = time.time()
row=d_train.shape[0]
dataset_on_batch \
= Dataset.from_tensor_slices((e_train,
d_train,
t_train)).batch(batch_size)
for i, (e_on_batch,
d_on_batch,
t_on_batch) in enumerate(dataset_on_batch) :
e = min([(i+1) * batch_size,row])
t_on_batch = np_utils.to_categorical(t_on_batch,
self.output_dim)
if kind == 'train' :
result = model.train_on_batch([e_on_batch, d_on_batch],
t_on_batch)
else :
result = model.test_on_batch([e_on_batch, d_on_batch],
t_on_batch)
list_loss.append(result[0])
list_perplexity.append(result[1])
list_accuracy.append(result[2])
elapsed_time = time.time() - s_time
if i % 100 == 0 :
sys.stdout.write("\r"
+" "
+" "
+" "
+" "
+" "
+" "
)
sys.stdout.flush()
if kind == 'train' :
ctl_color = Color.CYAN
else :
ctl_color = Color.GREEN
sys.stdout.write(ctl_color
+ "\r"+str(e)+"/"+str(row)+" "
+ str(int(elapsed_time))+"s "+"\t"
+ "{0:.4f}".format(np.average(list_loss)) + "\t"
+ "{0:.4f}".format(np.average(list_perplexity)) + "\t"
+ "{0:.4f}".format(np.average(list_accuracy))
+ Color.END)
sys.stdout.flush()
if i % 100 == 99 and kind == 'train':
model.save_weights(emb_param)
del e_on_batch, d_on_batch, t_on_batch
print()
return np.average(list_loss), \
np.average(list_perplexity), \
np.average(list_accuracy)
5-1-2. 訓練実行処理(1000_train.ipynb)
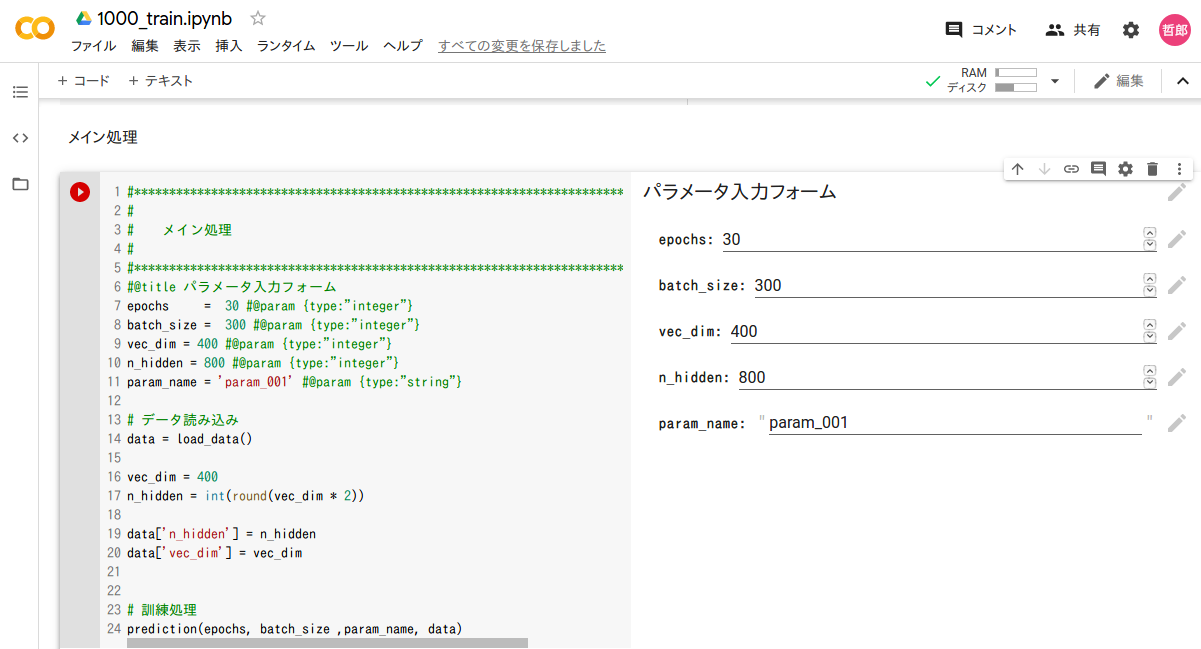
訓練実行処理です。ノートブック形式で、複数のcellで構成されています。
先頭のcdコマンドで、ニューラルネットワーククラス定義や訓練データ等の格納フォルダ(筆者の例ではgooglecofab/002_seq2seq_single_layer)に遷移します。
クリックして表示
%cd /content/drive/My Drive/GoogleColab/002_seq2seq_single_layer

from class_dialog import Dialog

import numpy as np
import csv
import random
import numpy.random as nr
import sys
import math
import time
import pickle
import gc
import os

import codecs
# *******************************************************************************
#                                                                              *
#    訓練データ、ラベルデータ等をロードする                                    *
#                                                                              *
# *******************************************************************************
def load_data() :
    #単語ファイルロード
    with open('words.pickle', 'rb') as ff :
        words=pickle.load(ff)

    #Encoder Inputデータをロード
    with open('e.pickle', 'rb') as f :
        e = pickle.load(f)

    #Decoder Inputデータをロード
    with open('d.pickle', 'rb') as g :
        d = pickle.load(g)

    #ラベルデータをロード
    with open('t.pickle', 'rb') as h :
        t = pickle.load(h)

    #maxlenロード
    with open('maxlen.pickle', 'rb') as maxlen :
        [maxlen_e, maxlen_d] = pickle.load(maxlen)

    row = e.shape[0]

    e = e.reshape((row, maxlen_e))
    d = d.reshape((row, maxlen_d))
    t = t.reshape((row, maxlen_d))

    data = {
            'e'           :e,
            'd'           :d,
            't'           :t,
            'maxlen_e'    :maxlen_e,
            'maxlen_d'    :maxlen_d,
            'input_dim'   : len(words),
            'output_dim'  : len(words)
            }
    return data
# *******************************************************************************
#                                                                              *
#    訓練処理                                                                  *
#                                                                              *
# *******************************************************************************
def prediction(epochs, batch_size , param_name, data) :
    maxlen_e     = data['maxlen_e']
    maxlen_d     = data['maxlen_d']
    e            = data['e']
    d            = data['d']
    t            = data['t']
    n_hidden     = data['n_hidden']
    input_dim    = data['input_dim']
    vec_dim      = data['vec_dim']
    output_dim   = data['output_dim']
    data_row     = e.shape[0]                  # 訓練データの行数
    n_split      = int(data_row*0.9)           # データの分割比率
    # データを訓練用とテスト用に分割
    e_train, e_test = np.vsplit(e,[n_split])   #エンコーダインプット分割
    d_train, d_test = np.vsplit(d,[n_split])   #デコーダインプット分割
    t_train, t_test = np.vsplit(t,[n_split])   #ラベルデータ分割
    # ニューラルネットワークインスタンス生成
    prediction = Dialog(maxlen_e, maxlen_d, n_hidden,
                        input_dim, vec_dim, output_dim)

    emb_param = param_name+'.hdf5'
    # 訓練
    model = prediction.train(e_train, d_train, t_train,
                             batch_size, epochs, emb_param)

    print()
    # テスト
    celoss, \
    perplexity,\
    accuracy = prediction.eval_perplexity(model,
                                          e_test, d_test, t_test, batch_size)
    print('loss =',celoss, perplexity, accuracy)
# *******************************************************************************
#                                                                              *
#    メイン処理                                                                *
#                                                                              *
# *******************************************************************************
# @title パラメータ入力フォーム
epochs     =  30 #@param {type:"integer"}
batch_size =  100 #@param {type:"integer"}
vec_dim = 400 #@param {type:"integer"}
n_hidden = 800 #@param {type:"integer"}
param_name = 'param_001' #@param {type:"string"}

# データ読み込み
data = load_data()

vec_dim = 400
n_hidden = int(round(vec_dim * 2))

data['n_hidden'] = n_hidden
data['vec_dim'] = vec_dim


# 訓練処理
prediction(epochs, batch_size ,param_name, data)
5-1-3. 応答文章生成処理(2000_response.ipynb)
応答文章生成処理です。訓練実行処理と同様にノートブック形式で、複数のcellで構成されています。
1つ目のcellは、3-3節に記述した、Juman++実行ファイルロード等の処理です。
2つ目のcellの先頭のcdコマンドで、ニューラルネットワーククラス定義や訓練データ等の格納フォルダ(筆者の例ではgooglecofab/002_seq2seq_single_layer)に遷移します。
クリックして表示
%cd /content/drive/My Drive/GoogleColab
!cp -rvf ./juman/bin/jumanpp /usr/local/bin/
%mkdir /usr/local/libexec/
!cp -rvf ./juman/libexec/jumanpp /usr/local/libexec/
!chmod 755 /usr/local/bin/jumanpp
!chmod 755 /usr/local/libexec/jumanpp/jumandic.config
!chmod 755 /usr/local/libexec/jumanpp/jumandic.jppmdl
!ls -l /usr/local/bin/jumanpp
!ls -l /usr/local/libexec/jumanpp/*
!pip install pyknp
%cd /content/drive/My Drive/GoogleColab/002_seq2seq_single_layer
# *******************************************************************************
#                                                                              *
#   import宣言                                                                 *
#                                                                              *
# *******************************************************************************

from __future__ import print_function
from class_dialog import Dialog

import numpy as np
import csv
import random
import numpy.random as nr
import sys
import math
import time
import pickle
import gc
import os

from keras.utils import plot_model
# sys.path.append("/home/ishigaki/pyknp-0.3")
from pyknp import Juman
import codecs
# *******************************************************************************
#                                                                              *
#   辞書ファイル等ロード                                                       *
#                                                                              *
# *******************************************************************************
def load_data() :

    #辞書をロード
    with open('word_indices.pickle', 'rb') as f :
        word_indices=pickle.load(f)         #単語をキーにインデックス検索

    with open('indices_word.pickle', 'rb') as g :
        indices_word=pickle.load(g)         #インデックスをキーに単語を検索

    #単語ファイルロード
    with open('words.pickle', 'rb') as ff :
        words=pickle.load(ff)

    #maxlenロード
    with open('maxlen.pickle', 'rb') as maxlen :
        [maxlen_e, maxlen_d] = pickle.load(maxlen)

    data = {'words'       :words,
            'indices_word':indices_word,
            'word_indices':word_indices ,
            'maxlen_e'    :maxlen_e,
            'maxlen_d'    :maxlen_d,
            'input_dim'   :len(words),
            'output_dim'  :len(words)
            }

    return data
# *******************************************************************************
#                                                                              *
#   モデル初期化                                                               *
#                                                                              *
# *******************************************************************************
def initialize_models(param_file, data) :
    maxlen_e = data['maxlen_e']
    maxlen_d = data['maxlen_d']
    n_hidden   = data['n_hidden']
    input_dim  = data['input_dim']
    vec_dim    = data['vec_dim']
    output_dim = data['output_dim']

    gen_context = Dialog(maxlen_e, 1, n_hidden, input_dim, vec_dim, output_dim)
    m, encoder_m , decoder_m = gen_context.create_model()
    #param_file1 = 'param_0'+'{0:0>2d}'.format(i)+'.hdf5'
    m.load_weights(param_file)

    return m, encoder_m, decoder_m
# *******************************************************************************
#                                                                              *
#   入力文の品詞分解とインデックス化                                           *
#                                                                              *
# *******************************************************************************
def encode_request(cns_input, data) :
    maxlen_e      = data['maxlen_e']
    maxlen_d      = data['maxlen_d']
    word_indices  = data['word_indices']
    words         = data['words']
    encoder_model = data['encoder_model']

    # Use Juman++ in subprocess mode
    jumanpp = Juman()
    result = jumanpp.analysis(cns_input)
    input_text=[]
    for mrph in result.mrph_list():
        input_text.append(mrph.midasi)

    mat_input=np.array(input_text)

    #入力データe_inputに入力文の単語インデックスを設定
    e_input=np.zeros((1,maxlen_e))
    for i in range(0,len(mat_input)) :
        if mat_input[i] in words :
            e_input[0,i] = word_indices[mat_input[i]]
        else :
            e_input[0,i] = word_indices['UNK']

    return e_input
# *******************************************************************************
#                                                                              *
#   応答文組み立て                                                             *
#                                                                              *
# *******************************************************************************

def generate_response(e_input, data) :
    maxlen_e      = data['maxlen_e']
    maxlen_d      = data['maxlen_d']
    n_hidden      = data['n_hidden']
    output_dim    = data['output_dim']
    indices_word  = data['indices_word']
    word_indices  = data['word_indices']
    words         = data['words']
    encoder_model = data['encoder_model']
    decoder_model = data['decoder_model']

    # Encode the input as state vectors.
    encoder_outputs, \
    encoder_state_h, \
    encoder_state_c = encoder_model.predict(e_input)
    decoder_input_state_h  = encoder_state_h
    decoder_input_state_c  = encoder_state_c

    decoded_sentence = ''
    target_seq = np.zeros((1,1) ,dtype='int32')
    # Populate the first character of target sequence with the start character.
    target_seq[0,  0] = word_indices['SSSS']

    # 応答文字予測
    for i in range(0,maxlen_d) :
        do, d_s1, d_s2 = decoder_model.predict([target_seq,
                                                 decoder_input_state_h,
                                                 decoder_input_state_c ])

        # 予測単語の出現頻度算出
        sampled_token_index = np.argmax(do[0, 0, :])
        #予測単語
        sampled_char = indices_word[sampled_token_index]
        # Exit condition: find stop character.
        if sampled_char == 'SSSS' :
            break
        decoded_sentence += sampled_char

        # Update the target sequence (of length 1).
        if i == maxlen_d-1:
            break
        target_seq[0,0] = sampled_token_index

        # 次段向け値設定
        decoder_input_state_h = d_s1
        decoder_input_state_c = d_s2

    return decoded_sentence
# *******************************************************************************
#                                                                              *
#   メイン処理                                                                 *
#                                                                              *
# *******************************************************************************

# @title パラメータファイル名入力フォーム
vec_dim = 400 #@param {type:"integer"}
n_hidden = 800 #@param {type:"integer"}
param = 'param_001' #@param {type:"string"}
param = param  + '.hdf5'                                   # 出力文章数

# データロード
data = load_data()

vec_dim = 400
n_hidden = int(round(vec_dim * 2))
data['n_hidden'] = n_hidden
data['vec_dim'] = vec_dim

# モデル初期化
model, encoder_model ,decoder_model = initialize_models(param , data)

data['encoder_model'] = encoder_model
data['decoder_model'] = decoder_model

sys.stdin = codecs.getreader('utf_8')(sys.stdin)
# maxlen_e = data['maxlen_e']
n_hidden = data['n_hidden']
while True:
    cns_input = input(">> ")
    if cns_input == "q":
        print("終了")
        break
    #--------------------------------------------------------------*
    # 入力文の品詞分解とインデックス化                             *
    #--------------------------------------------------------------*
    e_input = encode_request(cns_input, data)
    #print(e_input)
    #--------------------------------------------------------------*
    # 応答文組み立て                                               *
    #--------------------------------------------------------------*
    decoded_sentence = generate_response(e_input, data)
    cns_input    = decoded_sentence
    print(cns_input)
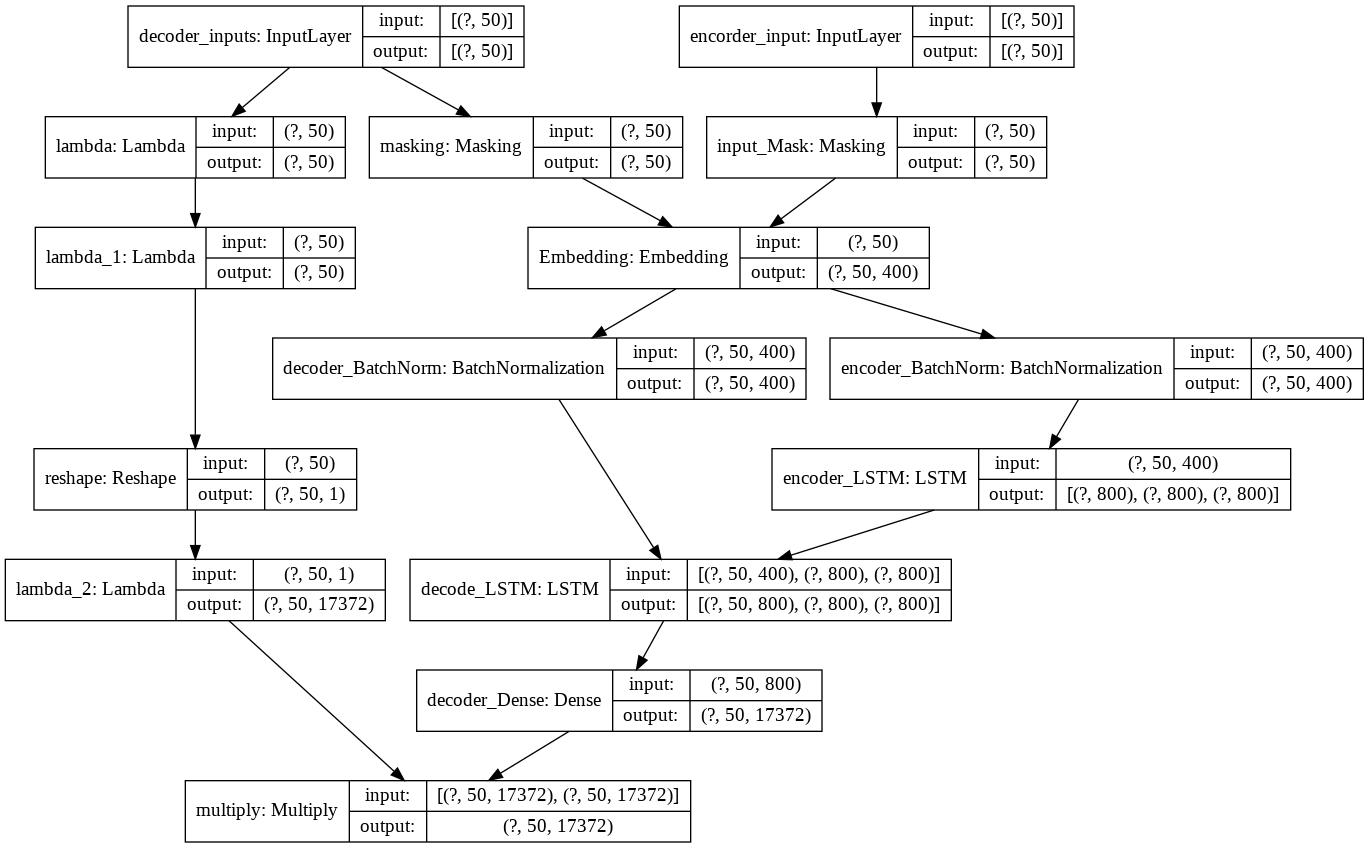
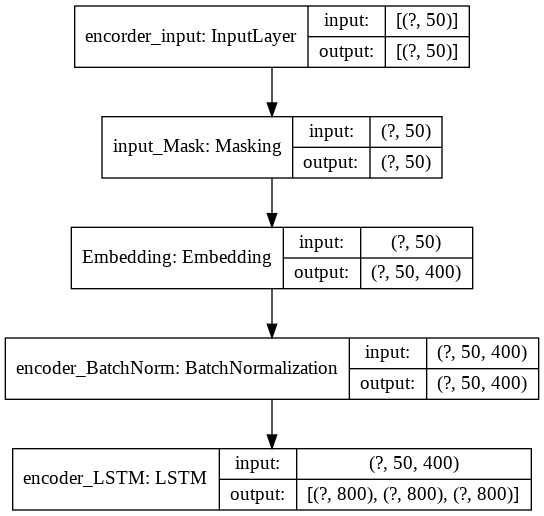
5−2. ネットワーク図
訓練用ニューラルネットワークです。
応答文生成用エンコーダーです。
応答文生成用デコーダーです。
5−3. ソースコードの説明
5-1-1項のニューラルネットワーク定義(class_dialog.py)、および5-1-3項の応答文章生成処理(2000_response.ipynb)について、以下にコードの補足説明をします。
5-3-1. 重みの共有
Seq2Seqは訓練用ニューラルネットワークと、推論用(応答文生成用)ニューラルネットワークが別物なので、何らかの方法で訓練結果の重みを応答文生成用ニューラルネットワークに反映させる必要が有ります。
今回の実装では、レイヤーの定義を含めた、ニューラルネットワーク自体を共通化することで、訓練用の重みをロードしたら、それが自動的に応答文生成用ニューラルネットワークに反映されるようにしました。
なお、レイヤー定義でseedを指定していますが、これは実行時のランダム要素をなるべく排除して、ソースを修正、再実行したときの効果を確認しやすくするためです。
5-3-2. Train on Batch
普通にfitを使って学習を進めようとしましたが、メモリ不足に陥ってしまったので、train_on_batchを使用することにしました。train_on_batchを使って、Kerasの外でミニバッチ制御を行うことによって、メモリが節約できます。
以下の通りです。class_dialog.pyの最後の方にある、「train_test_main」メソッドの中にあります。
    #***********************************************************************
    #                                                                      *
    # 訓練/テストメイン計算                                               *
    #                                                                      *
    #***********************************************************************
    def train_test_main(self, kind, e_train, d_train, t_train, params) :
        model      = params['model']
        batch_size = params['batch_size']
        emb_param  = params['emb_param']
        #損失関数、評価関数の平均計算用リスト
        list_loss = []
        list_perplexity =[]
        list_accuracy =[]

        s_time = time.time()
        row=d_train.shape[0]
        dataset_on_batch \
        = Dataset.from_tensor_slices((e_train,
                                      d_train,
                                      t_train)).batch(batch_size)
        for i, (e_on_batch,
                d_on_batch,
                t_on_batch) in enumerate(dataset_on_batch) :

            e = min([(i+1) * batch_size,row])
            t_on_batch = np_utils.to_categorical(t_on_batch,
                                                 self.output_dim)
            if kind == 'train' :
                result = model.train_on_batch([e_on_batch, d_on_batch],
                                              t_on_batch)
            else :
                result = model.test_on_batch([e_on_batch, d_on_batch],
                                             t_on_batch)

            list_loss.append(result[0])
            list_perplexity.append(result[1])
            list_accuracy.append(result[2])
            elapsed_time = time.time() - s_time
            if i % 100 == 0 :
                sys.stdout.write("\r"
                                 +"                "
                                 +"                "
                                 +"                "
                                 +"                "
                                 +"                "
                                 +"                "
                                )
                sys.stdout.flush()
            if kind == 'train' :
                ctl_color = Color.CYAN
            else :
                ctl_color = Color.GREEN
            sys.stdout.write(ctl_color
                 + "\r"+str(e)+"/"+str(row)+" "
                 + str(int(elapsed_time))+"s      "+"\t"
                 + "{0:.4f}".format(np.average(list_loss)) + "\t"
                 + "{0:.4f}".format(np.average(list_perplexity)) + "\t"
                 + "{0:.4f}".format(np.average(list_accuracy))
                 + Color.END)
            sys.stdout.flush()
            if i % 100 == 99 and kind == 'train':
                model.save_weights(emb_param)
            del e_on_batch, d_on_batch, t_on_batch
        print()
        return np.average(list_loss), \
                          np.average(list_perplexity), \
                          np.average(list_accuracy)
5-3-3. Perplexity
Seq2Seqでは、損失関数としてperplexityというものを使用するようですが、Kerasにはそれが実装されていないので、自分で準備することにしました。
perplexityはよく、損失関数$loss$を用いて、
e^{loss}
と定義されていますが、$loss$がcossentropyの損失関数の場合、cossentropyの定義から、上記は予測確率の逆数になります。これは取り得る選択肢の数を意味していて、これが小さいほど、選択候補が絞りこまれている、すなわち予測精度が高いということになります。
cossentropyの損失関数はKerasでも標準でサポートしているので、最初はこれを使ってperplexityを計算しようとしましたが、妙に良い値が出るのと、系列長(入出力の単語数)を大きくするだけで値が改善するところから、もしかしてMask値0も計算の対象になっているのではないかと考えて、自作することにしました。
以下の通りです。class_dialog.pyの後半にある「get_perplexity」関数として実装してあります。デコーダー入力はMaskZero対応のため、入力文章の文字数が系列長maxlen_dより小さい時は0パディングされています。これを利用してマスクを作成し、実際に文字がある部分だけが計算の対象となるようにしてあります。
        #---------------------------------------------------------
        # perplexity
        #---------------------------------------------------------
        def get_perplexity(y_true, y_pred) :
            perp_mask = K.sign((y_pred))
            perp_mask = perp_mask[:, :, 0]
            sum_mask       = K.sum(perp_mask, axis=-1, keepdims= True)
            epsilons       = 1 / 2 * y_pred + K.epsilon()
            cliped         = K.maximum(y_pred, epsilons)
            log_pred       = -K.log(cliped)
            cross_e        = y_true * log_pred
            cross_e        = K.sum(cross_e, axis=-1)
            masked_entropy = perp_mask * cross_e
            sum_entropy    = K.sum(masked_entropy, axis=-1, keepdims= True)
            perplexity     = sum_entropy / sum_mask
            perplexity     = K.exp(perplexity)
            #perplexity     = K.repeat(perplexity , self.maxlen_d)
            return K.mean(perplexity)
予測テンソルの各要素値を1 / 2 * y_pred + K.epsilon()で下方から足切りしているのは、0や小さい値を対数計算すると、以下のエラーが発生するので、これを防ぐためです。また、足切り値を定数ではなく、勾配をもたせているのは、この方が収束が速いからです。
~/anaconda3/lib/python3.6/site-packages/ipykernel_launcher.py:108: RuntimeWarning: divide by zero encountered in log
損失関数にperplexityを使用すると、あまりよく収束しないので、perplexityは評価関数として使い、損失関数としては以下のようにcrossentropy lossを自作して(「cross_loss」関数、class_dialog.pyの後半にあります)、こちらを使って訓練しました。perplexityと同じようにマスクをかけて、生きた値だけを計算するようにしてあります。
        def cross_loss(y_true, y_pred) :
            perp_mask = K.sign((y_pred))
            perp_mask = perp_mask[:, :, 0]
            #print(perp_mask.numpy()[0, :])
            sum_mask       = K.sum(perp_mask, axis=-1, keepdims= True)
            #print('perp_mask1',K.int_shape(perp_mask))
            epsilons       = 1 / 2 * y_pred + K.epsilon()
            cliped         = K.maximum(y_pred, epsilons)
            log_pred       = -K.log(cliped)
            cross_e        = y_true * log_pred
            cross_e        = K.sum(cross_e, axis=-1)
            masked_entropy = perp_mask * cross_e
            sum_entropy    = K.sum(masked_entropy, axis=-1, keepdims= True)
            celoss         = sum_entropy / sum_mask
            #print('celoss',K.int_shape(celoss))
            return K.mean(celoss)
更に、accuracyも自作しました(「get_accuracy」関数)。class_dialog.pyの後半にあります。出力ベクトルのargmaxとラベルベクトルが一致する比率を計算します。perplexityやcrossentropy lossと同様に、マスクをかけています。
        #---------------------------------------------------------
        # 評価関数
        #---------------------------------------------------------
        def get_accuracy(y_true, y_pred) :
            perp_mask = K.sign((y_pred))
            perp_mask = perp_mask[:, :, 0]
            perp_mask      = K.cast(perp_mask,dtype='int32')
            y_pred_argmax = K.argmax(y_pred, axis=-1)
            y_true_argmax = K.argmax(y_true, axis=-1)
            n_correct     = K.abs(y_true_argmax - y_pred_argmax)
            n_correct     = K.sign(n_correct)
            n_correct     = K.ones_like(n_correct, dtype='int64') - n_correct
            n_correct     = K.cast(n_correct, dtype='int32')
            n_correct     = n_correct * perp_mask
            n_correct     = K.cast(K.sum(n_correct, axis=-1, keepdims= True),
                                   dtype='float32')
            n_total       = K.cast(K.sum(perp_mask,axis=-1, keepdims= True),
                                   dtype='float32')
            accuracy      = n_correct / n_total
            #print('accuracy',K.int_shape(accuracy))
            return K.mean(accuracy)
5-3-4. Early Stopping
Early stoppingも自作します。データを訓練データ、評価データ、テストデータの3つに分け、訓練は訓練データを使用して行いますが、epoch毎に評価データを使ってloss、perplexity、accuracyを計算し、値の減少が止まったところで訓練を打ち切ります。
以下の通りです。class_dialog.pyの「train」メソッドの中にあります。
        row=d_input.shape[0]
        loss_bk = 10000
        perplexity_bk = 10000
        accuracy_bk = 0
        patience = 0
        print(Color.CYAN,model.metrics_names[0]+" "
              +model.metrics_names[1]+" "
              +model.metrics_names[2] ,
              Color.END)

        for j in range(0,epochs) :
            print(Color.CYAN,"Epoch ",j+1,"/",epochs,Color.END)
            loss, \
            perplexity, \
            accuracy = self.on_batch(model,
                                     e_input, d_input, target,
                                     batch_size, emb_param)

            #-----------------------------------------------------
            # EarlyStopping
            #-----------------------------------------------------
            if j == 0 or (loss       <= loss_bk and
                          perplexity <= perplexity_bk and
                          accuracy   >= accuracy_bk):
                loss_bk = loss
                perplexity_bk = perplexity
                accuracy_bk = accuracy
                patience = 0
            elif patience < 1  :
                patience += 1
            else :
                print('EarlyStopping')
                break
5-3-5. 応答文生成
コードは5-1-3応答文章生成処理のcell[5]です。応答文生成はKerasレイヤーおよびニューラルネットワークの外側で1単語単位にループを回します。出力された単語およびstatesを、次回ループの入力にします。ループはデリミタ'SSSS'が出力されるか、規定回数に達するまで実行します。
6. 訓練
以下の手順で訓練処理を実行します。
6−1. 事前準備
Google Driveの適当な場所に、ニューラルネットワーククラス定義(class_dialog.py)や訓練データを格納しておきます。
6−2. ノートブック作成
Google Drive画面の左上の「+新規」アイコンをクリックし、「Google Colaboratory」を選択します。もしメニューにGoogle Colaboratoryがない場合は、「+アプリ追加」メニューをクリックして、Google Colaboratoryをインストールしてください。
新規ノートブックの画面が開きますので、5-1-2項のソースコードを、cell単位にコピペしてください。
cell構成は、自由に変えていただいて結構です。
最初のcellの遷移先フォルダ(cdコマンドの引数)を、クラス定義ファイル等が格納されているフォルダに変更してください。
6−3. パラメータ設定
最後のcellに、パラメータ設定フォームが有ります。エポック数(epoch)、バッチサイズ(batch_size)、埋め込みベクトル次元(vec_dim)、隠れ層次元(n_hidden)、パラメータファイル名(param_name)の5項目が指定できますので、必要に応じて変更してください。
6−4. GPU設定
4-2節の記述に従って、GPU設定を行ってください。
ここまでの作業が完了したら、ノートブックに適当な名前をつけてセーブしてください。Google Drive上の、ノートブック新規作成を実行したフォルダにセーブされます。
6−5. 訓練実行
画面の上の方にある、「ランタイム」タブをクリックし、「すべてのセルを実行」メニューを選択すると、一気に処理が実行されます。
筆者の場合、21エポックでearly stoppingがかかりました。このときの訓練結果は以下のとおりです。
loss=1.1246
perplexity=155.5519
accuracy=0.3251
7. 応答文生成
いよいよ発話に対する応答文を生成してみます。
7-1. ノートブック作成
6章と同様の手順でノートブックを作成し、5-1-3項のソースコードをコピペします。
最後のcellの入力フォームで、埋め込みベクトル次元、隠れ層次元、パラメータファイル名が指定できますが、訓練の時と必ず同じ値を指定してください。
ノートブックが出来上がったら、適当な名前をつけてセーブしてください。
7-2. 応答文生成処理実行
画面の上の方にある、「ランタイム」タブをクリックし、「すべてのセルを実行」メニューを選択してください。
最後のcellにダイアログボックスが開きますので、発話文を入力すると、以下のワーニングの後、応答文が表示されます。
/usr/local/lib/python3.6/dist-packages/tensorflow/python/data/ops/dataset_ops.py:3350: UserWarning: Even though the tf.config.experimental_run_functions_eagerly option is set, this option does not apply to tf.data functions. tf.data functions are still traced and executed as graphs.
  "Even though the tf.config.experimental_run_functions_eagerly "
終了するときは、半角「q」を入力します。
7-3. 実行結果
以下の通りです。「うん。」しか返ってきません。
>> おはよう!
うん。
>> 今何してる?
うん。
>> ご飯食べた?
うん。
>> 何食べた?
うん。
>> こんにちは。
うん。
>> それでは御免蒙りまするでござります
うん。
8. おわりに
以上、単層LSTMによるseq2seqを実装し、チャットボットが動作するところまで実現できました。今後の予定としては、多層LSTMやAttentionによって、どれくらい精度が向上するか、確認していきます。
変更履歴
| 項番 | 日付 | 変更箇所 | 内容 |
|---|---|---|---|
| 1 | 2018/10/2 | - | 初版 |
| 2 | 2020/6/9 | 全体 | Google Colaboratory対応による記述内容見直し |
| 3 | 2020/6/10 | 5-1-2、5-1-3 | 埋め込みベクトル次元および隠れ層次元がフォームから指定できるように、コードを修正 |
| 4 | 2020/10/11 | 5-1-1 | Tensorflowのバージョンが2.3.0に上がったことにより、keras.initializersからuniformがなくなったため、これをコメントアウトした |
| 5 | 2020/10/11 | 5-1-1 | Tensorflowのバージョンが2.3.0に上がったことにより、model.metrics_namesが空のリストを返してくるようになったので、訓練結果表示の見出し行をコメントアウトした |
| 6 | 2020/10/11 | 5-1-1 | Tensorflowのバージョンが2.3.0に上がったことにより、GPU環境下のLSTM実行に必要になったので、LSTMのrecurrent_activationをsigmoidに変更した |
| 7 | 2020/10/11 | 5-1-1 | Tensorflowのバージョンが2.3.0に上がったことにより、GPU環境下のLSTM実行に必要になったので、LSTMのrecurrent_dropoutを0に変更した |
| 8 | 2020/10/11 | 5-1-1 | Tensorflowのバージョンが2.3.0に上がったことにより、GPU環境下のLSTM実行に必要になったので、Eager executionを利用可能にした |
| 9 | 2020/10/11 | 5-1-1 | 訓練データのバッチサイズ分割において、Datasetを使用するようにした |
