はじめに
three.jsでInstancedMeshを使って、サイリウムを表示し、Shaderでサイリウムを振る挙動を実装してみました
InstancedMeshを使用することで、描画呼び出し回数を削減し、アプリケーション全体のレンダリングパフォーマンスを向上させることができます
また、Shaderを使うことで、CPU負荷をかけずに個別にサイリウムを振る挙動を実装できます
サイリウムを振る挙動の実装にあたって、こちらのYouTubeの動画をとても参考にさせて頂きました
three.jsでサイリウムをInstancedMeshで表示してShaderで振る実装
Node.js
こちらで試しています
$ node -v
v22.17.0
$ npm -v
10.9.2
プロジェクトの作成
プロジェクトの作成手順
プロジェクトの作成
mkdir stick-light
cd stick-light
npm init -y
package.jsonに以下の項目を追加します
{
  "type": "module",
  "scripts": {
    "dev": "vite"
  },
}
必要なパッケージをインストール
npm install three
npm install --save-dev @types/three
npm install --save-dev typescript ts-node vite
TypeScriptの設定ファイルを作成
npx tsc --init
ディレクトリ構成
stick-light/
├─ index.html
├─ index.ts // 次の章で紹介します
├─ texture.png // 次の章で紹介します
├─ tsconfig.json
└─ package.json
index.html を作成
<!DOCTYPE html>
<html lang="ja">
<head>
    <meta charset="UTF-8" />
    <title>Stick Light</title>
    <style>
        html, body {
            margin: 0;
            height: 100%;
            overflow: hidden;
        }
        canvas {
            display: block;
        }
    </style>
</head>
<body>
    <script type="module" src="/index.ts"></script>
</body>
</html>
ローカルサーバーを起動
npm run dev
サイリウムの実装
サイリウムのテクスチャ
こちらをテクスチャとして利用します

TypeScriptの実装
まずは、処理の全体像を掴んだ方が良さそうと思ったので、index.ts全文を掲載します
実装のポイントは次の章で触れます
サイリウムの処理はStickLightManagerにまとめています
Shaderもコードの簡易化と一覧性のために、同じファイルにまとめていますが、glslファイルに分割すると便利です
また、実際に使用する場合は THREE.TextureLoader().load() など、適宜エラーハンドリングを追加して頂けると良さそうです
import * as THREE from "three";

class StickLightManager {
    private readonly STICK_COUNT = 600;
    private readonly SWING_FREQUENCY = 0.60;
    private readonly SWING_OFFSET = 0.3;
    private readonly BILLBOARD_SIZE = 0.2;

    private material: THREE.ShaderMaterial;
    private instancedMesh: THREE.InstancedMesh;
    private clock: THREE.Clock;

    private camera: THREE.Camera;

    constructor(camera: THREE.Camera) {
        this.clock = new THREE.Clock();
        this.camera = camera;

        const texture = new THREE.TextureLoader().load("texture.png");
        texture.colorSpace = THREE.SRGBColorSpace;

        this.material = new THREE.ShaderMaterial({
            vertexShader: vertexShader,
            fragmentShader: fragmentShader,
            uniforms: {
                time: { value: 0.0 },
                swingFrequency: { value: this.SWING_FREQUENCY },
                swingOffset: { value: this.SWING_OFFSET },
                opacity: { value: 1.0 },
                customCameraPosition: { value: this.camera.position },
                texBody: { value: texture }
            },
            transparent: true,
            blending: THREE.AdditiveBlending,
            side: THREE.DoubleSide,
            depthWrite: false,
            depthTest: true,
            lights: false
        });

        // 1. InstancedMeshを使って必要な数のインスタンスを作成
        this.instancedMesh = new THREE.InstancedMesh(
            new THREE.PlaneGeometry(this.BILLBOARD_SIZE, this.BILLBOARD_SIZE),
            this.material,
            this.STICK_COUNT
        );

        const randomSeeds = new Float32Array(this.STICK_COUNT);
        const tmpObject = new THREE.Object3D();
        // いい感じに見えるようにインスタンスをランダムに配置する
        for (let i = 0; i < this.STICK_COUNT; i++) {
            const angle = Math.random() * Math.PI;
            var radius = Math.random() * 3 + 2;
            const x = Math.cos(angle) * radius;
            const y = radius - 4;
            const z = -Math.sin(angle) * radius;

            tmpObject.position.set(x, y, z);
            tmpObject.updateMatrix();
            this.instancedMesh.setMatrixAt(i, tmpObject.matrix);
            randomSeeds[i] = Math.random();
        }

        // 2. randomSeed属性で個性を付与
        this.instancedMesh.geometry.setAttribute('randomSeed', new THREE.InstancedBufferAttribute(randomSeeds, 1));
        this.instancedMesh.instanceMatrix.needsUpdate = true;
        this.instancedMesh.castShadow = false;
        this.instancedMesh.receiveShadow = false;
    }

    public load(scene: THREE.Scene): void {
        scene.add(this.instancedMesh);
    }

    public update(): void {
        const elapsedTime = this.clock.getElapsedTime();
        this.material.uniforms.time!.value = elapsedTime;
        this.material.uniforms.customCameraPosition!.value.copy(this.camera.position);
    }

    public dispose(): void {
        this.instancedMesh.geometry.dispose();
        this.material.dispose();
    }
}

const vertexShader = `
attribute float randomSeed;
uniform float time;
uniform float swingFrequency;
uniform float swingOffset;
uniform vec3 customCameraPosition;
varying vec2 vUv;
varying float vAlpha;
varying float vRandomSeed;

float hash(float n) {
  return fract(sin(n) * 43758.5453);
}

float noise(float x) {
  float i = floor(x);
  float f = fract(x);
  float u = f * f * (3.0 - 2.0 * f);
  return mix(hash(i), hash(i + 1.0), u) * 2.0 - 1.0;
}

float smoothstepCustom(float edge0, float edge1, float x) {
  float t = clamp((x - edge0) / (edge1 - edge0), 0.0, 1.0);
  return t * t * (3.0 - 2.0 * t);
}

float lerp(float a, float b, float t) {
  return a + t * (b - a);
}

void main() {
  vUv = uv;
  vRandomSeed = randomSeed;

  vec3 originOffset = vec3(0.0, -0.5, 0.0);
  vec3 adjustedPosition = position - originOffset;

  float basePhase = 6.2831 * swingFrequency * time; // 2π * f * t
  float nr1 = randomSeed * 1000.0;
  float phaseNoise = noise(nr1 + time * 0.27);
  float phase = basePhase + phaseNoise;

  float angle = cos(phase);
  float angle_unsmooth = smoothstepCustom(-1.0, 1.0, angle) * 2.0 - 1.0;
  float rand01 = fract(sin(randomSeed * 1.2345) * 43758.5453); // 乱数再現
  angle = lerp(angle, angle_unsmooth, rand01);
  float randMag = 0.3 + fract(sin(randomSeed * 2.3456) * 43758.5453) * 0.7;
  angle *= randMag;

  float nr2 = randomSeed * 2000.0;
  float dx = noise(nr2 + time * 0.23 + 100.0);
  vec3 axis = normalize(vec3(dx, 0.0, 1.0));

  float c = cos(angle);
  float s = sin(angle);
  vec3 u = axis;
  mat3 axisRotation = mat3(
    c + u.x*u.x*(1.0 - c), u.x*u.y*(1.0 - c) - u.z*s, u.x*u.z*(1.0 - c) + u.y*s,
    u.y*u.x*(1.0 - c) + u.z*s, c + u.y*u.y*(1.0 - c), u.y*u.z*(1.0 - c) - u.x*s,
    u.z*u.x*(1.0 - c) - u.y*s, u.z*u.y*(1.0 - c) + u.x*s, c + u.z*u.z*(1.0 - c)
  );

  float offsetRand = 0.75 + fract(sin(randomSeed * 3.4567) * 43758.5453) * 0.5;
  float offset = swingOffset * offsetRand;

  vec3 rotatedPosition = axisRotation * adjustedPosition;
  rotatedPosition += vec3(0.0, offset, 0.0);
  rotatedPosition += originOffset;

  vec4 worldPosition = instanceMatrix * vec4(rotatedPosition, 1.0);

  // 3. ビルボード処理
  vec3 toCameraXZ = normalize(vec3(
    customCameraPosition.x - worldPosition.x,
    0.0,
    customCameraPosition.z - worldPosition.z
  ));

  vec3 up = vec3(0.0, 1.0, 0.0);
  vec3 right = normalize(cross(up, toCameraXZ));
  vec3 forward = cross(right, up);
  mat3 billboardMatrix = mat3(right, up, forward);

  rotatedPosition = billboardMatrix * rotatedPosition.xyz;
  vec4 finalPosition = instanceMatrix * vec4(rotatedPosition, 1.0);

  // 距離によるアルファ値の計算
  float distanceToCamera = distance(finalPosition.xyz, customCameraPosition);
  vAlpha = smoothstep(100.0, 5.0, distanceToCamera);

  gl_Position = projectionMatrix * viewMatrix * finalPosition;
}
`;

const fragmentShader = `
uniform sampler2D texBody;
uniform float opacity;

varying vec2 vUv;
varying float vAlpha;
varying float vRandomSeed;

void main() {
    vec4 texColor = texture2D(texBody, vUv);

    // 色オフセットを作成
    vec3 randomOffset = vec3(
        sin(vRandomSeed * 12.9898),
        sin(vRandomSeed * 78.233),
        sin(vRandomSeed * 39.425)
    );
    randomOffset = vec3(1) - randomOffset * 0.05;

    // 色味をちょこっと変える
    vec3 color = texColor.rgb * randomOffset;

    gl_FragColor = vec4(color, texColor.a * vAlpha * opacity);
}
`;

// --- 実行部分 ---
const scene = new THREE.Scene();
const camera = new THREE.PerspectiveCamera(60, window.innerWidth / window.innerHeight, 0.1, 1000);
camera.position.set(0, 0.5, 2);
camera.lookAt(0, 0, 0);

const renderer = new THREE.WebGLRenderer({ antialias: true });
renderer.setSize(window.innerWidth, window.innerHeight);
document.body.appendChild(renderer.domElement);

const manager = new StickLightManager(camera);
manager.load(scene);

// アニメーションループ
function animate() {
    requestAnimationFrame(animate);
    manager.update();
    renderer.render(scene, camera);
}
animate();
実装のポイント
1. InstancedMeshを使って必要な数のインスタンスを作成
InstancedMeshを使うことで、必要な数のインスタンスを作成します
setMatrixAt を使って、各々のサイリウムの位置を設定します
(参考) https://threejs.org/docs/#api/en/objects/InstancedMesh
2. randomSeed属性で個性を付与
各インスタンスごとに作成したrandomSeedをベースにすることで、それぞれ一貫した異なる揺れ方/色味になります
サイリウムを振る処理はこちらのYouTubeを参考にさせて頂きました
こちらの動画は、リアルなサイリウムの振りになるようなロジックをステップごとに解説されているので、大変勉強になりました
(参考) https://www.youtube.com/watch?v=iC3QKBW9EmA
3. ビルボード処理
ビルボードとは、ポリゴンが常にカメラに対して垂直に配置される描画技術です
頂点シェーダー内で、変換後の平面がカメラの方向を向くように回転させます
今回はY軸固定のビルボードにすることで、サイリウムを振った際の角度を保ちながら表示させました
ビルボードにすることで、円柱より必要なポリゴン数を削減することができます
Shaderの処理
1. randomSeedと時間による揺れ位相の計算
float basePhase = 6.2831 * swingFrequency * time; // 2π * f * t
float nr1 = randomSeed * 1000.0;
float phaseNoise = noise(nr1 + time * 0.27);
float phase = basePhase + phaseNoise;
- randomSeed:インスタンスごとに異なる揺れパターンを作るための値です
- basePhase:時間と周波数から生成されたベースの揺れの位相です
- phaseNoise:ノイズで位相にランダム性を加えることで、自然なズレを作ります
2. 振りの角度の生成
float angle = cos(phase);
float angle_unsmooth = smoothstepCustom(-1.0, 1.0, angle) * 2.0 - 1.0;
float rand01 = fract(sin(randomSeed * 1.2345) * 43758.5453);
angle = lerp(angle, angle_unsmooth, rand01);
float randMag = 0.3 + fract(sin(randomSeed * 2.3456) * 43758.5453) * 0.7;
angle *= randMag;
- randMag:個別に設定される揺れ幅です
3. 回転軸をランダム化
float nr2 = randomSeed * 2000.0;
float dx = noise(nr2 + time * 0.23 + 100.0);
vec3 axis = normalize(vec3(dx, 0.0, 1.0));
- Z軸寄りの軸を基本に、x軸方向にも少しランダム化します
- 左右方向だけでなく、前後にも微妙にバラついた揺れになります
4. 回転行列を作って頂点を回転
float c = cos(angle);
float s = sin(angle);
vec3 u = axis;
mat3 axisRotation = mat3(
  c + u.x*u.x*(1.0 - c), u.x*u.y*(1.0 - c) - u.z*s, u.x*u.z*(1.0 - c) + u.y*s,
  u.y*u.x*(1.0 - c) + u.z*s, c + u.y*u.y*(1.0 - c), u.y*u.z*(1.0 - c) - u.x*s,
  u.z*u.x*(1.0 - c) - u.y*s, u.z*u.y*(1.0 - c) + u.x*s, c + u.z*u.z*(1.0 - c)
);
- 軸を指定して回転します
- ロドリゲスの回転公式というらしいです
5. オフセット適用
float offsetRand = 0.75 + fract(sin(randomSeed * 3.4567) * 43758.5453) * 0.5;
float offset = swingOffset * offsetRand;
vec3 rotatedPosition = axisRotation * adjustedPosition;
rotatedPosition += vec3(0.0, offset, 0.0);
- サイリウムの支点(肩の高さ)をずらします
6. ビルボード処理(Y軸固定)
vec3 toCameraXZ = normalize(vec3(
  customCameraPosition.x - worldPosition.x,
  0.0,
  customCameraPosition.z - worldPosition.z
));
vec3 up = vec3(0.0, 1.0, 0.0);
vec3 right = normalize(cross(up, toCameraXZ));
vec3 forward = cross(right, up);
mat3 billboardMatrix = mat3(right, up, forward);
rotatedPosition = billboardMatrix * rotatedPosition.xyz;
- Y軸を固定したビルボードです
- サイリウムを振った際の角度を保ちながら表示されます
おわりに
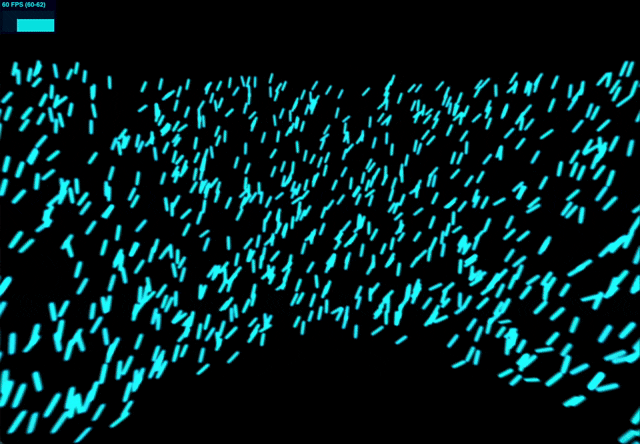
three.jsでInstancedMeshを使って、サイリウムを表示して、Shaderで振る挙動を実装してみました
InstancedMeshで表示して、Shaderで振ることで、パフォーマンスにも配慮した実装になったと思います
iPhone15Proで STICK_COUNT を10万個にしても60fps出ており、three.jsすげーとなりました