何をしたいのか?
株式会社セガゲームスの開発・運営する「PHANTASY STAR ONLINE 2」(以下PSO2)における,デイリーオーダーの内容を告知するtwitter botを作りたい。
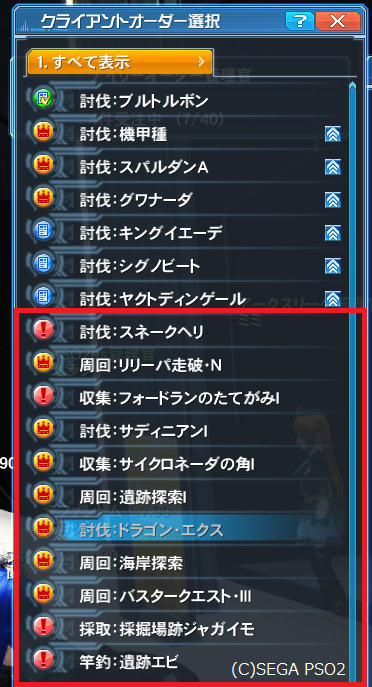
デイリーオーダーとは?
PSO2ではデイリーオーダーという特定のクエストをクリアしたり、アイテムを回収・納品する事でゲーム内通貨「メセタ」というものが手に入る。
【余談】PSO2では現在20キャラまで作成する事が出来て、所持しているキャラ数だけこのデイリーオーダーを受注することができる。
デイリーオーダーの構成
| 1~3 | ブーストオーダー |
| 4~5 | 難易度N以上推奨の収集・討伐・周回 |
| 6~7 | 難易度H以上推奨の収集・討伐・周回 |
| 8~9 | 難易度VH以上推奨の収集・討伐・周回 |
| 10~11 | 難易度SH以上推奨の収集・討伐・周回 |
| 12 | バスタークエスト関連 |
| 13~14 | ギャザリング関連 |
デイリーオーダーの仕様について
デイリーブーストが付くオーダーを除いた4番目~14番目の計11件のデイリーオーダーは93日の周期を持っており、ある程度の予測が可能である。ただしデイリーオーダーの更新が行われた場合は既存のものから差し変わる形になるため、更新があった後は全く違うオーダーが出現するようになることもあるので正確なデータが得られるわけではない。(wikiより抜粋)
※なお、当オーダー情報は、ゲームにログインし、配信されるオーダーを確認して記録するという正当な手段によって入手した情報になります。ゲームプログラムの解析やゲームサーバの侵入、クライアントの自動操作等の不正行為を行なって得た情報ではありません。
開発環境
開発環境は今回REST APIをLaravelを使って実装することにしました。
api.phpにルーティングを設定する
APIのルーティングはroutes/api.phpに記述していきます。
<?php

use Illuminate\Http\Request;

Route::middleware('auth:api')->get('/user', function (Request $request) {
    return $request->user();
});


Route::group(['middleware' => ['api']], function(){
    // Route::resource('v1/pso2/dailyorder', 'Api\ArticlesController', ['except' => ['create', 'edit']]);
    Route::get('v1/pso2/dailyorder', 'Api\ArticlesController@index');
});
以上を行ったら、php artisan route:listでルーティングを確認します。
$ php artisan route:list
+--------+----------+------------------------+------+---------------------------------------------------+--------------+
| Domain | Method   | URI                    | Name | Action                                            | Middleware   |
+--------+----------+------------------------+------+---------------------------------------------------+--------------+
|        | GET|HEAD | /                      |      | Closure                                           | web          |
|        | GET|HEAD | api/user               |      | Closure                                           | api,auth:api |
|        | GET|HEAD | api/v1/pso2/dailyorder |      | App\Http\Controllers\Api\ArticlesController@index | api          |
+--------+----------+------------------------+------+---------------------------------------------------+--------------+
テーブル設計
今回使うテーブルは2つとなります。
t_dayly: デイリーオーダー情報が入ったテーブル
t_reference_date: 基準日となる日付を格納したテーブル
マイグレーションファイルの作成
マイグレーションファイルを作成します。
$ php artisan make:migration t_dayly
$ php artisan make:migration t_reference_date
作成したマイグレーションファイルを編集していきます。
<?php

use Illuminate\Support\Facades\Schema;
use Illuminate\Database\Schema\Blueprint;
use Illuminate\Database\Migrations\Migration;

class TDayly extends Migration
{
    /**
     * Run the migrations.
     *
     * @return void
     */
    public function up()
    {
        Schema::create('t_dayly', function (Blueprint $table) {
            $table->bigIncrements('id');
            $table->string('difficulty_N1');
            $table->string('difficulty_N2');
            $table->string('difficulty_H1');
            $table->string('difficulty_H2');
            $table->string('difficulty_VH1');
            $table->string('difficulty_VH2');
            $table->string('difficulty_SH1');
            $table->string('difficulty_SH2');
            $table->string('baster');
            $table->string('gathering1');
            $table->string('gathering2');
            $table->timestamps();
        });
    }

    /**
     * Reverse the migrations.
     *
     * @return void
     */
    public function down()
    {
        Schema::dropIfExists('t_dayly');
    }
}
<?php

use Illuminate\Support\Facades\Schema;
use Illuminate\Database\Schema\Blueprint;
use Illuminate\Database\Migrations\Migration;

class TReferenceDate extends Migration
{
    /**
     * Run the migrations.
     *
     * @return void
     */
    public function up()
    {
        //
        Schema::create('t_reference_date', function (Blueprint $table) {
            $table->bigIncrements('id');
            $table->date('reference_date');
            $table->timestamps();
        });
    }

    /**
     * Reverse the migrations.
     *
     * @return void
     */
    public function down()
    {
        //
    }
}
マイグレーションファイルの実行
$ php artisan make:migrate
取得するデータをテーブルに挿入する
今回はseederを使ってデータをinsertする。
<?php

use Illuminate\Database\Seeder;

class TDaylyTableSeeder extends Seeder
{

    /**
     * Auto generated seed file
     *
     * @return void
     */
    public function run()
    {


        \DB::table('t_dayly')->delete();

        \DB::table('t_dayly')->insert(array (
            0 =>
            array (
                'id' => 1,
                'difficulty_N1' => '収集:ナヴ・ラッピーの羽毛Ⅰ',
                'difficulty_N2' => '討伐:キャタドランⅠ',
                'difficulty_H1' => '周回:ラスベガス探索',
                'difficulty_H2' => '収集:キャタドランサの牙Ⅰ',
                'difficulty_VH1' => '周回:リリーパ走破・VH',
                'difficulty_VH2' => '討伐:バル・ロドス',
                'difficulty_SH1' => '収集:フォードランサの頭角',
                'difficulty_SH2' => '討伐:バル・ロドス',
                'baster' => '周回:バスタークエスト・Ⅰ',
                'gathering1' => '赤身肉',
                'gathering2' => '採掘場跡タチウオ',
                'created_at' => NULL,
                'updated_at' => NULL,
            ),
            1 =>
            array (
                'id' => 2,
                'difficulty_N1' => '討伐:トレイン・ギドラン',
                'difficulty_N2' => '周回:アンジャドゥリリ討伐',
                'difficulty_H1' => '収集:ネオン管',
                'difficulty_H2' => '討伐:スパルダンAⅡ',
                'difficulty_VH1' => '収集:ギルナッチの胸部装甲Ⅰ',
                'difficulty_VH2' => '周回:アークス捜索任務:凍土Ⅰ',
                'difficulty_SH1' => '討伐:タグ・セヴァニアン',
                'difficulty_SH2' => '周回:海底探索',
                'baster' => '討伐:魔神城・ランザーバレス',
                'gathering1' => '森林トマト',
                'gathering2' => 'ラスベガスレタス',
                'created_at' => NULL,
                'updated_at' => NULL,
            ),
            .
            .
            .
            91 =>
            array (
                'id' => 92,
                'difficulty_N1' => '討伐:ギグル・グンネガム',
                'difficulty_N2' => '周回:アンジャドゥリリ討伐',
                'difficulty_H1' => '収集:シグノガンの砲身Ⅰ',
                'difficulty_H2' => '討伐:コドッタ・イーデッタ',
                'difficulty_VH1' => '収集:ウォルガーダの腹牙Ⅱ',
                'difficulty_VH2' => '周回:海底探索',
                'difficulty_SH1' => '討伐:ドゥエ・ソルダ',
                'difficulty_SH2' => '周回:遺跡探索',
                'baster' => '討伐:魔神城・ランザーバレス',
                'gathering1' => '浮上施設ミント',
                'gathering2' => '浮遊大陸コンブ',
                'created_at' => NULL,
                'updated_at' => NULL,
            ),
            92 =>
            array (
                'id' => 93,
                'difficulty_N1' => '収集:シル・ディーニアンの鱗Ⅱ',
                'difficulty_N2' => '周回:白ノ領域探索',
                'difficulty_H1' => '討伐:デビルズトレーラー・Ⅰ',
                'difficulty_H2' => '周回:ナベリウス上級走破・N',
                'difficulty_VH1' => '収集:アギニスの尾羽根Ⅰ',
                'difficulty_VH2' => '討伐:フォンガルフⅠ',
                'difficulty_SH1' => '収集:ウォルガーダの膝甲',
                'difficulty_SH2' => '周回:浮遊大陸探索',
                'baster' => '周回:バスタークエスト・Ⅱ',
                'gathering1' => '海岸オリーブ',
                'gathering2' => '白ノ領域フナ',
                'created_at' => NULL,
                'updated_at' => NULL,
            ),
        ));
seederを実行する
$ php artisan db:seed
Modelの作成
次にモデルを作成していきます。
$ php artisan make:model T_Dayly
$ php artisan make:model T_Reference_Date
作成したモデルを編集します。
<?php

namespace App;

use Illuminate\Database\Eloquent\Model;

class T_Dayly extends Model
{
    /**
     * モデルと関連しているテーブル
     *
     * @var string
     */
    protected $table = 't_dayly';
}
<?php

namespace App;

use Illuminate\Database\Eloquent\Model;

class T_Reference_Date extends Model
{
    /**
     * モデルと関連しているテーブル
     *
     * @var string
     */
    protected $table = 't_reference_date';
}
コントローラの作成
メインとなるコントローラの作成をします。
<?php

namespace App\Http\Controllers\Api;

use Illuminate\Http\Request;
use Auth;
use App\T_Dayly;
use App\T_Reference_Date;
use App\Http\Controllers\Controller;

class ArticlesController extends Controller {

    public function index() {
        // 基準日の取得
        $jsondate = T_Reference_Date::get(['reference_date']);
        $datetime = $jsondate[0]->reference_date;

        // 本日の日付の取得
        $today = date('Y/m/d');

        $day1 = new \DateTime($datetime);
        $day2 = new \DateTime($today);

        $interval = $day1->diff($day2);
        $interval_days = $interval->days + 1;

        // 93日周期の終了
        if($interval_days == 94) {
            // 基準日テーブルの更新
            $update_reference_date = T_Reference_Date::find(1);
            $update_reference_date->reference_date = $day2;
            $update_reference_date->save();
            // 1日目のデータを取得
            $dayly = T_Dayly::find(1);
        }

        // 93日周期内
        else {
            $dayly = T_Dayly::find($interval_days);
        }
        return json_decode($dayly, true);
    }
}
動作確認
$ php artisan serve --port=8080
postmanというソフトを使って確認しました。。
/api/v1/pso2/daylyorderでアクセスする
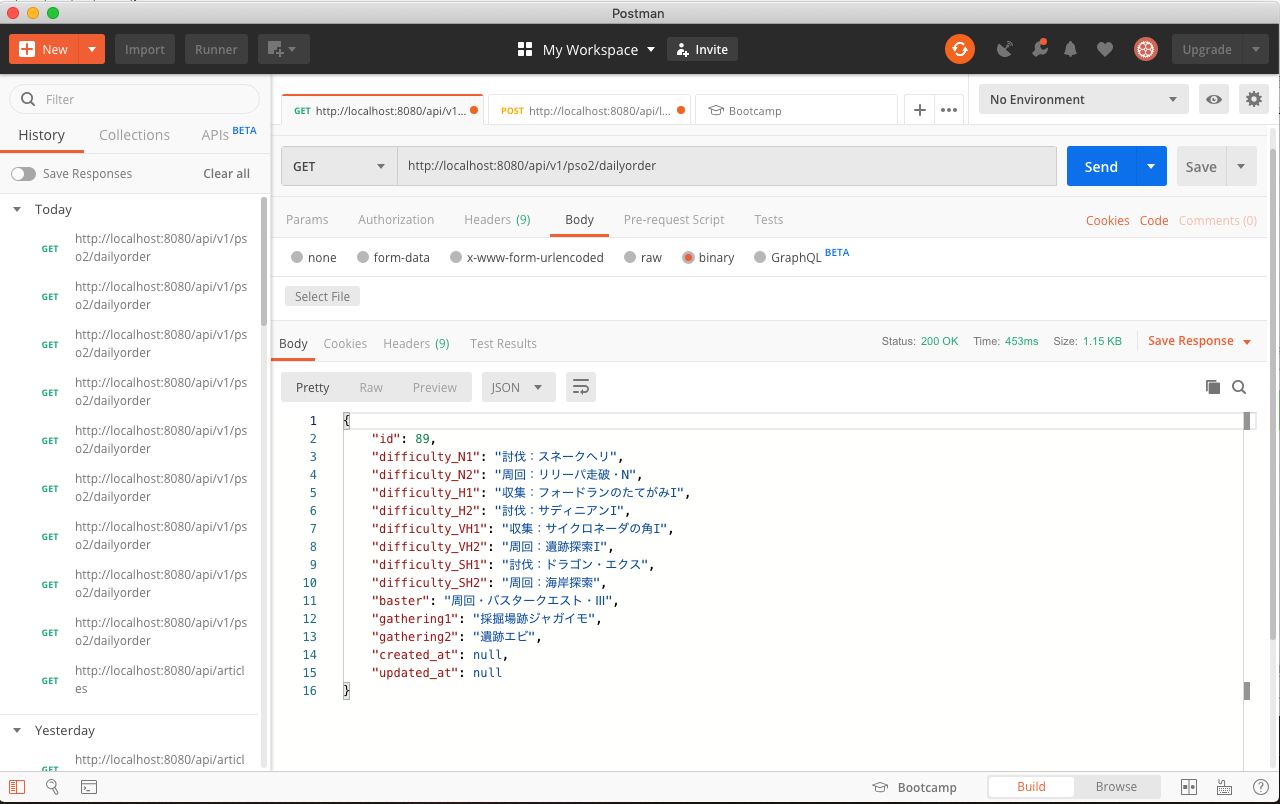
2019/08/22のオーダー内容
無事に取得する事ができました。
node.jsを使ってtwitterに投稿する
node.jsを使ってcronで毎時0時に自動投稿するbotを実装する。
必要なパッケージをインストールします。
$ npm install twitter
$ npm install xmlhttprequest
$ npm install node-cron
インストールしたら実装します。(twitter apiの申請方法については今回割愛します)
// twitterパッケージの読み込み
var twitter = require('twitter');
// XMLHttpRequest
var XMLHttpRequest = require("xmlhttprequest").XMLHttpRequest;
// node-cron
var cron = require('node-cron');
// 認証情報を設定(Twitter Appで発行したものを設定)
var client = new twitter({
consumer_key : "consumer_key",
consumer_secret : "consumer_secret",
access_token_key : "access_token_key",
access_token_secret : "access_token_secret"
});
var data = null;
// cron実行(毎時0時)
cron.schedule('0 0 0 * * *', () => {
var xhr = new XMLHttpRequest();
xhr.withCredentials = true;
xhr.addEventListener("readystatechange", function () {
if (this.readyState === 4) {
json_parse = JSON.parse(this.responseText);
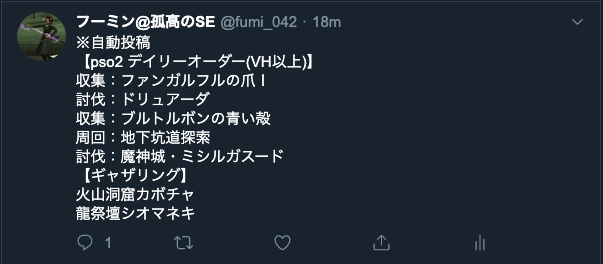
// tweet内容の整形
tweetText = "※自動投稿" + "\n" +
"【pso2 デイリーオーダー(VH以上)】\n" +
json_parse.difficulty_VH1 + "\n" +
json_parse.difficulty_VH2 + "\n" +
json_parse.difficulty_SH1 + "\n" +
json_parse.difficulty_SH2 + "\n" +
json_parse.baster + "\n" +
"【ギャザリング】" + "\n" +
json_parse.gathering1 + "\n" +
json_parse.gathering2;
// twitterに投稿する
client.post('statuses/update', {status: tweetText}, function(error, tweet, response) {
if(error) throw error;
if (!error) {
console.log(tweet);
console.log(data);
}
});
}
});
xhr.open("GET", "http://localhost:8080/api/v1/pso2/dailyorder");
xhr.send(data);
});
実行
$ node tweet.js
上記のように0時に投稿出来ていれば成功です。ヽ(´▽`)/