これまで、KerasでAutoEncoderとか、KerasでAutoEncoderその2とかの記事を書いてきたんだけれど、これをGoogle Colaboratoryで動かしてみようか、というココロミについて。
Google Colaboratoryで動かせば、GPUが使えるのが大きい。
目的
- 手書きの数字の「1」を学習する
- 手書きの「1以外の数字」が入力された際に、その画像が「1」とは何やら違う、ということを示す
まずは、KerasでAutoEncoderその2で書いたネタを、tensorflowのKerasで動作するようにするのがゴール。
Colab上で実装する
Colabでpip install -U Kerasしようかと思ったけれど、tf.kerasを使うことにする。
まずは、Colabの「ファイル」メニューで「Python3の新しいノートブック」を選択して、ノートブックを作成する。後は、Jupyter Notebook上での作業と本質的には変わらない。
宣言部
import tensorflow as tf
import tensorflow.keras.backend as K
MNISTのダウンロードと前処理
mnist = tf.keras.datasets.mnist
(x_train, y_train), (x_test, y_test) = mnist.load_data()
image_size = x_train.shape[1]

import numpy as np

x_train = x_train.astype('float32')/255.
x_test = x_test.astype('float32')/255.
x_train = np.reshape(x_train, (len(x_train), image_size, image_size, 1))
x_test = np.reshape(x_test, (len(x_test), image_size, image_size, 1))
上述した目的に従い、「1」のみを学習させたいので、x_trainの中身を「1」だけにしておく。
x_train = x_train[y_train==1]
学習時のバリデーション用に、x_trainを更に分割して、x_validを作っておく。
学習時のバリデーションにx_testを使えば良いという考え方もあるけれど、自分はx_testは学習後の評価時に使うもんなんじゃないか?と思っている。
from sklearn.model_selection import train_test_split
x_train, x_valid, y_train, y_valid = train_test_split(x_train, y_train, test_size=0.175)
よく使う変数の設定
この後よく使う変数を設定しておく。
input_shape = (image_size, image_size, 1)
batch_size = 64
kernel_size = 3
filters = 16
latent_dim = 2
epochs = 50
encoder、潜在変数z、decoderを定義する
encoderをKerasのsampleにあった書き方で。
inputs = tf.keras.layers.Input(shape=input_shape, name='encoder_input')
x = inputs
for i in range(2):
  filters *= 2
  x = tf.keras.layers.Conv2D(filters=filters,
                             kernel_size=kernel_size,
                             activation='relu',
                             strides=2,
                             padding='same')(x)
shape = K.int_shape(x)
x = tf.keras.layers.Flatten()(x)
x = tf.keras.layers.Dense(16, activation='relu')(x)
潜在変数zと、そのためのsampling()の定義。
def sampling(args):
  z_mean, z_log_var = args
  batch = K.shape(z_mean)[0]
  dim = K.int_shape(z_mean)[1]
  epsilon = K.random_normal(shape=(batch, dim))
  return z_mean + K.exp(0.5 * z_log_var) * epsilon
z_mean = tf.keras.layers.Dense(latent_dim, name='z_mean')(x)
z_log_var = tf.keras.layers.Dense(latent_dim, name='z_log_var')(x)
z = tf.keras.layers.Lambda(sampling, name='z')([z_mean, z_log_var])
いよいよ、encoderを定義する。
encoder = tf.keras.models.Model(inputs, [z_mean, z_log_var, z], name='encoder')
ここで、encoder.summary()すると、次のようになる。
__________________________________________________________________________________________________
Layer (type)                    Output Shape         Param #     Connected to
==================================================================================================
encoder_input (InputLayer)      (None, 28, 28, 1)    0
__________________________________________________________________________________________________
conv2d (Conv2D)                 (None, 14, 14, 32)   320         encoder_input[0][0]
__________________________________________________________________________________________________
conv2d_1 (Conv2D)               (None, 7, 7, 64)     18496       conv2d[0][0]
__________________________________________________________________________________________________
flatten (Flatten)               (None, 3136)         0           conv2d_1[0][0]
__________________________________________________________________________________________________
dense (Dense)                   (None, 16)           50192       flatten[0][0]
__________________________________________________________________________________________________
z_mean (Dense)                  (None, 2)            34          dense[0][0]
__________________________________________________________________________________________________
z_log_var (Dense)               (None, 2)            34          dense[0][0]
__________________________________________________________________________________________________
z (Lambda)                      (None, 2)            0           z_mean[0][0]
                                                                 z_log_var[0][0]
==================================================================================================
Total params: 69,076
Trainable params: 69,076
Non-trainable params: 0
______________________________________________________________________________________________
引き続き、decoderを定義する。
latent_inputs = tf.keras.layers.Input(shape=(latent_dim,), name='z_sampling')
x = tf.keras.layers.Dense(shape[1]*shape[2]*shape[3], activation='relu')(latent_inputs)
x = tf.keras.layers.Reshape((shape[1], shape[2], shape[3]))(x)
for i in range(2):
  x = tf.keras.layers.Conv2DTranspose(filters=filters,
                                      kernel_size=kernel_size,
                                      activation='relu',
                                      strides=2,
                                      padding='same')(x)
  filters //= 2
outputs = tf.keras.layers.Conv2DTranspose(filters=1,
                                          kernel_size=kernel_size,
                                          activation='sigmoid',
                                          padding='same',
                                          name='decoder_output')(x)
decoder = tf.keras.models.Model(latent_inputs, outputs, name='decoder')
ここで、decoder.summary()すると、次のようになる。
_________________________________________________________________
Layer (type)                 Output Shape              Param #
=================================================================
z_sampling (InputLayer)      (None, 2)                 0
_________________________________________________________________
dense_1 (Dense)              (None, 3136)              9408
_________________________________________________________________
reshape (Reshape)            (None, 7, 7, 64)          0
_________________________________________________________________
conv2d_transpose (Conv2DTran (None, 14, 14, 64)        36928
_________________________________________________________________
conv2d_transpose_1 (Conv2DTr (None, 28, 28, 32)        18464
_________________________________________________________________
decoder_output (Conv2DTransp (None, 28, 28, 1)         289
=================================================================
Total params: 65,089
Trainable params: 65,089
Non-trainable params: 0
_________________________________________________________________
これで、encoderとdecoderが逆のネットワーク構造になっていることが確認できた。
以上を踏まえて、Variational Autoencoderモデルを次のように定義する。
outputs = decoder(encoder(inputs)[2])
autoencoder = tf.keras.models.Model(inputs, outputs, name='vae')
loss関数の定義
loss関数を、Kerasのsampleに記載されていたように定義する。
rx_loss = tf.keras.losses.binary_crossentropy(K.flatten(inputs), K.flatten(outputs))
rx_loss *= image_size*image_size
kl_loss = 1+z_log_var-K.square(z_mean)-K.exp(z_log_var)
kl_loss = K.sum(kl_loss, axis=-1)
kl_loss *= -0.5
vae_loss = K.mean(rx_loss+kl_loss)

autoencoder.add_loss(vae_loss)
最適化関数の設定
最適化はAdamで行う。なんとなく、学習率だけ、デフォルトより小さい値にしてみる。
from tensorflow.keras.optimizers import Adam
adam = Adam(lr=0.0001)

autoencoder.compile(optimizer=adam)
学習の実施
実行に要した時間を表示するようにしておく。
import time
start_time = time.time()

autoencoder.fit(x_train,
                epochs=epochs,
                batch_size=batch_size,
                validation_data = (x_valid, None))

print('{:.2f}[sec]'.format(time.time()-start_time))
50 epochsを実行してみた結果、79.28秒だった。GPU速い。自宅のMacBook Pro (Mid2012)だと、10分弱くらいかかる。Colab上でも666.18秒かかった。
学習結果の確認
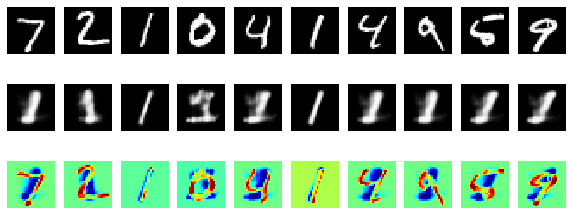
x_testの先頭10データを入力してみる。入力値から得られた特徴量を「1」のモノだと思って復元を試みるので、入力した画像と復元した画像との間で差異が小さければ「1」だろうし、大きければ「1以外の数値」である。
潜在変数zが今回2次元なので、その分布を図示して、学習した「1」の分布の重心等代表値と、入力した画像から求めたzとの距離を数値化するだけでも良いかもしれない。
from matplotlib.pyplot as plt
%matplotlib inline
import cv2
n = 10
decoded_imgs = autoencoder.predict(x_test[:n])

plt.figure(figsize=(10, 4))

for i in range(n):+1:
    # original_image
    orig_img = x_test[i].reshape(image_size, image_size)

    # reconstructed_image
    reconst_img = decoded_imgs[i].reshape(image_size, image_size)

    # diff image
    diff_img = ((orig_img - reconst_img)+2)/4
    diff_img = (diff_img*255).astype(np.uint8)
    orig_img = (orig_img*255).astype(np.uint8)
    reconst_img = (reconst_img*255).astype(np.uint8)
    diff_img_color = cv2.applyColorMap(diff_img, cv2.COLORMAP_JET)

    # display original
    ax = plt.subplot(3, n,  i + 1)
    plt.imshow(orig_img, cmap=plt.cm.gray)
    ax.get_xaxis().set_visible(False)
    ax.get_yaxis().set_visible(False)

    # display reconstruction
    ax = plt.subplot(3, n, i + n + 1)
    plt.imshow(reconst_img, cmap=plt.cm.gray)
    ax.get_xaxis().set_visible(False)
    ax.get_yaxis().set_visible(False)

    # display diff
    ax = plt.subplot(3, n, i + n*2 + 1)
    plt.imshow(diff_img, cmap=plt.cm.jet)
    ax.get_xaxis().set_visible(False)
    ax.get_yaxis().set_visible(False)
plt.show()
上段が、入力画像で、中段がautoencoderを使って、上段の画像を基に生成した画像で、下段が上段と中段の差分である。
「1」以外が入力されたときに、無理やり「1」を復元しようとして破綻していることが可視化された。
というワケで、KerasでAutoEncoderその2そのまんまなんだけれど、CoLabでGPUを使ってみたかったというハナシ。
