Building Autoencoders in Kerasという、KerasのBlogを見れば、だいたい分かるようにはなっている。
単純なAutoEncoder
Blogの一番最初に出てくるヤツ。MNIST(28x28の画像)を32次元のベクトルにencodeしてから、decodeして、「ああ、だいたい復元できるね。AutoEncoderってこういうことなんだね」ってのを知る。
from keras.layers import Input, Dense
from keras.models import Model
from keras.datasets import mnist
import numpy as np
from sklearn.model_selection import train_test_split
import matplotlib.pyplot as plt

# encoderの次元
encoding_dim = 32

# 入力用の変数
input_img = Input(shape=(784, ))
# 入力された画像がencodeされたものを格納する変数
encoded = Dense(encoding_dim, activation='relu')(input_img)
# ecnodeされたデータを再構成した画像を格納する変数
decoded = Dense(784, activation='sigmoid')(encoded)
# 入力画像を再構成するModelとして定義
autoencoder = Model(input_img, decoded)

# 入力する画像をencodeする部分
encoder = Model(input_img, encoded)
encoded_input = Input(shape=(encoding_dim, ))
decoder_layer = autoencoder.layers[-1]
# encodeされた画像データを再構成する部分
decoder = Model(encoded_input, decoder_layer(encoded_input))

# AdaDeltaで最適化, loss関数はbinary_crossentropy
autoencoder.compile(optimizer='adadelta', loss='binary_crossentropy')

# MNISTデータを前処理する
(x_train, _), (x_test, _) = mnist.load_data()
x_train, x_valid = train_test_split(x_train, test_size=0.175)
x_train = x_train.astype('float32')/255.
x_valid = x_valid.astype('float32')/255.
x_test = x_test.astype('float32')/255.
x_train = x_train.reshape((len(x_train), np.prod(x_train.shape[1:])))
x_valid = x_valid.reshape((len(x_valid), np.prod(x_valid.shape[1:])))
x_test = x_test.reshape((len(x_test), np.prod(x_test.shape[1:])))

# autoencoderの実行
autoencoder.fit(x_train, x_train,
                epochs=50,
                batch_size=256,
                shuffle=True,
                validation_data=(x_valid, x_valid))

# 画像化して確認
encoded_img = encoder.predict(x_test)
decoded_img = decoder.predict(encoded_img)

n = 10
plt.figure(figsize=(20, 4))
for i in range(n):
    ax = plt.subplot(2, n, i+1)
    plt.imshow(x_test[i].reshape(28, 28))
    plt.gray()
    ax.get_xaxis().set_visible(False)
    ax.get_yaxis().set_visible(False)

    ax = plt.subplot(2, n, i+1+n)
    plt.imshow(decoded_img[i].reshape(28, 28))
    plt.gray()
    ax.get_xaxis().set_visible(False)
    ax.get_yaxis().set_visible(False)
plt.show()
趣味で、x_trainからx_validを分離して、x_testはテスト結果の評価のときだけ使うようにしておいた。
実行すると、我が家の2012年型のMacBook Pro 13インチでも、1epochあたり3〜5秒くらいなので、50epoch回してもたいして時間かからずにKerasのBlogの通りの画像が表示される。
DeepでConvolutionalでVariationalな話
以上のように、KerasのBlogに書いてあるようにやればOKなんだけれど、Deep Convolutional Variational Autoencoderについては、サンプルコードが書いてないので、チャレンジしてみる。
Convolutional AutoEncoder
以下は、KerasのBlogに書いてあるConvolutional AutoEncoderの例である。
from keras.layers import Input, Dense, Conv2D, MaxPooling2D, UpSampling2D
from keras.models import Model
from keras import backend as K

input_img = Input(shape=(28, 28, 1))

x = Conv2D(16, (3, 3), activation='relu', padding='same')(input_img)
x = MaxPooling2D((2, 2), padding='same')(x)
x = Conv2D(8, (3, 3), activation='relu', padding='same')(x)
x = MaxPooling2D((2, 2), padding='same')(x)
x = Conv2D(8, (3, 3), activation='relu', padding='same')(x)
encoded = MaxPooling2D((2, 2), padding='same')(x)

x = Conv2D(8, (3, 3), activation='relu', padding='same')(encoded)
x = UpSampling2D((2, 2))(x)
x = Conv2D(8, (3, 3), activation='relu', padding='same')(x)
x = UpSampling2D((2, 2))(x)
x = Conv2D(16, (3, 3), activation='relu')(x)
x = UpSampling2D((2, 2))(x)
decoded = Conv2D(1, (3, 3), activation='sigmoid', padding='same')(x)

autoencoder = Model(input_img, decoded)
autoencoder.compile(optimizer='adadelta', loss='binary_crossentropy')
これを、Variational AutoEncoderに書き直す。
Variational AutoEncoderについては、Variational Autoencoder徹底解説がとても理解しやすかったです。
というワケで、潜在変数の定義を追加する。
z_mean = Dense(latent_dim, name='z_mean')(encoded)
z_log_var = Dense(latent_dim, name='z_log_var')(encoded)

def sampling(args):
    z_mean, z_log_var = args
    latent_dim = 20
    epsilon_std = 1.0
    epsilon = K.random_normal(shape=(K.shape(z_mean)[0],
                                     K.shape(z_mean)[1],
                                     K.shape(z_mean)[2],
                                     latent_dim),
                              mean=0.,
                              stddev=epsilon_std)
    return z_mean + K.exp(z_log_var / 2) * epsilon
上記のConvolutional AutoEncoderでは、Decoderにencodedを入力していたが、そうではなくて、ここで計算したzを入力するようにする。
あとは、KerasのBlogに書いてあるとおりの考え方で、ちょこちょこと修正をしつつ組み合わせて記述する。
# encoder
input_img = Input(shape=(img_size, img_size, 1))
x = Conv2D(32, (3, 3), activation='relu', padding='same')(input_img)
x = MaxPooling2D((2, 2), padding='same')(x)
x = Conv2D(64, (3, 3), activation='relu', padding='same')(x)
x = MaxPooling2D((2, 2), padding='same')(x)
x = Conv2D(32, (3, 3), activation='relu', padding='same')(x)
x = MaxPooling2D((2, 2), padding='same')(x)
x = Conv2D(16, (3, 3), activation='relu', padding='same')(x)
encoded = MaxPooling2D((2, 2), padding='same')(x)

# 潜在変数
z_mean = Dense(latent_dim, name='z_mean')(encoded)
z_log_var = Dense(latent_dim, name='z_log_var')(encoded)

def sampling(args):
    z_mean, z_log_var = args
    latent_dim = 32
    epsilon_std = 1.0
    epsilon = K.random_normal(shape=(K.shape(z_mean)[0],
                                     K.shape(z_mean)[1],
                                     K.shape(z_mean)[2],
                                     latent_dim),
                              mean=0.,
                              stddev=epsilon_std)
    return z_mean + K.exp(z_log_var / 2) * epsilon

z = Lambda(sampling)([z_mean, z_log_var])

# decoder
x = Conv2D(16, (3, 3), activation='relu', padding='same')(z)
x = UpSampling2D((2, 2))(x)
x = Conv2D(32, (3, 3), activation='relu', padding='same')(x)
x = UpSampling2D((2, 2))(x)
x = Conv2D(64, (3, 3), activation='relu', padding='same')(x)
x = UpSampling2D((2, 2))(x)
x = Conv2D(32, (3, 3), activation='relu')(x)
x = UpSampling2D((2, 2))(x)
decoded = Conv2D(1, (3, 3), activation='sigmoid', padding='same')(x)

# autoencoderの定義
autoencoder = Model(input_img, decoded)

# loss関数
# Compute VAE loss
xent_loss = K.mean(metrics.binary_crossentropy(input_img, decoded), axis=-1)
kl_loss =  - 0.5 * K.mean(K.sum(1 + K.log(K.square(z_log_var)) - K.square(z_mean) - K.square(z_log_var), axis=-1))
vae_loss = K.mean(xent_loss + kl_loss)

autoencoder.add_loss(vae_loss)
autoencoder.compile(optimizer='adam')
これで、上述のようにMNISTをloadしてfit()すると、1 epochあたり30秒くらいかかるけれど、なんとか動作する。
異常検知をしてみる
Variational AutoEncoderは異常検知に使うことができると言われている。
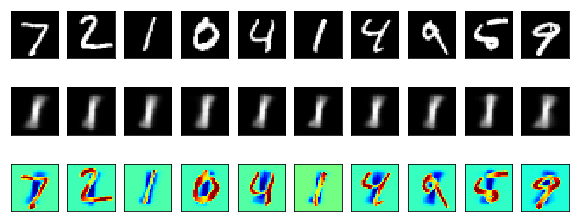
とりあえず、モデルとして「1」を学習させたAutoEncoderにいろんな数字を食わせてみたら、そこから1をgenerateしようとすることで破綻が生じて、異常の位置が分かるんじゃないか?という仮設に基づき、上述のコードを変更する。
1のみで学習する
1のみで学習するために、x_trainとx_validは、1だけにする。
(x_train, y_train), (x_test, y_test) = mnist.load_data()

# 正規化する
x_train = x_train.astype(np.float32)/255
x_test = x_test.astype(np.float32)/255
x_train = np.reshape(x_train, (len(x_train), 28, 28, 1))
x_test = np.reshape(x_test, (len(x_test), 28, 28, 1))

# x_trainを分割
x_train, x_valid, y_train, y_valid = train_test_split(x_train, y_train, test_size = 0.175)

# 学習に使うデータを1に限定する

x_train = x_train[y_train == 1]
x_valid = x_valid[y_valid == 1]
すると、どんな数字を入れても、そこから学習したweightとbiasに従って、1を出力する。
異常検知
ここでは、「本来ならば1であるはずなのに、1ではない数値が入力されたら異常」とすると、ソレは以下のように可視化できる。
すなわち、左から3番目や6番目のように、1が入力された時とそれ以外では、明るさの違う領域が異なる様子が分かる。
このように、ある閾値以上に明るい領域がある場合には、異常値が検出されたとみなすことができる。
学習結果の保存と読み込み
今回のように、学習した結果を保存する際には、学習する際に使用したモデルの定義と学習したweightsをそれぞれ保存するようにする。
# 定義とweightsをそれぞれ保存する
model_json = autoencoder.to_json()
with open('ae_mnist.json', 'w') as json_file:
    json_file.write(model_json)
autoencoder.save_weights('ae_mnist_weights.h5')
この保存した学習結果を読み出す場合は、次のようにする。
from keras.models import model_from_json

# 定義
json_file = open('ae_mnist.json', 'r')
loaded_model_json = json_file.read()
json_file.close()

loaded_model = model_from_json(loaded_model_json)

# weights
loaded_model.load_weights('ae_mnist_weights.h5')
本日のコード

