前提
Flutterを始めたので、今度はデータを一時的に保存できるようにしてみた。
環境
- macOS Mojave 10.14.6
- Android Studio 3.6.3
FlutterとDartのバージョンは以下の通り。
% flutter --version
Flutter 1.12.13+hotfix.9 • channel stable •
https://github.com/flutter/flutter.git
Framework • revision f139b11009 (4 weeks ago) • 2020-03-30 13:57:30 -0700
Engine • revision af51afceb8
Tools • Dart 2.7.2
% dart --version
Dart VM version: 2.7.2 (Mon Mar 23 22:11:27 2020 +0100) on "macos_x64"
やること
flutter のひな形アプリの「ボタンを押すとカウントアップするヤツ」のカウントアップした数値を保存する。
ローカルのストレージに保存する方法はいろいろあるようだけれど、cookbookに、Store key-value data on diskというのがあって、初期設定値などの保存に向いてそうだったので、ここで紹介されているshared_preferencesを使ってみる。
準備
Android Studioでアプリの雛形を作成する
Start a new Flutter project...で、「Flutter Application」を選択する。 今回は、「counter_app」という名前にしてみた。
shared_preferencesの設定
pubspec.yamlに追記して、flutter pub getする。
...
dependencies:
  flutter:
    sdk: flutter
  # https://pub.dev/packages/shared_preferences
  shared_preferences: any
...
2020/05/01時点で、shared_preferencesのバージョンは0.5.7だったので、shared_preferences: ^0.5.0とかって書くべきところかもしれない。
実装
ライブラリのインポート
shared_preferencesをimportする。
import 'package:shared_preferences/shared_preferences.dart';
読み書きなどする関数を作成する
カウントアップする数値の読み書きとデータの削除には、shared_preferencesの次のメソッドを使える。
-
getInt(): 読み -
setInt(): 書き -
remove(): 削除
読み書きには非同期処理を行うので、asyncキーワードを付けて、それぞれの関数を作成する。
  void _getCounterValue() async {
    SharedPreferences prefs = await SharedPreferences.getInstance();
    setState(() {
      _counter = prefs.getInt('counter');
    });
  }

  void _setCounterValue() async {
    SharedPreferences prefs = await SharedPreferences.getInstance();
    prefs.setInt('counter', _counter);
  }

  void _removeCounterValue() async {
    SharedPreferences prefs = await SharedPreferences.getInstance();
    setState(() {
      _counter = 0;
      prefs.remove('counter');
    });
  }
getInt()に失敗したときのために、_counter = prefs.getInt('counter') ?? 0;の方が良いのかな。
カウンタの初期値を設定する
アプリの起動時に保存済のカウンタの数値を読み込むようにする。アプリの起動時には、initState()が呼ばれるので、それをoverrideして、_getCounterValue()を呼ぶようにする。
  @override
  void initState() {
    super.initState();
    _getCounterValue();
  }
カウントアップした数値を保存する
数字のカウントアップをする_incrementCounter()の中で、_counter++してから_setCounterValue()を呼ぶ。
  void _incrementCounter(){
    setState(() {
      _counter++;
      _setCounterValue();
    });
  }
数値をリセット可能にする
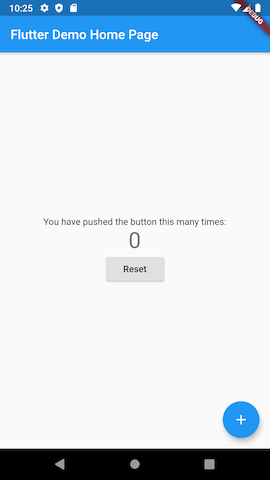
数値をリセットするボタンを設定する。デザインセンスを問われるところだけれど、とりあえず、数字の真下にRaisedButton()を設置する。RaisedButton()のonPressedには、_removeCounterValue()を設定する(センスなし!)。
  @override
  Widget build(BuildContext context) {
    return Scaffold(
      appBar: AppBar(
        title: Text(widget.title),
      ),
      body: Center(
        child: Column(
          mainAxisAlignment: MainAxisAlignment.center,
          children: <Widget>[
            Text(
              'You have pushed the button this many times:',
            ),
            Text(
              '$_counter',
              style: Theme.of(context).textTheme.display1,
            ),
            RaisedButton(
              child: Text("Reset"),
              onPressed: _removeCounterValue,
            ),
          ],
        ),
      ),
      floatingActionButton: FloatingActionButton(
        onPressed: _incrementCounter,
        tooltip: 'Increment',
        child: Icon(Icons.add),
      ),
    );
  }
実行
カウンタの下に「Reset」ボタンが付いた。
想定通り動くことも確認できた。
本日のソースコード
name: counterapp
description: A new Flutter application.

version: 1.0.0+1

environment:
  sdk: ">=2.1.0 <3.0.0"

dependencies:
  flutter:
    sdk: flutter
  shared_preferences: any
  cupertino_icons: ^0.1.2

dev_dependencies:
  flutter_test:
    sdk: flutter

# The following section is specific to Flutter.
flutter:
  uses-material-design: true
import 'package:flutter/material.dart';
import 'package:shared_preferences/shared_preferences.dart';

void main() => runApp(MyApp());

class MyApp extends StatelessWidget {
  // This widget is the root of your application.
  @override
  Widget build(BuildContext context) {
    return MaterialApp(
      title: 'Flutter Demo',
      theme: ThemeData(
        primarySwatch: Colors.blue,
      ),
      home: MyHomePage(title: 'Flutter Demo Home Page'),
    );
  }
}

class MyHomePage extends StatefulWidget {
  MyHomePage({Key key, this.title}) : super(key: key);

  final String title;

  @override
  _MyHomePageState createState() => _MyHomePageState();
}

class _MyHomePageState extends State<MyHomePage> {
  int _counter;

  void _incrementCounter() {
    setState(() {
      _counter++;
      _setCounterValue();
    });
  }

  void _getCounterValue() async {
    SharedPreferences prefs = await SharedPreferences.getInstance();
    setState(() {
      _counter = prefs.getInt('counter');
    });
  }

  void _setCounterValue() async {
    SharedPreferences prefs = await SharedPreferences.getInstance();
    prefs.setInt('counter', _counter);
  }

  void _removeCounterValue() async {
    SharedPreferences prefs = await SharedPreferences.getInstance();
    setState(() {
      _counter = 0;
      prefs.remove('counter');
    });
  }

  @override
  void initState() {
    super.initState();
    _getCounterValue();
  }

  @override
  Widget build(BuildContext context) {
    return Scaffold(
      appBar: AppBar(
        title: Text(widget.title),
      ),
      body: Center(
        child: Column(
          mainAxisAlignment: MainAxisAlignment.center,
          children: <Widget>[
            Text(
              'You have pushed the button this many times:',
            ),
            Text(
              '$_counter',
              style: Theme.of(context).textTheme.display1,
            ),
            RaisedButton(
              child: Text("Reset"),
              onPressed: _removeCounterValue,
            ),
          ],
        ),
      ),
      floatingActionButton: FloatingActionButton(
        onPressed: _incrementCounter,
        tooltip: 'Increment',
        child: Icon(Icons.add),
      ),
    );
  }
}
