祝ラズパイ購入!早速SSHで接続!と意気込んだはいいものの、ラズパイのセキュリティはMacやWindowsと比べて気になる部分が多いらしい...
というわけで、Raspberry Pi 4でAIDE(ファイルの改ざんを検知するシステム)を導入する過程をメモ。
AIDE v0.17以前の解説を参考にしたが、v0.17は以前の仕様とは違うところが多くあり、そこでかなり躓いた。
AIDEとは
AIDE (Advanced Intrusion Detection Environment)。改ざんされたファイルを検知するシステム。主にLinux環境で用いられる。
環境
インストール
私のラズパイではパッケージ管理をaptで行っているため、AIDEも同様にaptでインストール。
$ sudo apt install aide
バージョン確認
$ aide -i

  Aide 0.17.3
データベースの初期化
AIDEはもともと保存してあるバックアップデータと今あるデータを比較して改ざんの有無を判断します。そのため、バックアップデータを保存するデータベースを初期化する作業を最初に行います。
まさかのここで詰まる
何もしないで初期化コマンド
$ aide -i
あるいは
$ aide --init
をEnterするとエラー文が現れる。
ERROR: missing configuration (use '--config' '--before' or '--after' command line parameter)
要約すると「設定が正しくありません(--configや--beforeなどをコマンドライン引数として使いなさい)」と言っている。
解決にむけて
まずはコマンドのヘルプを確認。
$ aide -h

  Usage: aide [options] command

  Commands:
    -i, --init		Initialize the database
    -n, --dry-init	Traverse the file system and match each file against rule tree
    -C, --check		Check the database
    -u, --update		Check and update the database non-interactively
    -E, --compare		Compare two databases

  Miscellaneous:
    -D,			--config-check			Test the configuration file
    -p file_type:path	--path-check=file_type:path	Match file type and path against rule tree
    -v,			--version			Show version of AIDE and compilation options
    -h,			--help				Show this help message

  Options:
    -c [cfgfile]	--config=[cfgfile]	Get config options from [cfgfile]
    -l [REGEX]	--limit=[REGEX]		Limit command to entries matching [REGEX]
    -B "OPTION"	--before="OPTION"	Before configuration file is read define OPTION
    -A "OPTION"	--after="OPTION"	After configuration file is read define OPTION
    -L [level]	--log-level=[level]	Set log message level to [level]
ざっと見た感じ、--configで設定ファイルの場所を指定してやればいいかもしれない。
設定ファイルは/etc/aide/aide.confなのでこれを編集・保存。
$ sudo vim /etc/aide/aide.conf

 ### 末尾に以下を追加 ###
 # 改ざんを確認するディレクトリ + 検知アルゴリズム
/ Full

 # 改ざんを確認しないディレクトリ(!をつけるだけ)
!/dev
!/tmp
!/proc
!/sys
 ### ここまで ###
検知アルゴリズムはaide.confの上部で定義されている。今回はルートディレクトリ直下の/dev, /tmp, /proc, /sysを除くディレクトリを調べるようにしており、検知アルゴリズムFullは
Full = InodeData+StaticFile
    -> InodeData = OwnerMode+n+i+Size+l+X
    -> StaticFile = m+c+Checksums
        -> OwnerMode = p+u+g+ftype
        -> Checksums = sha256+sha512+rmd160+haval+gost+crc32+tiger+whirlpool
というような仕組みになっている。
以上を踏まえて再度コマンドをEnter...
$ sudo aide --config='/etc/aide/aide.conf' -i

  WARNING: get_file_status: lstat() failed for /run/user/1000/gvfs: Permission denied
  Start timestamp: 2022-05-16 02:26:45 +0900 (AIDE 0.17.3)
  AIDE initialized database at /var/lib/aide/aide.db.new

  Number of entries:	136924

  ---------------------------------------------------
  The attributes of the (uncompressed) database(s):
  ---------------------------------------------------

  /var/lib/aide/aide.db.new
   SHA256    : **************
   SHA512    : **************
   RMD160    : **************
   TIGER     : **************
   CRC32     : **************
   HAVAL     : **************
   WHIRLPOOL : **************
   GOST      : **************


  End timestamp: 2022-05-16 02:41:36 +0900 (run time: 14m 51s)
初期化成功!ルートディレクトリ直下のほとんどをチェックしてるためか15分もかかってる...
生成したバックアップデータは/var/lib/aide/aide.db.newに保存されるみたいですね。
現在のデータと比較
初期化から少し経ったので現在のディレクトリと比較。
$ sudo aide --config='/etc/aide/aide.conf' --check

  ERROR: /etc/aide/aide.conf:7: open (read-only) failed for file '/var/lib/aide/aide.db': No such file or directory (line: 'database_in=file:/var/lib/aide/aide.db')
/var/lib/aideにaide.dbなんてファイルは存在しないよ!と言っているから、/var/lib/aide/aide.db.newを/var/lib/aide.dbに変える必要がありそう。
$ sudo cp /var/lib/aide/aide.db.new /var/lib/aide/aide.db
cpで複製してるのは、aide.confにて、バックアップデータの所在はaide.dbに、現在のデータの出力先はaide.db.newに設定しているから。
再度checkコマンドをEnterすれば
$ sudo aide --config='/etc/aide/aide.conf' --check

  WARNING: get_file_status: lstat() failed for /run/user/1000/gvfs: Permission denied
  Start timestamp: 2022-05-16 03:08:54 +0900 (AIDE 0.17.3)
  AIDE found differences between database and filesystem!!

  Summary:
    Total number of entries:	136929
    Added entries:		5
    Removed entries:		1
    Changed entries:		50

  ---------------------------------------------------
  Added entries:
  ---------------------------------------------------

  ---------------------------------------------------
  Removed entries:
  ---------------------------------------------------

  ---------------------------------------------------
  Changed entries:
  ---------------------------------------------------

  ---------------------------------------------------
  Detailed information about changes:
  ---------------------------------------------------

  ---------------------------------------------------
  The attributes of the (uncompressed) database(s):
  ---------------------------------------------------

  End timestamp: 2022-05-16 03:30:38 +0900 (run time: 21m 44s)
無事成功!今度は22分とかなり長い...
チェック前にファイルを編集していた場合、それ以前のバックアップは古いものだから、初期化コマンドで初期化するかupdateコマンドでチェック後にバックアップを自動更新するのが良い。
$ sudo aide --config='/etc/aide/aide.conf' --update
ただし、updateコマンドで作られるバックアップファイルはaide.db.newなので、aide.dbを複製して作る必要がある。
cronでチェックを自動化する
自動で改ざん検出をし、結果をメール(Gmail)に送信するようにしたい。
今回はcronというプログラムを使った。
cronの設定
以下のコマンドをEnterすれば、cronの設定を変更できる。
$ crontab -e
エディタが開いたら
LANG=ja_JP.UTF-8

 # 分 時 日 月 曜日 コマンド
* 1 * * * sh /etc/aide/aide-dailyscan.sh   # 毎日1時にチェック
を保存。
aide-dailyscan.shを作成
スクリプトで記したaide-dailyscan.shを作成する。
$ sudo vim /etc/aide/aide-dailyscan.sh

 ### ここから追加 ###
!/bin/bash

SCAN_LOG=/tmp/scan.log.$$   # チェック時のログ保存先
MAIL=hoge@fuga.com          # 送信先メールアドレス

sudo aide --config='/etc/aide/aide.conf' --update > ${SCAN_LOG}
sudo cp /var/lib/aide/aide.db.new /var/lib/aide/aide.db
cat ${SCAN_LOG} | mail -s "Today's AIDE log." ${MAIL}

rm ${SCAN_LOG}
 ### ここまで ###
Postfixの設定
メール送信にはPostfixを用いて、Gmail宛に送信するようにする。
Postfixがインストールされてない場合は
$ sudo apt install postfix
以下は設定ファイル(/etc/postfix/main.cf)のGmail設定部分。これをmain.cfの末尾に追加する。こちらの記事を参考に作成。
 # Gmail Settings
relayhost = smtp.gmail.com:587                               # TLSはポート587番
smtp_sasl_auth_enable = yes
smtp_sasl_password_maps = hash:/etc/postfix/gmail_passwd     # Gmailのパスワード格納先
smtp_sasl_security_options = noanonymous
smtp_sasl_mechanism_filter = plain
smtp_use_tls = yes
smtp_tls_security_level = may
smtp_tls_loglevel = 1
"relayhost = "が既にmain.cf上部に存在する場合、コメントアウトするか削除しないと"relayhostが重複していますよ"というエラーが発生する。
Gmailの設定
まずGmailがIMAPを許可しているか確認。Gmail設定から「メール転送とPOP/IMAP」->「IMAPアクセス」の「IMAPを許可する」がチェックされているか。なければチェックして変更を保存する。
さらに、Gmail側でPostfix用のアプリパスワードを発行する必要がある。アプリパスワードの設定画面へ移ると、以下のような画面がでてくる。
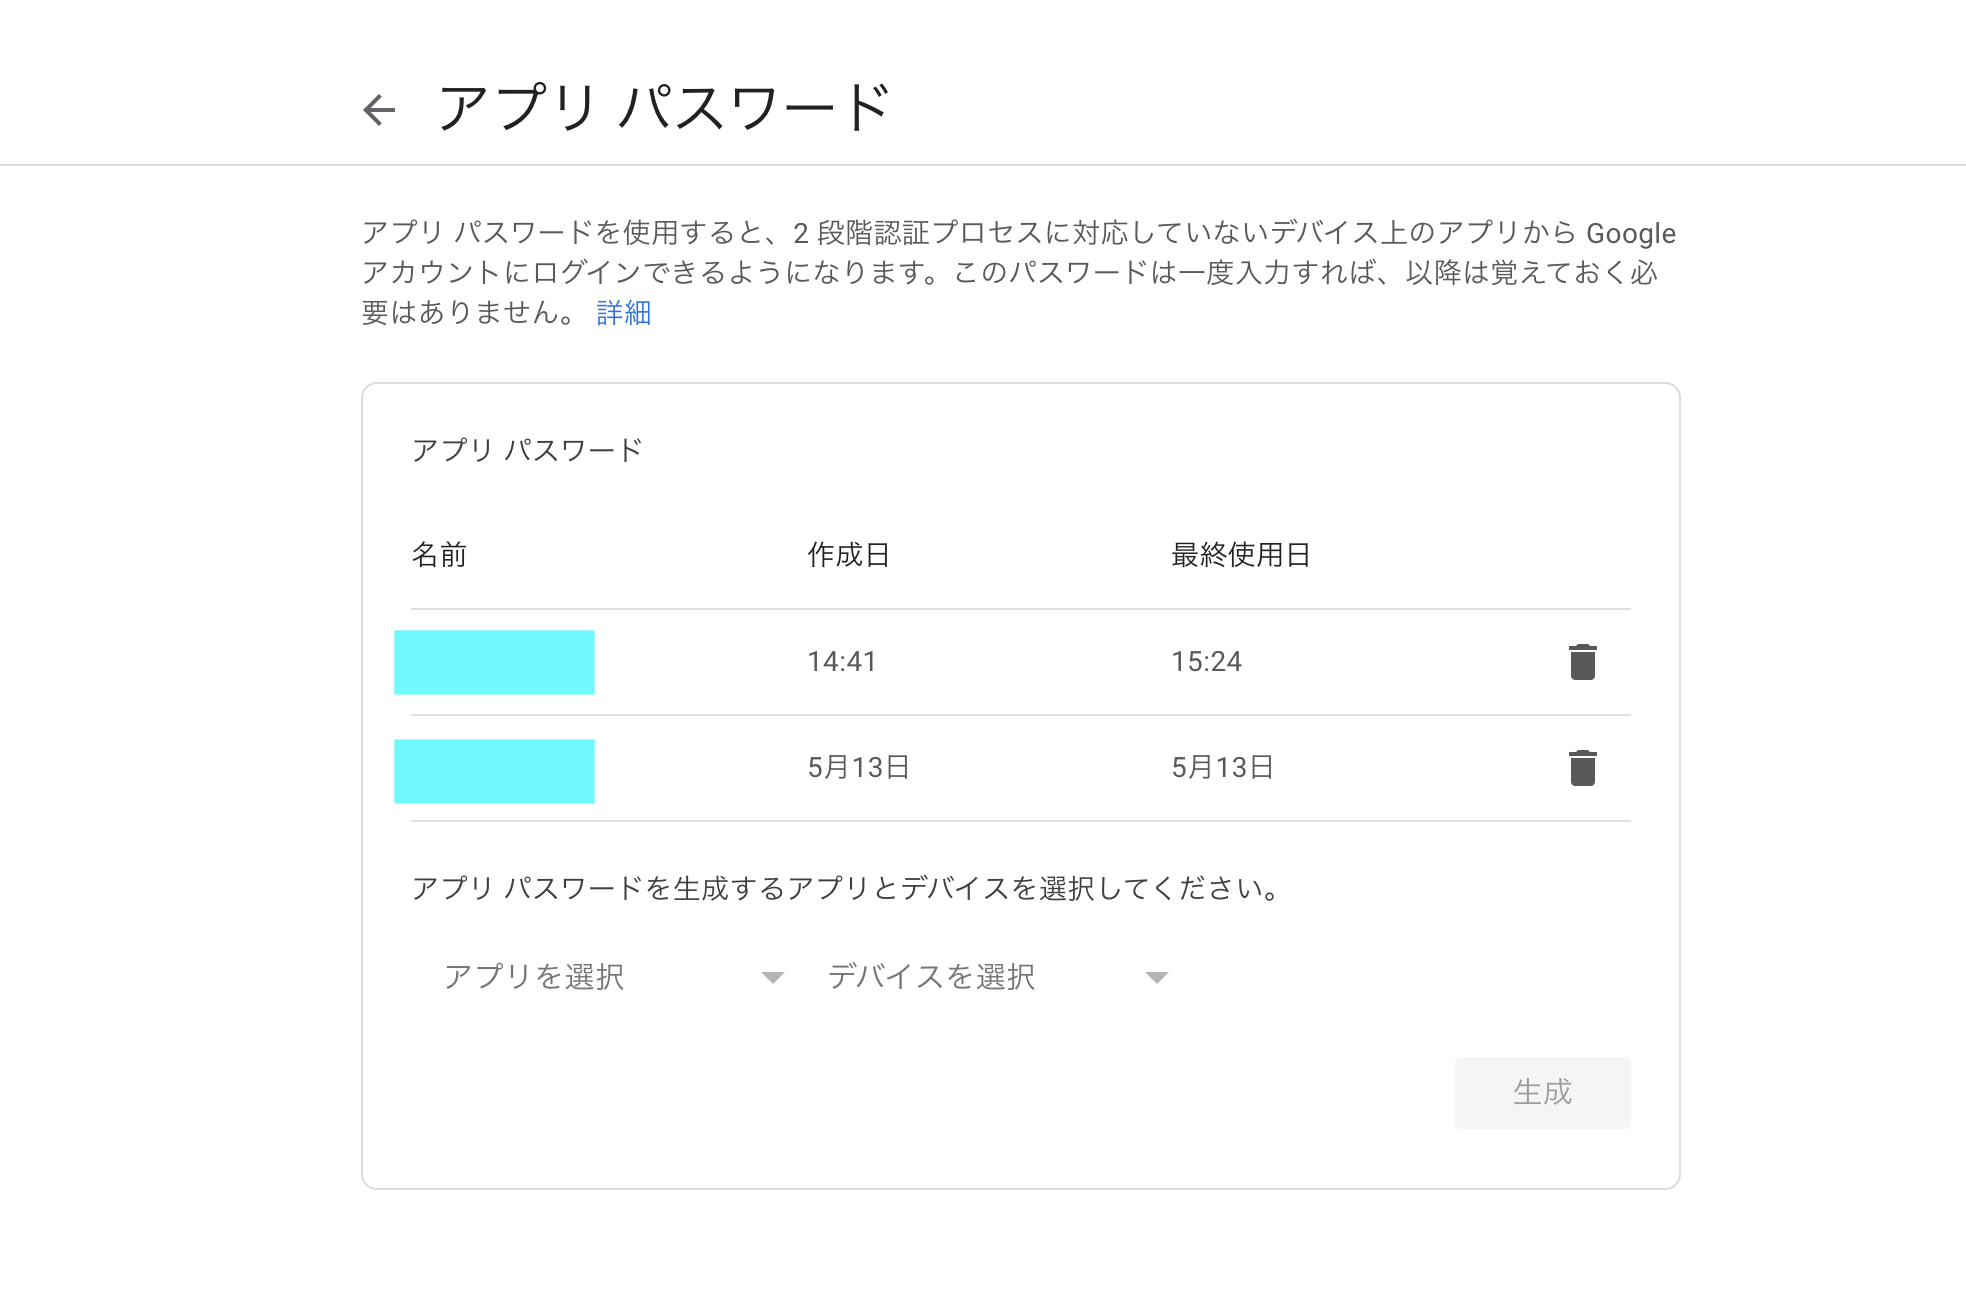
ここで「アプリを選択」には"その他(名前を入力)"を選択すれば名前入力のフォームがでてくるので、覚えられる名前(Postfixなど)を入力すればパスワードが生成される。
生成されたパスワードは/etc/postfix/gmail_passwdを作成し、そこに格納する。
smtp.gmail.com:587 送信先メールアドレス:作成したアプリパスワード
この形で保存し、postmapコマンド
$ sudo postmap /etc/postfix/gmail_passwd
でgmail_passwd.dbを生成する。
Postfixの再起動
以上が完了したらPostfixを再起動する。
$ sudo postfix reload
あるいは
$ service postfix restart
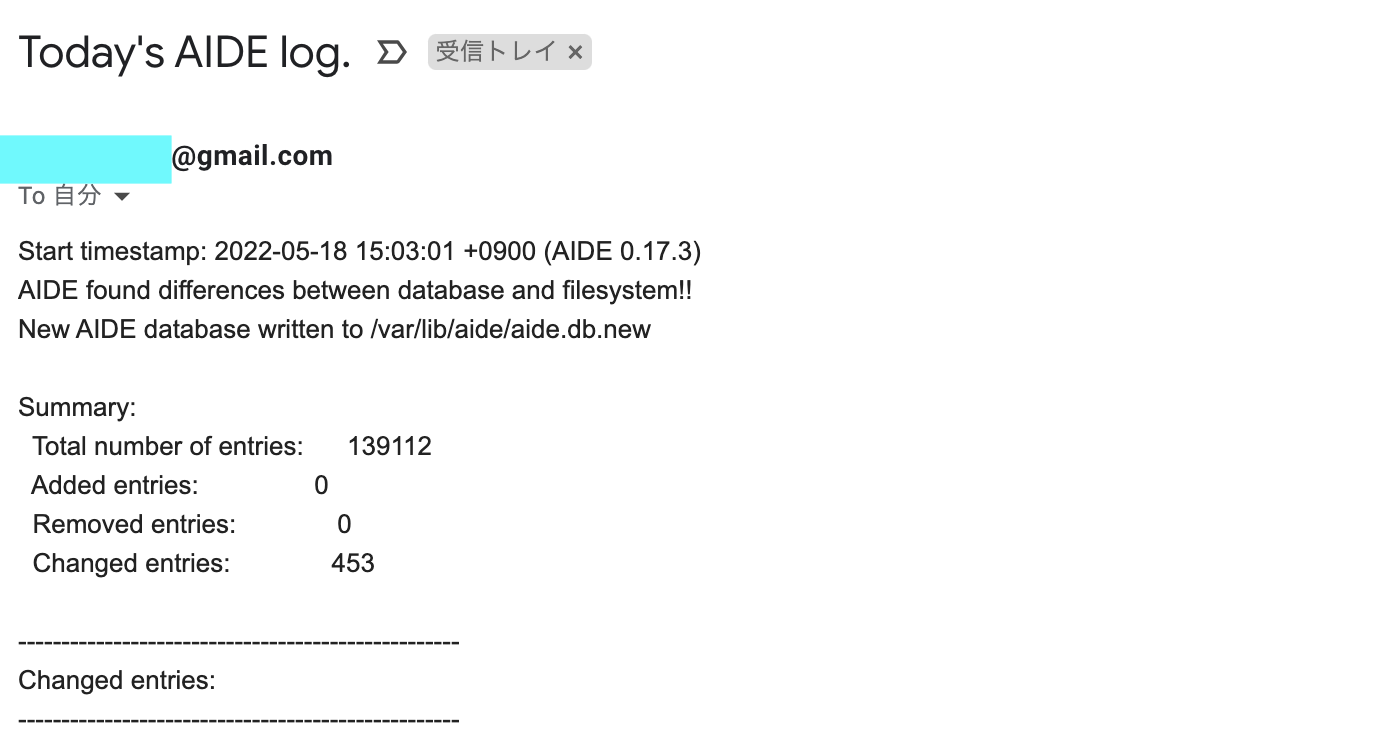
これでうまくいけばcronで設定した時刻に以下のようなメールが届くはず。
もしダメなら
$ sudo cat /var/log/mail.log
を確認してエラーに対処する。
参考