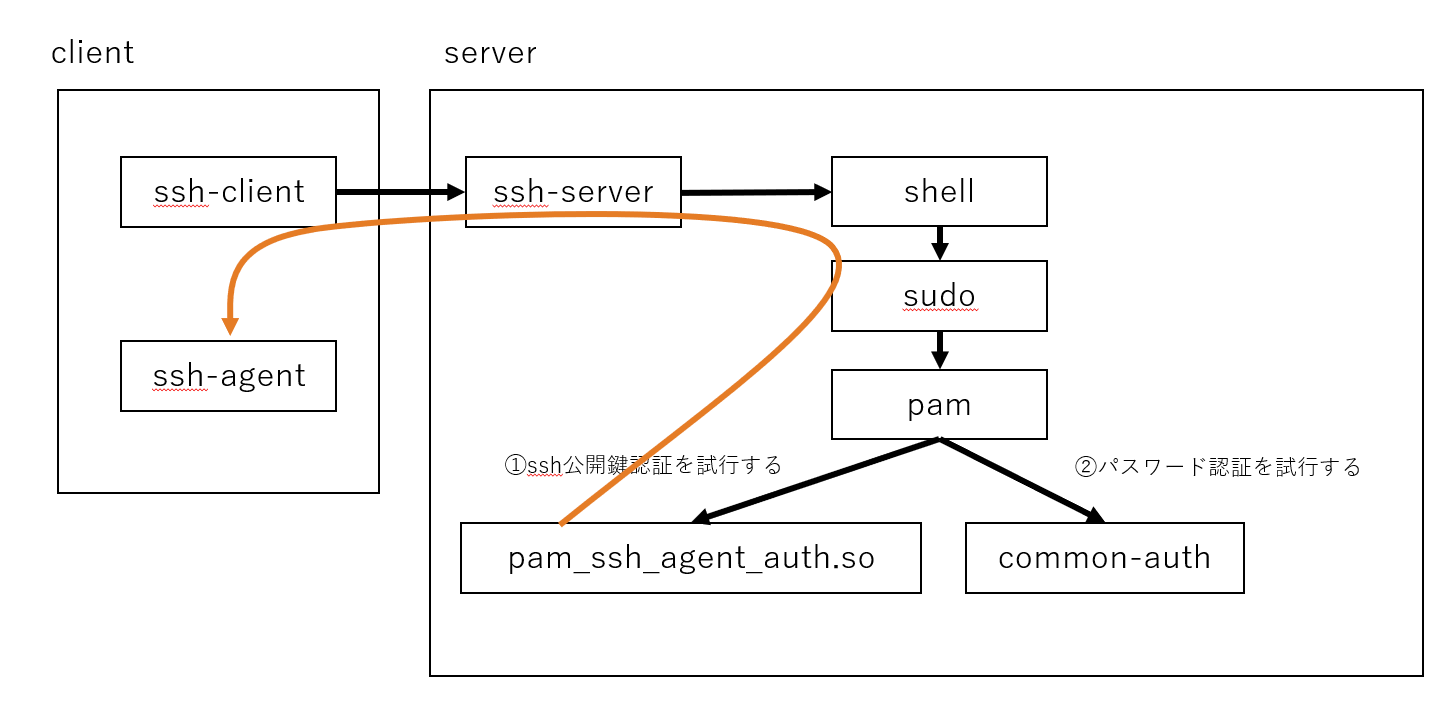
はじめに
メンテナンスなどで、サーバにssh接続しているとき、sudoパスワードを毎回入力しなければならないのがめんどくさいですよね。
デフォルトで5分間はパスワード入力不要ですが、手順書を確認していたり、別のサーバーに対して作業していたりすると、5分なんてあっという間に経過してしまいます。
特に、プロダクションサーバーは共有アカウントなので、自分が覚えられるsudoパスワードを設定できないのもつらいところです。
これを解消しようとしてsudoパスワード入力不要な設定にしてしまうと、セキュリティレベルが下がってしまいます。
そこで、本記事ではsudoパスワードを入力する代わりに、ssh公開鍵認証を使ってsudoできるようにする方法を紹介します。
ssh公開鍵認証で認証できなければsudoパスワード認証を試行するので、既存運用に影響を与えません。
環境
- Ubuntu 20.04
インストール・設定
ssh接続先のサーバーで、次の設定を行います。
% sudo apt install libpam-ssh-agent-auth
% cat /etc/pam.d/sudo
#%PAM-1.0

# sudo可能なssh公開鍵をシステムグローバルで設定したい場合
# 次のコメントアウトを外す。末尾の'debug'は認証ログ出力用。安定運用したら消してもよい。
# auth [success=3 default=ignore] pam_ssh_agent_auth.so file=/etc/ssh/sudo_authorized_keys allow_user_owned_authorized_keys_file debug

# sudo可能なssh公開鍵をユーザーのホームディレクトリで設定したい場合
# 次のコメントアウトを外す。末尾の'debug'は認証ログ出力用。安定運用したら消してもよい。
# auth [success=3 default=ignore] pam_ssh_agent_auth.so file=~/.ssh/authorized_keys debug

session    required   pam_env.so readenv=1 user_readenv=0
session    required   pam_env.so readenv=1 envfile=/etc/default/locale user_readenv=0
@include common-auth
@include common-account
@include common-session-noninteractive
% sudo cat /etc/sudoers

Defaults        env_reset
Defaults        mail_badpass
Defaults        secure_path="/usr/local/sbin:/usr/local/bin:/usr/sbin:/usr/bin:/sbin:/bin:/snap/bin"
Defaults        env_keep += "SSH_AUTH_SOCK"  # これを追記(sudoコマンドがユーザーのSSH_AUTH_SOCK環境変数を利用できるようにする)
sudo認証でssh公開鍵認証を許可する公開鍵の登録
/etc/pam.d/sudo の設定で選んだ設定方法(システムグローバルかホームディレクトリか)に合わせて、sudo用authorized_keysファイルに公開鍵を登録します。
# システムグローバルで設定する方法を選んだ場合
% cat <<EOF | sudo tee -a /etc/ssh/sudo_authorized_keys
ssh-ed25519 AAAAC3NzaC1lZDI1NTE5AAAAIMcl9G8v59xaZ8uBvnIh1s5C1imD65cojyUP+ydS6miP user@client
EOF

# ホームディレクトリで設定する方法を選んだ場合
% cat <<EOF >> ~/.ssh/authorized_keys
ssh-ed25519 AAAAC3NzaC1lZDI1NTE5AAAAIMcl9G8v59xaZ8uBvnIh1s5C1imD65cojyUP+ydS6miP user@client
EOF
使い方
sshクライアント側でSSH認証エージェントを起動し、秘密鍵を読み込ませておきます。Windowsの方は Pageant を使ってもよいですし、LinuxやMacの方はssh-agentを使ってもよいです。
% eval `ssh-agent`
% ssh-add ~/.ssh/id_ed25519  # サーバー上の、sudo用authorized_keysに登録した公開鍵に対応する秘密鍵を登録する
% ssh-add -l  # 確認
エージェント転送を許可してSSH接続します。
% ssh -A -u user myserver

-A: エージェント転送を許可する
ログインできたら、SSH_AUTH_SOCK環境変数が設定されているか確認します。
% env | grep SSH_AUTH_SOCK
#=> SSH_AUTH_SOCK=/tmp/ssh-uhDmmA3955/agent.3955
おもむろにsudoしてみます。パスワード入力を求められずに実行できます。
% sudo id
uid=0(root) gid=0(root) groups=0(root)
トラブルシュート方法
/etc/pam.d/sudoの設定を、debug付きで行っていれば、/var/log/auth.logにログが出力されます。
% less /var/log/auth.log
Authentication refused: bad ownership or modes for directory /home/user/.ssh
.sshディレクトリのオーナーやパーミッションがおかしいらしいです。
% less /var/log/auth.log
sudo[2151]: pam_ssh_agent_auth: Beginning pam_ssh_agent_auth for user user
sudo[2151]: pam_ssh_agent_auth: Attempting authentication: `user' as `user' using /home/user/.ssh/authorized_keys
sudo[2151]: pam_ssh_agent_auth: Contacted ssh-agent of user user (1000)
sudo[2151]: pam_ssh_agent_auth: trying public key file /home/user/.ssh/authorized_keys
sudo[2151]: pam_ssh_agent_auth: auth_secure_filename: checking for uid: 1000
sudo[2151]: pam_ssh_agent_auth: secure_filename: checking '/home/user/.ssh'
sudo[2151]: pam_ssh_agent_auth: Authentication refused: bad ownership or modes for directory /home/user/.ssh   # ここ
sudo[2151]: pam_ssh_agent_auth: Failed Authentication: `user' as `user' using /home/user/.ssh/authorized_keys
sudo[2151]: pam_unix(sudo:auth): conversation failed
sudo[2151]: pam_unix(sudo:auth): auth could not identify password for [user]
解決方法
% chown ${USER}: ~/.ssh              # オーナーとグループをログインユーザーにしてあげる
% chmod 700 ~/.ssh                   # パーミッションを適切にする
% chmod 600 ~/.ssh/authorized_keys   # パーミッションを適切にする
No ssh-agent could be contacted
ssh-agentと通信できないらしいです。
% less /var/log/auth.log
sudo[2004]: pam_ssh_agent_auth: Beginning pam_ssh_agent_auth for user user
sudo[2004]: pam_ssh_agent_auth: Attempting authentication: `user' as `user' using /home/user/.ssh/authorized_keys
sudo[2004]: pam_ssh_agent_auth: No ssh-agent could be contacted   # ここ
sudo[2004]: pam_ssh_agent_auth: Failed Authentication: `user' as `user' using /home/user/.ssh/authorized_keys
sudo[2004]: pam_unix(sudo:auth): conversation failed
sudo[2004]: pam_unix(sudo:auth): auth could not identify password for [user]
% env | grep SSH_AUTH_SOCK
#=> なにも表示されない
解決方法
クライアントからSSHするときに、SSHエージェント転送を許可します。
% ssh -A -u user myserver

-A: エージェント転送を許可する
もしかしたら、サーバーのsshdでSSHエージェント転送が拒否されているかもしれません。その場合はサーバーのsshd_configの設定変更が必要です。
# サーバー側で操作

% sudo sshd -T | grep allowagentforwarding
#=> allowagentforwarding no                 # yesでなければならない

% sudo vim /etc/ssh/sshd_config
AllowAgentForwarding yes
