ペイントを使って、様々な線を描画する方法を、実際に試しながら見てみましょう。
実線
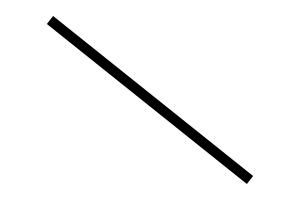
まずは、基本的な実線の描画です。
using var paint = new SKPaint {
    Color = SKColors.Black,
    IsAntialias = true,
    Style = SKPaintStyle.Stroke,
    StrokeWidth = 10
};
canvas.DrawLine( 50, 20, 250, 180, paint );
実行すると、以下のように、ペイントで指定した色と線幅で実線が描画されます。
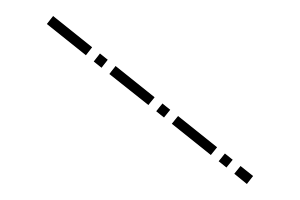
点線・破線
点線や波線を描画するには、ペイントのPathEffectプロパティにSKPathEffect.CreateDashを設定します。
using var paint = new SKPaint {
    Color = SKColors.Black,
    IsAntialias = true,
    Style = SKPaintStyle.Stroke,
    StrokeWidth = 10,
    PathEffect = SKPathEffect.CreateDash( new float[] { 30, 10 }, 0 )
};
canvas.DrawLine( 50, 20, 250, 180, paint );
実行すると、以下のように、30ピクセルの実線と10ピクセルの空白が交互に描画されます。

CreateDashメソッドの第1引数には、実線と空白の長さを交互に指定した配列を渡します。2組以上指定することで、一点鎖線なども描画できます。
PathEffect = SKPathEffect.CreateDash( new float[] { 50, 10, 10, 10 }, 0 )
実行すると、以下のように、50ピクセルの実線、10ピクセルの空白、10ピクセルの実線、10ピクセルの空白からなる、一点鎖線が描画されます。
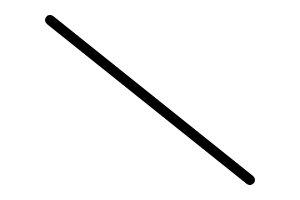
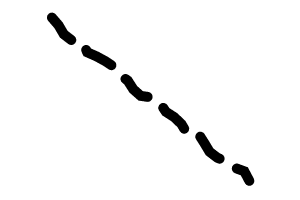
端の丸い線
デフォルトでは線の端は四角くなりますが、端を丸くすることもできます。これには、ペイントのStrokeCapプロパティをSKStrokeCap.Roundに設定します。
using var paint = new SKPaint {
    Color = SKColors.Black,
    IsAntialias = true,
    Style = SKPaintStyle.Stroke,
    StrokeWidth = 10,
    StrokeCap = SKStrokeCap.Round
};
canvas.DrawLine( 50, 20, 250, 180, paint );
実行すると、以下のように、端が丸い実線が描画されます。
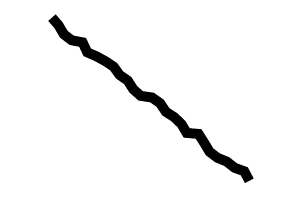
よれよれの線
線を手書き風にしたい場合は、PathEffectプロパティにSKPathEffect.CreateDiscreteを設定します。
using var paint = new SKPaint {
    Color = SKColors.Black,
    IsAntialias = true,
    Style = SKPaintStyle.Stroke,
    StrokeWidth = 10,
    PathEffect = SKPathEffect.CreateDiscrete( 10, 4 )
};
canvas.DrawLine( 50, 20, 250, 180, paint );
実行すると、以下のように、線がよれよれとした手書き風に描画されます。
複合的な線
最後に、点線とよれよれ線を組み合わせた、複合的な線の描画例を示します。SKPathEffect.CreateComposeメソッドを使って、複数のPathEffectを組み合わせることができます。
using var paint = new SKPaint {
    Color = SKColors.Black,
    IsAntialias = true,
    Style = SKPaintStyle.Stroke,
    StrokeWidth = 10,
    PathEffect = SKPathEffect.CreateCompose(
        SKPathEffect.CreateDash( new float[] { 30, 20 }, 0 ),
        SKPathEffect.CreateDiscrete( 10, 4 )
    ),
    StrokeCap = SKStrokeCap.Round
};
canvas.DrawLine( 50, 20, 250, 180, paint );
実行すると、以下のように、点線がよれよれとした手書き風に描画されます。
まとめ
ペイントのプロパティを組み合わせることで、簡単に、高度で多様な線の表現ができます。もっと複雑な表現も可能なので、ぜひ試してみてください。
総合目次