はじめに。
非同期通信を用いてCSVファイルのインポート機能にバリデーションチェックまでを含めた手順を記事にしています
開発環境
- Laravel 8.0
- php 7.3
- goodby/csv: 1.3
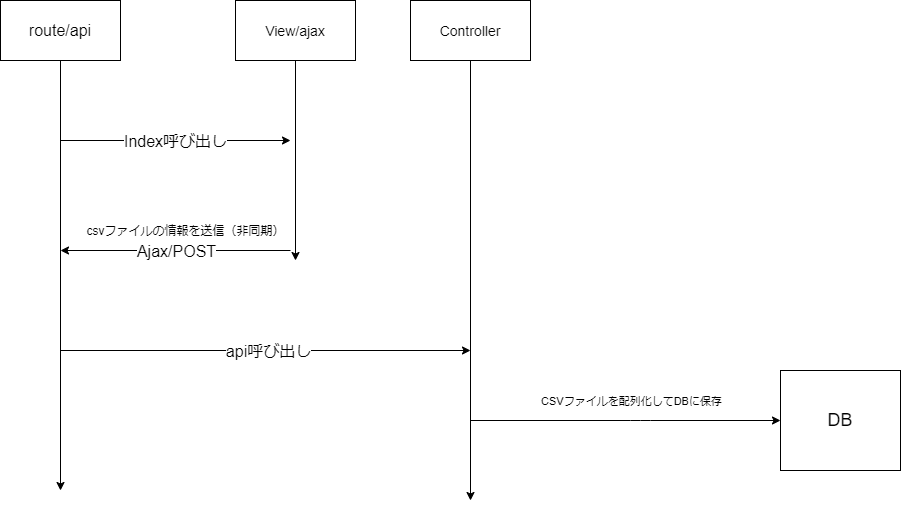
UML
Goodby/CSVのインストール
Goodby/CSVとはCSVをインポート/エクスポートするためのPHPライブラリ
まずはターミナル・またはコマンドプロンプトでプロジェクト直下に下記コマンドを打ち込んでください。
composer require goodby/csv上記コマンド後にcomposer.jsonにgoodby/csvが入ってることを確認
"goodby/csv": "^1.3",
Model/Viewを作成
まずはモデル作成(オプションに--migrationを付けてマイグレーションファイルも一緒に作成)
php artisan make:model Person --migration<?php
use Illuminate\Database\Migrations\Migration;
use Illuminate\Database\Schema\Blueprint;
use Illuminate\Support\Facades\Schema;
class CreatePeopleTable extends Migration
{
public function up()
{
Schema::create('people', function (Blueprint $table) {
$table->increments('id');
$table->string('name')->comment('名前');
$table->string('email')->comment('メールアドレス');
$table->string('tel',20)->nullable()->comment('電話番号');
$table->timestamps();
});
}
public function down()
{
Schema::dropIfExists('people');
}
}
view直下にform.blade.phpを作成して内容を下記に書き換えてください
<h1>CSVインポート演習</h1>

<script type="text/javascript">

    upload = function () {
        ajaxでのcsrfトークン送信
         $.ajaxSetup({
             headers: {
                 'X-CSRF-TOKEN': $('meta[name="csrf-token"]').attr('content')
             }
         });

        var form = new FormData();
        form.append("csv", $("#csv").prop("files")[0]);

        $.ajax({
            type: 'POST',
            url: '/api/csv/apiCsvUpload',
            data: form,
            processData: false,
            contentType: false,
        })
            .done(function (data) {
                console.log(data);
                console.log('成功');
            })
            .fail(function (XMLHttpRequest, textStatus, errorThrown) {
                console.log(errorThrown);
                console.log('失敗');
            });
    };
</script>

<form action="" method="post" enctype="multipart/form-data" id="imgForm">
    {{ csrf_field() }}
    <div class="row">
        <div class="col-11">
            <div class="custom-file">
                <label><input type="file" id="csv" name="file_data" class="custom-file-input">ファイルを選択</label>
                <p>選択されていません</p>
            </div>
        </div>
    </div>
    <button class="btn btn--orange btn--radius" onclick="upload(); return false;">アップロード</button>
</form>

<html>
<body>
<script src="https://cdnjs.cloudflare.com/ajax/libs/jquery/2.2.3/jquery.min.js"
        integrity="sha384-I6F5OKECLVtK/BL+8iSLDEHowSAfUo76ZL9+kGAgTRdiByINKJaqTPH/QVNS1VDb"
        crossorigin="anonymous"></script>

<script>

    // ファイルを選択すると、コントロール部分にファイル名を表示
    $('.custom-file-input').on('change', function () {
        $(this).next('.custom-file-label').html($(this)[0].files[0].name);
    })

    $('input').on('change', function () {
        var file = $(this).prop('files')[0];
        $('p').text(file.name);
    });
</script>
</body>
</html>
Controller
- Goodby/CSV の config設定
- Goodby/CSV ライブラリでCSVデータをパース
- get_csv_userメソッドでkeyとCSVデータを配列にセット
- regist_user_csvメソッドでDBに保存
コントローラー作成
php artisan make:controller CsvImportController<?php
namespace App\Http\Controllers;
use Goodby\CSV\Import\Standard\Interpreter;
use Goodby\CSV\Import\Standard\Lexer;
use Goodby\CSV\Import\Standard\LexerConfig;
use Illuminate\Http\Request;
use App\Models\Person;
use App\Requests\PersonValidate;
use Illuminate\Http\Response;
use Illuminate\Http\JsonResponse;
use Illuminate\Support\Facades\DB;
use Illuminate\Support\Facades\Validator;
class CsvImportController extends Controller
{
public function index()
{
return view('/form');
}
public function apiCsvUpload(Request $request)
{
if ($request->hasFile('csv') && $request->file('csv')->isValid()) {
$tmpname = uniqid("CSVUP_") . "." . $request->file('csv')->guessExtension();
$request->file('csv')->move(public_path() . "/csv/tmp", $tmpname);
$tmppath = public_path() . "/csv/tmp/" . $tmpname;
$config_in = new LexerConfig();
$config_in
->setFromCharset("SJIS-win")
->setIgnoreHeaderLine(true)
;
$lexer_in = new Lexer($config_in);
$datalist = array();
$interpreter = new Interpreter();
$interpreter->addObserver(
function (array $row) use (&$datalist) {
$datalist[] = $row;
}
);
$lexer_in->parse($tmppath, $interpreter);
unlink($tmppath);
$valid = new PersonValidate();
foreach ($datalist as $row) {
$csv_person = $this->getCsvPerson($row);
$this->registPersonCsv($csv_person, $valid->rules());
}
return response()->json($csv_person);
}
return redirect('/form')->with('flashmessage', 'CSVの送信エラーが発生しましたので、送信を中止しました。');
}
private function getCsvPerson($row)
{
return [
'name' => $row[0],
'email' => $row[1],
'tel' => $row[2],
];
}
private function registPersonCsv(array $person, array $rules)
{
if ($validator = Validator::make($person, $rules)->validate()) {
$newperson = new Person;
foreach ($person as $key => $value) {
$newperson->$key = $value;
}
$newperson->save();
}
}
}
次はバリデーション作成
<?php

namespace App\Http\Requests;

use Illuminate\Contracts\Validation\Validator;
use Illuminate\Foundation\Http\FormRequest;
use Illuminate\Support\Facades\Validator as LocalValidator;
use Illuminate\Validation\ValidationException;

class PersonValidate extends FormRequest
{

    public function rules()
    {
        return [
            'name' => 'nullable|max:30',
            'email' => 'nullable|max:100|email',
            'tel' => 'nullable|Integer',
        ];
    }
}
最後に、web.phpとapi.phpにroute情報を記述
use App\Http\Controllers\CsvImportController;

Route::get('/form',  [CsvImportController::class, 'index']);
use App\Http\Controllers\CsvImportController;

Route::namespace('csv')->group(function () {
Route::match(['get', 'post'], '/csv/apiCsvUpload', [CsvImportController::class, 'apiCsvUpload']);
});
動作確認
以上でLaravelでの非同期csvインポートの手順になります。
従来のフォームリクエストとは違ってControllerの中で配列を作成して、カンマ区切りでデータを挿入していくのは四苦八苦しながらも楽しめました。
引き続き学習を続けた中でのアウトプットを頑張っていきます。
※何か間違いやこうした方がいいよなどご指摘があれば遠慮なくコメントにお寄せいただけると幸いです(^o^)


